-29-
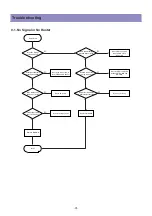
9. Trouble shooting
Before starting Trouble Shooting
- Trouble diagnosing and repairing of set mean find out which PCBs or blocks are not working
and replace them with new PCBs.
Repairing the broken PCBs are not necessary.
Keep the broken PCBs and return them to service center or R&D center.
- This Trouble Shooting list only contains representative and simple PCB trouble diagnosis
and Module Exchange method.
Therefore, if you find sets that are difficult to diagnose or to repair, contact R&D center.
- Basic Trouble Diagnosis procedure
1) Check problem Symptoms
2) Open Back Cover
3) Trouble Diagnosis & Replace broken PCB
4) Adjust new PCB module
5) HEATRUN for at least 30 minutes, inputting Full White test pattern
6) Full Function test
7) Repair Complete
- Required Equipment for trouble diagnosis
1) Digital Multimeter (User Mode : measure DC Voltage, measure Diode Voltage,
Short-open test)
2) Screwdriver (or electric screwdriver), Plastic adjusting tool
3) Oscilloscope (for detailed examination only)
- Before replacing PCBs, you MUST disconnect the AC Power.
- After replacing High Voltage Board (Power PCB, Y-SUS, Z-SUS, Data B/D, Scan B/D),
and Main, extra adjustment might be needed. (Refer to 6-1. MODULE POWER Adjustments
and Test Point Locations)
- Dust or extraneous materials may cause bad connections.
Therefore, try to apply soft brush, air fresher, or breath to clean the dust or extraneous materials.
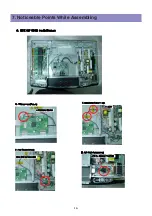
- While assembling the set in factory, it could have bad connection.
Try to reassemble the necessary connectors and also check the state of the connectors.
- After the set is repaired, leave Back Cover open for followings.
Run HEAT RUN for at least 30 minutes by displaying Full White test pattern of Service Mode
(Refer to Service Manual ‘5. Service Mode’ part).
Check the screen conditions and basic functions (remote control operation etc.)
- After Back Cover is closed, redo HEAT RUN for at least one hour with Full White input using
Test Pattern of Service Mode.
Check the screen conditions and basic functions.
Содержание DPX-32F1BMB
Страница 2: ......
Страница 8: ...8 The Feature of Inside 3 3 Power Specification...
Страница 16: ...7 Noticeable Points While Assembling 16...
Страница 17: ...Noticeable Points While Assembling 17...
Страница 18: ...8 Software Upgrade Methord 18 PICkit 2 Micro Controller Programmer PICkit 2 Connector Pinout 8 1 Pic upgrade...
Страница 19: ...Software Upgrade Methord 19 1 Main pcb Power off 2 Connecting the Pic upgrade board to Main pcb as shown below...
Страница 21: ...21 5 Importing HEX file for upgrade Software Upgrade Methord...
Страница 22: ...22 6 Write Click 7 Plese remove Pickit2 upgrade board when complet massage is come out Software Upgrade Methord...
Страница 37: ...37 Trouble shooting 9 6 No Key and Remote Control Operation...
Страница 41: ......
Страница 42: ...42 11 Exploded View...
Страница 43: ...DAEWOO ELECTRONICS CORP 686 AHYEON DONG MAPO GU SEOUL KOREA C P O BOX 8003 SEOUL KOREA PRINTED DATE June 2008...

