Dacor DOP30 40D Series Скачать руководство пользователя страница 8

8  English

Impor

tant saf

ety inf

ormation

Important safety information

• 

Select a location where a grounded, 3- prong outlet is easily accessible.

• 

If the range is located near a window, 

do not hang

 long curtains or paper 

blinds on that window.

• 

For the range to ventilate properly, make sure the range’s vents are not 
blocked or covered, and that there is enough clearance at the top, back, sides, 
and underneath the range. The vents allow the necessary exhaust for the range 
to operate properly with correct combustion and get the good cooking result.

• 

Make sure

 the wall coverings around the range can withstand heat up to 

194 °F (90 °C) generated by the range.

• 

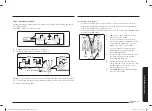
Cabinet storage above the surface of the range should be avoided. If cabinet 
storage above the range is necessary: allow a minimum clearance of 30 inches 
(76.2 cm) between the cooking surface and the bottom of cabinets; or install 
a range hood that projects horizontally a minimum of 5 inches (12.7 cm) 
beyond the bottom of the cabinets. For detail information, please refer to the 

Minimum dimensions

 section on page 

13

.

Cooktop safety 

WARNING

To reduce the risk of fire, electric shock, personal injuries, and/or death, obey the 
following precautions.

• 

Make sure

 all burners are off when not 

in use.

• 

Do not use

 aluminium foil to line the 

grates or any part of the cooktop.

• 

Do not leave

 burners unattended on 

medium or high heat settings.

• 

Before igniting, 

make sure

 all burner 

caps are properly in place and all 
burners are level.

• 

Always use the 

Lite (

)

 position when igniting the burners and make sure the 

burners have ignited. If ignition fails, turn the knob to 

OFF

 and wait until the 

gas has dissipated.

• 

When you set a burner to simmer, 

do not turn

 the knob quickly. Make sure the 

flame stays on.

• 

Do not

 place any objects other than cookware on the cooktop.

• 

Make sure

 your range is correctly installed and adjusted by a qualified service 

technician or installer for the type of gas (natural or LP) you will use. For 
your range to utilize LP gas. The installer must replace the 6 surface burner 
orifices with the provided LP orifice set. And reverse the GPR adapter. These 
adjustments must be made by a qualified service technician in accordance 
with the manufacturer’s instructions and all codes and requirements of the 
authority having jurisdiction. The qualified agency performing this work 
assumes the gas conversion responsibility.

• 

Installation of this range must conform with local codes or, in the absence of 
local codes, with the National Fuel Gas Code, ANSI Z223.1/NFPA.54, latest 
edition. In Canada, installation must conform with the current Natural Gas 
Installation Code, CAN/CGA-B149.1, or the current Propane Installation Code, 
CAN/CGA-B149.2, and with local codes where applicable. This range has been 
design-certified by ETL according to ANSI Z21.1, latest edition, and Canadian 
Gas Association according to CAN/CGA-1.1, latest edition.

Location safety

WARNING

To reduce the risk of fire, electric shock, personal injuries, and/or death, obey the 
following precautions.

• 

This range is for indoor, household use 
only. 

Do not install

 the range in areas 

exposed to the weather and/or water.

• 

Do not install

 the range in a place 

which is exposed to a strong draft.

• 

Select a level, well-constructed floor that can support the range’s weight. 
Synthetic flooring, such as linoleum, must withstand 180 °F (82 °C) 
temperatures without shrinking, warping, or discoloring. 

Do not install


the range directly over interior kitchen carpeting unless a sheet of ¼ inch 
plywood or a similar insulator is placed between the range and carpeting.

Install_DOP30T940DS_DA_DG68-01457A_EN.indd   8

Install_DOP30T940DS_DA_DG68-01457A_EN.indd   8

2022-10-11   오전 11:36:59

2022-10-11   오전 11:36:59

Содержание DOP30 40D Series

Страница 1: ...Installation Manual Dual Fuel Pro Range DOP30 40D Install_DOP30T940DS_DA_DG68 01457A_EN indd 1 Install_DOP30T940DS_DA_DG68 01457A_EN indd 1 2022 10 11 11 36 58 2022 10 11 11 36 58...

Страница 2: ...result in death serious personal injury and or property damage DO NOT step sit lean on the door or drawer to prevent accidental tipping of the range Be sure your appliance is properly installed and g...

Страница 3: ...9 Self cleaning oven safety 10 Storage drawer safety 10 Gas range components 11 Dual Fuel range specifications 11 Installation requirements 12 Location requirements 12 Installation guide 13 To remove...

Страница 4: ...tallation instructions before installing the range Remove all packing materials from the oven compartments before connecting the electric and gas supply to the range Observe all governing codes and or...

Страница 5: ...cooked to an internal temperature of 180 F 82 C California Proposition 65 Warning WARNING Cancer and Reproductive Harm www P65Warnings ca gov Commonwealth of Massachusetts This product must be install...

Страница 6: ...the risk of fire electric shock personal injuries and or death obey the following precautions Do not store place or use flammable or combustible materials such as charcoal paper plastic pot holders l...

Страница 7: ...et Do not remove the ground prong Do not use an adapter or an extension cord Do not use a damaged power plug power cord or loose power outlet Do not modify the power plug power cord or power outlet in...

Страница 8: ...place any objects other than cookware on the cooktop Make sure your range is correctly installed and adjusted by a qualified service technician or installer for the type of gas natural or LP you will...

Страница 9: ...g make sure the range is off and completely cool After cleaning the burner spreader make sure it is completely dry before re assembling Make sure the spark mark on the dual burner spreader is placed b...

Страница 10: ...en cavity when you run a self cleaning cycle When opening the door after a self cleaning cycle stand away from the oven If the self cleaning cycle malfunctions turn off the oven disconnect the power s...

Страница 11: ...G LF 16 000 BTU LR 16 000 BTU RF 23 000 BTU RR 9 500 BTU Surface burners LP LF 15 000 BTU LR 15 000 BTU RF 17 500 BTU RR 9 500 BTU Oven heater Bake 3000 W Broil 4200 W With grate 37 15 16 96 3cm Min 3...

Страница 12: ...learances Do not locate the range where it may be subject to strong drafts Provide adequate clearances between the range and adjacent combustible surfaces These dimensions must be met for safe use of...

Страница 13: ...rance is not possible minimum of 24 61 cm can be used when the bottom of the wood or metal cabinet is protected by not less than 0 64 cm flame retardant millboard covered with not less than no 28 MSG...

Страница 14: ...to install the range in a freestanding cutout cabinet For more information see Optional rear filler kit as shown below Optional rear filler kit WARNING Used to fill gap between the range back and wal...

Страница 15: ...om the pallet Use caution not to hold the door handle To avoid breakage CAUTION Please DO NOT push the unit strongly when you install These actions can cause the damage to the unit Hold the upper left...

Страница 16: ...ge with the type of gas for which it is designed Do not attempt to convert the appliance from the gas specified in this manual to a different gas without consulting the gas supplier This range is conv...

Страница 17: ...t provided in US model A 240 Volt 60 Hz AC approved electrical service with 40 amp circuit breaker or time delay fuse is required for all U S and Canadian models Check for in 1 9 cm UL listed strain r...

Страница 18: ...rsonal safety All gas models have a power cord with an equipment grounding conductor and a grounding plug The plug must be firmly plugged into a 3 prong or 4 prong outlet that is properly installed an...

Страница 19: ...e elbow optional Lag bolt or OD sleeve anchor Tools needed Flat blade screwdriver Phillips screwdriver Open end or adjustable wrench Pipe wrench 2 Pencil and ruler Level Pipe joint compound Nut driver...

Страница 20: ...e rating plate The rating plate is located on the bottom side of the control panel We recommend you have the electrical wiring and hookup of your range connected by a qualified electrician After insta...

Страница 21: ...s not recommended but if used it should be marked for use with nominal 1 diameter connection openings Care should be taken to center the cable and strain relief within the knockout hole to keep the ed...

Страница 22: ...wer terminals of the terminal block Be certain that the center wire white neutral is connected to the center lower position of the terminal block Tighten screws securely into the terminal block 5 Go t...

Страница 23: ...and the lower right terminal block openings 4 Tighten the screws until the wire is firmly secured 35 to 50 inch lbs Do not over tighten the screws since it could damage the wires 5 Go to Step 6 on pa...

Страница 24: ...ite Black Red 1 Loosen the 3 lower terminal screws from the terminal block Remove the ground screw and ground plate and retain them 2 Cut and discard the ground strap Do not discard any screws 3 Inser...

Страница 25: ...y closing the individual shut off valve Step 7 Connect the range to gas supply Shut off the main gas supply valve before disconnecting the old range and leave it off until the new hookup has been comp...

Страница 26: ...wing the instructions and template supplied with the bracket An anti tip bracket and screws installation instructions and template are shipped with every range PN DG94 00870B The instructions include...

Страница 27: ...Anti Tip bracket approximately 21 32 16 5 mm Screw must enter wood or concrete NOTE To install the Anti tip bracket release the leveling leg using pipe wrench because Loctite is applied on Bolt for vi...

Страница 28: ...Air Sled Insert 1 Due to the weight heavy equipment movers such as Air Sled should be used to move this unit The weight must be supported uniformly across the bottom 2 After transporting the range by...

Страница 29: ...check the operation of each surface burner in succession Step 12 Assemble the surface burners CAUTION Do not operate the surface burners without all burner parts in place 1 Position surface burner hea...

Страница 30: ...ecked to determine their flame quality 1 Prevailing soft blue flames Normal for natural gas operation 2 Yellow tips on outer cones Normal for LP gas operation 3 Yellow flames Abnormal for any gas oper...

Страница 31: ...Dealer Showroom H Another Dacor Owner D Kitchen Dealer Showroom I Model Home E Home Show J Other 2 Where did you buy your Dacor appliances A Appliance Dealer D Builder B Kitchen Dealer E Other C Buil...

Страница 32: ...of Industry CA 91745 Phone 833 35 ELITE 833 353 5483 Fax 626 403 3130 www dacor com DG68 01457A 00 Install_DOP30T940DS_DA_DG68 01457A_EN indd 32 Install_DOP30T940DS_DA_DG68 01457A_EN indd 32 2022 10 1...

Отзывы: