12
8. Insert the tube fully into the valve outlet, and screw the
compression nut snugly in place.
9. Turn off the valve, and coil the slack tubing, taking care
not to kink it.
10. Connect the flexible, code-approved water-supply line
to the open end of the copper tubing as in Steps 7, 8.
11. With the end of the flex tube in a bucket, open the
valve, and adjust the fittings where any leaks occur.
Connecting the Flex Tubing to the
Refrigerator
The flexible, code-approved tubing can connect to the
supply valve through the floor or side cabinetry.
1. (With the refrigerator unplugged) Connect the 7 ft. (2.1
m) min. flexible tube to the main-line outlet (whether to
the copper line or the supply-line valve as installed in
one of the previous connection procedures).
2. Run water through the tube from the main water-supply
line to flush out particulates and air.
3. (At several points along the flex tube) Tape the tube to
the floor 7” (17.8 cm) to the right of the refrigerator’s
left side and parallel to the cabinet wall.
NOTE
Flush the line until the water runs clear.
Style 2: Copper Tube to Shut-Off Valve
1. (With the refrigerator unplugged) Turn off the main
water supply; turn on the nearest faucet briefly to clear
the water from the line.
2. Find a 1/2” to 1 1/4” (1.3 cm to 3.2 cm) vertical
cold
-
water pipe near the refrigerator.
3. Determine copper tube length by measuring from the
refrigerator connection to the water pipe, then add 7 ft
(2.1 m) so the refrigerator can be slid out of its cabinet
without disconnecting the water line.
4. With a cordless drill, put a 1/4” (6.4 mm) hole in the
cold-water pipe.
5. Ensure the outlet end is solidly in the drill hole and
the washer is under the pipe clamp, then tighten the
packing nut.
6. Tighten the pipe-clamp screws slowly and evenly (but
not overly tight) so the valve mechanism seals to the
main water pipe.
7. Slip first the compression nut, then the compression
sleeve onto the copper tube.
IMPORTANT
If using a horizontal pipe, drill the pipe from the top to keep
water away from the drill and to prevent sediment from
collecting in the valve.
IMPORTANT
Use 1/4” (6.4 mm) OD (outside diameter) copper tubing; cut
both ends squarely.
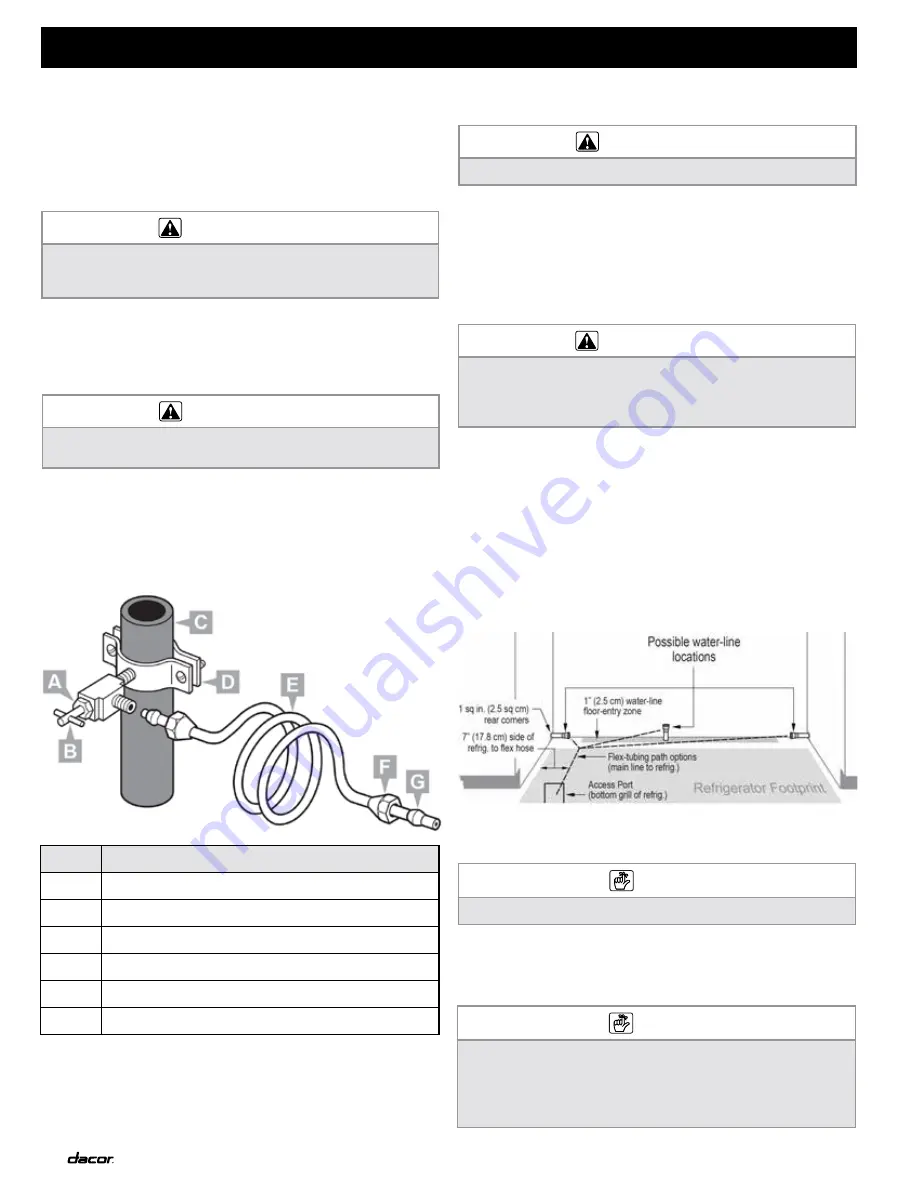
Callout
Feature
A
Packing nut (keeps water from leaking at shut-off valve)
B
Shut-off valve (controls water passage from main line to refrig.)
C
Cold-water pipe (home water-supply line)
D
Pipe clamp (secures shut-off valve to main supply line)
E
Copper tubing (connects main supply line to refrigerator)
F, G
Compression nut, sleeve (join copper tubing to valve/refrigerator)
IMPORTANT
Overtightening the nut will crush the copper tubing.
INSTALLATION INSTRUCTIONS
IMPORTANT
Before attaching the tubing to the shut-off valve, flush the main
water-supply line to remove particles and air in the line. Stop
when the water is clear. This action helps keep filters/valves
from clogging.
NOTE
• The 7” distance and the tape holds the tubing in a specific
place so the refrigerator can pass safely over the tubing when
installed/removed.
• Leave a minimum 26” (66.0 cm) of slack at the front end of
the flex tube for connection to the refrigerator.
Содержание Discovery DYF42SBIWS
Страница 2: ...2017 Dacor all rights reserved...
Страница 11: ...9 Refrigerator Dimensions PRODUCT SPECIFICATIONS...
Страница 12: ...10 Refrigerator Dimensions cont PRODUCT SPECIFICATIONS...
Страница 18: ...16 NOTES...
Страница 19: ...17 NOTES...
Страница 20: ...18 Dacor 14425 Clark Av City of Industry CA 91745 Ph 800 793 0093 Fax 626 403 3130 www dacor com...


