background image

Remote Control 

Installing batteries for the remote control: 

Remove the battery cover, and insert two AAA batteries (1.5V). Ensure that the battery polarity 
matches the “+”/“-” marks in the battery compartment of the remote control. 

Precautions for using the remote control: 

Aim the remote control at the receiver window. Do not place any object between the remote
control and the receiver window to avoid interference with the normal operation.

Keep the remote control away from violent vibration. In addition, do not set or place the
remote control in direct sunlight, or else the remote control may be deformed by heat.

The remote control may be invalid when the receiver window of the unit is in direct sunlight or
strong lighting; in this case, please adjust the angle of the lighting or the unit, or approach the
receiver window to use it.

The distance of remote control will be shortened if the battery voltage is insufficient; in this
case, please replace with new batteries; if the remote control won’t be used for a long time or
the batteries are run out, please take out the batteries to avoid corrosion due to battery
leakage, which will damage the remote control.

Do not use batteries of different types or mix new batteries with old ones. Always replace the
batteries in pairs.

Do not put the batteries in fire, or charge or disassemble them, or charge, short circuit,
disassemble, heat or burn used batteries. Please dispose of waste batteries in accordance with
local environmental regulations. Do not expose the batteries in overheated environments such
as sunlight and fire.

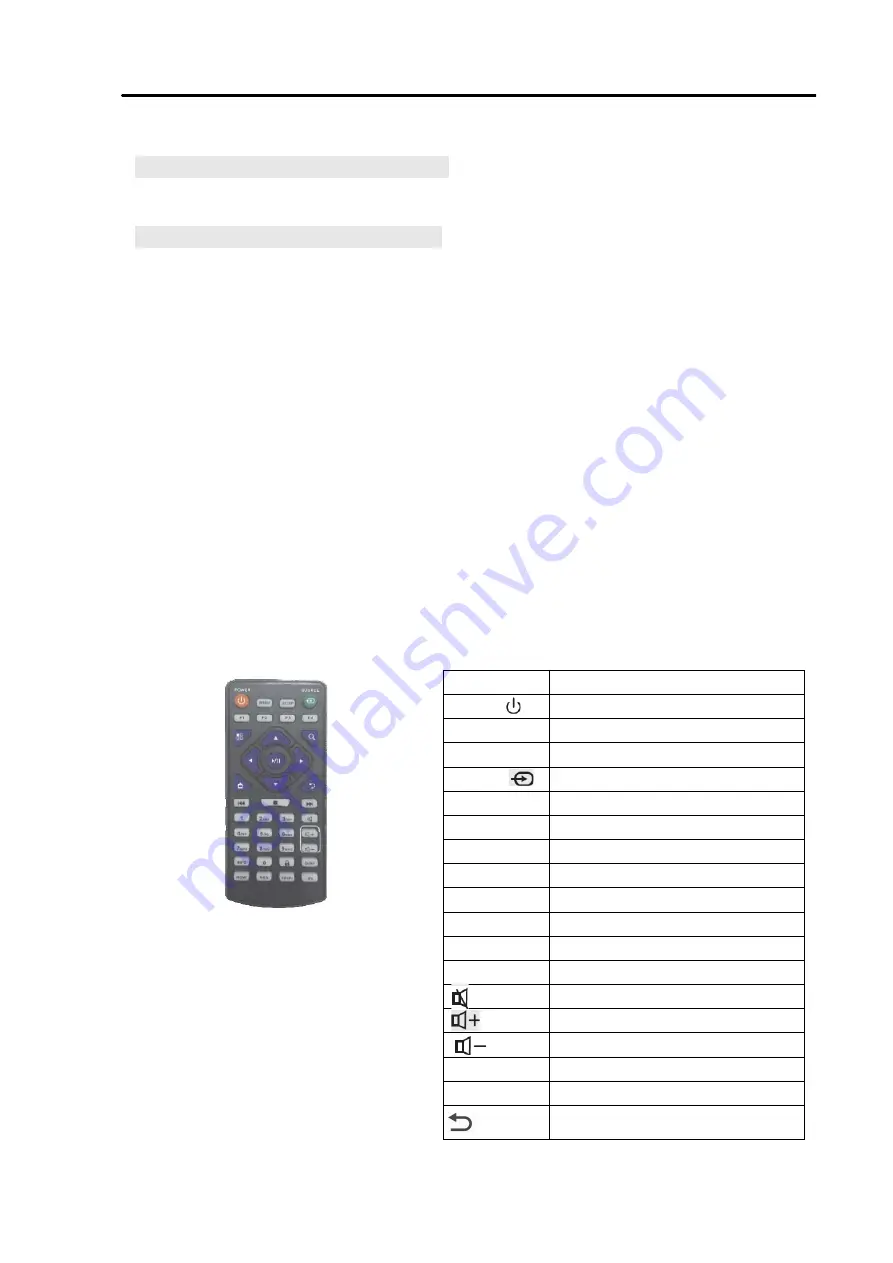
Description of remote control buttons 

Note: Press the SETUP button in the main 
interface to call out the OSD menu. After 
exiting the playback mode by pressing the 
STOP button, the playback will start according 
to the schedule next time. 

Remark:  The  real  appearance  of  the  remote 
control  may  be  different  from  the  picture, 
please refer to the actual product. 

Button 

Function 

POWER (

Power switch 

MENU 

To show the main menu 

SETUP 

To set up OSD menu 

SOURCE 

To show the Source menu 

/


Play programs; confirm selection 


To move the cursor up 


To move the cursor down 


To move the cursor left 


To move the cursor right 

Previous program 

Next program 

Stop playing and return to the main interface 

Mute 

Turn up the volume 

Turn down the volume 

HDMI 

Select HDMI device as the source 

VGA 

Select VGA device as the source 

Back

Содержание SBXSNT43 Series

Страница 1: ...or Floor Standing Digital Sign Operating Instructions for Digital Signage Note Before using the product please read the instructions carefully Do not attempt to disassemble this product If the product does not work properly please contact your local dealer or the company 1 ...

Страница 2: ...e Control 7 Description of Basic Operation 8 Power on Standby 8 About Launch Desktop 8 Description of Wallpaper Switch 8 File Manager 9 Local Settings 9 Slide Show APP Introduction 12 Technical Specifications 17 Troubleshooting 19 Cleaning and maintenance 20 Names and Contents of Toxic and Hazardous Substances or Elements in the Product 21 2 ...

Страница 3: ...It is a very valuable product which will give you a better visual experience We have considered the factors to ensure personal safety in product design and have tested rigorously at the factory However improper installation and use may result in electric shock and fire In order to ensure safety use extend the life of the product and ensure the best performance of the machine please read the follow...

Страница 4: ...and fire due to water drops or splashing Do not put any sharp objects metal or liquid into the vents or let them touch the signal terminals to avoid short circuit product damage and electric shock The openings in the enclosure are designed for ventilation and cooling to ensure long time reliable running of components inside the enclosure and prevent overheating Do not block the openings when place...

Страница 5: ...s and hold the bottom do not apply pressure on the panel Use the Digital Signage properly Use in proper lighting conditions insufficient lighting or long time watching will impair your eyesight When the plug or coupler is used as disconnection device it should be easy to operate the device Insert the plug into the outlet properly or else it may cause sparks and fire The technical specifications pr...

Страница 6: ...n 1 Open the top cover as shown in Fig 2 2 Remove EPE on both sides of the box as shown in Fig 3 3 Take out the base as shown in Fig 4 4 Lift out the unit as shown in Fig 5 and put it on the mounting table avoid scratching Fig 6 5 Tighten the base onto the unit with dedicated screws and hex socket wrench as shown in Fig 6 Fig 1 Fig 2 Fig 3 Fig 4 Fig 5 Mounting table Mounted state Fig 6 Fig 7 6 ...

Страница 7: ...d corrosion due to battery leakage which will damage the remote control Do not use batteries of different types or mix new batteries with old ones Always replace the batteries in pairs Do not put the batteries in fire or charge or disassemble them or charge short circuit disassemble heat or burn used batteries Please dispose of waste batteries in accordance with local environmental regulations Do ...

Страница 8: ...n power on state enter System Assistant and press the button on the remote control and the Digital Signage enters standby state About Home Screen Description of Icons Icon Function Main applications Back Home page Background applications Sound Sound Description of Wallpaper Switch As shown on the right tap and hold in the blank space to enter wallpaper switch interface and select the wallpaper fro...

Страница 9: ...ce Fig 2 and enter Explorer menu Fig 3 3 Tap options in the Explorer menu to read the files from different devices Fig 1 Fig 2 Fig 3 Local Settings 1 Tap the Main Apps button in the Home page to enter the APPS menu interface Fig 2 2 Tap the Settings icon in the APPS menu interface Fig 2 and enter Wi Fi menu Fig 3 3 Tap options in the Wi Fi menu and set up different options 9 ...

Страница 10: ...I switch Data usage Bluetooth USB Sound notification Battery saver HDMI Display Storage Apps Screenshot Setting Location Accounts Backup reset Security Language input Date time Printing Accessbiity About device 10 Fig 2 Fig 3 Description of Settings Interface shown on the right ...

Страница 11: ...Status of Menu bar 1 Step1 Click the setting 2 Step2 At the setting menu click the display menu 3 Step3 At the display setting menu unselect the display navigation check box Fig 1 Fig 2 Fig 3 11 ...

Страница 12: ...12 Slide Show APP Introduction How to upload media files Step1 Open the Android launcher screen and click the explorer app Step2 Go to the USB storage menu click the USB storage button ...

Страница 13: ...select the media files which you want to copy to the media folder click the edit button the pop menu will show then click the Copy button Step4 Click HOME button and go to the NAND FLASH menu you will see the media folder open it 13 ...

Страница 14: ...tton at the top of the screen the pop menu will show and click the Paste command button the files will start copy to the media folder Step6 Exit the Explorer app and go to the launcher screen run the Slide Show app to display the media files 14 ...

Страница 15: ...15 How to Delete the media files Step1 Open the Android launcher screen and click the explorer app Step2 Click home button and go to the NAND FLASH menu you will see the media folder open it ...

Страница 16: ... At the media folder select the media files which you want to delete and click the edit button at the top of the screen the pop menu will show and click the Delete command button the files will be deleted 16 ...

Страница 17: ...rating temperature C 0 40 C Storage temperature C 10 60 C Storage humidity 10 60 RH Non condensing Operating humidity 20 85 RH Non condensing Maximum operating time hrs day 18 hours Functions Operating system Android 5 1 1 Processor RK3288 quad core RAM 2G Built in memory 8G Decoding resolution 1080P FHD compatible Playback mode Support loop inter cut timer shim etc Compatible network Ethernet 3G ...

Страница 18: ...2 0 2 SIM 0 Structure Net weight 49kg Gross weight Unit dimensions W D H Package dimensions W D H Shell material Aluminum profile sheet metal Shell color Silver black Language OSD English Simplified Chinese 18 63kg 640 50 1760mm 800 270 1970mm ...

Страница 19: ...ug unit back into outlet and try again Try playing the content on a different device smart phone computer or tablet If all of the above have been checked and the issue is not resolved contact a customer service representative No picture but sound is working Content file damaged Content format is not compatible Screen damaged or defective Confirm content is one of the following compatible formats A...

Страница 20: ...olved contact a customer service representative Having problems with installing software or getting content to play Did you purchase the DisplayIt Xpress software from Displays2go Did the customer purchase or downloaded another 3rd party software onto the product If you purchased DisplayIt Xpress software from Displays2go or from Best Wave directly please contact Best Wave at support bestwave com ...

Страница 21: ...d hazardous substances or elements in the part is higher than the limit specified in GB T 26572 2011 standard The table shows that the machine contains harmful substances inside The data is provided by material suppliers and verified by the company according to the material type Some materials contain harmful substances that can t be replaced in present technology We are dedicated to improving thi...

Отзывы: