background image

109

Frequently Asked Questions (continued)

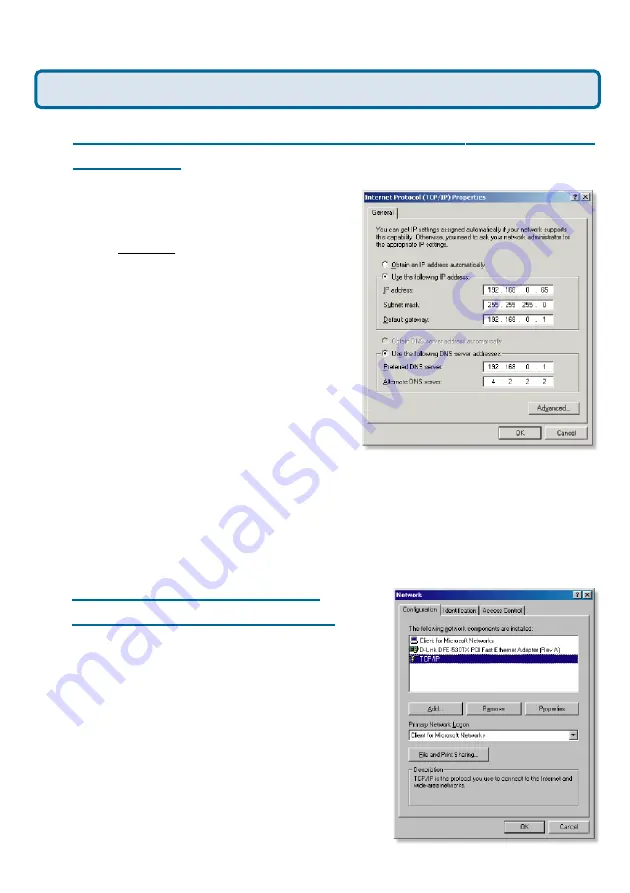
How can I assign a Static IP Address in Windows 2000?
(continued)

Click 

Use the following IP Address

 and

enter an IP Address that is on the same
subnet as the LAN IP address on your
router. Example: If the router´s LAN IP
address is 192.168.0.1, make your IP
address 192.168.0.X where X = 2-99.
Make sure that the number you choose is
not in use on the network.

Set the

 Default Gateway 

to be the same

as the LAN IP address of your router
(192.168.0.1).

Set 

the Preferred DNS server 

to be the

same as the LAN IP address of your
router (192.168.0.1).

The Alternate DNS server 

is not needed or enter a DNS server from your ISP.

Click 

OK

 twice. You may be asked if you want to reboot your computer. Click

Yes

.

How can I assign a Static IP
Address in Windows 98/Me?

Step 1 

From the desktop, right-click on the

Network Neigborhood 

icon (Win ME - My

Network Places) and select 

Properties

Highlight 

TCP/IP

 and click the 

Properties

button. If you have more than one  adapter,
then there will be a TCP/IP “Binding” for
each adapter. Highlight 

TCP/IP > (your

network adapter)

 and then click

Properties

.

Why can´t I access the Web-based configuration? (continued)

Содержание Wireless VPN Router DI-824VUP

Страница 1: ...ettings please do the following Resetting the DI 824VUP to the Factory Default Settings Use a paper clip to press the Reset button and power on Locate the Reset button on the back of the DI 824VUP After you have completed the above steps the DI 824VUP will be reset to the factory default settings Hold for about 5 seconds do not hold for too long and then release Or release when the status LEDflash...

Страница 2: ...rating Temperature 32 F to 131 F 0 C to 55 C Humidity 10 90 Power 5V DC 2 5A IEEE 802 3u 100BASE TX Fast Ethernet USB 1 1 IEEE 802 11g L 9 25 inches 233mm W 6 5 inches 165mm H 1 375 inches 35mm Dimensions 2 0oz 907g Weight 4 x 10 100 LAN Ports MDI MDIX 1 x 10 100 WAN Port MDI MDIX 1 COM Port Dial up Modem 1 Parallel Port DB25 1 USB Port Ports LPT ...

Страница 3: ...ferent port on the device if possible If the computer is turned off the link light may not be on The following connections require a Crossover Cable Computer to Computer Computer to Uplink Port Computer to Access Point Computer to Print Server Computer XBOX PS2 toDWL 810 Computer XBOX PS2 toDWL 900AP Uplink Port to Uplink Port hub switch Normal Port to Normal Port hub switch The following connecti...

Страница 4: ...er cable All you need to remember to properly configure the cables is the pinout order of the two cable ends and the following rules A straight through cable has identical ends A crossover cable has different ends It makes no functional difference which standard you follow for straight through cable ends as long as both ends are the same You can start a crossover cable with either standard as long...

Страница 5: ...sked Questions continued Click to the Connection tab and set the dial up option to Never Dial a Connection Click the LAN Settings button Nothing should be checked Click OK Go to the Advanced tab and click the Restore Defaults button to restore these settings to their facotry defaults Click OK Go to the desktop and close any open windows Go to Start Settings Control Panel Double click the Internet ...

Страница 6: ...2 The Run Dialogue Box will appear Type winipcfg in the text field and click OK Step 3 The IP Configuration window will appear displaying your Ethernet Adapter Information Select your adapter from the drop down menu If you do not see your adapter in the drop down menu your adapter is not properly installed Step 4 After selecting your adapter it will display your IP Address subnet mask and default ...

Страница 7: ...igure Most D Link devices use the 192 168 0 X range How can I find my IP Address in Windows 2000 XP Step 1 Click on Start and select Run Step 2 Type cmd then click OK Step 3 From the Command Prompt enter ipconfig It will return your IP Address subnet mask and default gateway Step 4 Type exit to close the command prompt Why can t I access the Web based configuration continued ...

Страница 8: ...fault it should be 192 168 0 1 How can I assign a Static IP Address in Windows XP Step 1 Click on Start Control Panel Network and Internet Connections Network connections Step 2 See Step 2 for Windows 2000 and continue from there How can I assign a Static IP Address in Windows 2000 Step 1 Right click on My Network Places and select Properties Step 2 Right click on the Local Area Connection which r...

Страница 9: ...8 0 1 Set the Preferred DNS server to be the same as the LAN IP address of your router 192 168 0 1 The Alternate DNS server is not needed or enter a DNS server from your ISP Click OK twice You may be asked if you want to reboot your computer Click Yes How can I assign a Static IP Address in Windows 98 Me Step 1 From the desktop right click on the Network Neigborhood icon Win ME My Network Places a...

Страница 10: ... X where X is between 2 99 Make sure that the number you choose is not in use on the network Step 5 Click OK twice Click Enable DNS Type in a Host can be any word UnderDNS server search order enter the LAN IPAddress of your router 192 168 0 1 Click Add When prompted to reboot your computer click Yes After you reboot the computer will now have a static private IP Address Why can t I access the Web ...

Страница 11: ...odem Step 1 Log into the Web based configuration by typing in the IP Address of the router default 192 168 0 1 in your web browser The username is admin all lowercase and the password is blank nothing Step 2 Click the Home tab and click the WAN button Dynamic IP address is the default value however if Dynamic IP address is not selected as the WAN type select Dynamic IP address by clicking on the r...

Страница 12: ... Info button If you do not already have a public IP Address under the WAN heading click on the DHCP Renew and Continue buttons Static Cable Connection Step 1 Log into the Web based configuration by typing in the IP address of the router default 192 168 0 1 in your Web browser The username is admin all lowercase and the password is blank empty Step 2 Click the Home tab and click the WAN button Sele...

Страница 13: ...ox appears enter the username admin and leave the password blank Click OK If the password dialog box does not come up repeat Step 2 Note Do not run Wizard Step 4 Click on the WAN tab on left hand side of the screen Select PPPoE Step 5 Select Dynamic PPPoE unless your ISP supplied you with a static IP Address Step 6 In the username field enter ELN username earthlink net and your password where user...

Страница 14: ...d by AOL DSL Plus In most cases yes AOL DSL Plus may use PPPoE for authentication bypassing the client software If this is the case then our routers will work with this service Please contact AOL if you are not sure To set up your router Step 1 Log into the Web based configuration 192 168 0 1 and configure the WAN side to use PPPoE Step 2 Enter your screen name followed by aol com for the user nam...

Страница 15: ...o DI 824VUP Routers how can I set them up to work with each other Frequently Asked Questions continued Step 2 Click the VPN button on the left column select the checkbox to Enable the VPN and then in the box next to Max number of tunnels enter the maximum numbers of VPN tunnels that you would like to have connected Step 3 In the space provided enter the TunnelName for IDnumber 1 select IKE and the...

Страница 16: ...UP s LAN and the corresponding subnet mask Step 5 In the Remote Subnet and Remote Netmask fields enter the network identifier for the remote DI 824VUP s LANand the corresponding subnet mask Step 6 In the Remote Gateway field enter the WAN IP address of the remote DI 824VUP and in the Preshare Key field enter a key which must be exactly the same as the Preshare Key that is configured on the remote ...

Страница 17: ...k with each other continued Frequently Asked Questions continued Step 8 The device will restart Click on the Continue button Step 9 Click on Select IKE Proposal Step 10 Enter a name for proposal ID number 1 and select Group 1 2 or 5 from the DHGroup dropdown menu ...

Страница 18: ...ther continued Frequently Asked Questions continued Step 11 Select DES or 3DES as the EncryptionAlgorithm Step 12 Select SHA 1 or MD5 as the Authentication Algorithm Step 13 Enter a Lifetime value of 2800 and then either select Sec or KByte as the unit for the lifetime value ...

Страница 19: ...sked Questions continued Step 15 The device will restart Click on the Continue button Then click Back Step 14 Select 1 out of the Proposal ID dropdown menu and clickAdd To which will add the proposal that was just configured to the IKE Proposal Index Click Apply Step 16 Click on Select IPSec Proposal ...

Страница 20: ...h other continued Frequently Asked Questions continued Step 17 Enter a name for proposal ID number 1 and select Group 1 2 5 or None from the DH Group dropdown menu Step 18 Select ESP or AH as the Encapsulation Protocol Step 19 Select DES or 3DES as the EncryptionAlgorithm ...

Страница 21: ...ther continued Frequently Asked Questions continued Step 21 Enter a Lifetime value and then either select Sec or KB as the unit for the lifetime value Step 22 Select 1 out of the Proposal ID dropdown menu and clickAdd To which will add the proposal that was just configured to the IPSec Proposal Index Click Apply and the device will restart ...

Страница 22: ...es the tunnel has been established I have two DI 824VUP Routers how can I set them up to work with each other continued Frequently Asked Questions continued You need to first configure your DI 824VUP router How can I set up my DI 824VUP to work with a DI 804V or DI 804HV Router Step 1 Log into the Web based configuration of the router by typing in the IP address of the router default 192 168 0 1 i...

Страница 23: ... Subnet and Local Netmask fields enter the network identifier forDI 824VUP s LANand the corresponding subnet mask Step 5 In the Remote Subnet and Remote Netmask fields enter the network identifier for the DI 804V or DI 804HV s LAN and the corresponding subnet mask Click Apply How can I set up my DI 824VUP to work with a DI 804V or DI 804HV Router continued ...

Страница 24: ...p 10 Select 3DES as the Encryption Algorithm and SHA 1 as the Authentication Algorithm Step 8 Click Apply and then click on Select IKE Proposal Step 9 Enter a name for proposal ID number 1 and select Group 2 from the DHGroup drop down menu Step 11 Enter a Lifetime value of 28800 and then select Sec as the unit for the lifetime value How can I set up my DI 824VUP to work with a DI 804V or DI 804HV ...

Страница 25: ... menu and click Add To which will add the proposal that was just configured to the IKE Proposal Index Click Apply Step 13 The device will restart Click on the Continue button Step 14 Click Back and click on Select IPSec Proposal Step 15 Enter a name for proposal ID number 1 and select None from the DH Group drop down menu Step 16 Select ESP as the Encapsulation Protocol ...

Страница 26: ... value of 3600 and then select Sec as the unit for the lifetime value How can I set up my DI 824VUP to work with a DI 804V or DI 804HV Router continued Step 19 Select 1 out of the Proposal ID dropdown menu and clickAdd To which will add the proposal that was just configured to the IPSec Proposal Index Click Apply The device will restart Click on the Continue button ...

Страница 27: ...heDI 824VUP Step 4 Click Next until you reach the Save Restart screen Click Save restart and then click Basic Setup once until the unit has rebooted Step 5 Click on VPN Settings How can I set up my DI 824VUP to work with a DI 804V or DI 804HV Router continued Step 6 Name your VPNconnection and click ADD Step 7 In Remote IP Network and Remote IP Netmask fields enter the network identifier and corre...

Страница 28: ...nd click SAVE Step 12 Click Next and then click on Save Restart How can I set up my DI 824VUP to work with a DI 804V or DI 804HV Router continued After you have configured both routers you need to establish a connection Step 1 Open a command prompt and from a computer on the internal LAN of theDI 824VUP and ping the IP address of a computer that is on the internal LAN of theDI 804VorDI 804HV or vi...

Страница 29: ...rst configure your DI 824VUP router Step 1 Log into the web based configuration of the router by typing in the IP address of the router default 192 168 0 1 in your web browser By default the username is admin and there is no password Step 2 Click the VPN button on the left column select the checkbox to Enable the VPN and then in the box next to Max number of tunnels enter the maximum numbers of VP...

Страница 30: ... the TunnelName for IDnumber 1 select IKE and then click More Step 4 In the Local Subnet and Local Netmask fields enter the network identifier forDI 824VUP s LANand the corresponding subnet mask Step 5 In the Remote Subnet and Remote Netmask fields enter the network identifier for the DFL 300 s Internal interface and the corresponding subnet mask ...

Страница 31: ...ctly the same as the Preshared Key that is configured on theDFL 300 Step 7 Click Apply The device will restart Click on the Continue button and then click on Select IKE Proposal Step 8 Enter a name for proposal ID number 1 and select Group 2 from the DH Group dropdown menu Step 9 Select 3DES as the Encryption Algorithm and SHA 1 as the Authentication Algorithm Step 10 Enter a Lifetime value of 288...

Страница 32: ... my DI 824VUP to work with a DFL 300 Firewall continued Frequently Asked Questions continued Step 12 Click on Select IPSec Proposal Step 13 Enter a name for proposal ID number 1 and selectNone from the DH Group dropdown menu Step 14 Select ESP as the Encapsulation Protocol Step 15 Select 3DES as the Encryption Algorithm and MD5 as the Authentication Algorithm Step 16 Enter a Lifetime value of 2880...

Страница 33: ...ntly Asked Questions continued Next you need to configure the DFL 300 firewall Step 1 Access the configuration screen of theDFL 300 by opening a web browser such as Internet Explorer and type the IP address of the DFL 300 in the address bar 192 168 1 1 Step 2 Enter the username admin and the password admin Click OK Step 3 Click on Configuration and take note of the IP address that your ISP has ass...

Страница 34: ...nternal interface Step 8 In the ToDestination section select either RemoteGateway FixedIP or Remote Gateway Dynamic IP Enter the WANIP address of theDI 824VUP if RemoteGateway Fixed IP is selected Step 9 Enter the network identifier corresponding subnet mask of the DI 824VUP s LAN Step 10 Enter a Preshared Key The Preshared Key needs to be identical to the one configured on theDI 824VUP Step 11 Se...

Страница 35: ...nce you begin to receive replies the VPN connection has been established Step 1 Open a command prompt and from a computer connected to the Inter nal interface of theDFL 300 and ping the IP address of a computer that is on the internal LAN of theDI 824VUP or vice versa How can I set up my DI 824VUP to work with a DFL 300 Firewall continued ...

Страница 36: ...pe either TCP UDP or both If you are not sure select both Step 7 Enter the port information next to Private Port and Public Port The private and public ports are usually the same The public port is the port seen from the WAN side and the private port is the port being used by the application on the computer within your local network Step 8 Enter the Schedule information Step 9 Click Apply and then...

Страница 37: ... the public network outside the company can access only the DMZ host The DMZ may typically also have the company s Web pages so these could be served to the outside world However the DMZ provides access to no other company data In the event that an outside user penetrated the DMZ hosts security the Web pages might be corrupted but no other company information would be exposed D Link a leading make...

Страница 38: ...lank empty How do I configure the DMZ Host continued Step 3 Click the Advanced tab and then click on the DMZ button Select Enable and type in the IP Address from step 1 Step 4 Click Apply and then Continue to save the changes Note When DMZ is enabled Virtual Server settings will still be effective Remember you cannot forward the same port to multiple IP Addresses so the Virtual Server settings wil...

Страница 39: ...applied to If you would like this rule to allow all internet users to be able to access these ports then put an Asterisk in the first box and leave the second box empty Step 5 Select LAN as the Destination and enter the IP Address of the computer on your local network that you want to allow the incoming service to This will not work with a range of IPAddresses Step 6 Enter the port or range of por...

Страница 40: ...table Server Port Server IP Enable 21 192 168 0 5 X 80 192 168 0 6 X 1723 192 168 0 7 X How do I use PC Anywhere with my DI 824VUP You will need to open 3 ports in the Virtual Server section of your D Link router Step 1 Open your web browser and enter the IPAddress of the router 192 168 0 1 Step 2 Click on Advanced at the top and then click Virtual Server on the left side Step 3 Enter the informat...

Страница 41: ...tep 6 Create a second entry as shown here Step 7 Click Apply and then click Continue Step 8 Create a third and final entry as shown here Step 9 Click Apply and then click Continue Step 10 Run PCAnywhere from the remote site and use the WAN IP Address of the router not your computer s IP Address ...

Страница 42: ...as the Java Interface with the client Step 1 Open your web browser and enter the IP Address of your router 192 168 0 1 Enter username admin and your password leave blank Step 2 Click on Advanced and then click Firewall Step 3 Create a new firewall rule Click Enabled Enter a name edonkey Click Allow Next to Source select WAN under interface In the first box enter an Leave the second box empty Next ...

Страница 43: ...ult Step 3 Click on the Advanced tab and then click on Virtual Server on the left side Step 4 You will now create a new Virtual Server entry Click Enabled and enter a name socom Enter the IP Address of your Playstation for Private IP Step 5 For Protocol Type select Both Enter 6869 for both the Private Port and Public Port Click Always Click Apply to save changes and then Continue Step 6 Click on t...

Страница 44: ...LE Always Frequently Asked Questions continued Step 1 Open your web browser and enter the IPAddress of the router 192 168 0 1 Enter admin for the username and your password blank by default Step 2 Click on the Advanced tab and then click Virtual Server on the left side Step 3 You will create 2 entries Step 4 Click Enabled and enter Settings Click Apply and then continue Step 5 Enter 2nd entry Clic...

Страница 45: ... If you are having problems please follow steps below Step 1 Enter the IP Address of your router in a web browser 192 168 0 1 Step 2 Enter your username admin and your password blank by default Step 3 Click on Advanced and then click Virtual Server Step 4 Click Enabled and then enter a Name kazaa for example Step 5 Enter the IP Address of the computer you are running KaZaA from in the Private IP b...

Страница 46: ...dress of the computer you want to host the game Select Both for Protocol Type Enter 6112 for both Private Port and Public Port Click Always or set a schedule Step 4 Click Apply and then Continue Note If you want multiple computers from you LAN to play in the same game that you are hosting then repeat the steps above and enter the IPAddresses of the other computers You will need to change ports Com...

Страница 47: ... taken it on themselves to actually provide H 323 compatibility This is not an easy task since the router must search each incoming packet for signs that it might be a netmeeting packet This is a whole lot more work than a router normally does and may actually be a weak point in the firewall D Link is not one of the manufacturers To read more on this visit http www HomenetHelp com How do I set up ...

Страница 48: ...edule Step 4 Click Apply and then Continue Step 5 Repeat steps 3 and 4 enter ichat2 and open ports 16384 16403 UDP How do I set up my DI 824VUP to use iChat for Macintosh users continued Click Enabled Enter a name ichat1 Click Allow Next to Source select WAN under interface In the first box enter an Leave the second box empty Next to Destination select LAN under interface Enter the IPAddress of th...

Страница 49: ...or Series field type in 5060 16384 16403 Step 7 In the Description field type in iChat AV Step 8 Click OK For File Sharing Step 1 Click on Advanced and then Virtual Server Step 2 Check Enabled to activate entry Step 3 Enter a name for your virtual server entry ichat3 Step 4 Next to Private IP enter the IP Address of the computer on your local network that you want to allow the incoming service to ...

Страница 50: ...iver may keep the firewall on if the AIM port is open To open the AIM port If you do not want to turn off the firewall at the sending computer a different file sharing service may be used instead of iChat The types of file sharing available in Mac OS X are outlined in technical document 106461 Mac OS X File Sharing in the AppleCare Knowl edge base online Note If you use a file sharing service when...

Страница 51: ...e the local IP Addresses to global address and vice versa Simply put it is a method of connecting multiple computers to the Internet or any other IP network using one IP Address D Link s broadband routers ie DI 824VUP supportNAT With proper configuration multiple users can access the Internet using a single account via the NAT device For more information on RFC 1631 The IPNetworkAddress Translator...

Страница 52: ...act D Link technical support through our web site or by phone D Link Technical Support over the Telephone 877 453 5465 24 hours a day seven days a week D Link Technical Support over the Internet http support dlink com When contacting technical support you will need the information below Please look on the back side of the unit Contacting Technical Support Serial number of the unit Model number or ...

Страница 53: ...al specifications for the Software as set forth in the applicable documentation from the date of original retail purchase of the Software for a period of ninety 90 days Warranty Period provided that the Software is properly installed on approved hardware and operated as contemplated in its documentation D Link further warrants that during the Warranty Period the magnetic media on which D Link deli...

Страница 54: ...al installation installation and removal of the product for repair and shipping costs Operational adjustments covered in the operating manual for the product and normal maintenance Damage that occurs in shipment due to act of God failures due to power surge and cosmetic damage Any hardware software firmware or other products or services provided by anyone other than D Link Products that have been ...

Страница 55: ...nstalled and used in accordance with the instructions may cause harmful interference to radio communication However there is no guarantee that interference will not occur in a particular installation If this equipment does cause harmful interference to radio or television reception which can be determined by turning the equipment off and on the user is encouraged to try to correct the interference...

Отзывы: