background image

D-Link DNS-1550-04 Quick Installation Guide

6

EN

G

LI

S

H

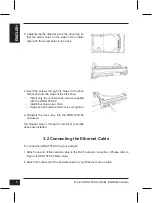
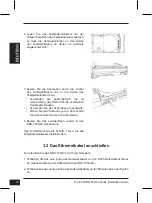
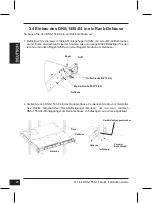
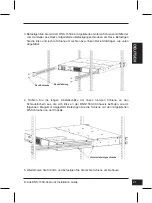
3. Insert the screws through the holes in the drive 

carrier and into the sides of the disk drive.

•  Install only the counter-sunk screws supplied 

with the DNS-1550-04.

•  Install four screws per drive.

•  Snug each screw. Be careful not to over-tighten.

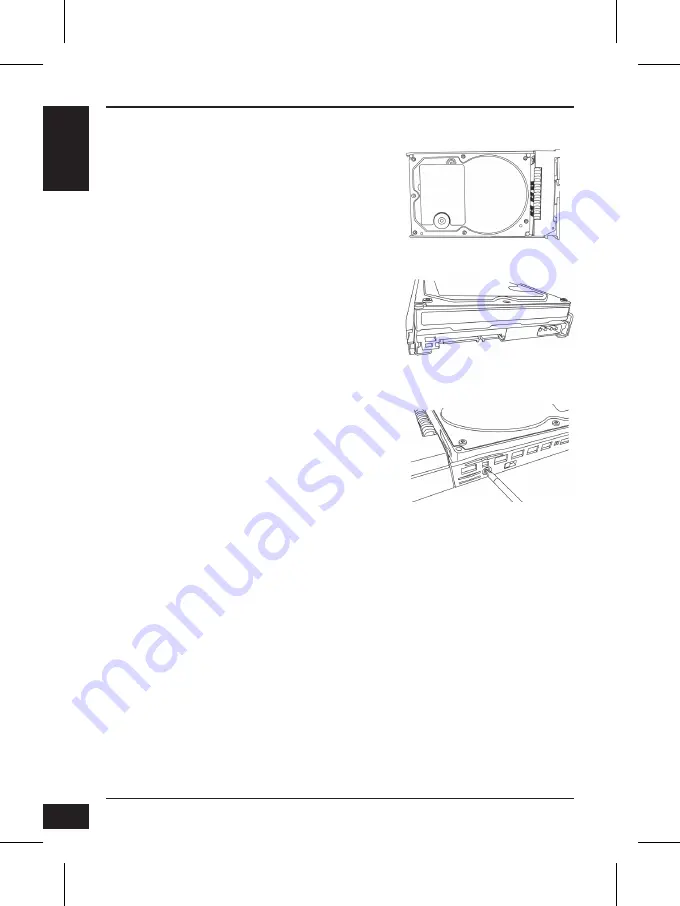
4. Reinstall  the  drive  tray  into  the  DNS-1550-04 

enclosure.

Tip: Repeat steps 1 through 4 until all of your disk 

drives are installed.

3.2 Connecting the Ethernet Cable

To connect the DNS-1550-04 to your network:

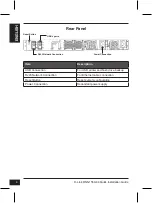
1. Attach one end of the network cable to the RJ45 network connection. (Please refer to 

Figure of DNS-1550-04 Rear View).

2. Attach the other end of the network cable to your Ethernet hub or switch.

2. Carefully lay the disk drive into the drive tray, so 

that the screw holes on the sides of the carrier 

align with the screw holes in the drive.

Содержание ShareCenter Pro DNS-1550-04

Страница 1: ... Link DNS 1550 04 DNS 1550 04 Quick Installation Guide 4 Bay SMB Rack mount Unified Network Storage Enclosure Quick Installation Guide Installationsanleitung Guide d installation Guía de instalación Guida di Installazione Documentation also available on CD and via the D Link Website ...

Страница 2: ...ded in this package or from the D Link support website Installation Steps 1 Verify the package contents against the list below 2 Hardware Overview 3 Hardware Installation 4 Configuration with Wizard 1 Package Contents D Link DNS 1550 04 CD ROM with Manual and Software Quick Installation Guide Power Cord Ethernet Cable Screws for Disk Drive installation Rack Kit and Screws If any of the above items...

Страница 3: ...al drive locate flashing green Disk Activity LED Disk access status System Status LED Power on flashing green orange red System ready green Disk array degrade orange Disk array offline Enclosure error red One Touch Backup Button Enable one touch backup Flashing green while backup is processing Power Button Power on off the NAS One Touch Backup Button PSU Status LED System Status LED Power Button U...

Страница 4: ...set Button RJ45 Network Connection USB 4 ports Power Connection Item Description USB Connection For USB printer and flash drive backup RJ45 Network Connection For Ethernet cable connection Reset Button Reset system configuration Power Connection Redundant power supply ...

Страница 5: ...ts contents To install DNS 1550 04 on your local network refer to the steps below To install disk drives 1 Remove the disk tray from the device by the following steps 3 1 Installing Disk Drives b Press the button next to the latch c Pull the latch to open the disk tray door and then remove the disk tray from the enclosure a Slide the latch towards the left ...

Страница 6: ...ray into the DNS 1550 04 enclosure Tip Repeat steps 1 through 4 until all of your disk drives are installed 3 2 Connecting the Ethernet Cable To connect the DNS 1550 04 to your network 1 Attach one end of the network cable to the RJ45 network connection Please refer to Figure of DNS 1550 04 Rear View 2 Attach the other end of the network cable to your Ethernet hub or switch 2 Carefully lay the dis...

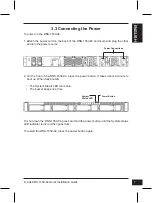
Страница 7: ...ress the power button again 3 3 Connecting the Power To power on the DNS 1550 04 1 Attach the power cord on the back of the DNS 1550 04 enclosure and plug the other end into the power source 2 On the front of the DNS 1550 04 press the power button It takes about a minute to boot up When fully booted The System Status LED turns blue The buzzer beeps one time Power Button System Status LED Power Con...

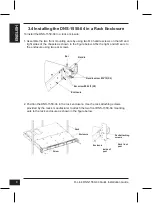
Страница 8: ... left ears to the enclosure using two ear screws 2 Position the DNS 1550 04 in the rack enclosure Use the rack attaching screws provided by the rack s manufacturer to attach the two front DNS 1550 04 mounting ears to the rack enclosure as shown in the figure below 3 4 Installing the DNS 1550 04 in a Rack Enclosure Rack Enclosure Screw Pack attaching screws Rack front post Inside of post Enclosure ...

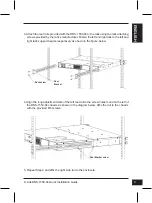
Страница 9: ... right rails to the left and right rack support beams respectively as shown in the figure below 4 Align the long adjustment slots of the left rear rail to the screw holes found on the left of the DNS 1550 04 chassis as shown in the diagram below Affix the rail to the chassis with the provided M5 screws 5 Repeat Step 4 and affix the right side rail to the enclosure Rack screw Rear Bracket Rear Brac...

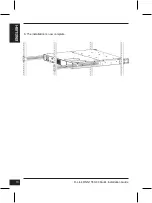
Страница 10: ...D Link DNS 1550 04 Quick Installation Guide 10 ENGLISH 6 The installation is now complete ...

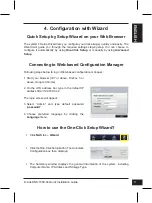
Страница 11: ...figuration Manager Following steps below to log in Web based configuration manager 1 Start your browser IE7 or above FireFox 3 or above Google Chrome 2 On the URL address bar type in the default IP address http 192 168 0 32 The login screen will appear 3 Select Admin and type default password password 4 Choose preferred language by clicking the Language menu The Summary window displays the general...

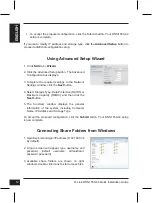
Страница 12: ...twork Settings window click the Next button 4 Select Storage Type Data Protection RAID5 or Maximum Capacity RAID0 and then click the Next button 5 The Summary window displays the general information of the system including Computer Name IP Address and Storage Type Using Advanced Setup Wizard Connecting Share Folders from Windows To accept the proposed configuration click the Submit button Your DNS...

Страница 13: ...P ftp ftp dlink co uk Home Wireless Broadband 0871 873 3000 9 00am 06 00pm Sat 10 00am 02 00pm Managed Smart Wireless Switches or Firewalls 0871 873 0909 09 00am 05 30pm BT 10ppm other carriers may vary Ireland Mon Fri All Products 1890 886 899 09 00am 06 00pm Sat 10 00am 02 00pm Phone rates 0 05ppm peak 0 045ppm off peak times ...

Страница 14: ...ber die D Link Support Website zur Verfügung steht Installationsschritte 1 Prüfen Sie den Packungsinhalt ob er mit den auf der Liste unten aufgeführten Artikeln übereinstimmt 2 Hardware Überblick 3 Hardware Installation 4 Konfiguration mithilfe des Assistenten 1 Packungsinhalt D Link DNS 1550 04 CD ROM mit Handbuch und Software Installationsanleitung Netzkabel Ethernetkabel Schrauben für die Festp...

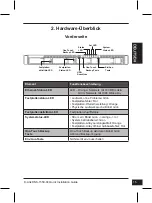
Страница 15: ...aufwerkssuche Blinkt Grün Festplattenaktivitäts LED Festplatten Zugriffstatus Systemstatus LED Strom ein Blinkt Grün orange rot System betriebsbereit Grün Festplatten Array Leistungsabfall Orange Festplatten Array offline Gehäusefehler Rot One Touch Backup Taste One Touch Backup aktivieren Blinkt Grün während Backup Vorgang Ein Aus Taste NAS Gerät ein ausschalten One Touch Backup Taste Status LED ...

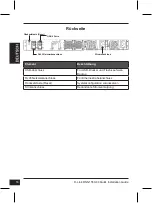
Страница 16: ...ung USB Anschluss Für USB Drucker und Flash Laufwerk Backup RJ45 Netzwerkanschluss Für Ethernet Kabelanschluss Rücksetztaste Reset Systemkonfiguration zurücksetzen Stromanschluss Redundante Stromversorgung Rücksetztaste Reset RJ45 Netzwerkanschluss USB 4 Ports Stromanschluss ...

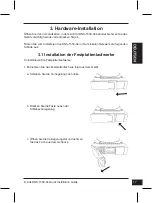
Страница 17: ... Sie zum Installieren des DNS 1550 04 in Ihrem lokalen Netzwerk die folgenden Schritte aus So installieren Sie Festplattenlaufwerke 1 Entnehmen Sie das Festplattenfach wie folgt aus dem Gerät 3 1 Installation der Festplattenlaufwerke b Drücken Sie die Taste neben der Schiebeverriegelung c Öffnen Sie die Verriegelungstür und nehmen Sie das Fach aus dem Gehäuse a Schieben Sie die Verriegelung nach l...

Страница 18: ...r in das DNS 1550 04 Gehäuse ein Tipp Wiederholen Sie die Schritte 1 bis 4 bis alle Festplattenlaufwerke installiert sind 3 2 Das Ethernetkabel anschließen So verbinden Sie das DNS 1550 04 mit Ihrem Netzwerk 1 Schließen Sie das eine Ende des Netzwerkkabels an den RJ45 Netzwerkanschluss an Siehe Abbildung der Rückansicht des DNS 1550 04 2 Schließen Sie das andere Ende des Netzwerkkabels an Ihr Ethe...

Страница 19: ... 3 3 Stromanschluss So schließen Sie das DNS 1550 04 an das Stromnetz an 1 Bringen Sie das Netzkabel auf der Rückseite des DNS 1550 04 Gehäuses an und schließen Sie das andere Ende an eine Stromquelle an 2 Drücken Sie auf die Ein Aus Taste auf der Vorderseite des DNS 1550 04 Der Hochfahrvorgang dauert etwa eine Minute Nach Abschluss des Vorgangs leuchtet die Systemstatus LED blau auf ertönt ein ei...

Страница 20: ...n Bügel mithilfe von zwei Bügelschrauben am Gehäuse 2 Stellen Sie den DNS 1550 04 in das Rack Gehäuse Verwenden Sie die vom Hersteller des Racks mitgelieferten Rack Befestigungsschrauben um die zwei vorderen DNS 1550 04 Montagebügel am Rack Gehäuse zu befestigen wie unten abgebildet 3 4 Einbau des DNS 1550 04 in ein Rack Gehäuse Rack Gehäuse Schraube Rack Befestigungsschrauben Vorderer Rack Stände...

Страница 21: ...ten bzw linken Rack Stützträger wie unten abgebildet 4 Richten Sie die langen Einstellschlitze der linken hinteren Schiene an den Schraublöchern aus die sich links an der DNS 1550 04 Chassis befinden wie im folgenden Diagramm dargestellt Befestigen Sie die Schiene mit den mitgelieferten M5 Schrauben an der Chassis 5 Wiederholen Sie Schritt 4 und befestigen Sie die rechte Schiene am Gehäuse Rack Sc...

Страница 22: ...D Link DNS 1550 04 Quick Installation Guide 22 6 Der Einbau ist jetzt abgeschlossen ...

Страница 23: ...en Sie sich im webbasierten Konfigurationsmanager an 1 Starten Sie Ihren Browser IE7 oder höher FireFox 3 oder höher Google Chrome 2 Geben Sie auf der URL Adresszeile die standardmäßige IP Adresse http 192 168 0 32 ein Der Anmeldebildschirm wird angezeigt 3 Wählen Sie Admin und geben Sie das vorgegebenene Kennwort password ein 4 Wählen Sie durch Klicken auf das Menü Language Sprache die von Ihnen ...

Страница 24: ...einstellungen vor und klicken Sie auf Next Weiter 4 Wahl des Speichertyps Max Datensicherung RAID 5 oder maximale Festplattenkapazität RAID0 Klicken Sie dann auf Next Weiter 5 Im Fenster Summary Übersicht werden die allgemeinen Systeminformationen wie z B der Computername die IP Adresse und der Speichertyp angezeigt Die Verwendung des Advanced Setup Assistenten Verbindung zu Freigabeordnern von Wi...

Страница 25: ... 2787 0 14 pro Minute Zeiten Mo Fr 09 00 17 30 Uhr Österreich Web http www dlink at Telefon 43 0 820 480084 0 116 pro Minute Zeiten Mo Fr 09 00 17 30 Uhr Schweiz Web http www dlink ch Telefon 41 0 848 331100 0 08 CHF pro Minute Zeiten Mo Fr 09 00 17 30 Uhr Gebühren aus Mobilnetzen und von anderen Providern können abweichen ...

Страница 26: ...onible sur le CD joint à ce coffret ou sur le site Web d assistance D Link Procédure d installation 1 Vérifiez le contenu de la boîte par rapport à la liste ci dessous 2 Description du matériel 3 Installation du matériel 4 Configuration à l aide de l assistant 1 Contenu de la boîte DNS 1550 04 D Link CD ROM avec manuel et logiciel Guide d installation rapide Un cordon d alimentation Câble Ethernet...

Страница 27: ...ès au disque Voyant d état du système Mise sous tension clignotement vert orange rouge Système prêt vert Matrice de disques dégradée orange Matrice de disques hors ligne Erreur liée au boîtier rouge Sauvegarde d une seule pression Bouton Permet d activer la sauvegarde d une seule pression Clignotement vert pendant la sauvegarde Bouton de mise sous tension Mise sous hors tension du NAS Bouton de sa...

Страница 28: ...primante USB et sauvegarde de mémoire flash Connexion réseau RJ45 Pour connexion du câble Ethernet Bouton de réinitialisation Réinitialiser la configuration système Connexion de l alimentation Alimentation redondante Bouton de réinitialisation 4 ports USB Connexion réseau RJ45 Connexion de l alimentation ...

Страница 29: ...er le DNS 1550 04 sur votre réseau local procédez comme suit Pour installer des disques 1 Retirez la baie de disques du périphérique en procédant comme suit 3 1 Installation des disques b Appuyez sur le bouton en regard du loquet c Tirez sur le loquet pour ouvrir la porte de la baie de disques puis retirez cette baie du boîtier a Faites glisser le loquet vers la gauche ...

Страница 30: ...eil Répétez les étapes 1 à 4 jusqu à ce que tous vos disques soient installés 3 2 Connexion du câble Ethernet Pour connecter le DNS 1550 04 à votre réseau 1 Connectez une extrémité du câble réseau à la connexion réseau RJ45 reportez vous à l illustration de la vue arrière du DNS 1550 04 2 Connectez l autre extrémité du câble réseau à votre concentrateur ou commutateur Ethernet 2 Placez le disque d...

Страница 31: ...limentation Pour mettre le DNS 1550 04 sous tension 1 Connectez une extrémité du cordon d alimentation à l arrière du boîtier DNS 1550 04 et l autre extrémité à la prise électrique 2 Sur la façade du DNS 1550 04 appuyez sur le bouton Marche Arrêt Le périphérique redémarre en une minute environ Lorsqu il a entièrement redémarré Le voyant d état du système devient bleu La sonnerie retentit une fois ...

Страница 32: ...e boîtier à l aide des deux vis à oreilles 2 Placez le DNS 1550 04 dans le boîtier en rack Utilisez les vis de fixation du rack fournies par le fabricant de racks pour fixer les deux pattes de montage avant du DNS 1550 4 sur le boîtier en rack comme illustré dans la figure ci dessous 3 4 Installation du DNS 1550 04 dans un boîtier en rack Rack Boîtier Vis Vis de fixation du rack Montant avant du r...

Страница 33: ...droite sur les colonnes correspondantes du rack comme illustré dans la figure ci dessous 4 Alignez les fentes d ajustement longues du rail arrière gauche sur les trous de vis se trouvant à gauche du châssis du DNS 1550 04 comme illustré sur le schéma ci dessous Fixez le rail sur le châssis à l aide des vis M5 fournies 5 Recommencez l étape 4 et fixez le rail droit sur le boîtier Vis du rack Suppor...

Страница 34: ...D Link DNS 1550 04 Quick Installation Guide 34 6 L installation est maintenant terminée ...

Страница 35: ...igateur IE7 ou toute version supérieure FireFox 3 ou toute version supérieure Google Chrome 2 Dans la barre d adresse saisissez l adresse IP par défaut http 192 168 0 32 L écran d ouverture de session s ouvre 3 Sélectionnez Admin puis saisissez le mot de passe par défaut password 4 Choisissez la langue souhaitée en cliquant sur le menu Language Langue La fenêtre Summary Récapitulatif affiche les i...

Страница 36: ...sur le bouton Next Suivant 4 Sélectionnez un type de stockage Data Protection Protection des données RAID5 ou Maximum Capacity Capacité maximale RAID0 puis cliquez sur le bouton Next 5 La fenêtre Summary Récapitulatif affiche les informations générales du système notamment le Computer Name Nom de l ordinateur l IP Address Adresse IP et le Storage Type Type de stockage Utilisation de l assistant de...

Страница 37: ...04 Quick Installation Guide 37 Assistance Technique Assistance technique D Link sur internet http www dlink fr Assistance technique D Link par téléphone 01 76 54 84 17 Du lundi au vendredi de 9h à 19h hors jours fériés ...

Страница 38: ... Pasos para la instalación 1 Verifique el contenido de la caja con la lista que aparece a continuación 2 Descripción general del hardware 3 Instalación del hardware 4 Configuración con el asistente 1 Qué contiene la caja D Link DNS 1550 04 CD ROM con manual y software Guía de instalación rápida Cable de alimentación Cable Ethernet Tornillos para la instalación de la unidad de disco Kit para estant...

Страница 39: ...de acceso al disco LED de estado del sistema Encendido parpadeo verde naranja rojo Sistema preparado verde Degradación de la matriz de disco naranja Matriz de disco sin conexión Error en la carcasa rojo Botón de copia de seguridad Alimentación Activar la copia de seguridad con una pulsación Parpadeo verde mientras se procesa la copia de seguridad Botón Alimentación Encendido apagado del NAS Botón ...

Страница 40: ...Para copia de seguridad de impresora y unidad flash USB Conexión de red RJ45 Para conexión del cable Ethernet Botón Reiniciar Reinicie la configuración del sistema Conexión de alimentación Fuente de alimentación redundante Botón Reiniciar Conexión de red RJ45 4 puertos USB Conexión de alimentación ...

Страница 41: ...ed local consulte los pasos siguientes Para instalar las unidades de disco 1 Extraiga la bandeja del disco del dispositivo mediante los pasos siguientes 3 1 Instalación de las unidades de disco b Pulse el botón situado junto al pestillo c Tire del pestillo para abrir la puerta de la bandeja del disco y a continuación extraiga la bandeja del disco de la carcasa a Deslice el pestillo hacia la izquie...

Страница 42: ...o en la carcasa del DNS 1550 04 Sugerencia repita los pasos 1 a 4 hasta que estén instaladas todas las unidades de disco 3 2 Conexión del cable Ethernet Para conectar el DNS 1550 04 a su red 1 Conecte un extremo del cable de red a la conexión de red RJ45 Consulte la figura de la vista posterior del DNS 1550 04 2 Conecte el otro extremo del cable de red al concentrador o conmutador Ethernet 2 Coloq...

Страница 43: ... Conexión de la alimentación Para encender el DNS 1550 04 1 Conecte el cable de alimentación a la parte posterior de la carcasa del DNS 1550 04 y enchufe el otro extremo en la fuente de alimentación 2 En la parte frontal del DNS 1550 04 pulse el botón de alimentación Tarda aproximadamente un minuto en iniciarse Cuando se inicie completamente El LED de estado del sistema cambia a azul El timbre son...

Страница 44: ...ndo dos tornillos para espiga 2 Coloque el DNS 1550 04 en la carcasa para estante Utilice los tornillos para acoplar el estante suministrados por el fabricante para acoplar las dos espigas delanteras de montaje del DNS 1550 04 a la carcasa como se muestra en la figura siguiente 3 4 Instalación del DNS 1550 04 en una carcasa para estante Estante Carcasa Tornillo Tornillos para acoplar el estante Po...

Страница 45: ...ante izquierdo y derecho respectivamente como se muestra en la figura siguiente 4 Alinee las ranuras de ajuste largas del riel posterior izquierdo con los orificios para tornillos que se encuentran a la izquierda del chasis del DNS 1550 04 como se muestra en el diagrama siguiente Sujete el riel al chasis con los tornillos M5 suministrados 5 Repita el paso 4 y sujete el riel del lado derecho a la c...

Страница 46: ...D Link DNS 1550 04 Quick Installation Guide 46 6 Se ha completado la instalación ...

Страница 47: ...dos a continuación para iniciar sesión en el gestor de configuración disponible en la web 1 Inicie el explorador IE7 o superior FireFox 3 o superior Google Chrome 2 En la barra de direcciones de la URL escriba la dirección IP predeterminada http 192 168 0 32 Aparecerá la pantalla de inicio de sesión 3 Seleccione Admin y escriba la contraseña predeterminada contraseña 4 Elija el idioma que prefiera...

Страница 48: ...ámetros de red y haga clic en el botón Siguiente 4 Seleccione el tipo de almacenamiento Protección de datos RAID5 o Capacidad máxima RAID0 y a continuación haga clic en el botón Siguiente 5 La pantalla Resumen muestra la información general del sistema incluido Nombre del ordenador Dirección IP y Tipo de almacenamiento Utilización del asistente de configuración avanzada Conexión a las carpetas com...

Страница 49: ...D Link DNS 1550 04 Quick Installation Guide 49 Asistencia Técnica http www dlink es Asistencia Técnica Telefónica de D Link 34 902 30 45 45 0 067 min De Lunes a Viernes de 9 00 a 19 00 ...

Страница 50: ...di D Link Procedura di installazione 1 Verificare il contenuto della confezione in base all elenco seguente 2 Panoramica hardware 3 Installazione dell hardware 4 Procedura guidata di configurazione 1 Contenuto della confezione D Link DNS 1550 04 CD ROM con manuale e software Guida di installazione rapida Cavo di alimentazione Cavo Ethernet Viti per l installazione dell unità disco Kit e viti per m...

Страница 51: ...ED di attività del disco Stato di accesso al disco LED di stato del sistema Accensione verde lampeggiante arancione rosso Sistema pronto verde Prestazioni array disco ridotte arancione Array disco offline Errore enclosure rosso Pulsante di backup One Touch Abilita il backup One Touch Verde lampeggiante durante il backup Pulsante di alimentazione Consente di accendere spegnere il NAS Pulsante di ba...

Страница 52: ...r la stampante USB e il backup su unità flash Connettore di rete RJ45 Per il collegamento del cavo Ethernet Pulsante di reset Ripristino della configurazione di sistema Connettore di alimentazione Alimentatore ridondante Pulsante di reset Connettore di rete RJ45 4 porte USB Connettore di alimentazione ...

Страница 53: ...itivo DNS 1550 04 nella rete locale eseguire le operazioni seguenti Per installare le unità disco 1 Rimuovere il cassetto delle unità disco dal dispositivo attenendosi alla seguente procedura 3 1 Installazione delle unità disco b Premere il pulsante accanto al meccanismo di blocco c Tirare il meccanismo di blocco per aprire lo sportello del cassetto quindi rimuovere il cassetto dall enclosure a Fa...

Страница 54: ...losure DNS 1550 04 Suggerimento ripetere i passi da 1 a 4 per installare tutte le unità disco 3 2 Collegamento del cavo Ethernet Per collegare il dispositivo DNS 1550 04 alla rete 1 Collegare un estremità del cavo di rete al connettore di rete RJ45 Fare riferimento alla figura relativa alla vista posteriore del dispositivo DNS 1550 04 2 Collegare l altra estremità del cavo di rete all hub o allo s...

Страница 55: ...avo di alimentazione Per accendere il dispositivo DNS 1550 04 1 Collegare un estremità del cavo di alimentazione al retro dell enclosure DNS 1550 04 e l altra estremità a una presa elettrica 2 Nella parte anteriore del dispositivo DNS 1550 04 premere il pulsante di alimentazione L avvio del dispositivo richiede circa un minuto Al termine dell operazione di avvio Il LED di stato del sistema diventa...

Страница 56: ... per ciascuna due viti per staffa 2 Posizionare il dispositivo DNS 1550 04 nell armadio rack Utilizzare le viti di fissaggio rack fornite dal produttore del rack per fissare le due staffe di montaggio anteriori del dispositivo DNS 1550 04 all armadio rack come illustrato nella figura seguente 3 4 Installazione del dispositivo DNS 1550 04 in un armadio rack Rack Armadio Vite Viti per il fissaggio d...

Страница 57: ...illustrato nella figura seguente 4 Allineare le fessure di regolazione della guida posteriore sinistra ai fori delle viti presenti sul lato sinistro dello chassis del dispositivo DNS 1550 04 come illustrato nella figura seguente Fissare la guida allo chassis utilizzando le viti M5 in dotazione 5 Ripetere l operazione descritta al punto 4 e fissare la guida sul lato destro dell armadio Vite per rac...

Страница 58: ...D Link DNS 1550 04 Quick Installation Guide 58 6 L installazione è stata completata ...

Страница 59: ...eguente per accedere al programma di gestione della configurazione basato su Web 1 Avviare il browser IE7 o versione successiva FireFox 3 o versione successiva Google Chrome 2 Sulla barra degli indirizzi URL digitare l indirizzo IP predefinito ovvero http 192 168 0 32 Verrà visualizzata la schermata di accesso 3 Selezionare Admin e digitare la password predefinita password 4 Selezionare la lingua ...

Страница 60: ... quindi fare clic sul pulsante Next Avanti 4 Selezionare il tipo di archiviazione Data Protection RAID5 Protezione dati RAID5 o Maximum Capacity RAID0 Massima capacità RAID0 quindi fare clic sul pulsante Next Avanti 5 Nella finestra di riepilogo sono visualizzate informazioni generali sul sistema inclusi nome del computer indirizzo IP e tipo di archiviazione Utilizzo della configurazione guidata a...

Страница 61: ...D Link DNS 1550 04 Quick Installation Guide 61 Supporto Tecnico http www dlink it support Supporto Tecnico dal lunedì al venerdì dalle ore 9 00 alle ore 19 00 con orario continuato Telefono 02 87366396 ...

Страница 62: ...62 NOTES ...

Страница 63: ...63 NOTES ...

Страница 64: ...Ver 1 10 EU 2012 04 06 G6102VA8I10M000 ...

Отзывы: