background image

23

D-Link ShareCenter™ 

DNS-320L

 User Manual

Section 3 - Installation

Step.16.-.

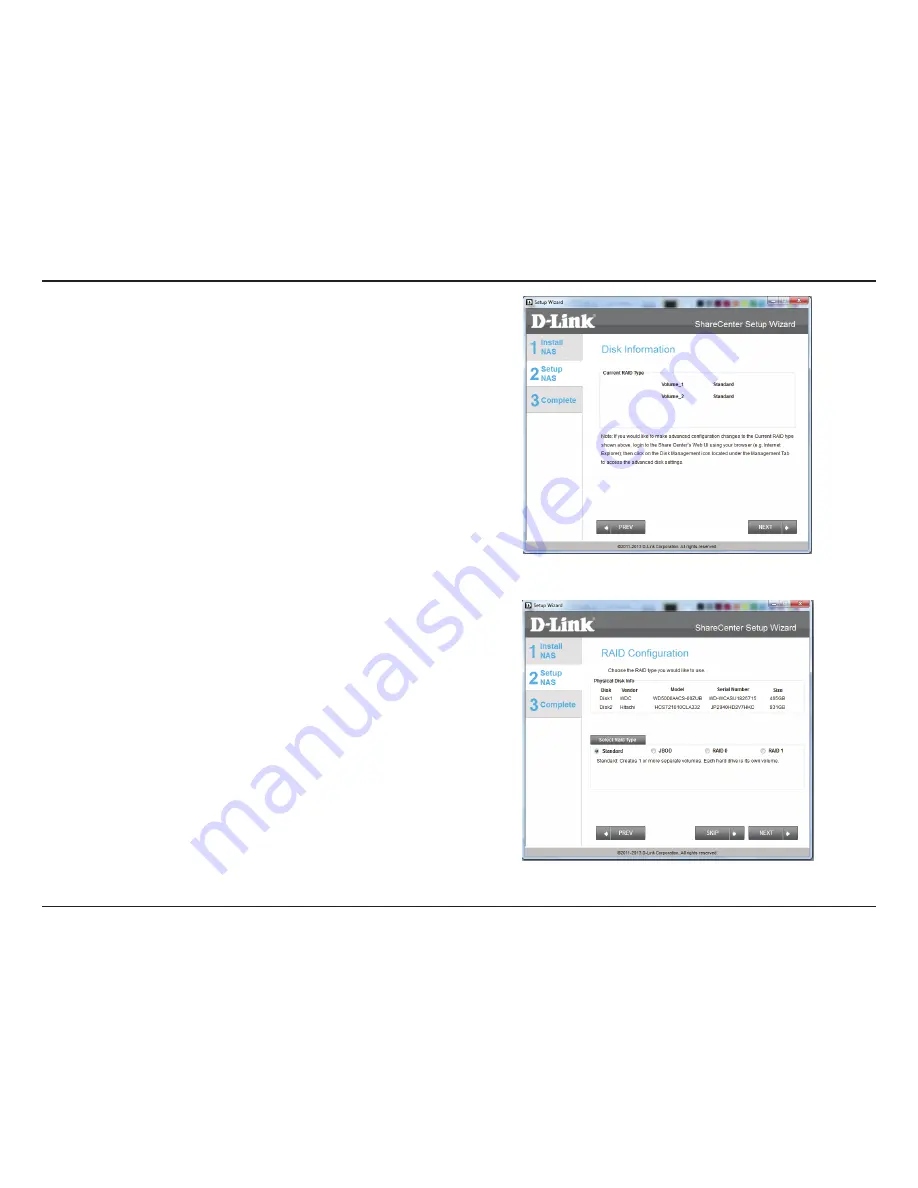
The 

Disk.Information

 window provides the current RAID 

Type. However, if this isn’t already configured, read the instructions 

under the 

Note

Click 

Next

 to continue.

Step.17.-.

The 

RAID.Configuration

 window provides more detailed 

Physical.Disk

 information. Here you can analyse your 

Disk

Vendor,


Model

 number, 

Serial

 number, and 

Disk

 size. Under 

Select.RAID.

Type

, there are four options to choose from. 

Standard,.JBOD,.RAID.

0,.and.RAID.1

. Selecting each one provides a brief description of 

which each 

RAID

 format offers. See illustrations below and check 

the 

Knowledge.Base

 at the back of this manual for more RAID 

descriptions.  Skip this step if you have setup this system before.

By default 

Standard

 is selected.

Содержание ShareCenter DNS-320L

Страница 1: ...Version 1 20 11 13 2013 DNS 320L User Manual ShareCenter 2 Bay Cloud Network Storage Enclosure ...

Страница 2: ...ks of D Link Corporation or its subsidiaries in the United States or other countries All other company or product names mentioned herein are trademarks or registered trademarks of their respective companies Copyright 2013 by D Link Systems Inc All rights reserved This publication may not be reproduced in whole or in part without prior expressed written permission from D Link Systems Inc Revision D...

Страница 3: ...ative methods to Mapping a Drive 51 Mac Setup Wizard Installation 52 Configuration 70 Managing your DNS 320L 70 D Link Storage Utility 71 D Link Storage Utility For Mac 73 Web UI Login 80 Web UI General Layout 81 Home 81 Applications 82 Management 83 Management 84 Setup Wizard Web UI 84 Disk Management 89 Hard Drive Configuration 89 Hard Drive Configuration Wizard 90 JBOD 97 RAID 0 101 RAID 1 107 ...

Страница 4: ...nd LLTD Settings 189 DDNS 190 Port Forwarding 191 Application Management 195 FTP server 195 Block IP List 196 AFP Service 200 NFS Service 200 Multimedia Services 201 UPnP AV Server 206 iTunes Server 207 System Management 208 Language 208 Time and Date 209 Device 210 System Settings 211 Power Management 212 Notifications 214 Email Settings 214 SMS Settings 215 Adding an SMS Service Provider 216 Eve...

Страница 5: ... The Categories 297 My Music The Categories 298 My Music Music on your DNS 320L 299 My Music Playback Music on an Apple device 301 My Music The Player 302 My Music Create a Playlist 303 My Surveillance 305 My Surveillance 313 My Surveillance Live View 314 My Surveillance Live View 315 My Surveillance Single Camera Live Video Mode 316 My Surveillance Full Screen Live Video Mode 317 My Surveillance ...

Страница 6: ...l Backups 377 Time Machine 378 Time Machine On the Mac 379 Time Machine Delete a Volume 386 USB Backups 389 MTP Backups 390 USB Backups 390 MTP Backup Process 391 USB Backup Process 393 P2P Downloads 395 Settings 395 Downloads 396 Amazon S3 397 Creating an AWS Account 398 mydlink 404 mydlink Verification 405 mydlink Java Runtime Machine 407 Creating a New Folder 412 mydlink Settings Details 413 Sh...

Страница 7: ...tal content to compatible media players2 such as those found in D Link s MediaLounge product line This feature is highly convenient as it allows you to turn off a computer that would normally be needed for the same function The availability of four different hard drive modes Standard JBOD RAID 0 RAID1 allows you to choose the configuration best suited to your needs Standard mode creates two separa...

Страница 8: ...with 1Ghz processor 512MB RAM 200MB available space CD ROM drive Internet Explorer version 8 Mozilla Firefox 4 Google Chrome 3 or Apple Safari 4 and above Windows XP with Service Pack 2 Windows Vista Windows 7 Windows 8 Mac OS X 10 5 6 or greater 3 5 SATA Hard Drive s D Link ShareCenter DNS 320L CD ROM with Manual and Software Quick Installation Guide 12VDC 3A Output Power Adapter CAT5E Ethernet C...

Страница 9: ...ptions DHCP Client or Static IP NTP Client Windows 7 Vista x32 64 PnP X LLTD Dynamic DNS Bonjour UPnP Port Forwarding IPv6 Network File Services SupportsWindows XP Vista 7 8 Mac OSX 10 5 Linux clients CIFS SMB for Windows and Mac OS X and Linux NFSv3 Server for Linux and UNIX AFP3 3 for Mac OS X HTTP and HTTP S for web browsers WebDAV File System EXT4 for internal HDD FAT32 NTFS for USB external S...

Страница 10: ... Storage Backup Amazon S3 Download Management HTTP FTP schedule download Peer to peer P2P downloads System Management Support mydlink portal Support D Link Storage Utility Setup Wizard OS Support Windows XP Vista 7 8 and Mac OS X Two access modes supported Open Share mode and Account User mode no setup Account and Password necessary in open mode Support Configuration file save load System Status E...

Страница 11: ...lassification Classify Contents by Photo Music Video and Document Supports iOS Android Built in Applications My Files Web File Server My Photos Photo Center My Music Music Center My Files Access and Manage Copy Move Delete Rename zip unzip Files through Web Browser Open Files on Web Browser or from PC s Default Program Share Files to Social Network Facebook Picasa Flickr Shows File Properties My P...

Страница 12: ...is standard Warning Any pre existing data on the drives will be erased during installation Determining How Much Hard Drive Space you Need In order to protect your data from hard drive failure your DNS 320L requires more space than what you will use for your data sometimes more than double the amount of space required Using a Router or Switch If you are connecting your ShareCenter to a router or sw...

Страница 13: ...ur hard drive s Front Panel The casing of the entire NAS Power Button Press once to power on the ShareCenter Press and hold the button for more than 5 seconds to power it down USB Button Press once to activate USB or press and hold the button for more than 5 seconds to release USB activity Left HDD Right HDD Indicates the position of the drive Left or Right LED Indicators Illuminates blue or red d...

Страница 14: ... On Off Blue Light the USB Storage is connected Blinking Orange transferring data a USB device is being installed or unmounted Orange Light USB storage failed to mount No Light No USB Storage or the device is off HDD On Off Orange Light s the hard drives are faulty No Light s the hard drives are inactive HDD On Off Blue Light s the hard drives are working Blinking Orange Light s the HDD s is writi...

Страница 15: ...good connection and will blink during data transmission If this LED is off check the connection cable to the device you are connecting to The LED on the right will light solid for a Gigabit connection and will remain off when connected to a 10 100 device Power Receptacle Connect the supplied power cord to the receptacle USB Port A single USB 3 0 Type A connector The USB Host port is for Print Serv...

Страница 16: ...ew Bottom Panel COMPONENT DESCRIPTION Product Details Information about the product DNS 320L Serial Number Part Number Manufacturer Number Reset Button Press and hold this button for more than 5 seconds to reset the unit to factory defaults Reset Button Product Details ...

Страница 17: ...e ShareCenter on your local network refer to the steps below or skip to page 17 to run the setup wizard which will show you how to install and configure your DNS 320L Getting Started Hardware Setup Step 1 Remove the top panel by firmly pressing the latch at the back Step 2 Once the faceplate is unlatched pull it off the the device to expose the devices s bays ...

Страница 18: ...ep 4 Insert up to two 3 5 SATA hard drives into the drive bays Note Make sure to align the drive connector to the SATA connector at the back edge inside the drive bay of the ShareCenter Gently push the drive in until it connects When a drive is inserted properly you will feel it set into the connector Some hard drives that are thin or oddly shaped may need to be inserted carefully into position If...

Страница 19: ...nsure the latch is inserted inside the panel Step 6 Connect an Ethernet cable to the Ethernet port This cable should connect the ShareCenter to your local network via arouter switch ordirectlytoacomputerfor configuration cross over cable required Step 7 Connect the power adapter to the power receptacle ...

Страница 20: ...into your CD ROM drive Step 1 When the autorun screen appears click Install Step 2 Select the Language of your choice and then click the Start button Note Windows Firewall presents you with a warning message to unblock the device Click Unblock to give your computer access to the NAS Windows Installation Setup Wizard ...

Страница 21: ...tion 3 Installation Step 3 Follow the instructions to remove the top cover of your ShareCenter Click Next to continue Install the Hard Drives Step 4 Attach the Hard Drives Bracket s to the side of the hard drives as indicated Click Next to continue ...

Страница 22: ...16 D Link ShareCenter DNS 320L User Manual Section 3 Installation Step 5 Slide one or two hard drive into an available hard drive bay of your ShareCenter Click Next to continue ...

Страница 23: ...rd drives installed properly into each bay close the chassis by re attaching the top panel into place Click Next to continue Step 7 Connect a CAT5 Ethernet cable to your ShareCenter and connect the other end to a switch or router Local LAN Click Next to continue Connect to your Network ...

Страница 24: ...hen power on the ShareCenter by pressing the power button located in the front panel Click Next to continue Step9 With the power on press theNext button on the device and check and make sure the IP address of your ShareCenter matches what you see on the screen Note Allow 1 2 minutes for the DNS 320L to be recognized Click Next to continue Power and Device Selection ...

Страница 25: ...19 D Link ShareCenter DNS 320L User Manual Section 3 Installation Step 10 A warning message will appear prompting you to confirm the device Click Yes to proceed Click Next to continue ...

Страница 26: ...If this is the first time you are doing the installation on this NAS leave the password blank Click Next to continue Step 12 In this step you can create a new password for the Admin username It is recommended you set a password however you may also leave the fields blank Click Next to continue Admin Password ...

Страница 27: ...onfigure the IP network settings of the ShareCenter If you select Static IP then enter the IP parameters as listed Click Next to continue You may also use DHCP to configure the IP network settings of the ShareCenter In this situation leave the parameters blank as your router should automatically configure them Click Next to continue ...

Страница 28: ...me that best suits the environment or leave the default workgroup name Click Next to continue Step 15 Configure the System Time Select a Time Zone from the drop down list Click Enable NTP Server and select NTP Server from the drop down list if your network is conected to the internet Set the Date Time settings using the calendar drop down menu Configure the time settings by manually configuring th...

Страница 29: ...more detailed PhysicalDisk information Here you can analyse your Disk Vendor Model number Serial number and Disk size Under Select RAID Type there are four options to choose from Standard JBOD RAID 0 and RAID 1 Selecting each one provides a brief description of which each RAID format offers See illustrations below and check the Knowledge Base at the back of this manual for more RAID descriptions S...

Страница 30: ...24 D Link ShareCenter DNS 320L User Manual Section 3 Installation Step 17 Select JBOD to see your configuration options Step 17 Select RAID 0 to see your configuration options ...

Страница 31: ...o RebuidSettings taballowsyouto enable or disable Auto Rebuild the RAID This is necessary should the RAID fail Note InStep18weresumethesettingswizardusingthe Standard RAID configuration Please see images further down for other configurations Note OnceyouhaveconfiguredtheRAIDofyourchoice skipahead to Step41 Otherwise scroll through this manual to view otherRAID installation options ...

Страница 32: ...26 D Link ShareCenter DNS 320L User Manual Section 3 Installation RAID OPTIONS Standard Step 18 JBOD Step 23 RAID 0 Step 29 RAID 1 Step 35 ...

Страница 33: ...rd RAID or click SKIP to bypass this step Step 19 Map Drive to Network This window makes it possible for you and users on your network to communicate with your NAS directly The MapDrive assigns a letter to eachVolume on your NAS See Mapping a Drive further in the manual for more details Click Next to continue ...

Страница 34: ...28 D Link ShareCenter DNS 320L User Manual Section 3 Installation Onceyouhavecompletedthepreviousstep theWizardautomatically creates mapping drives to your configured Volumes Click Next to continue ...

Страница 35: ...etailed summary of your current configuration If you are satisfied with your configuration click Next or if you want to change your settings click PREV to go back and change your settings Read the details carefully before making your choice Step 21 When you click Next you are prompted to verify your decision before you continue ...

Страница 36: ...hareCenter DNS 320L User Manual Section 3 Installation Step 22 The Wizard software starts the formatting process Initializing formatting and finally Success This completes the Format process Click Next to continue ...

Страница 37: ...guration Select RAID Type choose JBOD Read the JBOD RAID configuration requirements Click Next to continue Step 24 Under JBOD more than one disk is classified as a complete Volume so when mapping a drive only onedriveletterisneeded MapDrivetoNetworkonly shows one drive Click Next to continue ...

Страница 38: ...er Manual Section 3 Installation Step 25 The Volume Configuration Summary displays a detailed summary of JBOD Click Next to continue Step 26 Click Next you are prompted to verify your decision before you continue Click Yes to continue ...

Страница 39: ...33 D Link ShareCenter DNS 320L User Manual Section 3 Installation Step 27 The JBOD is initialized formatted and complete in 3 easy steps Do not click any buttons while this process is ongoing ...

Страница 40: ...ink ShareCenter DNS 320L User Manual Section 3 Installation Step 28 To verify your JBOD login to your NAS go toManagement DiskManagement andHardDrive Configuration This shows the current status of your drives ...

Страница 41: ...k Next to continue Step 30 With RAID 0 the two drives are striped into oneVolume makingitappearthatyouhaveonedrive Map Drive to Network indicates that the NAS has separated the drive into 2 Volumes To explain if the size of the two drives are different the spare drive space will be formatted as a JBOD volume It is better to have drives of the same sizes Click Next to continue ...

Страница 42: ...L User Manual Section 3 Installation Step 31 The Volume Configuration Summary displays the details of the new configuration Click Next to continue Step 32 Verify your configuration selection before continuing Click Yes to continue ...

Страница 43: ...37 D Link ShareCenter DNS 320L User Manual Section 3 Installation Step 33 The RAID 0 is initialized formatted and complete in 3 easy steps Do not click any buttons while this process is ongoing ...

Страница 44: ... ShareCenter DNS 320L User Manual Section 3 Installation Step 34 To verify your RAID 0 login to your NAS go to Management Disk Management and Hard Drive Configuration This shows the current status of your drives ...

Страница 45: ...ead the RAID 1 configuration requirements Click Next to continue Step 36 With RAID 1 the drives are mirrored for redundancy MapDrivetoNetworkindicatesthatthe NAS has separated the drive into a RAID array Note If the size of these two drives are different the spare drive space will be formatted as JBOD Volume Click Next to continue ...

Страница 46: ...L User Manual Section 3 Installation Step 37 The Volume Configuration Summary displays the details of the new configuration Click Next to continue Step 38 Verify your configuration selection before continuing Click Yes to continue ...

Страница 47: ...41 D Link ShareCenter DNS 320L User Manual Section 3 Installation Step 39 The RAID 1 is initialized formatted and complete in 3 easy steps Do not click any buttons while this process is ongoing ...

Страница 48: ... ShareCenter DNS 320L User Manual Section 3 Installation Step 40 To verify your RAID 1 login to your NAS go to Management Disk Management and Hard Drive Configuration This shows the current status of your drives ...

Страница 49: ...llation Connecting to the mydlink Step 41 D Link has provided a mydlink service that allows you to remotely access the files from your NAS through the mydlink portal Read the installation instructions and wait for the process to complete Click Next to continue ...

Страница 50: ...onnects you to the mydlink servers and configures your cloud service Click Next to continue Step 43 When the wizard fails to connects you to the mydlink servers and configures your cloud service the following screen appears to warn you of your network configuration Click Next to continue ...

Страница 51: ...ink account Enter your email address and password Click Next to continue Step 45 Alternatively you can create a new account if you select No I need to sign up for a new account Enter your email address and a password that you can remember Then retype the password enter a First Name and a Last Name Then click the checkbox that reads I accept the mydlink terms and conditions Click Next to continue ...

Страница 52: ...46 D Link ShareCenter DNS 320L User Manual Section 3 Installation Step46 A message appears asking you to verify your email address and account Click OK to continue ...

Страница 53: ...puter icon Ifyoudidnotusethewizardtomapthedrives youcanmanuallymap or access the created volumes through your computers operating system Detailed configurations using theWeb UI is explained in the configuration section of this manual Step 47 The mydlink section of the wizard installation is complete The wizard provides you with a mydlink number You can also tick the Add mydlink to My Favorites che...

Страница 54: ...dows key and the letter E on your keyboard at the same time The right side panel displays a list of your hard drives removable storage and network locations If you do not have any network locations thismaybethefirsttimeyousetupanetworkdrive Begin by clicking on Map Network Drive Step2 TheMapNetworkDrivescreenappears ChooseaDriveletter click Browse to find your network ...

Страница 55: ...tion 3 Installation Step 3 Windows will automatically detect all devices on your network including your ShareCenter Step 4 Click on your ShareCenter to see the volumes you created earlier Then select the volume that you wish to access and click OK ...

Страница 56: ... DNS 320L User Manual Section 3 Installation Step 5 After selecting your volume click Finish to proceed Step6 The drive will then appear in yourWindows Explorer under Network This means the drive is active and ready for use ...

Страница 57: ... 320L is discovered in the Storage Utility and the LAN configuration settings are complete finding the drives happens automatically Select the drive letter and click Connect To disconnect the drive click the Disconnect button Another method is using the Setup Wizard As you go through the Setup Wizard process there is a step in the process to map the drive See the image here ...

Страница 58: ... Manual Section 3 Installation Mac Setup Wizard Installation To run the Setup Wizard insert the ShareCenter CD into your CD ROM drive Step 2 Double click the SetupWizardDNS icon Step1 Whentheautorunscreenappears double click the dmg file ...

Страница 59: ...l Section 3 Installation Step 3 Click Start to begin the wizard Step4 Follow the instructions on the screen Pull the Top out and click Next Click Previous if you want to go back and make changes to any parts of your past configuration options ...

Страница 60: ...r DNS 320L User Manual Section 3 Installation Step 5 Follow the instructions on the screen Attach the Hard Drive Bracket s and click Next Step 6 Follow the instructions on the screen Install the Hard Drive s and click Next ...

Страница 61: ...eCenter DNS 320L User Manual Section 3 Installation Step 7 Follow the instructions on the screen Attach the Faceplate and click Next Step 8 Follow the instructions on the screen Connect to your Network and click Next ...

Страница 62: ...ation Step 9 Follow the instructions on the screen Power on the NAS and click Next Step 10 Return to the DNS 320L on your desktop and click the device if you see it onscreen Alternatively if you do not see the DNS 320L check the settings as explained previously ...

Страница 63: ...ge appears Read the instructions before proceeding If all is working click Yes Otherwise click No and check your set up again Step 12 Enter an admin Password If you have setup this system before use the password you used before Otherwise leave the password field blank Click Next to continue ...

Страница 64: ...password from a previous installation a warning message prompts you to relog in Click OK to continue Step 14 Create a new password and verify that passwordbyfillingintheConfirmPasswordfield Click Next Click Previous if you want to go back and make changes to any parts of your past configuration options ...

Страница 65: ...gures the Device IP and click Next Click Previous if you want to go back and make changes to any parts of your past configuration options Step 16 To configure the Device IP select either DHCP or Static IP In this window we select Static IP you manually configure the Device IP and click Next Click Previous if you want to go back and make changes to any parts of your past configuration options ...

Страница 66: ...go back and make changes to any parts of your past configuration options Step 18 To configure the System Time select a Time Zone from the drop down list Click Enable NTP Server if you are connected to one Select a NTP server from the drop down list Enter a Date and Time manually or click Set time from my computer Click Next Click Previous if you want to go back and make changes to any parts of you...

Страница 67: ...igure RAID select one of the RAID Types from the list Standard JBOD RAID 0 and RAID 1 Selecting each one provides a brief description of which each RAID format offers See illustrations below and check the Knowledge Base at the back of this manual for more RAID descriptions Skip this step if you have setup this system before Click Next Click Previous if you want to go back and make changes to any p...

Страница 68: ...our settings Click Next Click Previous if you want to go back and make changes to any parts of your past configuration options Step 22 Before the RAID configuration is set a warning message appears to inform you that all data will be erased Click Next Click Previous if you want to go back and make changes to any parts of your past configuration options ...

Страница 69: ...rmat begins Click Next Click Previous if you want to go back and make changes to any parts of your past configuration options Step 24 The formated process is successful Click Next Click Previous if you want to go back and make changes to any parts of your past configuration options ...

Страница 70: ...te Click Next Click Previous if you want to go back and make changes to any parts of your past configuration options Step 26 Setup the mydlink administration Click Next to view the next screen Click Previous if you want to go back and make changes to any parts of your past configuration options ...

Страница 71: ...u want to go back and make changes to any parts of your past configuration options Step 28 If you are unable to connect to the mydlink registration site a warning message notifies you of an unsuccessful connection Click OK to continue Check your connection settings or your NAS settings Click Previous if you want to go back and make changes to any parts of your past configuration options ...

Страница 72: ...your email address and password Click Next to view the next screen Click Previous if you want to go back and make changes to any parts of your past configuration options Step 30 Alternatively you can create a new account if you select No I need to sign up for a new account Enter your email address and a password that you can remember Then retype the password enter a First Name and a Last Name Then...

Страница 73: ...nd account Click OK to continue Step 32 The mydlink section of the wizard installation is complete The wizard provides you with a mydlink number You can also tick the Add mydlink to My Favorites checkbox or Save a shortcut to mydlink on my computer checkbox You can use this mydlink number for future reference Click Finish to continue ...

Страница 74: ...68 D Link ShareCenter DNS 320L User Manual Section 3 Installation Step 33 The setup is complete Click Finish Step 34 You can now view the DNS 320L in the Finder on the left panel ...

Страница 75: ...69 D Link ShareCenter DNS 320L User Manual Section 3 Installation Step 35 Click the icon to view contents on your NAS ...

Страница 76: ...e and system settings Also allows you to control power notifications view logs do firmware upgrades and manage USB devices System Status Displays system and hard drive information along with resource monitoring SECTION OPTION DESCRIPTION Applications FTP HTTP Downloads Configure FTP and HTTP download settings Remote Backup Configure remote backup services Local Backups Configures local backups Tim...

Страница 77: ...ftware included on the product CD to locate the device on your network and make any necessary changes D Link Storage Utility Network Storage Device The D Link Storage Utility displays any ShareCenter devices it detects on the network here Refresh Click Refresh to refresh the device list Configuration ClickConfigurationtoaccesstheWebbasedconfiguration of the ShareCenter LAN Configure the LAN Settin...

Страница 78: ... and direct it to the IP address listed for the device Make sure the browser is not configured to use a proxy server Note The computer used to access the ShareCenter web based configuration manager must be on the same subnet as the ShareCenter If your network is using a DHCP server and the computer receives IP settings from DHCP server the ShareCenter will automatically be in the same subnet ...

Страница 79: ...torage Utility For Mac Step1 To get started with the ShareCenter Storage Utility for Mac insert the supplied CD into your CD ROM drive Double click the dmg file 1 Step2 Double click the dmg file to install the program In the end you should have the D link Storage Utility for Mac ...

Страница 80: ...NS 320L User Manual Section 2 Getting Started Step 3 This opens the D Link Storage Utility Step 4 Make sure you are connected to your local LAN Click the Refresh button The D Link Storage Utility displays the D Link DNS 320L ...

Страница 81: ... Utility now shows the DNS 320L the LAN configuration toggle between DHCP and manual and the Volume details Use the drop down list to configure your LAN settings and click Apply Step 6 To configure the NAS click the configuration button This opens your default browser Log in and configure ...

Страница 82: ...76 D Link ShareCenter DNS 320L User Manual Section 2 Getting Started Step 7 To map the NAS volume select a Volume from the list then click the Connect button ...

Страница 83: ...77 D Link ShareCenter DNS 320L User Manual Section 2 Getting Started Step8 TheLog inwindowappears SelectGuestorRegistered User Step 9 Enter a username and password for the DNS 320L and click Connect ...

Страница 84: ...op up window appears notifying you that mapping the drive was a success Click OK to continue Use the Disconnect button to disconnect from the mapped drive s Step 11 Finder now opens the drive and displays the DNS 320L under the Shared column on the left and the Volumes on the right ...

Страница 85: ...79 D Link ShareCenter DNS 320L User Manual Section 2 Getting Started Step 12 When you click the About button it displays the software version number This comes in handy when updating to a new version ...

Страница 86: ...the ShareCenter If your network is using a DHCP server and the computer receives IP settings from the DHCP the ShareCenter will automatically be in the same subnet To access the Web UI open the D Link Storage utility select DNS 320L from the Network Storage Device list then click the Configuration button Select System Administrator and enter the password created during the Setup Wizard Click Login...

Страница 87: ...ink ShareCenter DNS 320L User Manual Section 4 Configuration After logging in the ShareCenter Home tab will appear You will see the Applications and Management tabs alongside of it Web UI General Layout Home ...

Страница 88: ...er DNS 320L User Manual Section 4 Configuration Applications The Applications tab contains FTP HTTP Downloads Remote Backups Local Backups P2P Downloads My Files and Amazon S3 icons Click on each icon to see the submenus ...

Страница 89: ...Manual Section 4 Configuration Management The Management tab contains the Setup Wizard Disk Management Account Management Network Management Application Management System Management and Status icons Click on each icon to see the submenus ...

Страница 90: ...Wizard Web UI The ShareCenter has a Setup Wizard that allows you to quickly configure some of the basic device settings Click the Setup Wizard icon to start the Setup Wizard Step 1 Click the RunWizard button to start the setup wizard Step 2 Click Next to continue Management ...

Страница 91: ...e the administrator account password here and confirm the password or leave it blank Click Next to continue Step 4 Set the time zone from the drop down menu to the appropriate geographical zone closest to your location Click Next to continue or click Skip to ignore these settings ...

Страница 92: ...Mask Enter the subnet mask of your network Gateway IP Address Enter the IP address of your gateway usually the local IP of your router DNS Servers Enter the IP address es of your DNS server s DNS1 is usually the IP address of your router Click Next to continue or click Skip to ignore these settings Step 6 Here you can assign a workgroup and name to the ShareCenter with a short description Click Ne...

Страница 93: ... provided to receive Event Alerts from the ShareCenter Click the button to test your settings Click Next to continue or click Skip to ignore these settings Step 8 Click Anonymous to create a random account with no specificsettings ClicktheTestEmailbuttontotestyoursettings Click Next to continue or click Skip to ignore these settings ...

Страница 94: ... Section 4 Configuration Step 9 Click the Previous button to go back and check your settings If you are satisfied with the settings click the Finish button to save and complete the wizard Click Exit to end the wizard without saving the settings ...

Страница 95: ...ere Set RAID type and Reformat Click on this button to launch a wizard that allows you to select the RAID configuration and format the drives Auto Rebuild Configuration If you have chosen RAID 1 as the configuration option then set the Auto Rebuild function here using the radio buttons Enable Auto Rebuild Enabling Auto Rebuild will rebuild a failed RAID 1 drive when a new drive has replaced the de...

Страница 96: ...D configuration under Current RAID Type Click Set RAID Type and Re Format When you click on the Set RAID type and Re Format button in the Disk Management Hard Drive Configuration menu a wizard will start allowing you to format your drives and create the volume RAID format The following is an example of a standard volume configuration The Setup Wizard begins ...

Страница 97: ...formation page displays all of the hard drives on the DNS 320L It shows the array number vendor model serial number and drive capacity Click Next to continue Select the format you want by clicking on the RAID type box highlight in blue In this example it is Standard Click Next to continue ...

Страница 98: ...Configuration Step3showstheVolumeConfigurationSummary theVolume Name Disk Type File System Disk Size and Disk Click Format to continue A warning message will appear to inform you that all volumes and data will be formatted and erased Click Yes to continue ...

Страница 99: ...begin Pleasebepatientwhilethisprocess takes place Do not turn off your NAS during this process Once the partition is completed the system initializes and format of the first drive starts Do not turn off your NAS during this process Ifyouwouldliketochangeyoursettingsatthisstage clickExit ...

Страница 100: ...r Manual Section 4 Configuration The wizard starts to format the first Volume Ifyouwouldliketochangeyoursettingsatthisstage clickExit The wizard starts to format the second Volume Ifyouwouldliketochangeyoursettingsatthisstage clickExit ...

Страница 101: ... all of the changes made Please be patient during this process Do not turn off your NAS during this process The wizard is now complete It shows the Volume number s filesystemselected thetypeofRAID andthediskformation in the RAID Click Finish to complete the process and start using your DNS 320L ...

Страница 102: ...96 D Link ShareCenter DNS 320L User Manual Section 4 Configuration On completion you are redirected back to the main Disk Management GUI ...

Страница 103: ...ate a single volume from all of the drives Click Next to continue Step 3 displays the Volume Configuration Summary before enabling JBOD On display is the Volume Name the Type JBOD the File System the size of the combined drive and the Disks participating in the JBOD Click Format to continue ...

Страница 104: ...98 D Link ShareCenter DNS 320L User Manual Section 4 Configuration A warning messege appears indicating that you will format the disk Click Yes to continue The Wizard starts to partition the drive ...

Страница 105: ...99 D Link ShareCenter DNS 320L User Manual Section 4 Configuration The Wizard formats the first Volume Click Exit to stop this process The Wizard updates the system ...

Страница 106: ...100 D Link ShareCenter DNS 320L User Manual Section 4 Configuration Setup is complete Click Finish to continue The Wizard automatically returns to the main screen and displays the JBOD ...

Страница 107: ...101 D Link ShareCenter DNS 320L User Manual Section 4 Configuration RAID 0 Start the Wizard Step 1 displays your current Physical Disk Information ...

Страница 108: ... Click Next to continue RAID Size Settings allows you to tweak the size of the RAID Volume Use the slider to change the RAID size or enter an amount in the field provided Click the Configure the remaining disk space as JBOD if you wish to use the remaining space for another RAID configuration Click Next to continue ...

Страница 109: ...enter DNS 320L User Manual Section 4 Configuration You can also deselect the Configure the remaining disk space as JBOD Click Next to continue Step 3 it displays the Volume Configuration Summary Click Format to continue ...

Страница 110: ...ShareCenter DNS 320L User Manual Section 4 Configuration A pop up screen displays a warning message that your disk will be formatted Click Yes to continue Step 4 the Wizard starts to format and partition the drive ...

Страница 111: ...ink ShareCenter DNS 320L User Manual Section 4 Configuration Step 5 the Wizard updates the system Step 6 the Wizard and Setup is complete View the Volume Name File System Mode and Disk Click Finish to continue ...

Страница 112: ...106 D Link ShareCenter DNS 320L User Manual Section 4 Configuration ThewizardreturnsyoutomainHardwareConfigurationpage Under Current RAID Type you can view your changes ...

Страница 113: ...107 D Link ShareCenter DNS 320L User Manual Section 4 Configuration RAID 1 The Hard Drive Configuration Wizard starts Click Next to continue View the Physical Disk Information Click Next to continue ...

Страница 114: ...xt to continue RAID Size Settings allows you to tweak the size of the RAID Volume Use the slider to change the RAID size or enter an amount in the field provided Click the Configure the remaining disk space as JBOD if you wish to use the remaining space for another RAID configuration Click Next to continue ...

Страница 115: ...it has been replaced with a new one Select Disable Auto Rebuild if you want to start the rebuild process manually after replacing a failed drive Click Next to continue The Volume Configuration Summary shows details on all of the configured drives Check the details on the list and click Format to continue or click Previous to make changes ...

Страница 116: ...nual Section 4 Configuration A pop up screen displays a warning message that your disk will be formatted Click Yes to continue Partitioningwillnowbegin Pleasebepatientwhilethisprocess takes place Do not turn off your NAS during this process ...

Страница 117: ...111 D Link ShareCenter DNS 320L User Manual Section 4 Configuration The system formats the Volume Ifyouwouldliketochangeyoursettingsatthisstage clickExit The system updates ...

Страница 118: ... User Manual Section 4 Configuration Setup is complete Setup provides a Volume Name File System and Mode Onceyouhavecompletedthewizard ShareCenter willreturn to the main screen The RAID 1 configuration you just set will be displayed ...

Страница 119: ...ndard mode to RAID 1 without shutting down the DNS 320L Standard Mode doesn t offer any redundancy and security of data It is best then to migrate from Standard Mode to RAID 1 To do this follow these instructions Step 1 Insert a second hard drive into the DNS 320L Step 2 Check the second HDD LED status If the HDD LED is blinking pleasewaitfortheblinkingtostopbeforeproceeding ...

Страница 120: ... Format or Format the new drive as Standard type If you select the latter option your Hard Drive Configuration Wizard shows six procedures but if you select the Set RAID Type and Re Format the Hard Drive Configuration Wizard only has four procedures Take a look at the two images below to compare Click Next to continue Format the new drive as Standard type Set RAID Type and Re Format ...

Страница 121: ...rovides the slot location vendor model number serial number and disk size Just below this informational box is a checkbox that offers you the option to Reconfigure the drive to RAID 1 Click the checkbox to proceed Click Next to continue Step 5 Under Auto Rebuild Settings select whether you want to enable auto rebuild or disable auto rebuild Click Next to continue ...

Страница 122: ...ion 4 Configuration Step 6 A warning message will appear prompting you to confirm whether you want to format your hard drive Click Yes to continue or No to exit Click Next to continue Step 7 The software communicates with the hardware to build a list ...

Страница 123: ...117 D Link ShareCenter DNS 320L User Manual Section 4 Configuration Step 8 The Wizard formats the hard drive Click Next to continue Step 9 The System updates Click Next to continue ...

Страница 124: ...User Manual Section 4 Configuration Step 10 Setup is completed when it shows final information on the slot vendor model number and serial number Click Finish to continue Step 11 The wizard returns to the main Hard Drive Configuration ...

Страница 125: ...hareCenter DNS 320L User Manual Section 4 Configuration Step 12 In this example the current RAID type is RAID 1 Degraded Step 13 Select Auto Rebuild Configuration then click Manually Rebuild Now to rebuild the RAID ...

Страница 126: ...uration Step 14 The DNS 320L wizard starts to rebuild the RAID and both HDD LED s blink during this rebuild process Note The rebuild duration is dependant on the size of hard drive Step 15 Once the RAID process is finished the Current RAID Type changes to RAID 1 ...

Страница 127: ... results are displayed as Passed Failed on the web UI and can also be sent as an e mail alert The ExtendedTest requires a lot more time to complete However it is a more thorough when compared to the Quick Test A warning message will prompt you to stop all services and network activity Click Yes to continue the Quick S M A R T test The test will run and a percentage completed will display under the...

Страница 128: ...122 D Link ShareCenter DNS 320L User Manual Section 4 Configuration When the test is complete the results will be displayed in the Result column ...

Страница 129: ... disks volumes to run the test on Under Schedule select the period Daily Weekly Monthly and then select the time from the drop down menu Click Create To view the Schedule List click on the Schedule List arrow A new table will appear showing details of the new schedule created To delete a schedule click on the Trash Can ...

Страница 130: ...sk Scan Disk provides a method to test the disk s file system on your ShareCenter Scan Disk scans your disks file system for errors and or corruption Click Management Disk Management and then Scan Disk Select the volume from the drop down list you wish to scan Click Scan Disk ...

Страница 131: ...allservices hard drive and network activity Click Yes to proceed or No to cancel The DNS 320L will initialize the volume s and begin scanning Please wait while the software scans the volume s or click Exit to cancel the scan Whenthescaniscomplete thetablewilleitherdisplaySuccess or Failure Click Finish to exit ...

Страница 132: ... to 256 users and 32 groups can be created By default all users have read and write access to all folders However access rules can be created and edited in the Network Shares menu Click Management Account Management Click Users Groups on the left side and then click Create The User Setup Wizard will appear Click Next to continue Creating a Single User Users Groups ...

Страница 133: ...areCenter DNS 320L User Manual Section 4 Configuration Step 1 Select Create A New User Account and then click Next to continue Step 2 Enter the user name and password for the new user and then click Next to continue ...

Страница 134: ...0L User Manual Section 4 Configuration Step 3 Add the user to a group by clicking the Group checkbox Click Next to continue Step 4 Select the network share settings Select Read Only Read Write or Deny Access Click Next to continue ...

Страница 135: ...fault CIFS is short for Common Internet File System AFP is short for Apple Filing Protocol FTP is short for File Transfer Protocol WebDAV is short for Web based Distribution Authoring and Versioning Click Next to continue Select the volumes the user can have WebDAV access to and then select whether to give Read Only or Read Write rights Click Next to continue ...

Страница 136: ...e amount of disk space you wish to assign the user on each volume Enter zero to provide unlimited disk space to the user Click Next to continue Step 6 The final step is a summary of all the configurations you made Click Finish to accept the changes or click Exit to cancel the changes ...

Страница 137: ...e Step 2 Enter the following information Enter a username Enter the account prefix The Account Prefix is a starting number Eg 1 no alphabet letters are allowed you select for the user list Entertheamount ofusers youwanttocreate Nexttotheinput field is the remaining amount of users you can add to the NAS Enter a password and confirm it Click Next to continue ...

Страница 138: ...L User Manual Section 4 Configuration Step 3 Add the user s to a group by clicking the Group checkbox Click Next to continue Step 4 Select the network share settings Select Read Only Read Write or Deny Access Click Next to continue ...

Страница 139: ... s Select FTP CIFS and AFP are set as default CIFS is short for Common Internet File System FTP is short for File Transfer Protocol Click Next to continue Step 5 Enter the amount of disk space you wish to assign the user s on each volume Type 0 to provide unlimited disk space to the user s Click Next to continue ...

Страница 140: ...r Manual Section 4 Configuration Step 6 The final step is a summary of all the configurations you made Click Finish to accept the changes or click Exit to cancel the changes The User Settings window will show a list of the users created ...

Страница 141: ... DNS 320L User Manual Section 4 Configuration Modify Users Step 1 Click the user you wish to modify The user will be highlighted in red Click Modify to continue Step 2 The User Setup Wizard will appear Click Next to continue ...

Страница 142: ...136 D Link ShareCenter DNS 320L User Manual Section 4 Configuration Step 3 Change the username or password Click Next to continue Step 4 Change the Network Share Settings Click Next to continue ...

Страница 143: ...limited disk space to the user Click Next to continue Step 5 Assign Privileges Access Methods for the user Select either FTP or WebDAV CIFS and AFP are set as default CIFS is short for Common Internet File System AFP is short for Apple Filing Protocol FTP is short for File Transfer Protocol WebDAV is short for Web based Distribution Authoring and Versioning Click Next to continue ...

Страница 144: ...figuration Step 7 The final step is a summary of all the configurations you made Click Finish to accept the changes or Exit to cancel the changes Step 8 A message will appear stating the user details have been changed successfully Click Yes to exit the wizard ...

Страница 145: ...figuration Deleting Users Step 1 Click the user you wish to delete The user will be highlighted in red Click Delete to continue Step 2 A message will appear prompting you to confirm deleting the user Click Yes to confirm The user is now removed from the list ...

Страница 146: ...0 D Link ShareCenter DNS 320L User Manual Section 4 Configuration Importing Users Step 1 Click Account Management Users Groups Import Users Step 2 The Import Users Wizard will start Click Next to continue ...

Страница 147: ...ared folder ro shared folder deny user quota Ex staff3 staff3 Group_Staff2 Folder_RW1 100 Note You must create the user groups and share folders first before importing the users file Check the Overwrite Duplicate Accounts box if this is necessary Click Browse to select the file you want to import Click Next to continue Step 4 Assign the privileges and access methods Click Next to continue ...

Страница 148: ... If there are problems with the user list the wizard will show the errors in red on the table Click Finish to close the wizard or go back to change the imported file Click the i icon to see details of each user Each user s details are provided in a list according to username group name read write priveledges or access control ...

Страница 149: ...4 Configuration Creating a Group Step 1 Click Account Management Users Groups Click the blue arrow next to Group Settings and settings window will appear Click New to create a new Group Step 2 The Group Setup Wizard will now start Click Next to continue ...

Страница 150: ...ShareCenter DNS 320L User Manual Section 4 Configuration Step 3 Enter a Group Name Click Next to continue Step 4 Click the checkbox to select the user s you wish to add to the group and then click Next to continue ...

Страница 151: ...lect the Network Share Settings read read write deny access for the corresponding disk volume for the group Click Next to continue Step 6 Select the Privileges Access Methods you want to assign to the group The greyed out selections are assigned by default Click Next to continue ...

Страница 152: ...ion 4 Configuration Step 7 Select the appropriate WebDAV settings and click Next to continue Step 8 Enter the amount of space you want to assign to the group for each volume Enter zero to give unlimited disk space to the group Click Next to continue ...

Страница 153: ...on 4 Configuration Step 9 The wizard is now complete The last step shows a summary of the group you created Click Previous to change your settings or Finish to end the wizard Step 10 Under Group Settings a table will display the group you just created ...

Страница 154: ...Modifying a Group Step 1 Click Account Management Users Groups Click the blue arrow next to Group Settings and the Group Settings table will appear Step 2 Select the group you want to modify Your selection will turn red Click Modify to change the settings for the Group ...

Страница 155: ...k ShareCenter DNS 320L User Manual Section 4 Configuration Step 3 The Group Setup Wizard will now start Click Next to continue Step 4 Make the necessary modifications to the group and then click Next to continue ...

Страница 156: ...iate Network Share Settings read read write deny access for the corresponding disk volume for the group Click Next to continue Step 6 Select the appropriate privileges you want to assign to the group The greyed out selections are assigned by default and cannot be modified Click Next to continue ...

Страница 157: ...ration Step 7 Select either Read Only or Read Write priviledges for WebDav Settings Click Next to continue Step 8 Edit the amount of space you want to assign to the group for each volume Enter zero to give unlimited disk space to the group Click Next to continue ...

Страница 158: ...152 D Link ShareCenter DNS 320L User Manual Section 4 Configuration Step 9 When editing the quota make sure the size is not smaller than the user quota on his her account Click Yes to change the quota ...

Страница 159: ...DNS 320L User Manual Section 4 Configuration Step9 Thewizardisnowcompleteandwilldisplayasummary of the group you edited Click Previous to change your settings or Finish to end the wizard Exit will cancel all changes you made ...

Страница 160: ...ction 4 Configuration Deleting a Group Step 1 Select the Group you want to delete and click Delete Step 2 A warning message will appear asking you to verify if you want to delete the Group Click Yes to delete the Group or No to cancel your decision ...

Страница 161: ... will limit the amount of storage allocated By default users and groups do not have a quota Click Account Management and then Quotas on the left side Click Enable to activate Quota Settings The status will now display Started notifying you that the Quota Settings are enabled To Modify a User s Quota Settings click the blue arrow next to User Quota Settings to reveal a table of users ...

Страница 162: ...tion SelecttheUseryouwanttomodify Yourselectionwillturnred Click Modify to change the user s settings The Quota Settings configuration box will display the user account you want to modify Enter a new quota amount for each volume Click Apply to confirm your settings ...

Страница 163: ...er DNS 320L User Manual Section 4 Configuration The modified quota settings will be displayed in the table For Group Quota Settings click the blue drop down arrow next to Group Quota Settings to view the group quota table ...

Страница 164: ...ion 4 Configuration Select the group you want to modify Your selection will turn red Click Modify The Group Quota Settings screen will display the group you want to modify Enter a new quota amount for each volume for the current group and click Apply ...

Страница 165: ...159 D Link ShareCenter DNS 320L User Manual Section 4 Configuration The modified quota settings will be displayed in the table ...

Страница 166: ... the user to add modify and remove both new and existing Network Share and ISO Mount Share Settings To add a rule click on theNew button To modify an existing rule click on the Modify button To remove a rule click on the Delete button To select a rule simply click on the rule Your selection will turn red indicating it is selected for use At the bottom of the table the user can navigate throughpage...

Страница 167: ...tton An easy to configure wizard will launch Step 1 This window welcomes the user to the setup wizard for creating a new network share In this wizard the user will be able to 1 Select share folders 2 Configure shared folder access rights 3 Configure network access settings 4 View a summary of the configuration before completing Click Next to continue Step 2 Select the Share Folder from one of the ...

Страница 168: ...access to this folder to all the accounts Select Specific User Group to only allow certain users or groups access to this folder Click Next to continue Step 4 Select the appropriate access rights for the share Options to select from are Read Only Read Write and Deny Access This procedure can also be used to block certain users from accessing certain folders Click Next to continue ...

Страница 169: ...cUser GroupinStep3 thenthis stepallowsyoutosettheaccessrightsforeachUserconfigured on the ShareCenter Click Next to continue Step 6 If you selected Specific user Group in Step 3 then this step allows you to set the access rights for each Group configured on the ShareCenter Click Next to continue ...

Страница 170: ...clients These guarantees inform the Client that a file s content will not be allowed to be changed by the server orifsomechangeisimminent theclientwillbenotifiedbefore the change is allowed to proceed Oplocks are designed to increase network performance when it comes to network file sharing However it is recommended to set the share oplocks to No off when using file based database applications Whe...

Страница 171: ...ccess this share Options to choose from are FTP NFS and WebDAV CIFS and AFP are set as default CIFS is short for Common Internet File System AFP is short for Apple Filing Protocol FTP is short for File Transfer Protocol NFS is short for Network File System WebDAV is short for Web based Distributed Authoring and Versioning Click Next to continue ...

Страница 172: ...us Read Write Full Access Click Next to continue If you checked NFS as an access method to your network share then this step allows you to set the parameters below Host Allowable host address that can access using NFS indicates all hosts Root Squash Disables writing to the Root owned directories and files on the system when the user has root access privileges Write provide write permission to the ...

Страница 173: ...nual Section 4 Configuration If you checked WebDAV as an access method then this step will allow you to set the access parameters Click Next to continue Step10 Hereasummaryofthecreatedshareswillbedisplayed Click Finish to save your settings ...

Страница 174: ...guration Deleting a Network Share Select the Network Share you wish to delete Your selection will turn red Click Delete to remove the share A warning message will appear prompting you to verify if you wish to delete the Share Click Yes to delete or No to Cancel ...

Страница 175: ...169 D Link ShareCenter DNS 320L User Manual Section 4 Configuration The deleted Share will be removed from the Network Share List ...

Страница 176: ...eCenter DNS 320L User Manual Section 4 Configuration Resetting the Network Shares Click the Reset Network Shares button A warning message will prompt you to confirm your selection Click Yes to confirm or No to cancel ...

Страница 177: ... following section will describe how to add a new ISO mount on the ShareCenter To add an ISO Mount click on the New button An easy to configure wizard will launch Click Next to continue Select the ISO file to mount Check the box to the left of the iso file to select it and click Next to continue ...

Страница 178: ...SO Mount share read deny privileges to all users Select Specific User Group in order to assign read deny privileges to individual users and groups Click Next to continue You can assign Read Only or Deny Access privileges to the ISO Mount share here Click on the appropriate radio button for the privileges you would like to assign Click Next to continue ...

Страница 179: ...s that a user can use to access this share Options to choose from are FTP NFS and WebDAV CIFS and AFP are set as default CIFS is short for Common Internet File System AFP is short for Apple Filing Protocol FTP is short for File Transfer Protocol NFS is short for Network File System WebDAV is short for Web based Distributed Authoring and Versioning Click Next to continue ...

Страница 180: ...tion 4 Configuration A summary of the share will be displayed Click on the Finish button to accept the change and complete the wizard Through the D Link Storage Utility the ISO Mount Share can now be mapped to your computer as a normal network share ...

Страница 181: ...nfiguration Creating an ISO Image The following section will describe how to create an ISO image from your NAS export the data out to your PC Click Account Management Network Shares ISO Mount Share Settings Click on the Create ISO Image button at the bottom ...

Страница 182: ...nter DNS 320L User Manual Section 4 Configuration ISO image Creation Wizard The ISO image wizard helps you create an ISO image on your ShareCenter ReadtheinstructionsfortheISOImageCreationWizardandthenclickNexttocontinue ...

Страница 183: ...mage Size choices CDROM 650MB 74MIN This creates an ISO file 650MB in size ready for burning onto a CDROM at a later stage DVD5 4 7GB This creates an ISO file 4 7GB in size ready for burning onto a single layer DVD at a later stage DVD9 8 5GB This creates an ISO file 8 5GB in size ready for burning onto a double layer DVD at a later stage ...

Страница 184: ...eCenter DNS 320L User Manual Section 4 Configuration Select the Image Path Click the Browse button to select the destination folder on your NAS Click the Volume to save it there or click New to create a new directory ...

Страница 185: ...er DNS 320L User Manual Section 4 Configuration Enter a name that resembles the ISO file you are writing Click Next A warning message appears asking you to confirm your decision Click Yes to continue or click No to cancel ...

Страница 186: ... Select the file s and click the button to add the file s to the ISO image On the right side of the window it displays the total available space of the ISO file and the used space of the ISO At the bottom of the window it shows the path where the ISO file will be saved Click Next to continue The wizard will create the ISO image Click the Auto Mount checkbox if you want the ISO file to be mounted a...

Страница 187: ...DNS 320L User Manual Section 4 Configuration Verifying the ISO image Open your Windows Explorer click the Network icon double click your ShareCenter NAS Double click the volume you saved the ISO Your ISO image should be there ...

Страница 188: ...ngsallowsyoutochangetheUsername and Password settings 1 Enter a new Username 2 Type the original Password 3 Enter a New Password 4 Confirm the New Password Click Save Settings to accept the changes or Don t Save Settings to cancel changes Changes to the administrator username and password can be made here ...

Страница 189: ...tion Network Management Network Management controls and manages all issues referring to LAN settings Even though your LAN settings were configured in the Setup Wizard it can still be configured here Go to Network Management and then LAN Setup Click Setup LAN Setup ...

Страница 190: ...zard gives you the option to configure the IP settings Click Next to continue This step allows you to configure your LAN settings Here you can choose between DHCP Client or Static IP If you select Static IP you will need to manually configure your own IP settings Click Next to continue ...

Страница 191: ...185 D Link ShareCenter DNS 320L User Manual Section 4 Configuration A summary of what you just configured will be displayed Click Finish to exit the wizard ...

Страница 192: ...186 D Link ShareCenter DNS 320L User Manual Section 4 Configuration IPv6 Settings Go to Management Network Management LAN Setup IPv6 Settings and click the Setup button An IPv6 setup window will appear ...

Страница 193: ...ere are four connection modes to select from Auto DHCP Static and Off Auto Requests information specifically from an IPv6 enabled router and automatically configure your settings DHCP Requests information from a DHCP server Static Enter your own IP configuration Off Do not use IPv6 ...

Страница 194: ...vided by your system administrator The prefix length for an IPv6 subnet will always be 64 no more no less Enter the Default Gateway and DNS settings Click Apply when complete The IPv6 Settings table will now display the settings in table format In order for the changes to take effect you are prompted to re login Click OK and log in ...

Страница 195: ...uto Auto Negotiate 100Mbps or 1000Mbps from the drop down menu Click the Save Settings button to save the new settings The device supports LLTD Link Layer Topology Discovery and is used by the Network Map application that is included in Windows Vista and Windows 7 Select to enable or disable LLTD Link Speed LLTD ...

Страница 196: ...dless of your IP address Go to Network Management and then Dynamic DNS Select Enable or Disable Select a DDNS Server from the combo box on the right hand side or type in the server address manually Enter your DDNS host name Enter your DDNS username or key Enter your DDNS password or key Re enter your password or key Displays your DDNS status DDNS Server Address Host Name Username or Key Password o...

Страница 197: ...upports UPnP port forwarding which configures port forwarding automatically on your UPnP enabled router Note You will need a UPnP router on your network Log in and click Network Management Port Forwarding Click Test to run a search The DNS 320L is searching for a UPnP router Do not turn off your NAS ...

Страница 198: ...nual Section 4 Configuration A message will notify you that the wizard has found a UPnP router on the network Note that you have to enable UPnP on your router Click the blue arrow next to port forwarding to reveal the Port Forwarding options ...

Страница 199: ...193 D Link ShareCenter DNS 320L User Manual Section 4 Configuration Click Add The Port Forwarding wizard will start Click Next to continue ...

Страница 200: ...port forwarding service to manually configure your own settings Click Next to continue If you select default service scan choose the service s to be allowedforremoteaccessfromtheInternetviayourUPnP enabled router Note You can select more than one port Click Previous to change the Port Forward Rule or Finish to configure the port forwarding on the UPnP router automatically ...

Страница 201: ...d on the router users from the Internet will access the FTP server through the WAN IP address of the router In situations where the device is behind a firewall and unable to accept incomingTCP connections passive mode must be used MoststandardFTPclientslikeWindowsFTP onlysupportWesternEuropean codepagewhentransferringfiles Supporthasbeenaddedfornonstandard FTP clients that are capable of supportin...

Страница 202: ... List allows you to block IP address that you consider threatening to your network Click the blue arrow to open the configuration window ThewindowexpandstoincludeaBlockedIPlistandaFTPServer Status report Click the blue arrow to see the drop down list Click New to block a specific IP address ...

Страница 203: ...hen enter the IP address of a machine you wish to block Select Permanent if you wish to block the IP address permanently or Temporary if you wish to set a time frame If you selected permanent click Apply and continue If you selected Temporary then select a time frame and click Apply to continue ...

Страница 204: ...ual Section 4 Configuration The Blocked IP list will display the IP addresses you blocked Click the blue arrow next to FTP Server Status to reveal the FTP details The FTP server is stopped by default Click Start FTP Server to run the process ...

Страница 205: ... D Link ShareCenter DNS 320L User Manual Section 4 Configuration After you have clicked the Start button the Status shows Started Open your default browser or FTP application and log in to your FTP server ...

Страница 206: ... button to turn NFS service on Click Save Settings The ShareCenter supports Apple Filing Service for connectivity with Mac OS based computers If you need to use AFP service enable it here otherwise leave it disabled to reduce CPU resource overhead NFS Service The ShareCenter supports Network File System NFS service To enable this multi platform file system on your ShareCenter enable it here Otherw...

Страница 207: ...Media Shares folders the system will generate the media library Users can see thumbnail views from the MyMusic and MyPhoto panel The My Music service provides detailed information on the genres file size and cover art My Photo creates automatic albums and collates them according to your collection Noted The system may become slow when generating the medialibrary especiallywhenprocessingwithahuge a...

Страница 208: ...202 D Link ShareCenter DNS 320L User Manual Section 4 Configuration Go to Application Management Multimedia Services ...

Страница 209: ...20L User Manual Section 4 Configuration Under Multimedia Shares Settings click the Volume you wish to use Then click Refresh Now Refresh Later or Exit Once you click Refresh now the following message appears Click Yes to continue ...

Страница 210: ...204 D Link ShareCenter DNS 320L User Manual Section 4 Configuration The Multimedia settings are initialized The process is successfully refreshed ...

Страница 211: ...k ShareCenter DNS 320L User Manual Section 4 Configuration ShareCenter builds the library automatically When the system has finished building the media library a success message will appear Click Yes to continue ...

Страница 212: ...nfigure the UPnP AV share Click Refresh to build up media library The ShareCenter features a UPnP AV Server This server provides the ability to stream photos music and videos to UPnP AV compatible network mediaplayers Iftheserverisenabled theShareCenter willbeautomaticallydetectedbyUPnPAVcompatiblemediaplayersonyourlocalnetwork Click the Refresh All button to update all the shared files and folder...

Страница 213: ...er launch iTunes In your iTunes utility select the ShareCenter and enter the iTunes server password if required Select the ShareCenter When prompted enter in the iTunes server password Click OK MediastoredontheShareCenter willthenbeavailableforuseiniTunes Select to enable or disable the iTunes Server SpecifiesthefolderordirectorythatwillbesharedbytheiTunesserver Select roottoshareallfilesonallvolu...

Страница 214: ...he instructions below When you disable the language pack the GUI will return to English Click System Management and then Language to install a new language Click on Browse to search for the specific language pack you want to install After selecting the language pack click Apply to install the language pack If you have not selected a language package a message will prompt you to locate one Click Ye...

Страница 215: ...n order to periodically update your system time from the NTP Server You can also sync the time and date of your computer as the system time Click System Management then Time and Date Select the Set Time from My Computer button if you want to use the timeanddateofyourcomputer Whenaconfirmationmessage appears click Yes to continue Select your time zone from the drop down menu Click Save Settings You...

Страница 216: ...xample http dlink d10001 Workgroup Enter your Workgroup name here The workgroup name should be the same as the computers on the network Devices using the same workgroup will have additional file sharing methods available Name Enter your device name here This name is what the device will appear as on the network By default the device name is dlink xxxxxx where xxxxxx is the last six digits of the M...

Страница 217: ...that have been configured will be erased Shutdown Click to turn off the DNS 320L Configuration Settings Click on the Save button to save the current configuration settings to a file on your computer If at a later time you need to reload this configuration afterasystemreset browsetothefileandclick Load Idle Time Enterthetime inminutes thattheadministratorand users will be allowed to remain idle whi...

Страница 218: ...emains constant to the device The drives will power up again when data is accessed HDD Hibernation Click Enable or Disable Turn Off Hard Drives Set the amount of idle time before the drives go into hibernation Power Recovery Settings Click Enable or Disable The Power Recovery feature will automatically restart your device from a previously unexpected shutdown due to a power failure ...

Страница 219: ...Low High depending on the internal temperature of the enclosure Power On Off Scheduling Click Enable to turn on this function Enable or disable the power on off days using the check box and configure the time for each day that the power on off will occur You can control the speed of the fan using three different settings and you can power off the device at scheduled times for each day of the week ...

Страница 220: ...tgoingmail server If you are unsure of this value contact your e mail provider Sender E mail Enter the from e mail address e g alerts share com This field does not require a valid e mail address However if your e mail client is filtering spam make sure you allow this address to be received Receiver E mail Enterthee mailaddressyouwanttosendthealertsto This address must correspond with the SMTP serv...

Страница 221: ...with the Add button Add button Click on the Add button and enter the information into the appropriate fields that your provider has given you to use for the configuration Delete button Remove the selected Service Provider from the configuration URL The specific service provider URL provided and added in the Add procedure Replace space character with If required by your service provider enter a cha...

Страница 222: ... wizard Enter the URL in the first window with an appropriate Provider Name In the next window select the appropriate HTTP API URL parameter types definitions from the drop down menus next to the parsed fields of the URL Enter the HTTP API URL provided to you Enter your SMS Provider name here Choose the appropriate type parameter in the drop down menu for the parsed parameters of the URL on the le...

Страница 223: ...gs You can limit which events are sent as alerts to the Email or SMS settings by checking the events here Event Settings Select the information you want e mailed to the above address or sent over SMS messages to the above mobile number The items checked will be sent when necessary ...

Страница 224: ... and the FTP logs here Enable Syslog Click to activate the Syslog client functionality of your device to be able to send the ShareCenter s log events to the Syslog server Syslog Server IP EntertheIPaddressofanexternalSyslogserverthat you wish to send the logs of this device to Clear Log Click Clear Log to delete all the existing logs Backup Log Click Backup Log to save the existing logs to a text ...

Страница 225: ...ink support website If new firmware is available download the file to your local computer Current Firmware Version Displays the current firmware version on your ShareCenter device Firmware Date Displays the date of when the firmware was created Firmware Upload When upgrading the firmware click Browse to select the new firmware file on your local computer and then click Apply to begin the firmware ...

Страница 226: ...a UPS device is connected to the USB port on your NAS you can select either Stand Alone or Master mode If you select Master mode you will have to enter the IP address es of the network UPS slaves to notify them in the event of a power failure For more details refer to the UPS Connectivity section Click the blue arrow to reveal the USB storage Information It displays information on the manufacturer...

Страница 227: ...Manual Section 4 Configuration Click the blue arrow to reveal Printer Information It displays information on the manufacturer product type and connection details Click Clear Print Queue s to remove all active print jobs Printer Information ...

Страница 228: ...tion on all hard drives including the manufacture details temperatures size and status Resource Monitor offers more detailed information on the CPU Memory Bandwidth and Processes Click System Status and then System Info Click the blue arrow from each of the headings to reveal information on each segment LANInformation DeviceInformation andVolumeInformation Click System Status and then Hard Drive I...

Страница 229: ...nter DNS 320L User Manual Section 4 Configuration Click System Status Resource Monitor then click the blue arrow to reveal the resource details It provides information on the CPU memory bandwidth and processes in action ...

Страница 230: ...iguration Home The Home tab is the center for all files on your ShareCenter Home is divided into one main subfolder called My Folder Under My Folder resides four main apps My Photos My Files and My Music Let s take a closer look at all four apps independently ...

Страница 231: ...and Cooliris Click the My Photos icon to open the window displayed below When you click the My Photo app you are transfered to the Applications section TherearetwosectionsintheMyPhotos app Photo Albums and Photo Gallery On the right hand side of My Photos there are 4 main icons andasearchfieldTheiconsturnbluewhenyourollyourmouse over it The first icon is Upload from my computer ...

Страница 232: ...226 D Link ShareCenter DNS 320L User Manual Section 4 Configuration The second icon is Upload from NAS The third icon is Edit ...

Страница 233: ...Link ShareCenter DNS 320L User Manual Section 4 Configuration The fourth icon is Refresh The search field can be used to search for photos and albums on the NAS Enter your search parameter in the search field ...

Страница 234: ...228 D Link ShareCenter DNS 320L User Manual Section 4 Configuration Creating an Album Click Upload from my computer A Create Album window pops up ...

Страница 235: ... Album Wizard The Photo Album Wizard will assist you with uploading photos from your computer to the ShareCenter The first step is to create an Album In the Album Name field enter your desired name and then enter a description in the Description field Click Next to continue ...

Страница 236: ...r the Select Photo section click the browse button to search your computer for your photos If you wish to add more than one photo repeat the process or hold the Shift Control button on your keyboard and select the photos to add Click the Open button to add them to the Album ...

Страница 237: ...reCenter DNS 320L User Manual Section 4 Configuration The Photo Album Wizard is now populated with the photos you have selected Click Next to upload the photos ShareCenter automatically updates the photos to the NAS ...

Страница 238: ...232 D Link ShareCenter DNS 320L User Manual Section 4 Configuration The Photo Album now features your Album ...

Страница 239: ...diting Photos in an Album Click the Album Click Edit The screen changes A Back button appears above Photo Gallery to go back A Select All checkbox appears below the Album s name to select all the photos to edit The icon panel changes on the right hand side of the screen ...

Страница 240: ...234 D Link ShareCenter DNS 320L User Manual Section 4 Configuration Select a Photo to edit A green check mark emphasis that it s been selected ...

Страница 241: ...he current photo as the Photo Album cover Select this icon if you wish to Move the current photo to a different location Select this icon if you wish to Delete the current photo from the Photo Album SelectthisiconifyouwishtoSharethecurrentphototoPicasa Select this icon if you wish to Share the current photo to Facebook Select this icon if you wish to Share the current photo to Flickr ...

Страница 242: ...nk ShareCenter DNS 320L User Manual Section 4 Configuration Select a Photo as a Cover image Click the Set Cover icon Youareaskedtoverifyyourinstruction ClickYestocontinue Notoexit The NAS configures the changes ...

Страница 243: ...237 D Link ShareCenter DNS 320L User Manual Section 4 Configuration The configuration is updated and saved Click Yes to continue ...

Страница 244: ...238 D Link ShareCenter DNS 320L User Manual Section 4 Configuration Select a Photo to Move Click My Photos Photo Albums the Photo Album you wish to select the Photo from Select the Photo and click Move ...

Страница 245: ...39 D Link ShareCenter DNS 320L User Manual Section 4 Configuration The Select Album window opens Select the Album you wish to transfer the Photo to Click the checkbox The Photo disappears from the Album ...

Страница 246: ...240 D Link ShareCenter DNS 320L User Manual Section 4 Configuration Delete a Photo Click My Photos Photo Albums the Photo Album you wish to select the Photo from Select the Photo and click Delete ...

Страница 247: ...donotselectanyphotointhealbum awarningmessageappears to indicate that you haven t selected an image Click Yes to continue Once you have selected a photo to delete and clicked the Delete icon thewizardprocessesyourrequest Thegallerynowdisplaysthephotos minus the deleted one s ...

Страница 248: ...l Section 4 Configuration Share a Photo to Picasa Click My Photos Photo Albums the Photo Album you wish to select the Photo from Select the Photo you wish to share on Picasa A green check mark highlights your selection and click Share to Picasa ...

Страница 249: ...Google requests you log in to your Google account You are unable to use the Picasa feature if you do not have a Google account Enter your Email Address Password and Sign In to proceed Google requests you to grant access to Picasa Web Albums Click Grant Access to proceed ...

Страница 250: ...have in Picasa Web or create a new web album to share Under Albums select an album from the drop down list and click Share Alternatively enter the new album name and click the Share button When you click the Share button your files are uploaded to your PicasaWeb Albums and another window will pop up to confirm its success Note You will have to enable Photos Picasa Web Albums with your Google accou...

Страница 251: ...ook Click My Photos Photo Albums the Photo Album you wish to select the Photo from Select the Photo you wish to share on Facebook A green check mark highlights your selection and click Share to Facebook A pop up window appears directing you to log in to Facebook Enter your details and log in ...

Страница 252: ...er Manual Section 4 Configuration Facebook requests you to access and get their D Link ShareCenter App Click Go to App to proceed The D Link ShareCenter App also requests permission to post images on your behalf Click Allow to continue ...

Страница 253: ...re photos to the album you already have in Facebook or create a new web album to share Under Album Name select an album from the drop down list and clickShare Alternatively enter the new album name and click the Share button When you click the Share button your files are uploaded to your Facebook account and another window will pop up to confirm its success ...

Страница 254: ...kr Click My Photos Photo Albums the Photo Album you wish to select the Photo from Select the Photo you wish to share on Flickr A green check mark highlights your selection and click Share to Flickr A pop up window appears directing you to log in to Yahoo Flickr Enter your details and log in ...

Страница 255: ... D Link ShareCenter DNS 320L User Manual Section 4 Configuration A pop up window appears directing you to log in to Yahoo Flickr Enter your details and click Sign in Create a name for your Album on Flickr ...

Страница 256: ...nk ShareCenter DNS 320L User Manual Section 4 Configuration The D Link ShareCenter asks to link to the Flickr account Click OK I LL AUTHORIZE IT to proceed Use your DNS 320L to access and upload files to Flickr ...

Страница 257: ...hareCenter DNS 320L User Manual Section 4 Configuration Deleting an Album Click the Edit button Click Delete to delete an Album If you do not select an album you are prompted to select an item Click Yes to continue ...

Страница 258: ...ection 4 Configuration Select an album a green checkmark will indicate the selection click the Delete icon A warning message will ask you to verify your choice Click Yes to continue or No to exit The Album is now deleted from the Photo Albums menu ...

Страница 259: ...hing the Album Database Click My Photos Photo Albums and click the Refresh icon to refresh the entire database Beforethescreenisrefreshed youarepromptedtoverifyyourdecision to refresh the database Click Yes to continue No to exit The DNS 320L refreshes the system and is ready ...

Страница 260: ...r Manual Section 4 Configuration Managing Photos My Photos contains all your photos on the DNS 3270 Click My Photos from the Home panel to manage all photos Management Panel Upload from my computer Upload from NAS Edit Slideshow Cooliris ...

Страница 261: ...en slow and fast GPS information Click this button to get GPS information about the image if your camera supports this function Cooliris link Click this button to display your images on the Cooliris website EXIF View detailed information about the image File Name Size Image Date Resolution Camera Camera Model ISO Exposure Time Aperture Rotation button This rotates the image at 90 degree angles Gal...

Страница 262: ...reCenter DNS 320L User Manual Section 4 Configuration Click a photo to go in full screen mode This is similar to clicking the fourth icon in the icon list to the right the Slideshow icon The screen opens in a new tab ...

Страница 263: ...r DNS 320L User Manual Section 4 Configuration This feature plays the Slideshow This feature adjusts the speed of the Slideshow This feature beams your Slideshow to a Local Device or to a TV via AirPlay enabled Apple Device ...

Страница 264: ...ShareCenter DNS 320L User Manual Section 4 Configuration This feature provides GPS information of the Slideshow This feature transfers the Slideshow to Cooliris mode This feature EXIF information of your Slideshow ...

Страница 265: ...k ShareCenter DNS 320L User Manual Section 4 Configuration This feature rotates the image of the Slideshow This feature pops up the browser window of the Slideshow This feature EXIF information of your Slideshow ...

Страница 266: ...260 D Link ShareCenter DNS 320L User Manual Section 4 Configuration Click the Cooliris icon This opens Cooliris in a new tab Click the arrows on each side of the Cooliris window to scroll between images ...

Страница 267: ...reCenter DNS 320L User Manual Section 4 Configuration Click here to activate Facebook in Cooliris Click here to activate Twitter in Cooliris Click here to activate Full Screen mode Click here to slide between photos ...

Страница 268: ...k on each photo to view separately The photo is enlarged On the right hand side of each image are the social network links Click here to close Single Image view Click here to enlarge into Full screen mode Click here to connect to Facebook or click here to connect to Twitter ...

Страница 269: ...D Link ShareCenter DNS 320L User Manual Section 4 Configuration Click the Facebook link to connect your images to your Facebook account Click the Twitter link to connect your images to your Twitter account ...

Страница 270: ...eam a Slideshow to your TV Click Apple Device the ShareCenter will connect to a shared Apple Device on the Network a message will pop up after connecting successfully Press Yes to continue Now you can enjoy your slideshow on your TV via the Apple Device and your DNS 320L ...

Страница 271: ...l Section 4 Configuration Photo Gallery Click Photo Gallery to view the images in your gallery Near the top right hand corner there are three main icons Click here to view All Photos Click here to view By Calendar Click here to Refresh the page ...

Страница 272: ...nter DNS 320L User Manual Section 4 Configuration ClicktheAllPhotosicon toviewallyourphotosinyour PhotoGallery Click the By Calendar icon to view your Photo Gallery by date Click the Refresh icon to refresh the database ...

Страница 273: ... on their ShareCenter by clicking the My Files icon in the My Folder window under Home My Files provides access to all your files on the NAS Click My Files The My Files window provides a list of all the Volumes created on the NAS Click on any Volume you created to see a directory listing of the files ...

Страница 274: ... Click the icons near the right hand side of the panel to access the My Files features Click this button to Download files to your local PC Click the icons near the right hand side of the panel to access the My Files features Click this button to Upload files to the NAS Click the icons near the right hand side of the panel to access the My Files features Click this button to Return to the previous...

Страница 275: ...Section 4 Configuration Upload To upload more files to the volume you have selected click the Upload button Click the Browse button to find files on your computer to upload to the NAS Locate the path of the file you want to upload and click Open ...

Страница 276: ... ShareCenter DNS 320L User Manual Section 4 Configuration Click Upload to start the uploading process Then click Exit to close the upload window The file updates to the NAS and is displayed on the directory table ...

Страница 277: ...n 4 Configuration Download TodownloadfilesfromtheNAStoyourcomputer selectthefileyouwanttodownload lighlightedinred andclicktheDownloadbutton Depending on your browser download settings the browser automatically downloads the file to your saved location ...

Страница 278: ...272 D Link ShareCenter DNS 320L User Manual Section 4 Configuration Alternatively click the Save File button and OK to continue ...

Страница 279: ...r folder of the NAS select the file you want to copy lighlighted in red and right click From the drop down list click Copy GotoApplications MyFiles Browseanyofthefoldersontheleftpane right click any of the files in the right pane Select Copy it turns blue Under Copy select a Destination Path or create a new Path ...

Страница 280: ...274 D Link ShareCenter DNS 320L User Manual Section 4 Configuration Enter a name for the new Folder Click OK Select the newly created folder and click Apply ...

Страница 281: ...275 D Link ShareCenter DNS 320L User Manual Section 4 Configuration To verify that the file did copy to the destination browse to the folder in question ...

Страница 282: ...r folder of the NAS select the file you want to move lighlighted in red and right click From the drop down list click Move GotoApplications MyFiles Browseanyofthefoldersontheleftpane right click any of the files in the right pane Select Move it turns blue Under Move select a Destination Path or create a new Path ...

Страница 283: ...277 D Link ShareCenter DNS 320L User Manual Section 4 Configuration Selct a folder from one of the Volumes and click Apply Browse to where you moved the file ...

Страница 284: ...ect the file you want to delete lighlighted in red and right click From the drop down list click Delete GotoApplications MyFiles Browseanyofthefoldersontheleftpane right click any of the files in the right pane Select Delete it turns blue A verification message appears asking for you to verify your selection Click OK to confirm ...

Страница 285: ...279 D Link ShareCenter DNS 320L User Manual Section 4 Configuration The file no longer exists in the folder ...

Страница 286: ...NAS select the file you want to rename lighlighted in red and right click From the drop down list click Rename Go to Applications My Files Browse any of the folders on the left pane right click any of the files in the right pane Select Rename it turns blue The Rename window displays the original name ...

Страница 287: ...281 D Link ShareCenter DNS 320L User Manual Section 4 Configuration Enter a new name for the file Click Apply The Renamed file is now accessable from its original location ...

Страница 288: ... to Applications My Files Browse any of the folders on the left pane right click any of the files in the right pane Select Properties it turns blue ThePropertieswindowdisplaystheProperties Privileges andOwner and User Group Under Privileges you are allowed to change the ownership settings The Owner User Group and OtherusershaveRead Write andExecutionable settings Click Apply once you have made the...

Страница 289: ... NAS select the file you want to zip lighlighted in red and right click From the drop down list clickThe Selected File to Zip Go to Applications My Files Browse any of the folders on the left pane right click any of the files in the right pane Select Create file name zip it turns blue The Wizard creates a zipped file in the same folder ...

Страница 290: ...AS select the file you want to zip lighlighted in red and right click From the drop down list click Add to Zip Add to zip allows you to add to an existing zipped file So take an existing zip look at the file size In our example bold zip the original file size is 3 01MB Right click the file you want to Add to zip ...

Страница 291: ...20L User Manual Section 4 Configuration UnderAddtoZip selectthezippedfileyouwanttohavethefileadded to Click the checkbox and click Apply The Wizard adds the new file to the zipped file In the example you can see the new file size ...

Страница 292: ...NAS select the file you want to unzip lighlighted in red and right click From the drop down list click Unzip GotoApplications MyFiles Browseanyofthefoldersontheleftpane right click any zipped files in the right pane Select Unzip it turns blue The Wizard unzips the zipped file A new folder is created from the unzipped file ...

Страница 293: ...ing a Tar File To unzip a tar file on the NAS select the file you want to untar lighlighted in red and right click From the drop down list click Untar An unzippedTAR file works when your workstation is Linux based The unzipping process works similar to unzipping a normal file ...

Страница 294: ...ion 4 Configuration Opening a File To open a file on the NAS select the file you want to open lighlighted in red and right click From the drop down list click Open Select the file you want to open right click it The file opens in a new browser window ...

Страница 295: ...ng ps psb psd webp doc docx xls xlsx mp3 txt on the NAS select the file you want to preview lighlighted in red and right click From the drop down list click Preview Select the file you want to Preview right click it The file opens in a new Gallery like window Use the left right slider to view the image or resize the image from the corner points ...

Страница 296: ...AS to Facebook select the file you want to share lighlighted in red and right click From the drop down list click Share to Facebook Select the file you want to Share to Facebook right click it The browser opens a newWindow and redirects you to Login with your Facebook account to automatically upload files to Facebook ...

Страница 297: ...the NAS to Picasa select the file you want to share lighlighted in red and right click From the drop down list click Share to Picasa Select the file you want to Share toPicasa right click it The browser opens a newWindow and redirects you to Login with your Google account to automatically upload files to Picasa ...

Страница 298: ...the NAS to Flickr select the file you want to share lighlighted in red and right click From the drop down list click Share to Flickr Select the file you want to Share to Flickr right click it The browser opens a newWindow and redirects you to Login with your Yahoo account to automatically upload files to Flickr ...

Страница 299: ...er DNS 320L User Manual Section 4 Configuration Quick Search When a user clicks the Search icon a GUI Quick Search column pops up The user can then key in the file name keywords to search the file s in a particular folder ...

Страница 300: ...er DNS 320L User Manual Section 4 Configuration My Music My Music allows users to add music to the DNS 320L Using this application users can view edit and play music straight from the NAS Access music files on the network ...

Страница 301: ...295 D Link ShareCenter DNS 320L User Manual Section 4 Configuration Click My Music to view the My Music features ...

Страница 302: ... User Manual Section 4 Configuration My Music The Interface Click here to playback music to a Local Device or to an AirPlay enabled Apple Device Click here to Refresh the screen The Music Player plays tracks directly off the DNS 320L ...

Страница 303: ...uration My Music The Categories Click All Tracks to view all the audio tracks on the DNS320L Click Albums to view all the albums on the DNS320L Click Artists to view the playlist by artist on the DNS320L Click Genres to view the playlist by genre on the DNS320L ...

Страница 304: ...298 D Link ShareCenter DNS 320L User Manual Section 4 Configuration My Music The Categories Click Playlists to view all playlists and create new playlists on the DNS320L ...

Страница 305: ...ation My Music Music on your DNS 320L Access your DNS 320L from your network Click the NASVolume directly Copy music directly from your local drive to the MultiMedia Shared Folder of the DNS 320L Make sure the files are only MP3 format The NAS does not accept flac ...

Страница 306: ...tion 4 Configuration View your All Tracks window and click the Refresh button The Playlist is populated with the same tracks you copied and pasted to before Click Albums to view it in album view Click Artists to view all the artists in your playlist ...

Страница 307: ...uration My Music Playback Music on an Apple device Click the Apple Device the ShareCenter will connect to the Apple Device on the Network A message will pop up after connecting successfully Press Yes to continue Now you can enjoy your music on your Apple Device ...

Страница 308: ...lays the Album art only available if its in the music folder the Genre Artist name s and disk The Player menu consists of A Scrollable music timeline A Stop button A rewind button A Play Pause button A Fast Forward button A Replay button A Shuffle button A Volume control You can also view the Genre duration of the song size of the file ...

Страница 309: ...the Playlist tab at the bottom of My Music Click the Plus icon at the top right hand corner The CreateaNewPlaylist menu appears Enter a name underPlaylist Name and click the songs you wish to add to the playlist Click Apply to add them to the list The new playlist is created under the Playlists window ...

Страница 310: ...Configuration Click on the Playlist to view its contents Click the Back icon to return to the Playlist menu or click the Edit icon to add delete songs from the playlist Once you are in Edit mode click the track you want to delete and click the Delete icon ...

Страница 311: ...o enable it right click the icon and click Enable Right clicking only applies to this app and icon A greyed out icon indicates that the My Surveillance feature is disabled Please Note My Surveillance is compatible with the following D Link cameras DCS 930 930L DCS 932 932L DCS 1100 1100L DCS 1130 1130L DCS 5230 5230L DCS 942L DCS 2103 2130 DCS 2210 2230 DCS 5222L 5211L Morecameraswillbesupportedin...

Страница 312: ... correct browser plug ins to view the streaming video If required the browser will prompt you to install the new plug in Click the plug in advisory to continue Click Save File to accept the SurveillanceCenterRealInstall msi file Note My Surveillance supports the following web browsers Internet Explorer 8 or higher Mozilla Firefox 4 or higher Apple Safari 4 or higher Windows Google Chrome 13 or hig...

Страница 313: ...er Manual Section 4 Configuration Oncethefileisdownloaded double clickorright click selectOpenandinstalltheprogram from your browser s Downloads window The Surveillance Center Real Install setup wizard will begin Click Next to continue ...

Страница 314: ...308 D Link ShareCenter DNS 320L User Manual Section 4 Configuration Select an Installation Folder location Click Next to continue Confirm that the Installation is complete Click Next to continue ...

Страница 315: ... cameras to the network the My Surveillance softwarewilldetectthecameraautomatically ThesoftwareisabletorecognizetheIPaddress model number and bit rate speed Click Close to continue To view the Surveillance utility in a browser open your web browser When you log in you will see the My Surveillance icon under the Home My Folder screen ...

Страница 316: ...net Explorer requires an add on The add on pops up at the top of the browser Click the pop up and click Install This Add on for All Users on This Computer The Global Digital D Link Corporation add on warning message pops up Click Yes to confirm the installation Once confirmed Internet Explorer will display the live camera feed ...

Страница 317: ...gramislaunched by default and automatically when you access the Live Video Page A red notification appears if you do not have any detected cameras Read the Auto Install Camera instructions to configure cameras for later use If you wish to disable auto install click the Disable Autoinstall button Click Exit to continue Please Note TheAutoinstall Camera function willnotworkifyoumodify thepassword on...

Страница 318: ...ection 4 Configuration Configuration is complete Click Yes to continue The browser will now display the Live View However if you do not have any cameras connected the live view window will have no video stream to show Close the browser tab to exit ...

Страница 319: ...The My Surveillance interface is based on the surveillance and camera features Normal operation is also dependant upon the camera s functionality The interface features navigation tabs in the left hand column which can be used to access the various functions of the My Surveillance app ...

Страница 320: ...m your connected IP cameras There are also various controls and functions on this page which can help you to customize your video view y y My Surveillance y y Camera Name IP Address y y Camera View y y E map Snapshot y y Mute and Volume Slider y y Pan Tilt Zoom Control y y Zoom y y Patrol Mode for PTZ y y Stop Start Manual y y Digital Zoom y y Camera details ...

Страница 321: ...mera to go to it s preset point Pan Tilt Zoom Control Used for cameras that support Pan Tilt Zoom PTZ controls You can use these controls to control the direction of the camera lens Zoom Clickthe or buttontozoominorzoomout Thisoptionisonlyavailablewhendigitalzoomisenabled Mute and Volume Slider The mute button can be used to mute the sound from the camera and the slider bar used to adjust the volu...

Страница 322: ...to enter Single Camera Mode The live video for the selected camera will expand to cover the full live viewing area Click the 2x2 button to return to Split Camera Mode Click on the camera you wish to view in the Camera Name and IP Address window My Surveillance Single Camera Live Video Mode ...

Страница 323: ...Click the Full Screen button to enter Full Screen Camera Mode The viewing angle expands to cover the entire screen Click the 2x2 button to return to Split Camera Mode This full screen mode can be used in 2x2 mode and 1x1 mode My Surveillance Full Screen Live Video Mode ...

Страница 324: ...and out on an area of the image You can place the mouse pointer in the bottom right corner of the image to click and drag the box around to view different parts of the video You can also click directly on the part of the main image you want to focus on Use the mouse wheel to control the level of zoom My Surveillance Digital Zoom Video Mode ...

Страница 325: ...p from the LiveVideo screen by clicking the button Note you must have installed E map JPEG files in order to use this feature Click the E map Upload button to upload images into the database When you click this button you will be directed to the E map Upload window My Surveillance E Map View ...

Страница 326: ...screen by clicking the snapshot button This will take a snapshot of your current live screen You can copy this image to the clipboard by clicking the Copy to Clipboard button or you can save the image to disk by clicking the Save Image button Click the Close button to exit this mode My Surveillance Snapshot View ...

Страница 327: ...ecord when motion is detected the camera icon on the E map will change to red when an alarm is sounded or motion is detected as shown below When motion is detected or an alarm is triggered click on the red camera icon on the E map to play the recorded event My Surveillance Motion Detection Camera Mode ...

Страница 328: ...nter works with the following D Link PTZ cameras DCS 5230 5230L and DCS 5222L 5211L1 Click the Patrol icon to configure the Patrol settings Scroll down and click Set Patrol The Patrol Setup window will pop up My Surveillance Configuring Patrol Settings 1 Please check your local D Link support site for an updated list of camera models which support the Patrol function ...

Страница 329: ...ll appear Select Clear All to clear the list or select Add Preset Point to create a new Preset Point This brings up the PTZ Preset Point box Enter a Preset Name and click OK To edit the presets click the Preset Point icon and select whichever preset you wish to delete My Surveillance Configuring Patrol Preset Points ...

Страница 330: ...324 D Link ShareCenter DNS 320L User Manual Section 4 Configuration Click the Go to Preset Point icon This icon directs the camera to the designated points My Surveillance Viewing Preset Points ...

Страница 331: ...ow many minutes one click on the Next Minutes or Previous Minutes buttons on the control panel advances or rewinds the video playback Capture Image This allows you to select where to save the snapshots taken using the snapshot button on the live video screen and the format they are stored in Save in Clipboard Snapshots will automatically be copied to the clipboard You should use the Paste function...

Страница 332: ...round box There are also options to make the text bold and choosing the edge option will apply the selected color to the text Background In the background section you can select a color for the OSD box and the level of transparency Information The information box allows you to select the information to display You may display the camera name camera number the date and time There are several date a...

Страница 333: ...327 D Link ShareCenter DNS 320L User Manual Section 4 Configuration My Surveillance Playback In this section you can play back previously recorded videos ...

Страница 334: ...n individual cameras Mute and Volume Slider The mute button can be used to mute the sound from the recorded video and the slider bar to adjust the volume Settings This configures general setting Snapshot Take a live snapshot of the recorded video Synchronous Playback This syncs four video channels to playback at the same time View as 1x1 View one screen at a time View as 2x2 View four cameras at a...

Страница 335: ...k List drop down menu provides various options Current Recording This shows camera videos recorded by the Surveillance Center module Historic Recording This shows camera recordings backed up by the user The number of entries below this will depend on how many recordings you have backed up The DateTime Period section allows you to narrow down the time and date for which to show recordings Thetimeli...

Страница 336: ...ton at the bottom of the window to go to the Backup Setup screen where you can backup the selected recording Click the Play button at the bottom of the window to play the selected recording on the main playback screen Note You can backup or play up to 4 selected recordings at the same time ...

Страница 337: ...331 D Link ShareCenter DNS 320L User Manual Section 4 Configuration My Surveillance Setup Note See descriptions later in this Manual ...

Страница 338: ... Camera Setup Once you click Setup Camera Setup is the first screen to configure On the left side are the sub menus while on the right are the configurable options Camera Setup is divided into four sections Wizard Camera List Camera Search and Auto Install Let s take a look at Wizard first ...

Страница 339: ...nfiguration box appears Click Next to continue The Wizard searches for your camera Make sure you have connected your camera to your router and you have enabled DHCP on your router to detect your camera You may attempt to skip this process using the Skip button However once you do this you will be unable to detect your camera ...

Страница 340: ...ual Section 4 Configuration The next screen appears blank if the camera wizard was unable to find your camera If you have set up your camera properly the camera wizard should have detected your camera The camera then appears in the Search box ...

Страница 341: ...previously indicated if you haven t setup your camera on the network then the camera wizardwillnotbeabletodetectyourIPcamera However ifyouhave theDeviceInformation window is automatically populated with your device information Click the Test Camera button to view streaming video from the connected camera ...

Страница 342: ...inue Set your Quota Information By default the NAS will keep the last 7 days of recordings and automatically overwrite the old recordings with new ones Select Automatic Overwrite to overwrite the earliest recorded video with the latest video if it reaches the quota limitation or if the disk space is full Select the Quota disk size based on your available disk space Check Keep the File within and e...

Страница 343: ...slot in the section above and you are able to adjust some settings You can modify the Name IP Address and Port if they are incorrect Enter the username and password for the camera if there is one Select the desiredVideoFormat dependent on your camera Finally confirm if the Vendor and Model are correct for your chosen camera Click Modify to confirm the changes You can also click Test Camera to view...

Страница 344: ...s to continue Click Yes to exit confirm You can also delete the camera from the list Select a camera from the camera list click the Trash button A confirmation message will pop up Click Yes to remove the camera from the list A message will pop up to confirm the changes Click Yes to exit ...

Страница 345: ... DNS 320L User Manual Section 4 Configuration My Surveillance Search and Add Camera Click the Search button to search all available cameras on the LAN Select one camera and click Add To to add the camera to the list Camera2 ...

Страница 346: ...Center DNS 320L User Manual Section 4 Configuration Click the Test Camera button to view streaming video from the connected camera Click Modify to add the camera to the camera list then Click Save Settings to continue ...

Страница 347: ...nter DNS 320L User Manual Section 4 Configuration A message pops up to confirm the changes Click Yes to exit Under Auto Install click EnableAutoInstall to detect other IP cameras next time you access the Live Video Page ...

Страница 348: ...nce Setup Audio and Video Audio and Video configures all your audio and video settings on each camera Let s take a look at a single camera configuration Click Audio and Video Here you can view all camera audio and video settings Click on the device to see the configuration options ...

Страница 349: ...deo and results in a larger file size Resolution The resolution is the number of pixels that the video will include This varies according to your camera video quality Quality Select between Very Low Low Medium High and Very High Selecting Fixed Quality will give you this setting and is a rough guide to determine the output video quality Bitrate This is the number of kilobits Kbps per second the vi...

Страница 350: ... DNS 320L User Manual Section 4 Configuration My Surveillance Setup Recording Setup The Recording Setup configuration tool displays options for each camera The settings including Quota Setting Event Record and Recording mode ...

Страница 351: ...345 D Link ShareCenter DNS 320L User Manual Section 4 Configuration Double click the camera to expand the configuration options ...

Страница 352: ... Next to it is displayed the remaining free disk space Keep the File within This indicates how long you want to keep the recorded camera video files before it is overwritten Estimate Required Space Click this button to find out how much disk space is required for video storage with the current settings Event Record Pre record If required select how long video should be recorded for prior to an eve...

Страница 353: ...tion detection configuration page where you can configure motion detection settings for that camera These settings will then be used when recording motion detection events on the ShareCenter Here is an example of a camera s motion detection configuration page Note The appearance and or functions of this page may vary depending on the camera model you are using ...

Страница 354: ...tton you can copy the camera recording settings to similar cameras Check the boxes of the cameras you wish to copy recording settings to and click Save to continue Click Yes to continue Select your Recording Mode Record by Schedule Click the Always Record blue box to set normal recording mode ...

Страница 355: ...your mouse over the time frame s you want to set for constant recording The selected frames turn to blue to indicate the recording duration Click Save Settings to finish Motion Detection Record Click the MotionDetectionRecord red box to set recording only when motion is detected by the camera ...

Страница 356: ...uration Clickorclickanddragyourmouseoverthetimeframe s youwanttosetformotiondetection recording The selected frames turn to blue to indicate the recording duration Click Save Settings to finish To delete recording schedule frames click the light blue Delete box ...

Страница 357: ...n 4 Configuration Click or click and drag your mouse over the time frame you want to delete The selected frames will return to light blue to indicate no recording schedule You can also check Select All to select all frames Click Save Settings to finish ...

Страница 358: ...onfiguration My Surveillance Setup Event Setup The Event Setup configuration tool displays options for each camera The basic settings relate to how you want event notifications to be sent Click Advanced to configure accounts for Email and SMS notifications ...

Страница 359: ... recording Motion Detection Notifies you when motion detection has started or ended Digital Input Output When an event is triggered from the D I port of the camera the D O port of the camera will begin sending a signal to My Surveillance My Surveillance will then notify you accordingly Archived Limit Reached Notifies you when your history archive material has reached or exceeded the disk space all...

Страница 360: ...sesettings pleasereferto EmailSettings onpage173ofthis manual Click Save Settings when done and click Exit Click the blue arrow next to SMS Settings to extend the SMS configuration options Check the box to enable SMS notifications and enter the required information for your SMS service provider For a detailed explanation of these settings please refer to SMS Settings on page 175 of this manual Cli...

Страница 361: ...etup E map Upload The E map Upload configuration panel allows you to import a schematic illustration of the area office space you want to monitor using your IP cameras The E map in JPEG BMP GIF and PNG format is uploaded to the DNS 327L and configured to work with the camera s installed ...

Страница 362: ...356 D Link ShareCenter DNS 320L User Manual Section 4 Configuration Click the Browse button to find the E map you want to use Select the E map and click Upload ...

Страница 363: ...Configuration The file is now displayed on right side of the camera Click and drag a camera from the camera list on the left of the image When you have placed the camera in the correct location double click the icon to change the orientation of the camera ...

Страница 364: ...D Link ShareCenter DNS 320L User Manual Section 4 Configuration My Surveillance Setup Backup The Backup Setup page allows you to configure the ShareCenter NAS to backup and restore the IP Camera recordings ...

Страница 365: ...ing your new backup folder and destination Enter a Folder Name in the field provided Click Browse to select a destination path If you do not have a folder click the sign to create a new folder Type a new folder name then click OK to continue Select the path on the NAS where you want the backup to reside ...

Страница 366: ...360 D Link ShareCenter DNS 320L User Manual Section 4 Configuration You should have the Folder name and the Destination configured Configure a Start Date Time and a Stop Date Time ...

Страница 367: ... to the camera s name to activate the camera you want to use as a backup Click Save Settings to finish The archive table at the bottom will populate as you collect data A message will pop up to confirm the configuration Click Yes to continue and the DNS 327L starts to backup the IP camera recordings ...

Страница 368: ...you have created a new backup it will appear in the Archive section From here you can check which archives to include in the playback list on the playback screen by adding or removing a check from the Playback List column If you want to delete the archive click the trash can icon for the folder you want to delete ...

Страница 369: ...e Setup Server Port This page allows you to modify the ports that the Live Video Server Playback Server and Config Server operate on You may wish to do this if you have port restrictions on your local network To change the port numbers use the provided fields and click Save Settings ...

Страница 370: ...364 D Link ShareCenter DNS 320L User Manual Section 4 Configuration My Surveillance Status ...

Страница 371: ...a Camera Status and Log The Camera Status shows the current status of all cameras connected to the network and Log shows a history of all significant events of the Surveillance Center software You can filter the events shown in the log by checking the checkbox for Type Camera or Date You also have the option to back up the log to a text file and clear the log ...

Страница 372: ...tion 4 Configuration To backup your files click the Backup Log button Select the location that you wish to save the log file to and click Save A notification will appear to confirm that the log file has been successfully saved Click Yes to continue ...

Страница 373: ... DNS 320L User Manual Section 4 Configuration To clear your the click the Clear Log button You will be prompted to verify that you want to clear the log Click Yes to continue Now you can see that your previous log disappears ...

Страница 374: ...n 4 Configuration My Favorites Application The My Favorites Application section allows users to add applications to the Home section so users can easily access these applications Follow these easy steps to setup Favorite Applications on the Home screen ...

Страница 375: ...tion Adding Applications Click the Add Remove button to add Applications Click the checkbox under each application you wish to add to the Home screen Click Apply to continue The shortcut is now created on the Home screen Click the shortcut to access the application ...

Страница 376: ...ted on an FTP server Login Method Enter the login information for the site that contains the files that you want to schedule for downloading If no password is required choose Anonymous If a password is required choose Account and enter the user name and password Username Enter the user name here Password Enter the password here Type Select either File or Folder from the drop down list depending on...

Страница 377: ...nguageused in the file or folder that you are trying to download When Select the date and time for the download to occur Recurring Backup If you wish to schedule a recurring backup select the desired interval daily weekly or monthly and the time you want the backup to start Schedule Download List Pending and completed download events will be listed here The current status for each event is display...

Страница 378: ... ShareCenter Note If you are not using the Remote Backup functionality of your ShareCenter leave this box unchecked so that your ShareCenter s performancewillnotbeaffectedbytheadditional overhead used by this process Password Enter a password that the remote client will use to access your NAS for backup Remote Backups list This is the list of remote backup jobs Create Click the Create button to bu...

Страница 379: ...the wizard Service Type NAS to NAS backup from the local NAS to a remote NAS or vice versa NAS to Linux backup from the local NAS to a Linux file system or vice versa LocaltoRemote setsthebackupsourceasthelocal NAS and the target destination for the backup files as the remote NAS or Linux file system Remote To Local sets the backup source as the remote NAS or Linux file system and the target desti...

Страница 380: ...backed up over the network between the local and remote devices Ignore existing file s Checking this box prevents the backup process from writing over any files in the targetfilesystemthatarenotpartofthebackupfiles or folders Therefore any existing files in the target system are preserved Incremental backup support Num Checking this box provides multiple backup capability at scheduled times The fi...

Страница 381: ...ackup Schedule Settings Scheduled Mode Manual Check either Yes or No selection below to start the backup yes immediately on completion of the wizard or no manually start the backup from the Remote Backup list Once Select this option to run the Remote Backup once at a specific date and time set here Scheduled Select this option to set the backup to occur daily weekly monthly per a specific schedule...

Страница 382: ...emote backup job was unsuccessful during execution Enable Disable If the button shows a red circle the remote backup job is enabled Clicking the red button will disable the remote backup job and the button will change to a green right pointing triangle Clicking the green triangle will enable the job again Backup now Clicking this button will execute the backup job immediately as long as the job is...

Страница 383: ...d is required choose Anonymous If a password is required choose Account and provide the user name and password This option is only available for LAN Backups Username Enter the user name here Password Enter the password here Type Select File or Folder depending on what you want to download or backup URL Enter the path of the site or server you are initiating a transfer from e g Volume_1 Test or 192...

Страница 384: ...nction is enabled Enable Time Machine Click this to enable the Time Machine function to work with a Mac OS X Time Machine The Time MachineSettingslistwillappearwhenthischeckbox is checked Time Machine Settings list A list of destination folders on the Network Shares associated with the Time Machine backup New Adds a NAS folder as a Time Machine destination Delete Deletes a NAS folder setup as a Ti...

Страница 385: ... use this function the AFP service is required The AFP service will start automatically as soon as this function is enabled Go to Applications Local Backups Time Machine Under Time Machine Enable Disable click the Enable Time Machine checkbox Click the blue arrow next to Time Machine Settings to see the configuration options Click New under Time Machine Settings to access the SetupWizard for Time ...

Страница 386: ...380 D Link ShareCenter DNS 320L User Manual Section 4 Configuration Select the Volume you want to use for Time Machine and click Next A summary displays your backup options Click Finish ...

Страница 387: ... ShareCenter DNS 320L User Manual Section 4 Configuration The wizard returns to the Time Machine table It displays the Volumes you just selected for the backup process The Volumes are also viewable in the Finder ...

Страница 388: ...382 D Link ShareCenter DNS 320L User Manual Section 4 Configuration You can also browse the Volume in Finder Go to System Preferences click Time Machine ...

Страница 389: ...383 D Link ShareCenter DNS 320L User Manual Section 4 Configuration In Time Machine click Select Backup Disk View the DNS 320L Volumes ...

Страница 390: ...384 D Link ShareCenter DNS 320L User Manual Section 4 Configuration Select the Volume you want to use for the backup and click Use Disk Log in to the server Enter a Name and a Password and click Connect ...

Страница 391: ...anual Section 4 Configuration TheTime Machine backup process is now complete View your settings once you have set your disk To deactivate Time Machine move the slider to OFF This however doesn t delete the Volumes from the DNS 320L settings ...

Страница 392: ...ion 4 Configuration Time Machine Delete a Volume To delete a Volume under Time MachineSettings select theVolume you want to delete it turns red Click the Delete button A warning message prompts you to verify if you want to delete the Volume Click Yes ...

Страница 393: ...User Manual Section 4 Configuration The Volume is no longer visible in Finder To Remove all network shares click the Remove All Network Shares button A warning message appears asking you to confirm your selection Click Yes to continue ...

Страница 394: ...388 D Link ShareCenter DNS 320L User Manual Section 4 Configuration The Time Machine wizard shows an empty Time Machine Settings window ...

Страница 395: ...tination for a USB device that is connected to your DNS 320L MTP Backups Media Transfer Protocol basically backup digital media content from a MTP compatible USB device such as digital cameras MP3 players and smartphones to your ShareCenter USB Backups allows you to backup data from a USB storage device to the ShareCenter or from the ShareCenter to a USB storage device ...

Страница 396: ...s the current MTP backup status USB Backups Click Enable to allow your ShareCenter to copy data from to a USB storage device Category Select either USB to NAS backup from the USB storage device to the ShareCenter or NAS to USB backup from the ShareCenter to the USB storage device Source Click Browse to select a folder as the source folder for the backups Destination Click Browse to select a folder...

Страница 397: ... backup settings 2 Press the USB button to start the backup process The white USB LED flashes briefly to display that the backup is in the process The ShareCenter will create a new folder in the destination folder that you selected in the MTP backups settings and will copy all the media files from the MTP USB device to this folder At this time the USB LED remains white until the device is disconne...

Страница 398: ...ll become solid white Click and hold the USB button at the front for over 5 seconds and the DNS 320L unmounts the device 3 Go to System Management USB Devices Under USB Storage Information you will see detailed information on the device you plugged into the DNS 320L You can connect an Android device but enable USB debugging ...

Страница 399: ...up if USB Backups has been enabled in the USB backup settings 2 Press the USB button to start the backup process The LED starts to blink that the backup is in the process The ShareCenter will copy or sync all the files from the source folder to the destination folder Please Note No warning message will appear to indicate that all data on the destination folder will be deleted automatically USB Bac...

Страница 400: ...white To unmount the USB storage device you can click and hold the USB button at the front of the DNS 320L for over 5 seconds oryoucangototheUSBdevicesmenuoftheSystemManagement icon in the Management Tab of the Web GUI of the device Click the blue arrow to reveal the USB Storage information Click the Unmount button to eject the USB device ...

Страница 401: ...enable or disable the automatic download option Port Settings The user can choose whether to allow the device to automatically choose an incoming connections port or configure the incoming connections port manually Seeding Select one of the three seeding options Torrent Save Path Displays the volume where theTorrent will be saved Encryption Here the user can choose to enable or disable the encrypt...

Страница 402: ...the list with a single click Detail The Details button allows the user to view the files that are being downloaded for each torrent Top Up Down Bottom TheTop Up DownandBottombuttonsallow you to move the selected P2P download in the task list The downloads at the top of the list have a higher priority than the one listed below them Delete The Delete button allows the user to remove a selected downl...

Страница 403: ...vice offered by AWS Amazon Web Services It provides a simple web services interface that can be used to store and retrieve any amount of data at any time from anywhere on the web With Amazon S3 support it is possible to upload the data from your DNS 320L to Amazon S3 or download the data from Amazon S3 to your DNS 320L Amazon S3 ...

Страница 404: ...on 4 Configuration Creating an AWS Account Open your web browser and type the following link for the Amazon Web Services http www aws amazon com s3 Then click on the link at the top named Sign Up Now Follow the instructions to create your AWS account ...

Страница 405: ...tructions to select the amount of desired storage and create your Amazon S3 account You will be issued the following keys as credentials to give you access to the account 1 Access Key ID 2 Secret Access Key Save these keys in a secure location as your ShareCenter will need them to create the backup and recovery jobs to and from the Amazon S3 Cloud Storage ...

Страница 406: ...you will be able to create either a ShareCenter backup or a restore job to the Amazon S3 Cloud Storage You can schedule the job to run once scheduled or manually You will need the following configuration data to create a backup restore job Step 1 Job Name Settings Enter a 16 character name to identify the name of the backup or the restore job ...

Страница 407: ...zon S3 Cloud Storage Secret Access Key Enter your Secret Access Key to access your Amazon S3 Cloud Storage Remote Path Input a new or already existing Amazon bucket name Region Select your Region from the drop down menu Step 3 Server Type Type Select Upload or Download from the drop down menu Backup Type Use the drop down menu and select Overwrite Existing Files Full Backup or Incremental Backup ...

Страница 408: ...e the path to the ShareCenter file location to be either backed up or restored to from the AmazonS3 Cloud Step 5 Schedule Settings Select the Schedule Mode for the job to be executed You may select Manual now or later from the job list Once at a predetermined time and day or Scheduled a predetermined time on a daily basis ...

Страница 409: ...s Note The Job Name cannot be modified Delete Button The Delete button is used to delete any backed up or restored job listed in the Amazon S3 table Click on a created job in the Amazon S3 table so that its text turns red Then click the Delete button to remove the job from your ShareCenter configuration Enable Disable Column This field of the jobs controls whether the job will execute or not If th...

Страница 410: ...ice offers a cloud service to DNS 320L users Connect to the mydlink service from any location and using any operating system If you are not connecting to the service directly from the DNS 320L open your browser and type in www mydlink com Sign into your account on the home page mydlink ...

Страница 411: ...405 D Link ShareCenter DNS 320L User Manual Section 4 Configuration Check your e mail box and click the weblink to activate mydlink account mydlink Verification ...

Страница 412: ...406 D Link ShareCenter DNS 320L User Manual Section 4 Configuration mydink is verified ...

Страница 413: ...reCenter DNS 320L User Manual Section 4 Configuration Once you log into your account you will need the Java Runtime machine The screen provides directions in order for you to download it mydlink Java Runtime Machine ...

Страница 414: ...408 D Link ShareCenter DNS 320L User Manual Section 4 Configuration The Java Runtime machine takes a few steps Follow the instructions ...

Страница 415: ...409 D Link ShareCenter DNS 320L User Manual Section 4 Configuration After the Java Runtime machine is installed run the mydlink application and enter the password ...

Страница 416: ...L User Manual Section 4 Configuration Once you are connected you can view your existing storage on the cloud and the DNS 320L You can also upload download files using your browser create new folders rename folders and delete folders ...

Страница 417: ...411 D Link ShareCenter DNS 320L User Manual Section 4 Configuration Click Volume 1 to see its contents Here you can create a New Folder Upload and Download files Delete and Rename files ...

Страница 418: ...elete a folder click the checkbox next to the file you wish to delete Click the Delete button A confirmation window will appear for you to confirm the deletion Click Delete to proceed To rename a file or folder click the checkbox next to the file folder you wish to rename Click the Rename button A confirmation window will appear for you to rename the file Enter a new name and click Rename ...

Страница 419: ...l Information you can view the properties of your NAS On display is the Device Name mydlink Number Model Name MAC address which is associated with your account and NAS and Activation time and date Also viewable is the router you are using and file settings mydlink Settings Details ...

Страница 420: ... your new mydlink password to access your ShareCenter NAS again A red x indicates that your ShareCenter NAS is offline and currently cannot be accessed remotely If your ShareCenter is offline try the following Check to make sure that the internet connection to your ShareCenter NAS is working properly Try restarting your internet router Check your ShareCenter NAS cable connections and make sure the...

Страница 421: ...ation Select the device you wish to delete A warning message appears for you to verify your deletion Deleting a mydlink device Enter your admin password to delete the device Click Delete Device to proceed An acknowledgement message appears to confirm the deletion ...

Страница 422: ...onfiguration Under Profile Information click the Delete account link at the bottom Deleting a mydlink account A warning message appears to ask you if you want to delete the account Select No keep it to do nothing or click Yes delete it to delete the account ...

Страница 423: ...Manual Section 4 Configuration In order to delete the mydlink account you need to enter your password details Enter your details and then click Confirm Delete Click Cancel to revert back and keep your account in tact The Account is deleted ...

Страница 424: ... 4 Configuration The mydlink Access NAS App Access your files anytime anywhere with your ShareCenter Cloud NAS and the mydlink Access NAS app Stream your stored photos documents music and movies directly to your iOS and Android devices over 3G or Wi Fi ...

Страница 425: ...nts such as Microsoft Office files and PDFs Save files to your mobile device for offline playback Back up photos and images from your Camera Roll to your ShareCenter Cloud NAS Search for specific files on your ShareCenter Cloud NAS or on your iOS device Rename and delete your files Supports Open in option to open your files with different apps Supports AirPlay for playback of your media on other d...

Страница 426: ...ccess NAS is compatible with the following models DNS 320L ShareCenter 2 Bay Cloud Network Storage Enclosure DNS 320LW ShareCenter 2 Bay Cloud Network Storage Enclosure DNS 327L ShareCenter 2 Bay Cloud Network Storage Enclosure More coming soon Note If you are using a DNS 325 or DNS 345 please use the mydlink Cloud app ...

Страница 427: ...al Section 4 Configuration You can download the app from below link iOS iTunes App Store https itunes apple com us app mydlink access nas id531078699 l zh mt 8 Android Google Play https play google com store apps details id com dlink nas hl en ...

Страница 428: ...with each one providing a different method of sharing or distributing data amongst the drives The DNS 320L supports Standard JBOD RAID 0 and RAID 1 Standard provides a single volume for each drive Although performance is improved the lack of any RAID or mirroring means that if one drive fails all data on the volume will be lost Standard JBOD JBOD allows you to create a large virtual disk drive by ...

Страница 429: ...e is improved the lack of fault tolerance means that if one drive fails all data in the array will be lost RAID 1 RAID 1 provides mirroring over multiple disks with the same read write speed of a single disk A RAID 1 array can only be as large as it s smallest member disk Because the data is stored on multiple disks RAID 1 provides fault tolerance and protection in addition to performance advantag...

Страница 430: ...is the combined total of all the individual drives in the set RAID 0 allows you to assign two or more disks as a striped set Once you create the striped set you will see it as a single disk drive But when you write data to the RAID 0 striped set the data will be distributed across all of the drives that make up the set Because each disk has less to do it takes less time to write the data The same ...

Страница 431: ...l see it as a single disk drive But when you write data to the mirrored set it will duplicate the data across all members of the set This ensures that your data is protected against loss if any hard drive in the RAID 1 set fails In fact as long as any single member of the set remains functional you will continue to operate normally with complete access to your data ...

Страница 432: ...tivity The DNS 320L supports USB UPS giving users the ability to share the UPS on their local network and protect from an abnormal shutdown due to a power failure Connect a UPS to the USB port on the back of the ShareCenter Standalone and Network Master Mode Log into the DNS 320L ...

Страница 433: ... and then USB Devices Click the blue arrow next to UPS Settings There are two modes Standalone and Master Select Standalone to use the UPS only on the DNS 320L or select Master to share the UPS with the network UPS slaves TheUPSStatusscreenshowsthemode manufacturer product type battery charge meter and status ...

Страница 434: ...nowledge Base Under Mode select Master from the drop down list and then click Add Enter the IP address of the other UPS slave on the network Click the button to add more IP addresses Make sure the DNS 320L and the UPS slaves are on the same physical network ...

Страница 435: ...ge Base Once you have entered an IP address the system will check its database for IP address records TheUPSSettingstablewilldisplaytheIPaddress es youadded Your DNS 320L is now setup as the network master to notify the network slaves about critical power status ...

Страница 436: ...DNS 320L User Manual Section 5 Knowledge Base Deleting a UPS Slave UnderManagement SystemManagement USBDevices UPS Setting select the IP address Your selection will turn red Click Delete The DNS 320L will process your request ...

Страница 437: ...431 D Link ShareCenter DNS 320L User Manual Section 5 Knowledge Base The IP address will no longer be listed in the table ...

Страница 438: ...k of the device It is important to ensure that any of the printer manufacturer s drivers are already installed or available on any computer you want to print from Note Only the print function is supported The device does not support the copy and scan functions of Multi Function Printers To add a printer connect your printer via USB cable to the USB port of your device The printer should appear in ...

Страница 439: ...Base Select the printer driver from the installed Manufacturer list or use the Have Disk button to browse for the printer driver file The Windows Add Printer Wizard will launch Click OK to continue Connect to your device with Samba and then double click the lp icon ...

Страница 440: ...nter DNS 320L User Manual Section 5 Knowledge Base Once you have selected the proper driver as shown in the browse list then click OK to install the printer The printer is now installed and the printer queue will appear ...

Страница 441: ...20L User Manual Section 5 Knowledge Base Setting up a printer using Mac OS 10 8 GotoManagement SystemManagement USBDevicestoview the printer attached to your NAS Checkthedevicesettings underSystemManagement Device Device Settings ...

Страница 442: ...er DNS 320L User Manual Section 5 Knowledge Base DownloadthedriversfromtherespectivePrintermanufacturers and install it on your Mac You need to select the proper firmware for Mac OS 10 8 Go to System Preferences Print Scan ...

Страница 443: ...437 D Link ShareCenter DNS 320L User Manual Section 5 Knowledge Base Under Print Scan click the plus sign Under Add Printer click the IP tab to add the shared printer which is connected to the NAS ...

Страница 444: ...areCenter DNS 320L User Manual Section 5 Knowledge Base Enter the IP address and the Queue configuration Note Under the Queue section enter lp where lp stands for Line Printer Under Location select Printer Software ...

Страница 445: ...e Base Select your specific printer If you cannot find a driver for your printer please download the driver from the manufacturer s web site and install it The IP printer now appears under Print Scan The IP address is clearly visible in the configuration settings ...

Отзывы: