background image


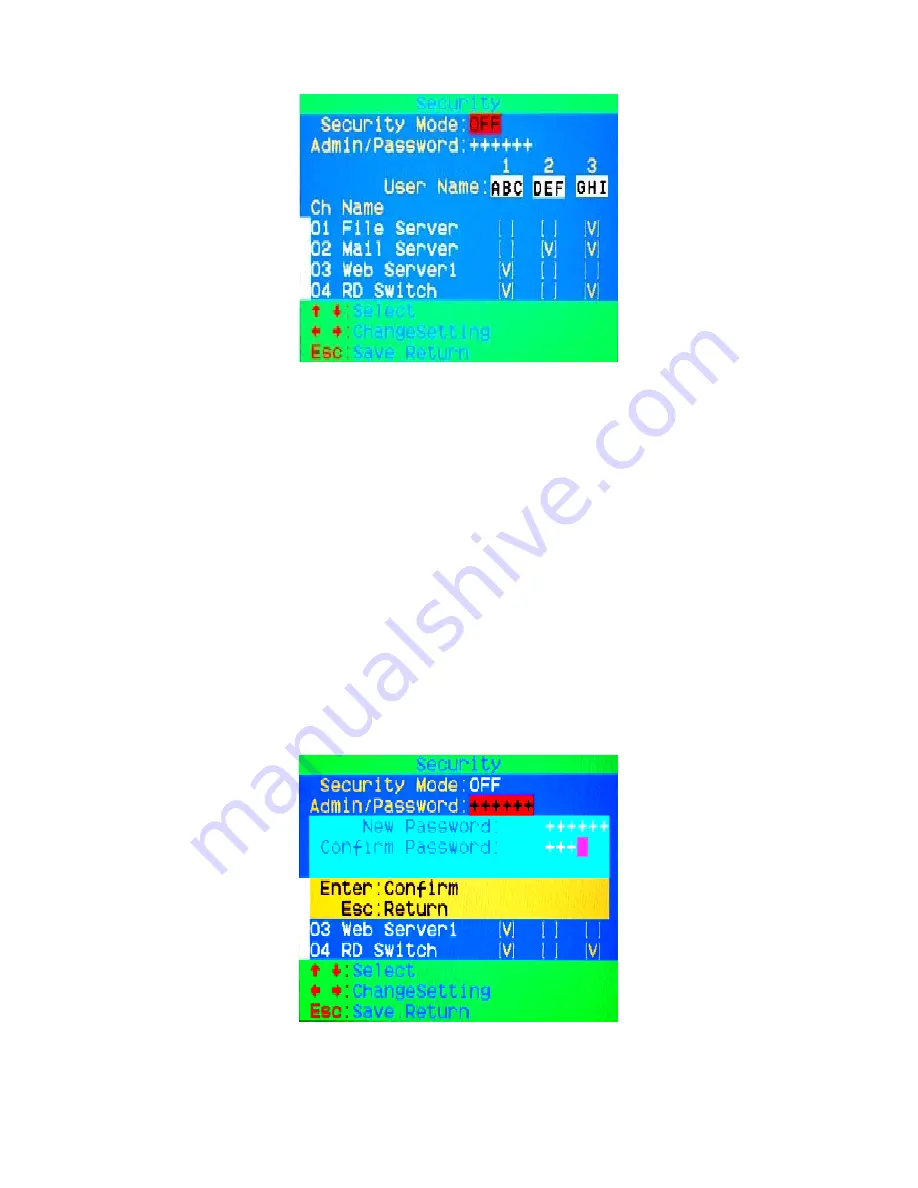
Figure 27: Security setup main window 


7.7.2.


Security Mode 

To change the security mode setting, please move the highlight bar to 

Security Mode

, and press the 

<left arrow>

 or 

<right arrow>

 key to 

change it. The 

<F3> Console Lock

,

 <F6> Port Lock

 and 

user authority 

functions

 cannot be executed until the security mode is enabled. 


7.7.3.


Change Administrator Password 

To change the administrator password, move the highlight bar to


Admin/password

, and press 

<left arrow>

 or 

<right arrow>

 key. The 

administrator password setup window will be shown on the screen. Input 
the new password twice and press 

<ENTER>

 to confirm, or press 

<ESC>


to exit. 


Figure 28: Administrator password setup window 


28


Содержание KVM-440

Страница 1: ...D Link KVM 440 KVM 450 8 16 Port Combo KVM Switch User Manual Version 1 00...

Страница 2: ...15 6 3 1 Specific Channel Selection 15 6 3 2 Arrow Key Channel Shift Function 16 6 3 3 ALT Channel Shift Function 16 6 4 CHANNEL SELECT CASCADE CHAIN LAYER 17 6 5 ENABLE DISABLE BUZZER SOUND 18 6 6 AU...

Страница 3: ...2 25 7 4 1 Start to Auto scan in OSD 25 7 4 2 Stop Auto scan 25 7 4 3 Auto scan Mode 26 7 4 4 Auto scan Time Interval 26 7 5 CONSOLE LOCK IN OSD F3 26 7 6 CHANNEL RENAME F4 27 7 7 SECURITY SETUP F5 27...

Страница 4: ...iguration 7 Emulates a PS 2 or USB keyboard on each PC allowing them to boot normally without a keyboard error 8 Supports hot plugging All devices connected to the KVM can be added or removed at any t...

Страница 5: ...ectors Video 8 16 x HDB 15 female KB MS PS 2 USB signal combined Console Ports Keyboard 1 x 6 pin mini DIN female Mouse 1 x 6 pin mini DIN female Video 1 x HDB 15 female Firmware Upgrade Port Mini USB...

Страница 6: ...R e d T h er e dL E Di n d i c a t e s t h a t t h ec o r r e s p o n d i n gP Ci s s e l e c t e d O n L i n e G r e e n T h eg r e e nL E Di n d i c a t e s t h a t t h ec o r r e s p o n d i n gP C...

Страница 7: ...7...

Страница 8: ...4 3 2 Console Connection Plug the keyboard mouse and monitor into the console ports on the rear panel of the KVM Switch Figure 5 Figure 5 Console connection 8...

Страница 9: ...le to connect your computers Refer to the figures and instruction shown below for information about connecting the KVM to PCs Note Please contact your reseller to purchase the custom combo 4 in 1 cabl...

Страница 10: ...2 keyboard mouse and VGA connectors to computers We recommend that users connect computers in the manner shown below Figure 7 Figure 7 USB PS 2 Keyboard Mouse and VGA connected B Connect only PS 2 ke...

Страница 11: ...ster or Slave Once connected the KVM Switches will automatically configure themselves appropriately as the Master or Slave To install a cascade chain please follow the instruction below A Power off an...

Страница 12: ...d level Slave KVM Switch connect to second level Slave KVM Switch if needed 4 All computers connected to the Master Slave KVM Switch F After all KVM Switches are powered by power adaptors turn on the...

Страница 13: ...Figure 10 Cascade chaining 13...

Страница 14: ......

Страница 15: ...then pressing Enter you can change the leading hotkey The available leading hotkey are Scroll Lock Num Lock or Caps Lock for option Set leading hotkey to Scroll Lock CTRL CTRL Scroll Lock Enter Set le...

Страница 16: ...3 2 Arrow Key Channel Shift Function Press Scroll Lock twice and press the Left Arrow or Right Arrow key to shift left right one channel Switch one channel to the left Scroll Lock Scroll Lock Left Arr...

Страница 17: ...r quick channel selection Press Scroll Lock twice D the cascade channel number 1 2 3 16 and Press Enter Select first layer channel Scroll Lock Scroll Lock D CH L1 Enter Select second layer channel Scr...

Страница 18: ...Please refer section 7 3 6 Setup in OSD Sound Figure 13 Buzzer setup hotkey 6 6 Auto Scan Function Enable the Auto Scan function by pressing Scroll Lock twice then S and Enter The KVM Switch will shi...

Страница 19: ...1 Setup in OSD Scan Mode to set up the auto scan mode Scan all computers Scan any computers which are marked for auto scan 6 6 4 Auto scan Time Interval The auto scan time interval can be adjusted by...

Страница 20: ...refer section 7 5 Console Lock in OSD 7 OSD Operation 7 1 OSD Main Menu Press Scroll Lock twice and Enter then you will enter to OSD On Screen Display main menu The channel number names and the statu...

Страница 21: ...is not marked for auto scan 7 1 4 Current Active Channel Number This indicates the current active channel number The channel of the currently selected computer is displayed in the upper right corner...

Страница 22: ...ty function and user authority settings F6 Lock Port PC port lock function for administrator only 7 2 Channel Selection in OSD 7 2 1 Channel Select to Computer Use the UP and DOWN arrow keys to highli...

Страница 23: ...o the upper layer OSD menu 7 3 Setup in OSD F1 Please use the Up or Down arrow keys to select the item you want to change and use Left or Right arrow keys to change the settings Press ESC to exit and...

Страница 24: ...ion Menu Use four arrow keys to move the OSD main menu to the desired position Press ESC to save the adjusted menu position Figure 20 Menu Position Setup Banner Use four arrow keys to move the channel...

Страница 25: ...uage English En Deutsch De Francais Fr 3 languages are available 7 4 Auto Scan in OSD F2 7 4 1 Start to Auto scan in OSD Press F2 from the OSD main menu The auto scan banner will be shown to indicate...

Страница 26: ...7 Security Setup in OSD You can logout to lock the console by pressing F3 In OSD mode The Console Lock Banner will be shown on the screen Figure 23 Console Lock Banner The KVM will be locked until an...

Страница 27: ...ty Setup F5 7 7 1 Security mode login Press F5 from the OSD main menu to enter security setup mode The administrator login is required before entering security mode Figure 26 Security mode login windo...

Страница 28: ...and user authority functions cannot be executed until the security mode is enabled 7 7 3 Change Administrator Password To change the administrator password move the highlight bar to Admin password and...

Страница 29: ...to cancel Figure 29 User name password setup window 7 7 5 User Authority Setup You can set up the authority level for each user Specific users have different access rights for each channel To change...

Страница 30: ...anyone selects the channel of the locked port either by front panel button or hotkey the system will enter OSD mode and wait for an administrator to unlock the port 7 8 3 Unlock Port Only an administ...

Страница 31: ...u must press the LEFT Window key first this key usually is located between the LEFT CTRL and LEFT ALT Then press the second key Sun Microsystems Function Key Please do not release LEFT Window when you...

Страница 32: ...stallation procedures Make sure the console of the Slave is connected to the Master s PC port Remove any power supplies to the slave unplug all cables before connecting it to the Master Double OSD ima...

Страница 33: ...ility The firmware filename for PS 2 console is like Dlink_KVM_Vxxx_bx PS2 OSD Update for on screen display functions The firmware filename for OSD is like Dlink_KVM_Vxxx_bx OSD To update the firmware...

Страница 34: ...t of computer which runs the firmware update utility Figure 34 7 The utility will scan the KVM programmer automatically Figure 35 8 Please select the target by enabling the check box for example USB C...

Страница 35: ...35 Figure 36 9 Select the firmware file to update Figure 37 10 Click the Program button to start firmware programming Figure 38...

Страница 36: ...tatus bar is shown under the panel to indicate the update progress Figure 40 Figure 39 12 The firmware is updated successfully 13 Unplug the power adapter for a moment and plug it back in to restart t...

Страница 37: ...equipment does cause harmful interference to radio or television reception which can be determined by turning the equipment off and on the user is encouraged to try to correct the interference by one...

Отзывы: