D-Link DGS-3212SR Скачать руководство пользователя страница 55

D-Link DGS-3212SR Layer 2 Gigabit Ethernet Switch


IEEE 802.1Q (tagged) VLANs are implemented on the DES-3226S switch.  802.1Q VLANs require tagging, 
which enables the VLANs to span an entire network (assuming all switches on the network are IEEE 802.1Q-
compliant).   

Any port can be configured as either 

tagging 

or 

untagging

.  The 

untagging 

feature of IEEE 802.1Q VLANs 

allow VLANs to work with legacy switches that don’t recognize VLAN tags in packet headers. The 

tagging 

feature allows VLANs to span multiple 802.1Q VLAN compliant switches through a single physical connection 
and allows Spanning Tree to be enabled on all ports and work normally. 

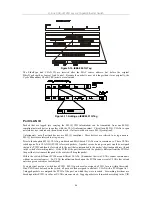
802.1Q VLAN Packet Forwarding 

Packet forwarding decisions are made based upon the following three types of rules: 

• 

Ingress rules – rules relevant to the classification of received frames belonging to a VLAN. 

• 

Forwarding rules between ports – decides to filter or forward the packet 

• 

Egress rules – determines if the packet must be sent tagged or untagged. 


Figure 5-9. IEEE 802.1Q Packet Forwarding 
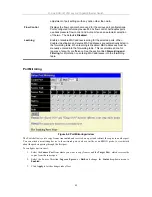
802.1Q VLAN Tags 

The figure below shows the 802.1Q VLAN tag.  There are four additional octets inserted after the source MAC 
address. Their presence is indicated by a value of 0x8100 in the EtherType field.  When a packet’s EtherType 
field is equal to 0x8100, the packet carries the IEEE 802.1Q/802.1p tag.  The tag is contained in the following 
two octets and consists of 3 bits or user priority, 1 bit of Canonical Format Identifier (CFI – used for 
encapsulating Token Ring packets so they can be carried across Ethernet backbones), and 12 bits of VLAN ID 
(VID).  The 3 bits of user priority are used by 802.1p.  The VID is the VLAN identifier and is used by the 
802.1Q standard.  Because the VID is 12 bits long, 4094 unique VLANs can be identified. 

The tag is inserted into the packet header making the entire packet longer by 4 octets.  All of the information 
contained in the packet originally is retained. 


45

Содержание DGS-3212SR

Страница 1: ...D Link DGS 3212SR High Density Layer 2 Modular Gigabit Ethernet Switch Manual...

Страница 2: ...strictly forbidden Trademarks used in this text D Link the D LINK logo are trademarks of D Link Computer Corporation Microsoft and Windows are registered trademarks of Microsoft Corporation Other trad...

Страница 3: ...340T 1000BASE T Module 4 DEM 340MG SFP Mini GBIC Module 4 DEM 540 IEEE 1394 Stacking Module 5 Switch Stacking 5 Stacking Module LED Indicators 6 Management Options 7 Installation 8 Package Contents 8...

Страница 4: ...51 Forwarding and Filtering 53 IGMP Settings 56 Static Router Ports 57 Spanning Tree Protocol Configuration 59 802 1w Rapid Spanning Tree 59 Quality of Service Configuration 64 Traffic Control Broadc...

Страница 5: ...SNMP Host Table 97 SNMP Engine ID 98 System Monitoring and Statistics 99 Port Utilization 99 Packets 100 Maintenance 110 Technical Specifications 115 Glossary 117...

Страница 6: ...r prompts appearing on your screen For example You have mail Bold font is also used to represent filenames program names and commands For example use the copy command Boldface Typewriter Font Indicate...

Страница 7: ...ety section the caution icon is used to indicate cautions and precautions that you need to review and follow Safety Cautions To reduce the risk of bodily injury electrical shock fire and damage to the...

Страница 8: ...ated to operate with the power available in your location Safety Instructions continued Use only approved power cable s If you have not been provided with a power cable for your system or for any AC p...

Страница 9: ...er installing system components in a rack never pull more than one component out of the rack on its slide assemblies at one time The weight of more than one extended component could cause the rack to...

Страница 10: ...is omitted or disconnected Protecting Against Electrostatic Discharge Static electricity can harm delicate components inside your system To prevent static damage discharge static electricity from you...

Страница 11: ...ing IEEE 1394 stacking cables or up to 8 additional Gigabit Ethernet ports 1000BASE T or SFP or use combination of stacking and Gigabit Ethernet ports Star topology switch stacking configuration for u...

Страница 12: ...module or a stacking module to connect to four DES 3226S or four DES 3326S switches LED Indicators The LED indicators of the Switch include Power Console and Link Act The following shows the LED indi...

Страница 13: ...supported at this time NOTICE At the time of the writing of this manual stacking of multiple DGS 3212SR switches is not supported The Stack NO LED on the switch s front panel will display an F regardl...

Страница 14: ...d in combination with any of the three available modules Plug in modules must be purchased separately DEM 340T 1000BASE T Module Figure 1 4 1000BASE T Four port module Front panel module Connects to 1...

Страница 15: ...UT port on the next switch in the stack Restrictions and Cautions for Stacking The DGS 3212SR may serve as the Master of up to eight additional switches The slave switch units must meet the following...

Страница 16: ...ed all switches for switch stacking An improperly configured switch stack can cause a broadcast storm Stacking Module LED Indicators Each stacking module has a single Link Act LED indicator for each I...

Страница 17: ...or Telnet You can also connect a computer or terminal to the serial console port or use Telnet to access the switch The command line driven interface provides complete access to all switch management...

Страница 18: ...Port Password Protection SNMP Settings IP Address Assignment Connecting Devices to the Switch Package Contents Before you begin installing the switch confirm that your package contains the following i...

Страница 19: ...until you have properly configured all switches for switch stacking An improperly configured switch stack can cause a broadcast storm Installing the Switch Without the Rack 1 Install the switch on a l...

Страница 20: ...ndard 19 inch 48 3 cm racks Refer to the illustrations below 1 Use the supplied screws to attach a mounting bracket to each side of the switch 2 Align the holes in the mounting bracket with the holes...

Страница 21: ...D Link DGS 3212SR Layer 2 Gigabit Ethernet Switch Figure 2 3 Install switch in equipment rack 11...

Страница 22: ...a ring topology All switches in a stacked group must be properly configured to operate The instructions below Configuring a Stacked Switch Group tell you how to configure the DGS 3212SR to function as...

Страница 23: ...g mode to reduce potential confusion To configure the DES 3226S SR to function in a stacked group as a slave do the following 1 At the CLI login prompt enter config stacking mode enable auto and press...

Страница 24: ...switch stack consisting of only DES 3226S or DES 3226SR switches The stacking of DGS 3212SR switches is not supported at this time The Unit ID of individual DES 3226S SR switches in a switch stack is...

Страница 25: ...7 DES 3226S SR Stacking Module Front Panel NOTICE At the time of the writing of this manual the Unit ID STACK NO of a DES 3226S SR switch in a switch stack connected to a DGS 3212SR will be determine...

Страница 26: ...ndant Power System The switch supports an external redundant power system Figure 2 5 DPS 200 with DES 3226S NOTE See the DPS 200 documentation for more information CAUTION Do not use the switch with a...

Страница 27: ...ow and Ctrl keys Ensure that you select Terminal keys not Windows keys NOTICE When you use HyperTerminal with the Microsoft Windows 2000 operating system ensure that you have Windows 2000 Service Pack...

Страница 28: ...nistrator account being created and press the Enter key 3 You will be prompted to enter the same password again to verify it Type the same password and press the Enter key 4 Successful creation of the...

Страница 29: ...eparated into two parts The first part is to maintain a list of users and their attributes that are allowed to act as SNMP managers The second part describes what each user on that list can do as an S...

Страница 30: ...managed with the Web based manager The switch IP address can be automatically set using BOOTP or DHCP protocols in which case the actual address assigned to the switch must be known The IP address may...

Страница 31: ...ia the Web based management Connecting Devices to the Switch After you assign IP addresses to the switch you can connect devices to the switch To connect a device to an SFP transceiver port 1 Use your...

Страница 32: ...ol The Web based management module and the Console program and Telnet are different ways to access the same internal switching software and configure it Thus all settings encountered in web based mana...

Страница 33: ...Manager Screen Area Function 1 Presents a graphical near real time image of the front panel of the switch This area displays the switch s ports and expansion modules showing port activity duplex mode...

Страница 34: ...egmentation multicast router server MAC checking and 802 1x The Switch Information page is used to enter system contact and physical location information and lists basic information such as the switch...

Страница 35: ...Information window shows which if any external modules are installed and the switch s MAC Address assigned by the factory and unchangeable In addition the Boot PROM and Firmware Version numbers are s...

Страница 36: ...subnet mask of 255 0 0 0 and a default gateway of 0 0 0 0 To manually assign the switch s IP address subnet mask and default gateway address Select Manual from the Get IP From drop down menu Enter the...

Страница 37: ...require entries under this option are as follows Subnet Mask A Bitmask that determines the extent of the subnet that the Switch is on Should be of the form xxx xxx xxx xxx where each xxx is a number...

Страница 38: ...xxx xxx xxx xxx z Where the x s represent the IP address to be assigned to the IP interface named System and the z represents the corresponding number of subnets in CIDR notation The IP interface name...

Страница 39: ...User Name and New Password and retype the same password in the Confirm New Password entry field Choose the level of privilege Admin or User from the Access Right drop down menu To add a user account...

Страница 40: ...s Yes No Admin and User Privileges After establishing a User Account with Admin level privileges be sure to save the changes see below Saving Changes Changes made to the switch s configuration must be...

Страница 41: ...ch is rebooted it will return to the last configuration saved to the switch s NV RAM using the Save Changes option Reset System returns all configuration settings to the factory default settings but d...

Страница 42: ...valent to executing Save Changes and then restarting the switch Switch Information The first page displayed upon logging in presents the System Information menu This page can be accessed at any time b...

Страница 43: ...anager and their corresponding CLI command groups are the following Parameter Description Serial Port Auto Logout Select the logout time used for the console interface This automatically logs the user...

Страница 44: ...allow configuration of the system through Telnet choose Disabled Web Status Web based management is Enabled by default If you choose to disable this by selecting Disabled you will lose the ability to...

Страница 45: ...a switch s default stacking configuration for example the order in the stack you must use the console Command Line Interface The number of switches in the switch stack up to 5 total are displayed in t...

Страница 46: ...itches in the switch stack Entering the show stacking command with no parameters returns all of the relevant stacking information for all of the switches in the stack Figure 4 2 Console CLI show stack...

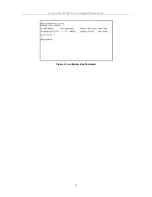
Страница 47: ...D Link DGS 3212SR Layer 2 Gigabit Ethernet Switch Figure 4 3 config stacking Command 37...

Страница 48: ...LAN In the Configuration folder open the VLAN folder and click the Static VLAN Entry link to open the following menu Figure 5 1 802 1Q Static VLANs The 802 1Q Static VLANs menu lists all previously co...

Страница 49: ...in the Add dialog box or for editing the VLAN name in the Edit dialog box Port Allows an individual port to be specified as member of a VLAN Tag Specifies the port as either 802 1Q tagging or 802 1Q u...

Страница 50: ...d packets received on port 2 will be assigned to VLAN 3 This number is generally the same as the VID number assigned to the port in the Edit 802 1Q VLANs menu above Ingress Check This field can be tog...

Страница 51: ...New button in the header row of the table To edit an existing VLAN click on the Modify button of the VLAN you want to edit To eliminate an entire VLAN click on the X button for the VLAN you wish to de...

Страница 52: ...AN Edit 802 1Q VLANs The following figure and table describe how to edit an existing 802 1Q VLAN entry on the switch Figure 5 7 802 1Q Static VLANs Entry Settings Edit Screen The Static VLANs Edit scr...

Страница 53: ...e Apply button to make your changes take effect 802 1Q Port Settings Open the 802 1Q Port Settings menu and select the Unit and range of ports to configure For the selected port or group of ports choo...

Страница 54: ...s destination the receiving device will use the PVID to make VLAN forwarding decisions If a packet is received by the port and Ingress filtering is enabled the port will compare the VID of the incomin...

Страница 55: ...between ports decides to filter or forward the packet Egress rules determines if the packet must be sent tagged or untagged Figure 5 9 IEEE 802 1Q Packet Forwarding 802 1Q VLAN Tags The figure below...

Страница 56: ...n common use These VLANs relied upon a Port VLAN ID PVID to forward packets A packet received on a given port would be assigned that port s PVID and then be forwarded to the port that corresponded to...

Страница 57: ...and out of those ports If the packet doesn t have an 802 1Q VLAN tag the port will not alter the packet Thus all packets received by and forwarded by an untagging port will have no 802 1Q VLAN informa...

Страница 58: ...s 1 Choose the Unit from the pull down menu 2 Choose the port or sequential range of ports using the From To port pull down menus 3 Use the remaining pull down menus to configure the parameters descri...

Страница 59: ...the forwarding table This is sometimes done for reasons of security or efficiency See the section titled Forwarding and Filtering for information on entering MAC addresses into the forwarding table P...

Страница 60: ...m a 100 Mbps port onto a 10 Mbps port this can cause throughput problems The port you are copying frames from should always support an equal or lower speed than the port to which you are sending the c...

Страница 61: ...tion group This port is called the Master Port of the group and all configuration options including the VLAN configuration that can be applied to the Master Port are applied to the entire link aggrega...

Страница 62: ...s to quickly isolate a bandwidth intensive network device or to have an absolute backup aggregation group that is not under automatic control Type This pull down menu allows you to select between Stat...

Страница 63: ...dress resides MAC Address The MAC address to which packets will be statically forwarded This must be a unicast MAC address Allowed to Go to Unit Allows the designation of the module on which the above...

Страница 64: ...MAC Address The MAC address of the static source of multicast packets This must be a multicast MAC address VID The VLAN ID of the VLAN the above MAC address belongs to Port Settings Allows the selecti...

Страница 65: ...to select a range of ports that the filter settings will be applied to Mode This drop down menu allows you to select the action the switch will take when it receives a multicast packet that is to be f...

Страница 66: ...Multicast group member based on IGMP messages sent from the device to the IGMP host or vice versa The Switch monitors IGMP messages and discontinues forwarding multicast packets when there are no lon...

Страница 67: ...the forwarding table without receiving a membership report Default 260 Leave Timer This specifies the maximum amount of time in seconds between the Switch receiving a leave group message from a host...

Страница 68: ...tries page shown above displays all of the current entries to the Switch s static router port table To add or modify an entry click the Modify button This will open the Static Router Ports Settings pa...

Страница 69: ...sed in 802 1d and creates a single state Discarding In either case ports do not forward packets in the STP port transition states disabled blocking or listening or in the RSTP port state discarding th...

Страница 70: ...TP can interoperate with legacy equipment and is capable of automatically adjusting BPDU packets to 802 1d format when necessary However any segment using 802 1 STP will not benefit from the rapid tra...

Страница 71: ...port on the Switch spends in the listening state while moving from the blocking state to the forwarding state Priority 0 61440 32768 A Priority for the switch can be set from 0 to 61440 This number i...

Страница 72: ...bove with the addition of Port Priority and Port Cost An STP Group spanning tree works in the same way as the switch level spanning tree but the root bridge concept is replaced with a root port concep...

Страница 73: ...P status to 802 1w RSTP status RSTP can coexist with standard STP however the benefits of RSTP are not realized on a port where an 802 1d network connects to an 802 1w enabled network Migration should...

Страница 74: ...lassification can be done with the Output Scheduling menu also explained below Individual ports may still be assigned priority using the 8 levels as defined by the 802 1p standard It is important to n...

Страница 75: ...icast Storm and Destination Look Up Failure may be Enabled or Disabled The Threshold value is the upper threshold at which the specified traffic control is switched on This is the number of Broadcast...

Страница 76: ...ion QoS can be customized by changing the output scheduling used for the hardware queues in the Switch As with any changes to QoS implementation careful consideration should be given to how network tr...

Страница 77: ...figuration window This window allows you to configure traffic class priority by specifying the class value from 0 to 3 of the Switch s eight levels of priority Click Apply to let your changes take eff...

Страница 78: ...y a switch from a switch stack and then a port from that switch Then you specify a second switch from the switch stack and then you select which ports or different ports on the same switch on that swi...

Страница 79: ...ive packets from the port specified above Click Apply to enter the settings into the switch s Traffic Segmentation table Bandwidth Control The bandwidth control settings are used to place a ceiling on...

Страница 80: ...Switch no_limit This drop down menu allows you to specify that the selected port will have no bandwidth limit Enabled disables the limit Rate This field allows you to enter the data rate in kb s that...

Страница 81: ...set Parameter Description Unit Allows you to specify a switch in a switch stack using that switch s Unit ID 15 indicates a switch in standalone mode From To A consecutive group of ports may be config...

Страница 82: ...The following parameters can be set Parameter Description Unit Allows you to specify a switch in a switch stack using that switch s Unit ID 15 indicates a switch in standalone mode From To A consecuti...

Страница 83: ...Figure 13 2 System Log Servers Add The following parameters can be set Parameter Description Index Syslog server settings index 1 4 Server IP The IP address of the Syslog server Severity This drop dow...

Страница 84: ...messages generated internally by syslog line printer subsystem 7 network news subsystem 8 UUCP subsystem 9 clock daemon 10 security authorization messages 11 FTP daemon 12 NTP subsystem 13 log audit...

Страница 85: ...ess to the network Figure 14 1 System Log Servers Add The following parameters can be set Parameter Description Unit Allows you to specify a switch in a switch stack using that switch s Unit ID 15 ind...

Страница 86: ...rameters can be set or are displayed Parameter Description Current Time Displays the current system time Time Source Displays the time source for the system SNTP State Use this pull down menu to Enabl...

Страница 87: ...HH MM SS Enter the current time in hours minutes and seconds if you want to update the system clock Time Zone and DST Figure 15 2 Time Zone and DST Settings Page The following parameters can be set Pa...

Страница 88: ...Month Enter the month DST will start on From time in HH MM Enter the time of day that DST will start on To Which Day Should be To Which Week Enter the week of the month the DST will end To Day of Wee...

Страница 89: ...rame The entire process is described below in two parts To display the currently configured Access Profiles on the switch open the Configuration folder and click on the Access Profile Table link This...

Страница 90: ...MAC address 802 1p Selecting this option instructs the switch to examine the 802 1p priority value of each packet header and use this as the or part of the criterion for forwarding Ethernet type Sele...

Страница 91: ...ne the VLAN part of each packet header and use this as the or part of the criterion for forwarding Source IP Mask Source IP Mask Enter an IP address mask for the source IP address Destination IP Mask...

Страница 92: ...k for the destination port in hex form hex 0x0 0xffff Select UDP to use the UDP port number contained in an incoming packet as the forwarding criterion Selecting UDP requires that you specify a source...

Страница 93: ...switch be entered here to avoid possible frequent disconnection from the switch s Web based management agent Figure 17 1 Security IP Management The following fields can be set Parameter Description IP...

Страница 94: ...de of IEEE 802 1X Port Based Network Access Control Through this mechanism users have to be authorized before being able to access the network See the following figure Figure 17 2 Typical 802 1X Confi...

Страница 95: ...1X Configuration with User Authentication The user s information including account number password and configuration details such as IP address and billing information is stored in a centralized RADIU...

Страница 96: ...EE 802 1X Standards Configure Authenticator To display the current 802 1X Authenticator Settings on the switch open the Security folder and then the Port Access Entity folder and finally click on the...

Страница 97: ...is auto This enables 802 1X and causes the port to begin in the unauthorized state allowing only EAPOL frames to be sent and received through the port The authentication process begins when the link s...

Страница 98: ...n menu select Force Authorized Force Unauthorized or Auto Force Authorized forces the Authenticator of the port to become Authorized Force Unauthorized forces the port to become Unauthorized TxPeriod...

Страница 99: ...X Authenticator Settings To set up the Switch s 802 1X port based authentication select which ports are to be configured in the From and To fields Next enable the ports by selecting Authenticator from...

Страница 100: ...r Authentic Port This is the UDP port on the Radius server that will be used to authenticate users The default is 1812 Accounting Port This is the UDP port on the Radius server that will be used to lo...

Страница 101: ...device SNMP settings are configured using the menus located on the SNMP V3 folder of the web manager Workstations on the network that are allowed SNMP privileged access to the switch can be restricte...

Страница 102: ...HMAC MD5 96 authentication level will be used SHA Indicates that the HMAC SHA authentication protocol will be used Priv Protocol None Indicates that no authorization protocol is in use DES Indicates...

Страница 103: ...vel will be used SHA Specifies that the HMAC SHA authentication protocol will be used Priv Protocol None Specifies that no authorization protocol is in use If an authorization protocol is chosen you m...

Страница 104: ...SNMP view being created Subtree OID Type the Object Identifier OID Subtree for the view The OID identifies an object tree MIB tree that will be included or excluded from access by an SNMP manager View...

Страница 105: ...ing parameters can be set Parameter Description Group Name Type an alphanumeric string of up to 32 characters This is used to identify the new SNMP group of SNMP users Read View Name This name is used...

Страница 106: ...agent The community string acts like a password to permit access to the agent on the switch One or more of the following characteristics can be associated with the community string An Access List of I...

Страница 107: ...g SNMP Host Table entry click the corresponding X icon under the Delete heading To display the current settings for an existing SNMP Group Table entry click the blue link for the entry under the Host...

Страница 108: ...ntations This is an alphanumeric string used to identify the SNMP engine on the switch To display the switch s SNMP Engine ID open the Management folder and then the SNMPV3 folder Next click on the SN...

Страница 109: ...ing a line graph or table format To view the port utilization click on the Network Monitoring folder then the Statistics folder and then the Port Utilization link Figure 19 1 Port Utilization Line Cha...

Страница 110: ...d sets the interval at which the error statistics are updated The following fields can be set Parameter Description Unit Allows you to specify a switch in a switch stack using that switch s Unit ID 15...

Страница 111: ...nterval field sets the interval at which the error statistics are updated The following fields can be set Parameter Description Unit Allows you to specify a switch in a switch stack using that switch...

Страница 112: ...dicates a switch in standalone mode Port Allows you to specify a port to monitor from the switch selected above Update Interval The time between updates received from the switch in seconds Suspend sto...

Страница 113: ...nu The Update Interval field sets the interval at which the error statistics are updated The following fields can be set Parameter Description Unit Allows you to specify a switch in a switch stack usi...

Страница 114: ...that 64 octets in length excluding framing bits but including FCS octets and had either an FCS or an alignment error Jabber The total number of frames received that were longer than 1518 octets exclud...

Страница 115: ...a port to monitor from the switch selected above Update Interval The time between updates received from the switch in seconds Suspend stops the updates The default is 1s Allows you to specify a switc...

Страница 116: ...statistics are updated The following fields can be set Parameter Description VLAN ID Enter the VLAN ID of the VLAN you want to view the MAC Address table for MAC Address Enter a particular MAC address...

Страница 117: ...onding MAC address from IGMP packets that pass through the switch The number of IGMP reports that were snooped is also displayed in the Reports field Figure 19 9 IGMP Snooping Table The following fiel...

Страница 118: ...ed by a user using the console or Web based management interfaces is displayed as a static router port designated by S A router port that is dynamically configured by the switch is designated by D Fig...

Страница 119: ...Session Table The Session Table page displays the management sessions since the switch was last rebooted Figure 19 12 Session Table Port Access Control This feature was not supported at the writing of...

Страница 120: ...5 indicates a switch in standalone mode Enter the IP address of the TFTP server in the Server IP Address field The TFTP server must be on the same IP subnet as the switch Enter the path and the filena...

Страница 121: ...ch History to TFTP Server To upload the switch history log file to a TFTP server click on the Maintenance folder then the TFTP Service folder and then the Save History Log link Figure 20 4 Save Switch...

Страница 122: ...s to NV RAM before rebooting the switch To retain any configuration changes permanently click on the Save Configuration button in the Save Changes page as shown below Figure 20 6 Save Changes Once the...

Страница 123: ...the last saved configuration when rebooted In addition the Reset System option is added to reset all configuration parameters to their factory defaults save these parameters to the switch s non volat...

Страница 124: ...D Link DGS 3212SR Layer 2 Gigabit Ethernet Switch Logout Use the Logout page to logout of the switch s Web based management agent by clicking on the Log Out button Figure 20 9 Logout 114...

Страница 125: ...IEEE 802 3 Nway auto negotiation Protocols CSMA CD Data Transfer Rates Ethernet Fast Ethernet Gigabit Ethernet Fiber Optic Half duplex Full duplex 10 Mbps 20Mbps 100Mbps 200Mbps 1000Mbps 2000Mbps IEC...

Страница 126: ...441 mm x 309 mm x 44 mm 17 36 x 12 16 1 73 inches 1 0U 19 inch rack mount width Weight 4 4 kg 9 7 lbs EMI FCC Part 15 IECES 003 Canada EN55022 EN50082 1 or EN55024 BSMI CNS13438 Safety UL 1950 CSA22...

Страница 127: ...ed In addition the protocol can assign the subnet mask and default gateway to a device bridge A device that interconnects local or remote networks no matter what higher level protocols are involved Br...

Страница 128: ...ed systems The Switch contains its own internal MIB multicast Single packets copied to a specific subset of network addresses These addresses are specified in the destination address field of the pack...

Страница 129: ...minal service letting a user log in to another computer system and access a host as if the user were connected directly to the host TFTP Trivial File Transfer Protocol Allows you to transfer files suc...

Страница 130: ...ble warranty period D Link will provide repair or replacement of the product D Link shall have the sole discretion whether to repair or replace and replacement product may be new or reconditioned Repl...

Страница 131: ...anty that operation of its software products will be uninterrupted or absolutely error free and no warranty that all defects in the software product within or without the scope of D Link s applicable...

Страница 132: ...ren Zeitraum nicht benutzt sollten Sie es vom Stromnetz trennen Somit wird im Falle einer berspannung eine Besch digung vermieden 13 Durch die L ftungs ffnungen d rfen niemals Gegenst nde oder Fl ssig...

Страница 133: ...Hardware D Link warrants each of its hardware products to be free from defects in workmanship and materials under normal use and service for a period commencing on the date of purchase from D Link or...

Страница 134: ...his warranty but shall not apply to any update or replacement which may be provided for download via the Internet or to any update which may otherwise be provided free of charge D Link s sole obligati...

Страница 135: ...ion from the date of original retail purchase of the Software for a period of ninety 90 days Warranty Period provided that the Software is properly installed on approved hardware and operated as conte...

Страница 136: ...PRODUCT IS WITH THE PURCHASER OF THE PRODUCT Limitation of Liability TO THE MAXIMUM EXTENT PERMITTED BY LAW D LINK IS NOT LIABLE UNDER ANY CONTRACT NEGLIGENCE STRICT LIABILITY OR OTHER LEGAL OR EQUITA...

Страница 137: ...let on a circuit different from that to which the receiver is connected Consult the dealer or an experienced radio TV technician for help For detailed warranty outside the United States please contact...

Страница 138: ...iao Road Haidan District 100081 Beijing China TEL 86 10 68467106 FAX 86 10 68467110 URL www dlink com cn E MAIL liweii digitalchina com cn Denmark D Link Denmark Naverland Denmark Naverland 2 DK 2600...

Страница 139: ...92 FAX 7 095 737 3390 URL www dlink ru E MAIL vl dlink ru Singapore D Link International 1 International Business Park 03 12 The Synergy Singapore 609917 TEL 6 6774 6233 FAX 6 6774 6322 E MAIL info dl...

Страница 140: ...8731 5555 SALES 44 020 8731 5550 FAX 44 020 8731 5511 SALES 44 020 8731 5551 BBS 44 0 181 235 5511 URL www dlink co uk E MAIL info dlink co uk U S A D Link U S A 17595 Mt Herrmann Fountain Valley CA...

Отзывы: