background image

  2

E

N

G

L

IS

H

About This Guide

This guide gives step-by-step instructions for setting up
the DGS-1100-10MPP switch. Please note that the model
you have purchased may appear slightly different from
those shown in the illustrations.

Step 1 – Unpacking

Open the shipping carton and carefully unpack its
contents. Please consult the packing list located in the
User Guide to make sure all items are present and
undamaged. If any item is missing or damaged, please
contact your local D-Link reseller for replacement.

•  DGS-1100-10MPP switch

•  Rack mounting brackets

• 

Power cord

• 

CD (optional)

• 

• 

Mounting kit and rubber feet

Step 2 – Switch Installation

For safe switch installation and operation, it is
recommended that you:

•  Visually inspect the power cord to see that it is

secured fully to the AC power connector.

•  Make sure that there is proper heat dissipation and

adequate ventilation around the switch.

•  Don't place heavy objects on the switch.

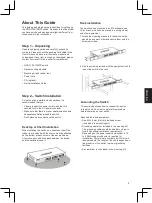
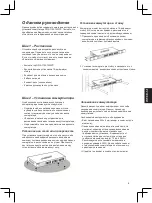
Desktop or Shelf Installation

When installing the switch on a desktop or shelf, the
rubber feet included with the device must be attached
on the bottom at each corner of the device's base.
Allow enough ventilation space between the device
and the objects around it.

Quick Installation Guide

Rack Installation

The switch can be mounted in an EIA standard size
19-inch rack, which can be placed in a wiring closet
with other equipment.

1. Attach the mounting brackets to the switch's side

panels (one on each side) and secure them with the
screws provided.

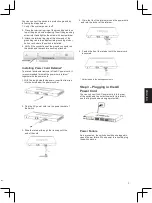
2. Use the screws provided with the equipment rack to

mount the switch in the rack.

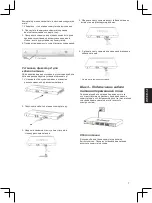
Grounding the Switch

This section describes how to connect the switch
to the ground. You must complete this procedure
before powering on your switch.

Required tools and equipment:

•  One M4 x 6 mm (metric) pan-head screw

(included in the mounting kit).

•  Grounding cable (not included in the mouting kit):

The grounding cable should be sized according to
local and national installation requirements.
Depending on the power supply and system, a 12
to 6 AWG copper conductor is required for
installation. Commercially available 6 AWG wire is
recommended. The length of the cable depends on
the proximity of the switch to proper grounding
facilities.

•  A screwdriver (not included in the mounting kit).

Содержание DGS-1100-10MPP

Страница 1: ...PoE бюджет 242 Вт DGS 1100 10MPP Краткое руководство по установке Quick Installation Guide DGS 1100 10MPP B 8 x 10 100 1000Base T PoE ports 2 x 1000Base X SFP ports switch Настраиваемый коммутатор EasySmart с 8 портами 10 100 1000Base T и 2 портами 1000Base X SFP порты 1 8 с поддержкой PoE 802 3af 802 3at 30 Вт порты 7 8 с поддержкой 802 3bt 90 Вт PoE бюджет 242 Вт DGS 1100 10MPP C ...

Страница 2: ...t included with the device must be attached on the bottom at each corner of the device s base Allow enough ventilation space between the device and the objects around it Quick Installation Guide Rack Installation The switch can be mounted in an EIA standard size 19 inch rack which can be placed in a wiring closet with other equipment 1 Attach the mounting brackets to the switch s side panels one o...

Страница 3: ...tie wrap 2 Plug the AC power cord into the power socket of into the hole below the power socket 3 Slide the retainer through the tie wrap until the end of the cord 4 Circle the tie of the retainer around the power cord 5 Fasten the tie of the retainer until the power cord is secured and into the locker of the retainer Step 3 Plugging in the AC Power Cord You can connect the AC power cord into the ...

Страница 4: ...a the autorun program on the installation CD 1 Insert the CD into your CD ROM drive The autorun program will pop up automatically 2 Click on the Install DNA D Link Network Assistant button and an installation wizard will guide you through the process 3 After successful installing you can find the DNA under Start Programs D Link DNA Option 2 Follow these steps to install DNA manually 1 Insert the C...

Страница 5: ...ус устройства Перед очисткой устройства от загрязнений и пыли отключите питание устройства Удаляйте пыль с помощью влажной салфетки Не используйте жидкие аэрозольные очистители или магнитные статические устройства для очистки Избегайте попадания влаги в устройство Срок службы устройства 5 лет технических характеристиках устройства Для подключения необходима установка легкодоступной розетки вблизи ...

Страница 6: ... входящие в комплект поставки резиновые ножки к нижней панели коммутатора расположив их по углам Обеспечьте достаточное пространство для вентиляции между устройством и объектами вокруг него Краткое руководство по установке Установка коммутатора в стойку Коммутатор может быть установлен в 19 дюймовую стойку EIA которая как правило размещается в серверной комнате вместе с другим оборудованием 1 Прик...

Страница 7: ...тяжку замком вниз в отверстие 2 Подключите кабель питания к коммутатору расположенное под разъемом питания 3 Наденьте зажим на стяжку и сместите его в сторону разъема питания 4 Оберните ленту зажима вокруг кабеля питания и 5 Затяните ленту зажима для надежной фиксации кабеля питания вставьте ее в фиксирующий замок Шаг 3 Подключение кабеля питания переменного тока Подключите кабель питания переменн...

Страница 8: ...ка 2 Нажмите кнопку Install DNA D Link Network Assistant Установить DNA и выполните установку с появится автоматически помощью Мастера 3 После успешного завершения установки DNA можно будет найти в разделе Пуск Программы D Link DNA Вариант 2 Выполните следующие шаги чтобы установить DNA вручную в привод CD ROM 2 В меню Пуск на рабочем столе Windows выберите Мой компьютер 3 Дважды нажмите на значке...

Страница 9: ...88 Mpps Flash память 32 МБ DGS 1100 10MPP C Метод коммутации Store and forward IEEE 802 3az Energy Efficient Ethernet EEE Безопасность cUL UL LVD CB CCC BSMI Уровень шума MTBF часы 2 порта 1000Base X SFP Power Fail Power OK на порт PoE IEEE 802 3z 1000Base X Настраиваемое автоматически или вручную определение MDI MDIX режима дуплекса DGS 1100 10MPP C 16K записей DGS 1100 10MPP B 1 5 МБ DGS 1100 10...

Страница 10: ... 495 744 00 99 E mail mail dlink ru Україна Київ вул Межигірська 87 А Тел 38 044 545 64 40 E mail ua dlink ua Moldova Chisinau str C Negruzzi 8 Tel 373 22 80 81 07 E mail info dlink md Беларусь Мінск пр т Незалежнасці 169 Тэл 375 17 218 13 65 E mail support dlink by Қазақстан Алматы Құрманғазы к cі 143 үй Тел 7 727 378 55 90 E mail almaty dlink ru Հայաստան Երևան Դավթաշեն 3 րդ թաղամաս 23 5 Հեռ 374 ...

Отзывы: