background image

31

D-Link DCS-933L User Manual

31

Section 3 - Configuration

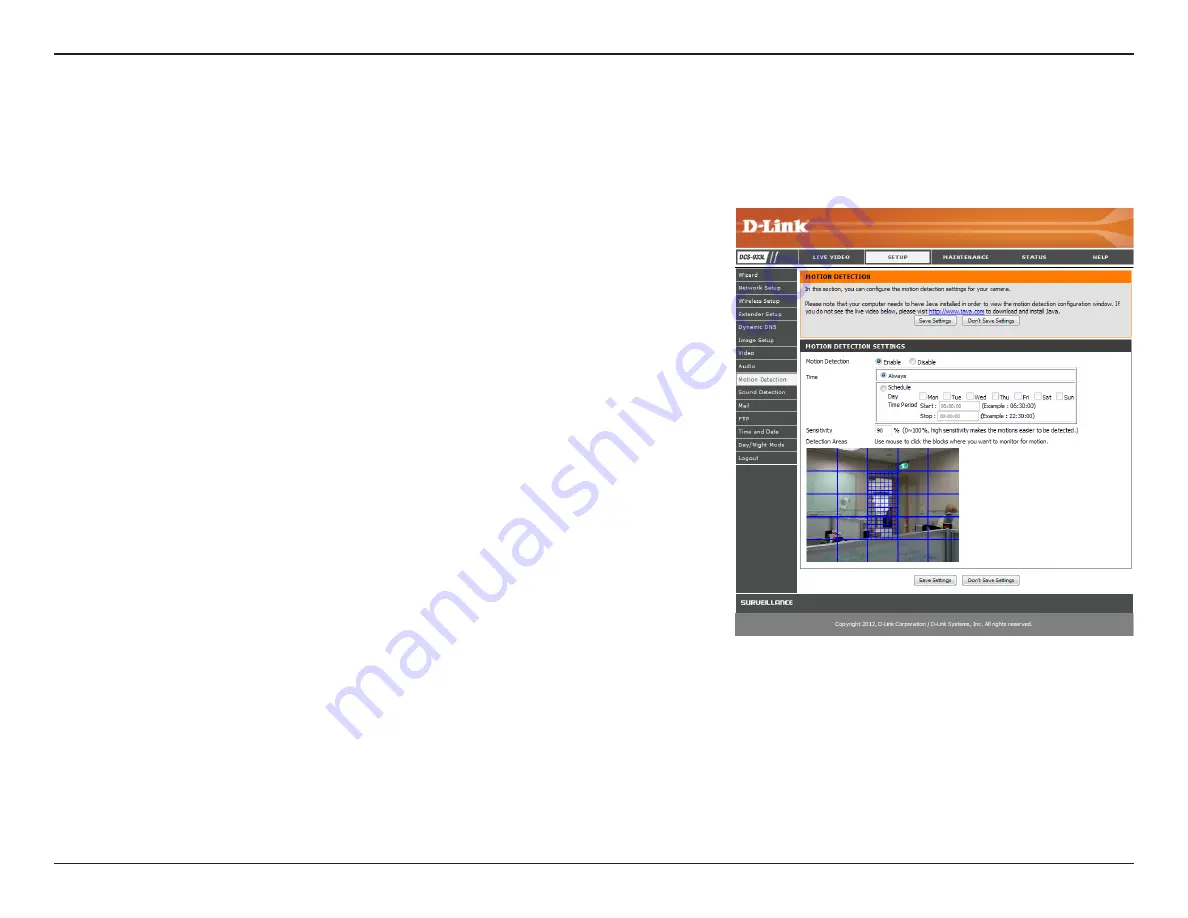
Motion Detection

Motion detection allows you to mark areas of your camera’s video to monitor for motion, which can be used to trigger snapshots 

or recordings. Refer to 

“Mail” 

on page 33 and 

“FTP”

 on page 35 for more details.

Motion 

Detection:

Time:

Sensitivity:

Detection 

Areas:

Select whether you want to enable or disable the motion detection 

feature of your camera.

Specify whether you want to 

Always

 have motion detection enabled, 

or according to a 

Schedule 

that you define.

Specify the amount of difference between two sequential images that 

will indicate motion. 

Use your mouse to click on the areas of the video that you would like 

to monitor for motion. 

Содержание DCS-933L Cloud Camera 1150

Страница 1: ...Version 1 0 02 06 2013 User Manual Day Night Network Camera DCS 933L Cloud Camera 1150 ...

Страница 2: ...al Revision Trademarks D Link and the D Link logo are trademarks or registered trademarks of D Link Corporation or its subsidiaries in the United States or other countries All other company or product names mentioned herein are trademarks or registered trademarks of their respective companies Copyright 2012 2013 by D Link Corporation All rights reserved This publication may not be reproduced in wh...

Страница 3: ...onsiderations 16 WPS Push Button Setup 17 mydlink 18 Configuration 19 Using the Web Configuration Interface 19 Live Video 20 Setup 21 Wizard 21 Internet Connection Setup Wizard 22 Network Setup 24 Wireless Setup 25 Repeater Setup 26 DDNS 27 Image Setup 28 Video 29 Audio 30 Motion Detection 31 Sound Detection 32 Mail 33 FTP 35 Time and Date 37 Day Night Mode 38 Maintenance 39 Admin 39 System 40 Fir...

Страница 4: ...and void the warranty for this product If any of the above items are missing please contact your reseller System Requirements Computer with Microsoft Windows 8 7 Vista XP or Mac with OS X 10 6 or higher PC with 1 3GHz or above and at least 128MB RAM Internet Explorer 7 Firefox 12 Safari 4 or Chrome 20 or higher version with Java installed and enabled Existing 10 100 Ethernet based network or 802 1...

Страница 5: ...any PC Notebook over your local network or through the Internet via a web browser The simple installation and intuitive web based interface offer easy integration with your Ethernet Fast Ethernet or 802 11 b g n wireless network and its Repeater Mode even allows you to increase your wireless network s coverage The DCS 933L also comes with remote monitoring and motion detection features for a compl...

Страница 6: ...n set volume limits to detect when a loud sound is picked up by the camera Supports a Variety of Platforms Supporting TCP IP networking HTTP and other Internet related protocols The DCS 933L can also be integrated easily into other Internet Intranet applications because of its standards based features 802 11b g n Wireless or Ethernet Fast Ethernet Support The DCS 933L offers wireless 802 11b g n a...

Страница 7: ...7 D Link DCS 933L User Manual Section 1 Product Overview Hardware Overview Front View Camera Lens Microphone IR LED Light Sensor ...

Страница 8: ...8 D Link DCS 933L User Manual Section 1 Product Overview Rear View Power Connector Ethernet Port Reset Button WPS LED WPS Button Camera Stand Power and Link LED ...

Страница 9: ...ge 10 2 Camera Setup Wizard If you do not have a mydlink enabled router use the Camera Setup Wizard to guide you through the setup and initial configuration of your camera Refer to page 13 3 Manual Hardware Installation This section shows you how to manually set up your camera although in order to use the mydlink features of your camera you will still need to run the Camera Setup Wizard Refer to p...

Страница 10: ...ionwillautomaticallyconfigureyourDCS 933L and add the camera to your mydlink account With this quick and easy setup you can remotely access your camera from the www mydlink com website to manage and monitor your DCS 933L Zero Configuration Setup Connect the Ethernet Cable Use the included Ethernet cable and plug it into the camera Plug the other end into an available port on your router If you wis...

Страница 11: ...ically configured details Make a note of the details and click Yes to add the camera to your account Check Your mydlink Account Openawebbrowserandlogintoyourmydlinkaccount Themydlinkpagewill check for new devices and display a New device Found pop up notification in the bottom left corner Click the notification to continue ...

Страница 12: ... router wirelessly disconnect the Ethernet cable and move the camera to its intended location Your router s wireless settings will have been automatically transferred to the camera and no further configuration is required Your camera is now set up You can skip to the mydlink section on page 18 To learn more about the mydlink features of this camera or for Configuration go to page 19 for advanced c...

Страница 13: ...ct your camera and choose the Windows Setup Wizard Once your computer downloads the file unzip the file and then double click on the autorun exe located in the Advanced folder to run the wizard Then click Set up your Cloud Camera to go through the Setup Wizard which will guide you through the step by step installation process ...

Страница 14: ...choose the Mac OS Setup Wizard Once downloaded open the Setup Wizard file and lunch the application After about 20 30 seconds the Setup Wizard will open which will guide you step by step through the installation process from connecting your hardware to configuring your camera and registering it with your mydlink account ...

Страница 15: ...workwirelessly Formore information refer to WPS Push Button Setup on page 17 If your router does not support WPS you will still be able to set up your camera s wireless settings in the camera s web interface Connect the Ethernet Cable Use the included Ethernet cable and plug it into the camera Plug the other end into an available port on your router Attach the External Power Adapter Connect the po...

Страница 16: ... degree angle appears to be almost 3 feet 1 meter thick At a 2 degree angle it looks over 42 feet 14 meters thick Position your devices so that the signal will travel straight through a wall or ceiling instead of at an angle for better reception 3 Building Materials make a difference A solid metal door or aluminum studs may weaken the wireless signal Try to position your access points wireless rou...

Страница 17: ...he front or side of your router On some routers you may needtologintothewebinterfaceandclickonanon screenbuttontoactivate the WPS feature If you are not sure where the WPS button is on your router please refer to your router s User Manual The DCS 933L will automatically create a secure wireless connection to your router Whileconnecting thegreenLEDwillflashandyourcamerawillreboot WPS Push Button Se...

Страница 18: ...motely access your camera from the www mydlink com website Once you are signed on to your mydlink account you will see a screen similar to the following For more details on using your camera with mydlink go to the Support section of the mydlink website and check the User Manual section for your product to find the latest instruction guide for your camera s mydlink features ...

Страница 19: ...d configure your DCS 933L At the end of the wizard click Go To Camera or enter the IP address of your camera into a web browser such as Internet Explorer To log in use the User name admin and the password you created in the Setup Wizard If you did not create a password the default password is blank After entering your password click OK Note If you are directly connecting your PC to the camera or i...

Страница 20: ...your camera Click on these buttons to zoom in and out of the video Click on the ON OFF button to turn audio playback on and off Click on the ON OFF button to manually turn the night mode ON andOFF PleaserefertoDay NightModeonpage38formoredetails The Live Video screen shows you the live video feed from your camera For information on how to configure your Live Video streams refer to Video on page 29...

Страница 21: ...n Setup Wizard that includes step by step instructions Otherwise you may manuallyconfigureyourconnectionusingtheManualInternetConnection Setup Note To register your camera with mydlink and enable its mydlink related features you will need to use the Camera Setup Wizard Please refer to Camera Setup Wizard on page 13 for more details ...

Страница 22: ...ction Default If you are connected to a router or are not sure which connection to use select DHCP Connection Static IP Address This will allow you to manually enter your network settings for the camera If you are not sure what settings to enter check with your Internet Service Provider or network administrator PPPoE Connection If your camera is directly connected to a DSL modem you may need to us...

Страница 23: ...d and scheduled at the right time Click Next to continue This page displays your configured settings Click Apply to save and activate your changes or click Back to change your settings If you have a Dynamic DNS account and would like the camera to update your IP address automatically select Enable and enter your host information Otherwise simply select Disable Click Next to continue ...

Страница 24: ...f transmissions to a different subnet Primary DNS Primary domain name server that translates names to IP addresses Secondary DNS Secondary domain name server to backup the Primary DNS If you are using a PPPoE connection enable it and enter the User Name and Password for your PPPoE account You can get this information from your Internet service provider ISP You may configure a Second HTTP port that...

Страница 25: ...ct the connection mode used by your wireless network In most cases you should select Infrastructure Ad Hoc is only used if your camera is directly connecting to another PC or device Clicking this button will allow you to select an available wireless network to connect to and will fill in the necessary settings for you Select the wireless security mode used by your wireless network If you selectWEP...

Страница 26: ... for the extended network You will need to add this information for each wireless device that connects to this Extended network Set the maximum number of clients that are allowed to connect to the extended network If you choose to Create a New Wireless Network Name you can set your wireless security options here Enable Repeater Mode Host Wireless Network Name Extended Wireless Network Name SSID Ma...

Страница 27: ...ost name of the DDNS server Enter your username or e mail used to connect to the DDNS Enter your password used to connect to the DDNS server Enable Server Address Host Name User Name Password DDNS This section allows you to configure the DDNS setting for your camera DDNS will allow all users to access your camera using a domain name instead of an IP address ...

Страница 28: ...flip the video Horizontally flip the video Note If the camera is installed upside down Flip Image and Mirror should both be checked Allows you to adjust the brightness level Allows you to adjust the contrast level Allows you to adjust the saturation level Enable Anti Flicker Flip Image Mirror Brightness Control Contrast Control Saturation Control This section allows you to configure the image sett...

Страница 29: ... 640x480 320x240 and 160x112 Higher settings offer better quality but will require more bandwidth to stream The bps will affect the bit rate of the video recorded by the camera Higher bit rates result in higher video quality but a larger file size Select the frame rate FPS to use for the video stream Higher settings offer better quality but will require more bandwidth to stream Select one of five ...

Страница 30: ...ection allows you to adjust the audio settings for your camera Note Please wait a few seconds for the camera to adjust the audio after making changes Audio Settings Volume Settings You may Enable or Disable the camera audio feed Select the desired volume percentage level ...

Страница 31: ...r more details Motion Detection Time Sensitivity Detection Areas Select whether you want to enable or disable the motion detection feature of your camera Specify whether you want to Always have motion detection enabled or according to a Schedule that you define Specify the amount of difference between two sequential images that will indicate motion Use your mouse to click on the areas of the video...

Страница 32: ...gger snapshots or recordings Refer to Mail on page 33 and FTP on page 35 for more details Sound Detection Time Detection Level Select whether you want to enable or disable the sound detection feature of your camera Specify whether you want to Always have sound detection enabled or according to a Schedule that you define Specifythevolumelevelthatasoundmustexceedinordertobe detected ...

Страница 33: ... For example if you want to use Gmail with SSL TLS for e mail notifications you can follow the setup procedure as below Step 1 Enter smtp gmail com in SMTP Server Address Step 2 Change the SMTP server port number from 25 to 465 Step 3 Enter your gmail e mail address in Sender E mail Address Step 4 Enter the destination e mail address in Receiver E mail Address Step 5 Enter the user name required t...

Страница 34: ... would like the camera to e mail images only when motion or sound is detected You can choose to e mail a snapshot immediately or e mail 6 snapshots together with 3 frames before and after motion sound was detected You can also set the Frame interval time to specify how far apart the snapshots should be This sets the limit for how frequently e mail notifications will be sent This can be set from 1 ...

Страница 35: ...wall This section allows you to configure your camera to send snapshots and video clips to an FTP server Enable the uploading of images to an FTP server Image Frequency Base File Name Enabling this will allow snapshots to be uploaded in different ways Choosing Always will upload snapshots continuously based on the Image Frequency specified Choosing Schedule will allow you to schedule when to start...

Страница 36: ...ile name You can also choose to make subfolders based on a period of time you specify to help you organize your snapshots Sequence Number Suffix will add a number to the end of the snapshot file name up to the number you specify after which the oldest files will be overwritten Enabling this will allow video clips to be uploaded in different ways This is the same as uploading images as specified ab...

Страница 37: ...s clock automatically from an NTP server Select the NTP server closest to you and select whether you want to apply daylight saving corrections If Synchronize NTP Server is disabled you can set the date and time manually You can also click on theCopyYour Computer sTime Settings to automatically set the date and time based on your computer s settings This section allows you to configure the settings...

Страница 38: ...luminators to allow for clear black and white video in dark areas with little to no light Auto Manual Always Day Mode Always Night Mode Day Mode Schedule This mode will automatically switch between Day and Night mode based on the amount of available lighting This mode allows you to manually switch between modes through the Live Video page This sets the camera to always use Day mode This sets the c...

Страница 39: ... Turning this off may be useful if you do not want the camera to be noticeable Select Enable to enable user access control or Disable to allow only the administrator account to access the camera Select Enable to allow access to the current camera snapshot via the web address indicated Select Enable to allow the current time to be added to the camera video and select a color to use for the text You...

Страница 40: ...ck the Save Configuration button to save the current camera configuration to your local PC To load a previously saved configuration click the Browse button select your saved configuration file then click the Restore Configuration From File button Click the Restore Factory Defaults button to reset all settings back to the factory defaults Please note that this will erase any changes you have made t...

Страница 41: ...test firmware from the D Link Support Page to your local hard drive Click the Browse button and select the firmware file then click the Upload button to start the firmware upgrade Warning The firmware upgrade process must not be interrupted or the camera may be damaged When upgrading firmware do not unplug the camera or your PC or close your web browser until the process is complete It is also hig...

Страница 42: ...42 D Link DCS 933L User Manual 42 Section 3 Configuration Status Device Info This section displays all the detailed information about your device and network settings ...

Страница 43: ...43 D Link DCS 933L User Manual 43 Section 3 Configuration Active User This page lists all the active users information including the User Name IP address and the time that camera access began ...

Страница 44: ... solid green your Internet connection is working your router s LAN WAN connections are working properly your router has UPnP enabled if your router does not support UPnP please refer to Appendix A your router can get a public IP your router is upgraded to the latest firmware you have tried rebooting your router by unplugging it then plugging it back in After checking the above items you can click ...

Страница 45: ...ht be caused by the firewall protection Check the Internet firewall with your system administrator The firewall may need to have some settings changed in order for the Network Camera to be accessible outside your local LAN For more information please refer to the section about installing your camera behind a router Make sure that the Network Camera isn t conflicting with any Web server you may hav...

Страница 46: ...settings are set properly For more refer to Image Setup on page 28 9 Why are no images available through the Web browser ActiveX might be disabled If you are viewing the images from Internet Explorer make sure ActiveX has been enabled in the Internet Options menu You may also need to change the security settings on your browser to allow the ActiveX plug in to be installed If you are using Internet...

Страница 47: ... PROTOCOL 10 100BASE TX Fast Ethernet 802 11b g n WLAN WIRELESS CONNECTIVITY 802 11b g n Wireless with WEP WPA WPA2 security WPS WIRELESS TRANSMIT OUTPUT POWER 16 dbm for 11b 12 dbm for 11g 12 dbm for 11n typical SDRAM 64 MB FLASH MEMORY 8 MB RESET BUTTON Reset to factory default VIDEO CODECS H 264 MJPEG JPEG for still images VIDEO FEATURES Adjustable image size and quality Time stamp and text ove...

Страница 48: ...240 V AC 50 60 Hz Output 5 V DC 1 A External AC to DC switching power adapter DIMENSIONS W X D X H Including the bracket and stand 65 8 x 65 x 126 mm Camera only 27 2 x 60 x 96 mm WEIGHT 96 2 g without bracket and stand MAX POWER CONSUMPTION 4 W OPERATION TEMPERATURE 32 F to 104 F 0 C to 40 C STORAGE TEMPERATURE 4 F to 158 F 20 C to 70 C HUMIDITY 20 80 RH non condensing EMISSION EMI SAFETY OTHER C...

Страница 49: ...e Revision located on the label on the bottom of the Network Camera e g rev A1 Serial Number s n number located on the label on the bottom of the Network Camera You can find software updates and user documentation on the D Link website as well as frequently asked questions and answers to technical issues For customers within the United States Phone Support 877 453 5465 Internet Support http suppor...

Страница 50: ...is Limited Warranty will be at D Link s option to repair or replace the defective Hardware during the Warranty Period at no charge to the original owner or to refund the actual purchase price paid Any repair or replacement will be rendered by D Link at an Authorized D Link Service Office The replacement hardware need not be new or have an identical make model or part D Link may at its option repla...

Страница 51: ...see for the non conforming Software will be refunded by D Link provided that the non conforming Software and all copies thereof is first returned to D Link The license granted respecting any Software for which a refund is given automatically terminates Non Applicability of Warranty The Limited Warranty provided hereunder for Hardware and Software portions of D Link s products will not be applied t...

Страница 52: ...uct that is not packaged and shipped in accordance with the foregoing requirements or that is determined by D Link not to be defective or non conforming Submitting A Claim Canada The customer shall return the product to the original purchase point based on its return policy In case the return policy period has expired and the product is within warranty the customer shall submit a claim to D Link a...

Страница 53: ...00PM EST What Is Not Covered The Limited Warranty provided herein by D Link does not cover Productsthat inD Link sjudgment havebeensubjectedtoabuse accident alteration modification tampering negligence misuse faultyinstallation lack of reasonable care repair or service in any way that is not contemplated in the documentation for the product or if the model or serial number has been altered tampere...

Страница 54: ...EDY FOR A BREACH OF THE FOREGOING LIMITED WARRANTY IS REPAIR REPLACEMENT OR REFUND OF THE DEFECTIVE OR NONCONFORMING PRODUCT THE MAXIMUM LIABILITY OF D LINK UNDERTHISWARRANTY IS LIMITEDTOTHE PURCHASE PRICE OFTHE PRODUCT COVERED BYTHEWARRANTY THE FOREGOING EXPRESS WRITTEN WARRANTIES AND REMEDIES ARE EXCLUSIVE AND ARE IN LIEU OF ANY OTHER WARRANTIES OR REMEDIES EXPRESS IMPLIED OR STATUTORY Governing...

Страница 55: ...ect the equipment into an outlet on a circuit different from that to which the receiver is connected Consult the dealer or an experienced radio TV technician for help FCC Caution Any changes or modifications not expressly approved by the party responsible for compliance could void the user s authority to operate this equipment This device complies with Part 15 of the FCC Rules Operation is subject...

Страница 56: ...2 this device must accept any interference received including interference that may cause undesired operation IMPORTANT NOTE Radiation Exposure Statement This equipment complies with Canada radiation exposure limits set forth for an uncontrolled environment This equipment should be installed and operated with minimum distance 20cm between the radiator and your body This device has been designed to...

Страница 57: ...stration 57 D Link DCS 933L User Manual Version 1 0 February 6 2013 Product registration is entirely voluntary and failure to complete or return this form will not diminish your warranty rights Registration ...

Отзывы: