background image

19

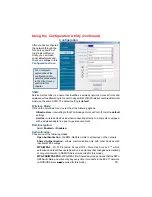
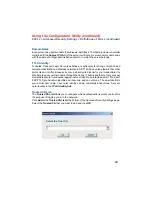
Using the Configuration Utility

(continued)

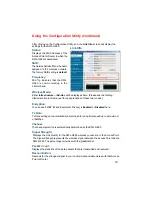
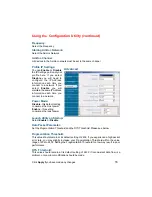
Site Survey > Configuration > 802.1x

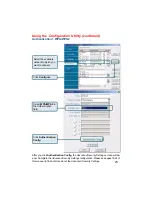
To use 802.1x and to configure its settings, please do the following:

IEEE 802.1x

 -

Select

Enabled

.

Click

Authentication Config.

Select the 

EAP Type

 you

want to use. Configure the
information needed for
authenticating.

Click

OK

Trusted CA List.

Inner Authentication Protocol.

For an explanation of
the terms shown in this
window please see the

following pages.

Advanced Security Settings

Содержание AirPremier DWL-G680

Страница 1: ...Manual D Link AirPremier DWL G680 High Speed 802 11g Building Networks for People Wireless Notebook Adapter Rev A2 ...

Страница 2: ...ts 3 Introduction 4 Features Benefits 5 Wireless Basics 6 Getting Started 9 Using the Configuration Utility 12 Networking Basics 26 Troubleshooting 44 Technical Specifications 51 Technical Support 53 Warranty 54 Registration 57 ...

Страница 3: ...z processor An 802 11g or 802 11b Access Point for Infrastructure mode or another 802 11g or 802 11b wireless adapter for Ad Hoc Peer to Peer networking mode Contents of Package D Link AirPremier DWL G680 High Speed 2 4GHz 802 11g Wireless CardbusAdapter Manual andDrivers on CD Quick Installation Guide If any of the above items are missing please contact your reseller ...

Страница 4: ...lient attempting to connect to the network Unfamiliar clients would be denied access For home users that will not incorporate a RADIUS server in their network the security for the DWL G680 used in conjunction with other WPA WPA2 compatible 802 11 products will still be much stronger than ever before Utilizing the Pre Shared Key mode of WPA WPA2 theDWL G680 will obtain a new security key every time...

Страница 5: ...ifies users based on a secret key that changes automatically at regular intervals for example TKIP Temporal Key Integrity Protocol in conjunction with a RADIUS server changes the temporal key every 10 000 packets ensuring greater security Pre Shared Key mode means that the home user without a RADIUS server will obtain a new security key every time he or she connects to the network vastly improving...

Страница 6: ...cards People use WLAN technology for many different purposes Mobility Productivity increases when people have access to data in any location within the operating range of the WLAN Management decisions based on real time information can significantly improve worker efficiency Low Implementation Costs WLANs are easy to set up manage change and relocate Networks that frequently change can benefit fro...

Страница 7: ...nsmissions TheD LinkDWL G680 will automatically sense the best possible connection speed to ensure the greatest speed and range possible 802 11g offers the most advanced network security features available today including WPA WPA2 802 1x TKIP AES and Pre Shared Key mode These security features are explained in more detail in the Introduction and the Features section of this manual The DWL G680 is ...

Страница 8: ...d ceilings between theDWL G680 and other network devices to a minimum each wall or ceiling can reduce your DWL G680 range from 3 90 feet 1 30 meters Position your devices so that the number of walls or ceilings is minimized 1 Be aware of the direct line between network devices Awall that is 1 5 feet thick 5 meters at a 45 degree angle appears to be almost 3 feet 1 meter thick At a 2 degree angle i...

Страница 9: ...or peer to peer communication using wireless network adapters on each computer such as two or more DWL G680 wireless network adapters On the following pages we will show you an example of an Infrastructure Network and an Ad Hoc Network An Infrastructure network contains an Access Point or Router The Infrastructure Network example shown on the following page contains the following D Link network de...

Страница 10: ... If you are connecting a desktop computer to your networks you can install the D Link AirPremier DWL G550 Wireless CardbusAdapter into a computer See the Quick Installation Guide included with the DWL G550 Install the D Link AirPremier DWL G680 Wireless CardbusAdapter into a laptop computer See the Quick Installation Guide included with the DWL G680 If you wish you may connect a computer that is e...

Страница 11: ... below IP Address Desktop When assigning IP Addresses to the computers on the network please remember that the IP Address for each computer must be in the same IP Address range as all the computers in the network and the subnet mask must be exactly the same for all the computers in the network For example If the first computer is assigned an IP Address of 192 168 0 2 with a Subnet Mask of 255 255 ...

Страница 12: ...lity Another way to start the Configuration Utility is to click on Start Programs D Link AirPremier D Link AirPremier Client Utility Using the Configuration Utility If you are using Windows XP you can use either the Zero Configuration Utility or the D Link Configuration Utility If the icon does not display in the taskbar then click on this icon on your desktop to open To use the D Link Configurati...

Страница 13: ...trength Packet Count Displays the statistics of the data packets that are transmitted and received Frequency 802 11g indicates that the DWL G680 is communicating in the 2 4GHz band Encryption You can see if WEP Wired Equivalent Privacy is Enabled or Disabled here Wireless Mode Either Infrastructure or Ad Hoc will be displayed here Please see the Getting Started section in this manual for an explan...

Страница 14: ...ain a new security key every time it connects to the 802 11 network A RADIUS Server is not required for this mode SSID Service Set Identifier is a name that identifies a wireless network Access Points and wireless devices attempting to connect to a specific WLAN Wireless LocalAreaNetwork must use the same SSID The default setting is default Infrastructure connecting to the WLAN using an Access Poi...

Страница 15: ...mal digits consist of the numbers 0 9 and the letters A F ASCII American Standard Code for Information Interchange is a code for representing English letters as numbers from 0 127 Key Length Select the key length and either ASCII or hexadecimal format IEEE 802 1x Authentication which is a first line of defense against intrusion In the Authentication process the Authentication Server verifies the i...

Страница 16: ... default setting consumes the most power Enable this setting consumes the least power Using the Configuration Utility continued This value should remain at its default setting of 2432 If inconsistent data flow is a problem only a minor modification should be made RTS Threshold Fragmentation Threshold This value should remain at its default setting of 2432 If you experience a high packet error rate...

Страница 17: ...or configure the Properties of the profile in order to connect with an available network Connect Highlight a network profile click Connect to connect to that network Rescan Click Rescan to rescan and connect to the strongest signal Configure Highlight an existing network and click Configure the configuration window on the next page will appear Advanced Highlight a network click Advanced and the sc...

Страница 18: ...he changes If you clicked on Configuration or Properties you can config ure in this window all the prop erties of a profile that already exists in the network Click OK to save the changes Advanced Configuration Add or Properties If you choose to use the IEEE 802 1x feature please see the detailed instructions on the fol lowing pages If you select WPA WPA2 in the Authentication field please see det...

Страница 19: ...se do the following IEEE 802 1x Select Enabled Click Authentication Config Select the EAP Type you want to use Configure the information needed for authenticating Click OK Trusted CA List InnerAuthentication Protocol For an explanation of the terms shown in this window please see the following pages Advanced Security Settings ...
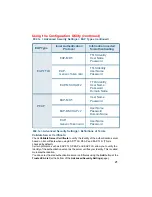
Страница 20: ...l Information needed for Authenticating EAP TLS EAP MSCHAPv2 Certificate User Name User Name Password Domain Name LEAP User Name Password PAP TTLS Identity User Name Password CHAP TTLS Identity User Name Password MSCHAP TTLS Identity User Name Password Domain Name EAP TTLS MSCHAPv2 TTLS Identity User Name Password Domain Name ...

Страница 21: ... the identity of the authentication server as the server verifies your identity This is called mutual authentication You can select trusted authentication server certificates using the Add button at the Trusted CA List at the bottom of the Advanced Security Settings page EAP Type Inner Authentication Protocol Information needed for Authenticating EAP Generic Token card EAP MD5 User Name Password E...

Страница 22: ...tials it is also able to pass your login name through that tunnel That means that not only are your credentials secure from eavesdropping but your identity is protected as well Thus with EAP TTLS you have two identities an inner one and an outer one The inner identity is your actual user name Your outer identity can be completely anonymous Set your outer identity in the TTLS Identity field Trusted...

Страница 23: ...ou want to connect Select WPA WPA2 in the Authentication field Click Authentication Config After you click Authentication Config the Advanced Security Settings screen will ap pear Complete the Advanced Security Settings configuration Please see pages 19 22 of this manual to find out more about the Advanced Security Settings ...

Страница 24: ...thentication WPA PSK WPA2 PSK WPA PSK WPA2 PSK does not require a RADIUS Server in the network Select WPA PSK WPA2 PSK in the Authentication field Click Authentication Config Click Configure Select the available network to which you want to connect ...

Страница 25: ...25 Using the Configuration Utility continued Authentication WPA PSK WPA2 PSK continued Enter the WPA WPA2 Passphrase Click OK The configuration is done Advanced Security Settings ...
Страница 26: ...Microsoft Windows XP Note Please refer to websites such as http www homenethelp com and http www microsoft com windows2000 for information about networking computers using Windows 2000 Go to Start Control Panel Network Connections Select Set up a home or small office network Networking Basics When this screen appears click Next ...

Страница 27: ...ns in this window Networking Basics continued Click Next In the following window select the best description of your computer If your computer connects to the Internet through a gateway router select the second option as shown Click Next ...

Страница 28: ...28 Enter a Computer description and a Computer name optional Networking Basics continued Click Next Enter a Workgroup name All computers on your network should have the same Workgroup name Click Next ...

Страница 29: ... while the Network Setup Wizard applies the changes Networking Basics continued When the changes are complete click Next Please wait while the Network Setup Wizard configures the computer This may take a few minutes ...

Страница 30: ...w below select the option that fits your needs In this example Create a Network Setup Disk has been selected You will run this disk on each of the computers on your network Click Next Insert a disk into the Floppy Disk Drive in this case drive A ...

Страница 31: ... read the information under Here how t in the screen below After you complete the Network Setup Wizard you will use the Network Setup Disk to run the Network Setup Wizard once on each of the computers on your network To continue click Next ...

Страница 32: ...ew settings will take effect when you restart the computer Click Yes to restart the computer You have completed configuring this computer Next you will need to run the Network Setup Disk on all the other computers on your network After running the Network Setup Disk on all your computers your new wireless network will be ready to use ...

Страница 33: ...nued Naming Your Computer in Windows Vista below dereetions Click Start in the lower left corner of the screen Right click on Computer Select Properties To name your computer in Windows VISTA please follow these directions 33 ...

Страница 34: ...the Computer Name Tab KP VJG 5 UVGO 2TQRGTVKGU window QW OC GPVGT C Computer Description KH QW YKUJ VJKU ſGNF KU QRVKQPCN To rename the computer and join a domain click Change NKEM VJG FXCPEGF U UVGO setting 34 ...

Страница 35: ...he Local Area Connection icon in the task bar Click on Status In this window enter the Computer name Enter the name of the Workgroup NN EQORWVGTU QP QWT network must have the same Workgroup name Click OK Networking Basics continued Naming Your Computer 35 ...

Страница 36: ...upport tab Click Close Networking Basics continued Checking the IP Address in Windows XP Checking the IP Address In Windows VISTA Right click on the Wireless Network Connection icon in the task bar Click on Network and Sharing Center 36 ...

Страница 37: ...In Windows Vista This window will appear Click the View Status Click Close Networking Basics continued Checking the IP Address Click on the Detail 37 ...

Страница 38: ...t Configuration Protocol technology If you are using a DHCP capable router you will not need to assign static IP addresses H QW CTG PQV WUKPI C 2 ECRCDNG TQWVGT QT QW PGGF VQ CUUKIP C UVCVKE 2 address please follow these instructions Go to Start Click on Control Panel In Windows XP 2000 Networking Basics continued Double click on Network Connections 38 ...

Страница 39: ... Click on Properties Right click on Local Area Connections Networking Basics continued D Link AirPlus G DWL G122 Wireless USB Adapter Click on Internet Protocol TCP IP Click Properties 39 ...

Страница 40: ...et Service Provider Networking Basics continued Input your IP address and subnet mask The IP addresses on your network must be within the same range For example if one computer has an IP address of 192 168 0 2 the other computers should have IP addresses that are sequential like 192 168 0 3 and192 168 0 4 Thesubnet mask must be the same for all the computers on the network 40 Click OK ...

Страница 41: ...Networking Basics continued Click on View Status Click on Properties 41 Right Click on Wireless Network Connection icon in the task bar Click Network and Sharing Center In Windows VISTA ...

Страница 42: ...ess of 192 168 0 2 the other computers should have IP addresses that are sequential like 192 168 0 3 and 192 168 0 4 The subnet mask must be the same for all the computers QP VJG PGVYQTM Click on Internet Protocol TCP IPv4 Click Properties PRWV QWT 05 UGTXGT CFFTGUUGU 0QVG H QW CTG GPVGTKPI C 05 UGTXGT QW must enter the IP address of VJG GHCWNV CVGYC The DNS server information will be supplied by ...

Страница 43: ...es from the Wireless Router or Access Point as shown You may be pinging different IP Addresses than the ones pictured here however the procedure for pinging remains the same Checking the Wireless Connection by Pinging in Windows VISTA Go to Start Start Searcg type cmd A window similar to this one will appear Type ping xxx xxx xxx xxx where xxx is the IP Address of the Wireless Router or Access Poi...

Страница 44: ...ter provides solutions to problems that can occur during the installation and operation of the DWL G680 Read the following descriptions if you are having problems The examples below are illustrated in Windows Vista Windows XP If you have another operating system these solutions will still apply although the appearance on your computer screen may differ In Windows XP Ŷ Ŷ Ŷ ...

Страница 45: ...click on Network Adapters Right click on D Link AirPremier DWL G680 Wireless Cardbus Adapter Select Properties to check that the drivers are installed properly Look under Device Status to check that the device is working properly Click OK ...

Страница 46: ...In Windows VISTA Click Device Manager Go to Start Computer Properties Troubleshooting continued 46 ...

Страница 47: ...rs Right click on D Link AirPlus G DWL G122 Wireless USB Adapter Select Properties to check that the drivers CTG KPUVCNNGF RTQRGTN Look under Device Status to check that the device is working RTQRGTN Click OK D Link AirPlus G DWL G122 Wireless USB Adapter 47 ...

Страница 48: ...80 Cardbus adapter is firmly inserted into the Cardbus slot of your computer Troubleshooting continued 3 The DWL G680 Activity and Link lights are not on 4 I forgot my Encryption key Reset the Access Point to its factory default settings and restore the DWL G680 Wireless CardbusAdapter to the factory default settings The default settings are listed in the Using the Configuration Utility section in...

Страница 49: ...onnected Check that the IP Address subnet mask gateway and DNS settings are correctly entered for the network In Infrastructure mode make sure the same Service Set Identifier SSID is specified on the settings for the wireless clients and Access Points The SSID factory default setting for theD Link AirPremier products is default Double click on the WLAN icon in the taskbar The Link Info screen will...

Страница 50: ...y connected Check that the IP Address subnet mask gateway and DNS settings are correctly entered for the network In Infrastructure mode make sure the same Service Set Identifier SSID is specified on the settings for the wireless clients and Access Points The SSID factory default setting for theD Link AirPremier products is default Double click on the WLAN icon in the taskbar The Link Info screen w...

Страница 51: ...P with TKIP MIC IV Expansion Shared Key Authentication Data Rates 108 54 48 36 24 18 12 11 9 6 5 5 2 and 1Mbps PowerSave mode 30mA Transmit mode 500mA Power Consumption Wireless Trasmit Power Typical 21dBm at 11 5 5 2 and 1Mbps Typical 18 21dBm for 24 18 12 9 6Mbps Typical 15 18dBm for 54Mbps Typical 16 19dBm for 48Mbps Typical 17 20dBm for 36Mbps 802 11b 802 11g Internal Antenna Type Diversity ...

Страница 52: ...ms Weight Physical Dimensions L 4 68 inches 118mm W 2 13 inches 54mm H 0 28 inches 7 1mm Temperature Operating 0 to 55 32 F to 149 F 10 90 RH non condensing Humidity Receiver Sensitivity DQPSK DBPSK DSSS CCK 802 11b BPSK QPSK 6QAM OFDM 802 11g C C ...

Страница 53: ...support through our website or by phone Tech Support for customers within the United States D Link Technical Support over the Telephone 877 453 5465 Monday through Friday 8 00am to 5 00pm PST D Link Technical Support over the Internet http support dlink com email support dlink com Tech Support for customers within Canada D Link Technical Support over the Telephone 800 361 5265 Monday to Friday 7 3...

Страница 54: ...tware portion of the product oftware T will substantially conform to D Link then current functional specifications for the Software as set forth t in the applicable documentation from the date of original retail purchase of the Software for a period of ninety 90 days arranty Period provided that the Software is properly installed on approved X hardware and operated as contemplated in its documenta...

Страница 55: ...r replaced packages will be shipped to the customer via UPS Ground or any common carrier selected by D Link with shipping charges prepaid Expedited shipping is available if shipping charges are prepaid by the customer and upon request D Link may reject or return any product that is not packaged and shipped in strict compliance with the foregoing requirements or for which an RMA number is not visib...

Страница 56: ...tion against harmful interference in a residential installation This equipment generates uses and can radiate radio frequency energy and if not installed and used in accordance with the instructions may cause harmful interference to radio communication However there is no guarantee that interference will not occur in a particular installation If this equipment does cause harmful interference to ra...

Страница 57: ...57 11 08 2007 Register your D Link product online at http support dlink com register Registration ...

Отзывы: