


This unit accepts total of 3 video inputs, component video, PC and DVI(HDMI)
inputs. The formats supported by these inputs are as follows:
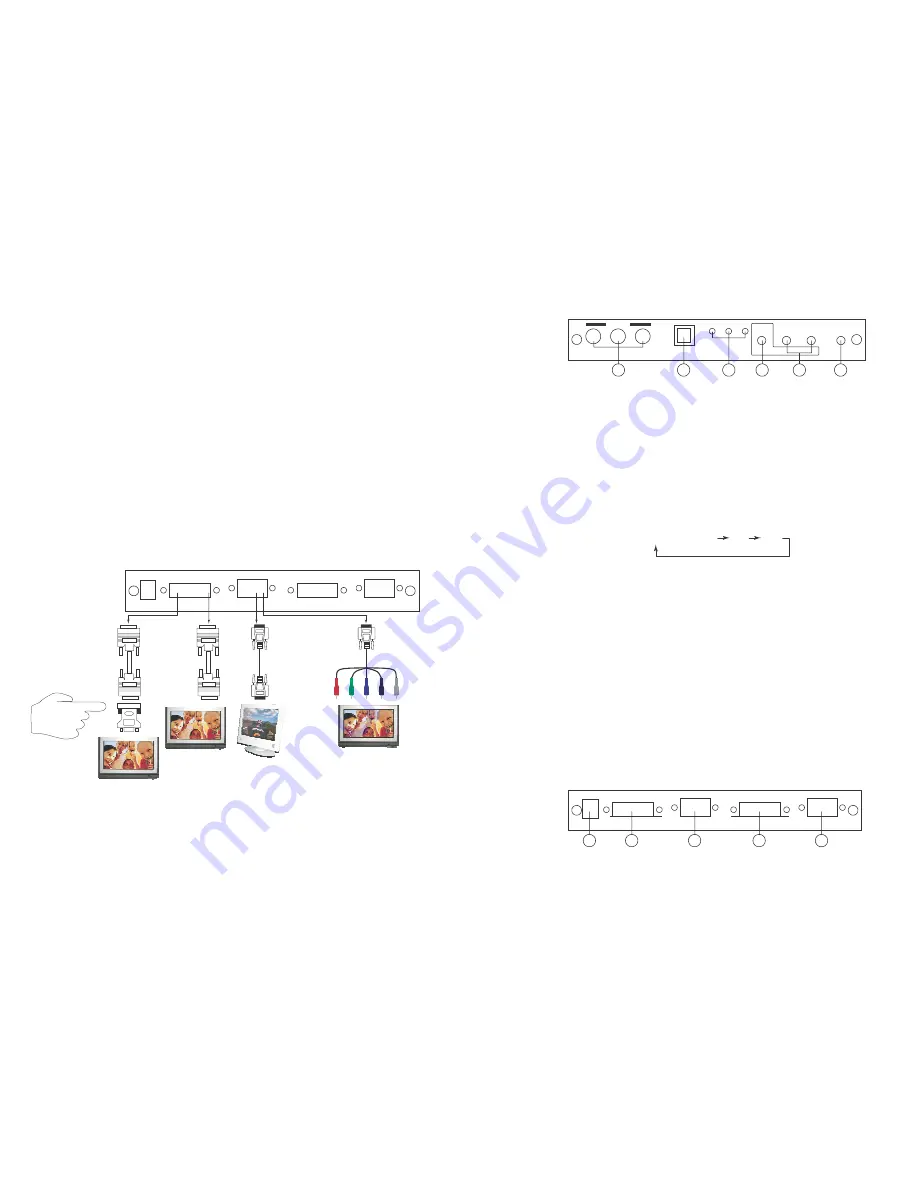
Operation Controls and Functions
- When connecting to a PC source, use a VGA 15-pin cable to connect the
Front Panel
INPUT
HD PC
MENU
AUTO
ADJUST
INPUT
POWER
output of a computer to the VGA input of this unit.
D
HD PC DVI
- When connecting to a component source (either SD or HD resolution) use a
Cr/Pr
Cb/Pb
Y/HD
ENTER
-
+
component video cable to connect the component video output of a DVD or
satellite receiver to the component video input of this unit.
- When connecting to a DVI source, use a DVI-I or DVI-D cable to connect the
DVI output of a PC or DVI video source to the DVI input of this HDV5 model.
- When connecting to a HDMI source, use a HDMI to DVI cable to connect the
the HDMI end to the HDMI video source, such as DVD or other media player.
Next connect the DVI connector of the HDMI to DVI adapter cable to the DVI
input of the HDV5 unit.
This unit automatically detects the input resolution from the video source.
To switch from one input source to another just press the input button on the
front panel ("+") or on the remote control.
6 5
4
2
3
1
1. Power:
Press the button to turn ON or turn OFF (standby) the power of the unit.
2. Menu/Enter:
This button serves two purposes.
a. Press the button to bring up OSD main menu as shown in the
"OSD Operation". (page 7)
b. To act as a "Enter" key to enter sub menu or to adjust setting value of the
selected parameter.
3. +/- button:
The buttons provide 3 functions:
a.
Input select ("+"):
Press the "+" button repeatedly to select your desired
input source. The input sources are toggled through in the following
sequence.
Output Connection
YPbPr (YCbCr) PC DVI
DVI to HDMI
connector
adaptor
5V 2A
DVI Cable
DVI out
or
DVI
Cable
PC out
or
DVI IN
PC IN
RGBHV
b.
Auto Tune ("-"):
Press the "-" button to carry out picture auto adjust for
analog inputs (component or PC). The HDV5 will fine tune the position
(centering) and color of the output picture.
c. When in the OSD menu mode: Press the +, - button to move up or down
the highlight bar to your desired parameter. Or once a parameter is
selected with MENU/Enter button, press the button to adjust setting value
of your selected parameter.
4. Input LED Indicators:
When one of the LED illuminates its corresponding source
is being selected as input.
5. IR Sensor:
Infrared remote control sensor.
6. Component Input:
Connects this input connector to the Component output
connector of your source equipment using the enclosed 3RCA to 3RCA
cable.
The HDV5 accepts both interlaced component input (480i, 576i) and
HDMI TV
HDMI TV
LCD TV
LCD
or
Monitor
De-interlaced progressive input (480p, 576p...1080p).
The input range is 480i, 570i~1080i, 1080p.
Rear Panel
This digital video scaler outputs various PC VGA, SD and HD resolutions in both
digital and analog format simultaneously.
The digital output is available through the DVI output connector while the
analog output is available through the PC VGA output connector.
5V 2A
DVI OUT
D-SUB OUT
DVIIN
D-SUB IN
5
4
3
2
1
1. PC input:
Connects this PC input connector to the VGA output of your
PC. The acceptable PC resolutions range from VGA~WUXGA.
5
2


