CYBEX Bravo Lift Скачать руководство пользователя страница 5

 5

Cybex 18030 Bravo Lift Owner’s Manual
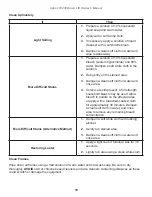
• 

 Inspect the equipment for worn or loose components prior to use. Tighten/replace any loose or 

worn components before to using. Pay close attention to belts, cables, grips or pulleys and their  

connections. Always look for potential problems in equipment condition. 

Loose components should 

be tightened to function properly. Replacing worn components maintains the equipment is in the 

best condition for regular use.

• 

 To maximize stability, securely anchor each machine to the floor using the anchor holes provided 

in each machine. Each machine must be set up, anchored, and operated on a solid level surface.

Do not install equipment on an uneven surface!
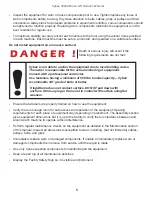
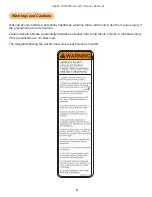
D A N G E R   !

Death or serious injury will occur if the 

following requirements are not met:


  Cybex is not able to anchor the equipment due to local building codes. 

The owner is responsible for the actual anchoring of equipment. 

Consult with a professional contractor.

   Use fasteners having a minimum of 500 lbs. tensile capacity -- Cybex 

recommends 3/8” grade 2 bolts or better.

   If legs/frame does not contact surface, DO NOT pull down with 

anchors. Shim any leg or frame not in contact with surface using flat 

washers.

• 

Ensure that all users are properly trained on how to use the equipment.

• 

 Verify there is enough room for safe access and operation of the equipment. Spacing  

requirements for each piece of equipment vary depending on placement. The Assembly section 

gives equipment dimensions but it is up to the facility to verify there is clearance between and 

around each machine to operate without interference.

• 

 Perform regular maintenance checks on the equipment as detailed in the Maintenance section 

of this manual. Inspect all areas most susceptible to wear, including, (but not limited to) cables, 

pulleys, belts, and grips.

• 

 Immediately replace worn or damaged components. If unable to immediately replace worn or  

damaged components then remove from service until the repair is made.

• 

Use only Cybex supplied components to maintain/repair the equipment.

• 

Keep a repair log of all maintenance activities.

• 

Display the Facility Safety Sign so it is visible and prominent.

Содержание Bravo Lift

Страница 1: ...Cybex Bravo Lift Owner s Manual Strength Systems Part Number 18030 999 4 A www cybexintl com...

Страница 2: ...of America 10 Trotter Drive Medway MA 02053 508 533 4300 FAX 508 533 5183 www cybexintl com 18030 999 4 A November 2011 Table of Contents Safety Safety Guidelines And Practices 3 Securing Equipment 6...

Страница 3: ...e of the equipment Read the Owner s Manual carefully before assembling servicing or using the equipment In an institutional environment it is the facility owner s responsibility to properly instruct u...

Страница 4: ...cause severe injury or damage Consult a physician prior to commencing an exercise program If at any time during exercise you feel faint dizzy or experience pain stop and consult your physician Users...

Страница 5: ...a minimum of 500 lbs tensile capacity Cybex recommends 3 8 grade 2 bolts or better If legs frame does not contact surface DO NOT pull down with anchors Shim any leg or frame not in contact with surfa...

Страница 6: ...istance or as defined and required by local building and architectural codes Anchoring of equipment must be completed by a qualified licensed contractor Due to the wide variation of flooring on which...

Страница 7: ...ean upholstery Weekly Inspect all nuts and bolts for looseness Tighten as required Inspect all cables and belts for damage or wear If a cable or belt is worn or damaged immediately discontinue use unt...

Страница 8: ...decals indicate a potentially hazardous situation that could result in minor or moderate injury if the precautions are not observed The diagram following the decals show where each decal is located F...

Страница 9: ...9 Cybex 18030 Bravo Lift Owner s Manual Label Placement 4605 381 X...

Страница 10: ...rench 7 32 Allen wrench 1 8 Allen wrench 3 4 Socket or wrench Hammer 3 16 Pin punch Loctite 242 Environment and Storage Static Electricity To reduce static electricity increase the humidity Humidity T...

Страница 11: ...ENDICULAR OR PARALLEL SHALL BE SO WITHIN 1 REMOVE ALL BURRS BREAK SHARP EDGES 005 010 R SURFACE FINISH INDICATED PER ANSI B46 1 1985 GENERAL MACHINING DIMENSIONS IN INCHES DATE DATE THIS NOTE REFERS T...

Страница 12: ...ired for this procedure 1 Remove the four shipping cones using a 3 4 socket or wrench 2 Attach foot pads to each foot of frame 3 Remove front panel from machine Remove weight stack 1 Verify weight sta...

Страница 13: ...ap and remove 3 Remove lifting post 4 Remove weight plates Move handle pulley and cable 1 Remove the pin spring with a 3 16 punch and hammer securing handle to ball stop and remove handle Pin Spring B...

Страница 14: ...Reattach frame halves and securely tighten the BHSCS and locknuts Securely anchor machine to the floor To maximize stability equipment must be secured to a solid level surface Cybex is not responsibl...

Страница 15: ...ctite on BHSCS and inside threads of ball stop 2 Secure cable to ball stop using a 1 8 Allen wrench 3 Reconnect handle pulley and cable to platform on both sides 4 Position pulley mount parallel to th...

Страница 16: ...ance 2 Adjust handles for desired pulley height 3 Ensure all adjustment knobs are locked into place CAUTION Serious injury can result if precautions are not followed Use equipment only as described in...

Страница 17: ...LEGGED DEADLIFT LUNGE STIFF LEGGED DEADLIFT LUNGE STIFF LEGGED DEADLIFT LUNGE Motions Developed Hip Extension Knee Extension Muscles Used Quadriceps Gluteus Maximus Hamstrings Motions Developed Hip Ex...

Страница 18: ...en servicing Failure to do so could result in personal injury CAUTION Daily Procedures When using strong cleaning agents such as rubbing alcohol or bleach it is advisable to first test in an inconspic...

Страница 19: ...full strength household bleach may be used Allow bleach to puddle on the affected area or apply with a bleached soaked cloth for approximately 30 minutes Dampen a clean soft cloth in water and rinse a...

Страница 20: ...and rinsing Follow up each application with warm water rinse DO NOT use abrasives or high alkaline cleaners DO NOT leave cleaners on for long periods wash immediately DO NOT apply cleaners in direct...

Страница 21: ...belts can fail if not replaced Inspect cables and belts Inspect all cables and belts for wear or damage and proper tension When inspecting cables and belts run fingers on the cable or belt paying part...

Страница 22: ...in belt Belt is necked down narrow section Replace belt if any section is over 1 32 03 narrower than the rest of belt Examine edge of belt both sides Replace belt if any section is narrower than the...

Страница 23: ...nspect bars and handles for wear paying particular attention to tab area connection points Replace all worn handles immediately Inspect snap links for proper latching indicates wear Replace all loose...

Страница 24: ...Nut Rod End Adjustment This type of adjustment uses a socket head cap screw SHCS securing a cable rod end bearing to the machine Primary adjustment is by turning the rod end bearing The other end of...

Страница 25: ...bs in Belt Adjustment Action Loose Belt 1 Using a 7 32 Allen wrench loose set screws 2 Pull belt tight 3 Secure belt in place with set screws 4 Torque set screws to 300 350 lb in 5 Verify that the bel...

Страница 26: ...from 8 30 a m to 6 00 p m Eastern Standard Time For Cybex customers living in the USA contact Cybex Customer Service at 888 462 9239 For Cybex customers living outside the USA contact Cybex Customer S...

Страница 27: ...535 D490 127 D490 128 D490 865 D491 237 D491 238 D497 190 6 033 350 7 727 128 7 717 831 1975 24th Ave SW Owatonna MN 55060 1 888 462 9239 Made in U S A MODEL 8810 90 SERIAL XXXXXXXXXXXXX 125 FINISH MA...

Страница 28: ...the description of the problem the serial number of the equipment and the name and address of the owner in the package along with the part s Merchandise returned without an RMA number on the outside o...

Страница 29: ......

Страница 30: ...10 Trotter Drive Medway MA 02053 508 533 4300 FAX 508 533 5183 www cybexintl com techhelp cybexintl com...

Отзывы: