background image

You can choose to display your music files in two ways:

!

SPLIT MODE

 (Default) - Shows all the music files on 

the disc in one list.

!

FOLDER MODE

 - Displays the files organized by the 

folders on the disc. 
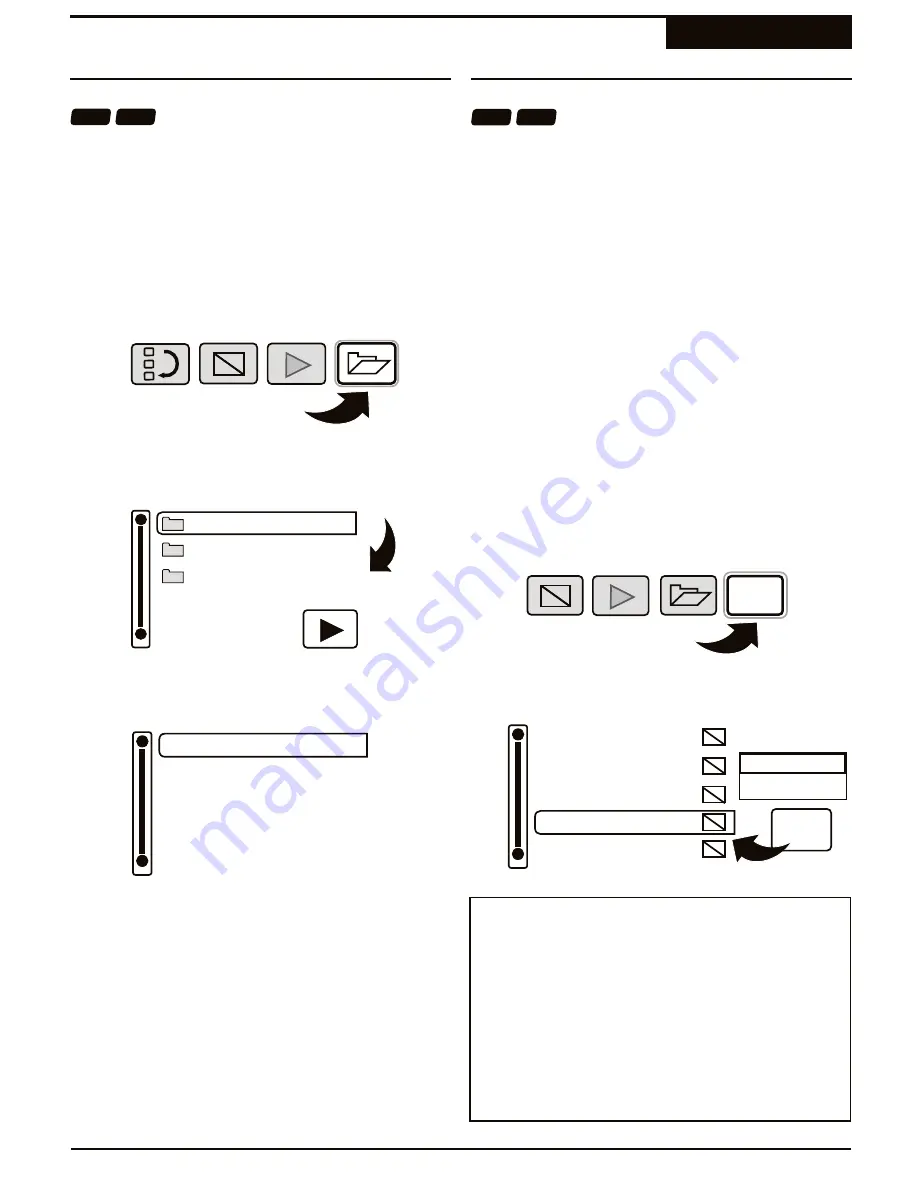
1

Press 

ENTER

 to access the Action Menu. Use the  

3

/

4

 keys to select ENTER FOLDER MODE and 

press 

ENTER

. (This option will change to ENTER 

SPLIT MODE once the Navigator is in FOLDER 
MODE).

2

To OPEN a folder, press 

PLAY

. Alternatively, you 

may press 

ENTER

 to bring up the Action Menu and 

then press 

ENTER

 again on the PLAY ICON. 

3

Mode

FOLDER_ONE

FOLDER_TWO

FOLDER_THREE

To navigate back to the Folder List, select the BACK 
icon (two dots) at the top of the list and press 

ENTER

.  

..

SONG_TWO.MP3

SONG_THREE.MP3

Changing How Files Are Listed and Played

Music Playback

Choosing a File Display Mode

The Music File Navigator provides a convenient way to 
over-ride previous customization of a play list by 
allowing you to skip or play ALL files in a folder (when in 

Folder Mode

) or on a disc (

Split Mode

). There are two 

options for ALL files: 

!

SKIP ALL

 - In List Mode, all files on the disc are 

selected to be SKIPPED during playback. This is 
useful if you wish to playback only a small number of 
files on the disc. In this case, simply go back and 
"UN-SKIP" those files you wish to add to your playlist 
by selecting SHOW ITEM in the Action Menu. In 
Folder Mode, selecting SKIP ALL will mark all files in 
the current folder to be skipped during playback.

!

PLAY ALL

 - In List Mode, all files are selected to be 

included in the playback list, over-riding any previous 
"SKIP" settings. In Folder Mode, all files in the current 
folder will be played. As an example, to play all the 
files in one folder on a disc with many folders, enter 
SPLIT MODE and select SKIP ALL. Next, enter 
FOLDER MODE and select PLAY ALL in the chosen 
folder. 

Press 

ENTER

 to access the Action Menu. Use the 

3

/

4

 keys to select ACTION FOR ALL and press 

ENTER

.

1

Mode

Use the 

5

/

6

 keys to select an option and then 

press 

ENTER

. Notice that after choosing SKIP ALL, 

the SKIP ICON is displayed next to each file. 

2

All

SONG_FOUR.MP3

SONG_ONE.MP3

SONG_THREE.MP3

SONG_FIVE.MP3

SONG_TWO.MP3

Skip all

Play all

All

Playing or Skipping ALL Files

This unit supports Music CDs, as well as CD-R/RW 
discs recorded with MP3 music files. 

!

MP3 files must be named with the extension “.MP3”

!

Discs created with personal computers may have 
problems playing due to differences in recording 
techniques. Compatibility with all recordable formats 
is not guaranteed. 

!

When a disc containing both MP3s and JPGs is 
inserted, choose which files to use from the prompt.

¤

MP3 Notes

31

CD

MP3

CD

MP3

Содержание CH-DVD 1530

Страница 1: ...VD TV LIVE SOURCE RECORD ENTER RIGHT DV IN CHANNEL 1 2 3 4 5 6 7 8 9 0 C TM DVD TV LIVE SOURCE ANGLE CH CH REC MODE REC CHAP MARK PIP PLAY GOTO SUBTITLE MUTE AUDIO DISPLAY TIMER ENTER REC REC TM JPG PROGRESSIVE SCAN CH DVD 1530 DVD Recorder With Progressive Scan Video Playback Operation Guide Quick Startup Guide Page 15 ...

Страница 2: ...atus during lightning storms or when unused for long periods of time Refer all servicing to qualified service personnel Servicing is required when the apparatus has been damaged in any way such as when the power supply cord or plug is damaged liquid has been spilled objects have fallen into the apparatus the apparatus has been exposed to rain or moisture or when the unit does not operate normally ...

Страница 3: ...ufactured under license from Dolby Laboratories Dolby Pro Logic and the double D symbol are trademarks of Dolby Laboratories Confidential Unpublished Works 1992 1997 Dolby Laboratories Inc All rights reserved Consumers should note that not all high definition television sets are fully compatible with this product and may cause artifacts to be displayed in the picture In case of 525 progressive sca...

Страница 4: ...DVDs you can enjoy them in the highest quality with the unit s Progressive Scan Video Out and Digital Audio Out TM JPG PROGRESSIVE SCAN CHANNEL HT RIG E L FT Live and Timer Recording Functions Multiple Recording Modes HQ SP LP EP EP SLP Up to 8 Hours Recording on one DVD R RW Disc On Screen Disc Title Navigator gives you quick easy access to your Recordings Built In TV Tuner Front and Rear A V Inp...

Страница 5: ...tion 25 Subtitles 25 ZOOM Playback 26 Muting the Sound 26 Changing the Audio Track 26 Disc Playback Music Playback Interface 28 Inserting a MP3 or CD Audio Disc 29 Creating a Custom Playlist 29 Skipping Showing Songs 30 Changing the Playback Mode 30 Choosing a File Display Mode 31 Playing MP3 Music Files Common Problems and Solutions 55 Troubleshooting CH DVR 1530 Specifications 56 Specifications ...

Страница 6: ...elects between available Input Sources when the Recorder is in Live Record mode TV Tuner VIDEO IN 1 2 S VIDEO IN 1 2 or DV IN REC Press to begin a live recording or resume recording from PAUSE 7 8 12 10 11 14 16 3 4 5 1 2 6 9 13 15 17 18 23 Remote Control Functions CHAP MARK Inserts a Chapter Marker during a live recording OPEN CLOSE Press to open or close the disc tray TITLE Accesses the title sc...

Страница 7: ... Press to open or close the disc RIGHT Navigates to the right tray ENTER Confirms a choice in menus or settings RECORD Begins a Live Recording DV IN Front DV Input for recording To select DVD TV LIVE Switches between Live Recording use the SOURCE key and select DV IN mode and DVD Player mode S VIDEO IN 2 Front S Video Input for recording PLAY PAUSE Begins playback of a disc chapter To select use t...

Страница 8: ...ted audio track is the elapsed time of the playback session Also in DTS format displays disc tray status system messages and more When the unit is in Standby Mode displays DOLBY DIGITAL Glows if the currently selected the system clock audio track is in Dolby Digital format L R Indicates L R Stereo Mode CLOCK Glows when the system clock is displayed in Standby Mode DAY Shows the day of the week whe...

Страница 9: ...Vs with S VIDEO in for better picture quality than standard STEREO AUDIO INPUTS Use with S VIDEO IN composite video 1 or VIDEO IN 1 for recording S VIDEO INPUT 1 S VIDEO input for recording VIDEO INPUT 1 Composite Video input for To select this input press SOURCE and choose recording To select this input use the SOURCE S VIDEO IN 1 button and choose VIDEO IN 1 ANTENNA IN OUT For Antenna or Cable T...

Страница 10: ...dio connections as well 1 Turn on the DVD Recorder You must first set the Power Switch on the back of the recorder to ON Then press STANDBY ON on the remote control or front panel 2 V Audio Video Input Jacks VIDEO L AUDIO R Your TV must be equipped with AV inputs like those pictured to the right in order to connect this unit If your TV does not have AV inputs you will need a RF Modulator to connec...

Страница 11: ...ks Y Pb Pr Component Video Cable COMPONENT VIDEO the highest quality video connection requires a special Component P SCAN Video Cable not included with separate connectors for the Y Pb Cb and Pr Cr signals You can only use the Progressive Scan Video Out feature with a TV supporting Component Video Inputs and P SCAN capability Obtain a special Component Video Cable and connect the YCbCr outputs fro...

Страница 12: ...coding capability These outputs require special cables not included TV with coaxial antenna or cable TV connection Antenna Cable TV Connections Connect your Antenna or Cable to the Antenna Input then use the supplied RF Cable to pass the signal through to your TV Antenna Cable or Set Top Box Input RF Cable You can also connect a Cable Set Top Box to the Antenna Input In this case you can use the T...

Страница 13: ...IDEO STEREO AUDIO OUTPUT Audio Video source such as DVD player or VCR with Composite Video Out Audio Video source such as camcorder supporting DV Output DV OUTPUT DV IN REAR RECORDING INPUTS There are 2 recording source inputs on the back panel 1 S VIDEO referred to as S VIDEO 1 and 1 Composite Video referred to as VIDEO 1 Note that both of these video inputs share the same stereo audio input FRON...

Страница 14: ... and be careful not to scratch or damage the disc surface To prevent discs from becoming bent or deformed they should be vertically kept in the disc storage case To prevent damage avoid leaving discs in your car where they may be subject to direct sunlight and high temperature Do not use any disc accessory to improve the audio quality disc protective solutions or lens cleaner These products may da...

Страница 15: ...ing foam 1 2 3 4 5 6 7 8 9 0 C TM DVD TV LIVE SOURCE ANGLE CH CH REC MODE REC CHAP MARK PIP PLAY GOTO SUBTITLE MUTE AUDIO DISPLAY TIMER ENTER REC REC 7 3 4 5 1 2 6 7 3 4 5 1 2 6 Remote control Batteries 2 AAA A V cable Video Stereo Audio Power cord RF Cable for TV This operation manual and warranty card Blank DVD RW Disc 1 Checking the Package Contents Quick Start Guide 15 ...

Страница 16: ...he remote control be sure to stay within a 30 degree angle of the sensor on the receiver Keep in mind that any obstructions between the remote control and the receiver will effect performance If the remote control functions better when it is closer to the unit the batteries may be running low In case of any leakage of batteries dispose of the batteries right away and avoid touching the chemical di...

Страница 17: ...u will need a RF Modulator to connect the recorder to your TV s antenna cable input as shown below RF Modulators are available at major electronics retailers RF Cable Use the AV Audio Video cable provided to connect the DVD recorder s Video YELLOW and Stereo Audio R RED L WHITE outputs to your TV 1 Connect your TV Antenna or Cable TV input to the Recorder s ANTENNA INPUT then use the RF Cable prov...

Страница 18: ...he main power switch is turned off The unit draws no power and cannot be turned on by the remote control STANDBY The main power switch has been turned ON but the unit has not been taken out of standby by pressing either the STANDBY key on the remote control or the ON STANDBY button on the front panel The unit draws a slight amount of power to enable the remote control receiving circuit ON The main...

Страница 19: ...d 5 6 keys to choose a field to change and then press ENTER to enable editing for that field 3 When the unit is first powered on you ll be prompted to set the time and date as well as TV Tuner options You can change any of the settings you choose during the Initial Setup later in the recorder s SETUP MENU Press SETUP to exit The Initial Setup is now complete Remember any settings chosen during the...

Страница 20: ...s ENTER 1 Auto Scanning Channels This is the easiest way to fill your channel list with those channels available in your area The unit scans for channels automatically When complete press SETUP to return to the TUNER SETUP menu Select the AUTO SCAN option from the TUNER SETUP and press ENTER Select your connection type Antenna or Cable TV and press ENTER 1 Notification Choose your connection type ...

Страница 21: ...other Video Input Source in the small PIP window by selecting it with the SOURCE key 3 To cancel Picture In Picture and remove the small window from the screen press PIP again To return to full screen TV TUNER mode press DVD TV LIVE again 4 5 TV Watching TV Picture In Picture Function Quick Start Guide 21 Once you have configured your channels you can begin using the recorder s built in TV TUNER f...

Страница 22: ...egin playback of a disc press PLAY Remote Control or PLAY PAUSE Front Panel STOP To stop playback of a disc press STOP The first time STOP is pressed the location where disc play was halted is saved and you can begin playback where you left off by pressing PLAY If STOP is pressed twice the playback location is reset to the beginning of the disc 1 2 PAUSE To freeze the video on a single frame or pa...

Страница 23: ...ack press on the remote control or front panel 1 2 You can advance or skip back through the chapters or tracks on DVD discs Audio CDs and other discs with the NEXT and 9 PREVIOUS buttons on the remote or front panel SKIP PREVIOUS Press 9 on the remote control or front panel to skip back to the previous track PLAY REC REC FRONT PANEL OR Fast Forward Reverse Scanning Frame By Frame Step Playback Ski...

Страница 24: ...T 1 ALL key On DVDs you can repeat an entire Disc ALL Title or Chapter On VCDs chapter and disc repeat is supported but PBC must be disabled first Press the PBC key Audio CDs also allow repeat of tracks or the entire disc To return to normal playback press REPEAT 1 ALL until the icon shows that repeat play is cancelled Repeating a Disc Title or Chapter During playback when you reach the start of t...

Страница 25: ...i angle will display an indicator or angle mark that alerts the viewer that multiple angles are available for the current scene When this mark appears on screen press the ANGLE button to select an angle to view 1 Some DVD discs are recorded with multiple viewing angles for certain scenes When you are viewing a disc that supports this feature you can choose among the available angles on the disc wi...

Страница 26: ...OOM Playback Audio Functions Playback 2X 2X Press the ZOOM key repeatedly to choose a magnification level You can enlarge the image by 2X 3X or 4X normal size Or you can ZOOM OUT to reduce the image to 1 2 size 1 2 Use the ZOOM function to magnify or shrink the image on screen during playback or when paused You can use the ZOOM function with DVDs VCDs and even JPG images When the ZOOM function is ...

Страница 27: ...wing images will be displayed on screen each for about 7 seconds in SLIDESHOW mode 5 Press to exit the slideshow and return to the preview screen 6 While a JPG image is displayed on screen you can rotate the image 90º 180º or 270º in the clockwise direction 1 Use the 5 6and 3 4 keys to rotate the image Press 4 to rotate the image 90º 6 for 180º or 3 for 270º To return to normal viewing press 5 2 9...

Страница 28: ...it the Action Menu PLAY Begin playback of a file MOVE ITEM Change the playback position of a file in the list SKIP ITEM Mark a file to be skipped during playback PLAY MODE Select from available playback modes including Shuffle Repeat Normal FOLDER MODE Switches the FILE DISPLAY MODE to display the folders on a disc This option appears only in SPLIT MODE ACTION FOR ALL Plays or Skips ALL files on t...

Страница 29: ... position of files in the playback list with the MOVE ITEM option in the Action Menu Use the 5 6 keys to select the file you wish to move 1 Press ENTER to access the Action Menu Use the 3 4 keys to select MOVE ITEM and press ENTER 2 ARROWS appear to the right of the file in the file list indicating that the position of the file can now be changed Use the 5 6 keys to move the file up or down in the...

Страница 30: ...3 SONG_FOUR MP3 SONG_FIVE MP3 Press ENTER to access the Action Menu Use the 3 4 keys to select SHOW ITEM and press ENTER 2 Choosing Playback Content Mode Music Playback Showing Previously Skipped Songs Skipping Songs During Playback You can change the Playback Mode from the default Normal mode with the MODE option of the Action Menu The following Playback Modes are available SHUFFLE Selects a rand...

Страница 31: ...his case simply go back and UN SKIP those files you wish to add to your playlist by selecting SHOW ITEM in the Action Menu In Folder Mode selecting SKIP ALL will mark all files in the current folder to be skipped during playback PLAY ALL In List Mode all files are selected to be included in the playback list over riding any previous SKIP settings In Folder Mode all files in the current folder will...

Страница 32: ...table the TOC can be constantly updated as new recordings are made This means that a DVD RW disc can be played on a standard DVD Player directly after the first recording and will remain compatible as new material is added later Although DVD RW discs are more expensive than DVD Rs they can actually be more economical and convenient for certain situations For example if you are recording TV program...

Страница 33: ...oduced by major studios As an example if you have a DVD player connected to an AV input and attempt to record a DVD an error message will occur letting you know that the disc is copy protected DVDs not encoded with Macrovision can be used as a recording source Notes on Copy Protection Recording Sources and Types Recording What You Can Record From About Titles and Chapters There are two recording m...

Страница 34: ...matically add a Chapter Marker every 5 minutes during your recordings This allows you to divide your recordings into sections or Chapters that provide the user friendly navigation made popular on motion picture DVDs During playback this will allow you to skip backward or forward in 5 minute intervals by using the 9 keys on the remote These chapter markers are compatible with most standard DVD Play...

Страница 35: ...CE button 2 Use the 5 6 keys to select an Input Source and then press ENTER After a DVD RW or DVD R disc is inserted in the DVD Recorder you must select the input source that will be recorded You may choose from the following input sources TV The DVD Recorder s built in TV Tuner allows you to record your favorite TV programs VIDEO IN 1 The Composite Video Input located at the back of the unit Used...

Страница 36: ...lity setting chosen Making a Live Recording Recording Specifying the Recording Time Starting the Recording 36 DVD TV LIVE SOURCE REC MODE REC CHAP MARK TIMER TimedRec 30 min You may pause the DVD Recorder during a Live Recording 1 Simply press REC to temporarily halt recording The PAUSE RECORDING icon appears on screen 2 When you wish to begin recording again press REC When you PAUSE and RESUME a ...

Страница 37: ...is finalized no more recordings can be added Notes on Finalization Recording Functions Recording Changing the Rec Time with DISPLAY Adding Chapter Markers Manually 37 1 Press DISPLAY while recording The DISPLAY MENU appears as shown Disc Type Displays the recordable disc format DVD R or DVD RW Date and Time The system date and time in 12HR or 24HR mode depending which format is selected in the SET...

Страница 38: ...e field rather than navigate the screen 3 With Time fields select the 10 s or 1 s digit to change with increments of 10 minutes or 1 minute respectively 4 Press ENTER to save your changes and exit edit mode for the current field 1 Select an input source or TV channel to record from with the 3 4keys Scheduling Timer Recordings Recording About Timer Recordings Selecting an Input Source Scheduling a ...

Страница 39: ...creen In this case the Timer Recording that begins first will take precedence canceling any entries that occur within it s recording period Schedule Conflicts 5 Exit the Schedule Screen at any time by pressing TIMER Saving Editing Schedules Recording Setting the Quality Mode Editing a Saved Schedule Naming the Recording Saving the Schedule 39 The Recurrence setting indicates when the scheduled rec...

Страница 40: ...Exit the Schedule Screen at any time by pressing TIMER You can temporarily suspend a recording schedule and then enable it again with the Schedule Screen s Action Menu This allows you to use schedules on a one by one basis that would conflict each other if they were all enabled at the same time It s easy to clear any schedule you ve saved with the Action Menu Suspending Deleting Schedules Recordin...

Страница 41: ...he Action Menu appears Use the 3 4 keys to select the CHAPTER ACTION menu and then press ENTER 6 The Action Menu appears Use the 3 4 keys to select the PLAY icon and then press ENTER 7 To return to the Title Screen press MENU 5 Use the 5 6 keys to select the chapter you wish to play and press ENTER Playing Back Your Recordings Recording The Title Screen Playing a Chapter Playing a Title Playing a ...

Страница 42: ...itle Screen is not displayed on screen press MENU to bring it back 2 Use the 5 6 keys to select the LAST TITLE on the disc and press ENTER 4 You are prompted to confirm the deletion of the title Use the 3 4 keys to select YES and press ENTER to delete the title 3 The Action Menu appears Use the 3 4 keys to select the DELETE ACTION menu and then press ENTER It s easy to edit the names your recordin...

Страница 43: ...ically capitalized Use the 5 6 and 3 4 keys Simply use the directional arrow keys to move to the character you wish to insert and then press ENTER To save your changes select DONE by pressing DISPLAY or using the 5 6 and 3 4 keys to select DONE and then pressing ENTER p q r s w x y z t u v g h i m n o j k l d e f a b c 1 2 3 c 4 5 6 7 8 9 Display Display Exit Clear all Back Done Done Letters Numbe...

Страница 44: ...scs are playable on standard DVD players as soon as they re made However you ll need to use the MAKE COMPATIBLE option to create or update the Main Title Menu on your recordings and to update any edits you ve made to the disc such as when you rename or delete a Title You can still make new recordings to a DVD RW disc after using Make Compatible However you ll need to use the Make Compatible functi...

Страница 45: ...n In this case we select 16 9 5 To exit the SETUP MENU press the SETUP key until the screen is clear 3 Select VIDEO with the 5 6 keys and press ENTER The Video Configuration Screen appears Press SETUP to exit Video Standard Output NTSC TV Shape Scan Mode 16 9 Interlace Press SETUP to exit Video Standard Output NTSC Language OSD DVD Menu DVD Audio Subtitle Settings 46 Parental Control Rating and Pa...

Страница 46: ...h and this setting is set to SPANISH then the Spanish menu will be used The DVD must support multiple menu languages for this setting to work Choices are ENGLISH SPANISH and FRENCH Default DVD AUDIO Default setting ENGLISH Sets the default audio track used by DVDs For example if a DVD disc contains multiple audio tracks such as Spanish and English and this setting is set to SPANISH then the Spanis...

Страница 47: ...Level 4 Use the 6 key to move to OK and press ENTER Parental Control Password Setup Menu Parental Options Changing the Parental Setting 1 The first time you define a user password enter the factory password 3351 in the OLD PASSWORD field the factory password is not changed After you have defined a user password you would enter that value in this field If you forget the value of your user password ...

Страница 48: ...exit the CLOCK SETTINGS MENU 1 Use the 5 6 to select the Hour Mode field 2 To edit a field press ENTER 3 Use the 3 4 keys to select an option 4 Press SETUP to exit the CLOCK SETTINGS MENU Select either 12HR normal civilian time or 24HR military time time mode Setting the Clock Setup Menu Time and Date Settings Hour Mode 48 Setup Recording Tuner Disc Maintain A V Output General Timer Clock Settings...

Страница 49: ... all the lines of an image in one pass creating a more film like quality to DVD movies Press SETUP to exit the VIDEO MENU 1 2 Use the 3 4 keys to select an option Default setting NTSC Your DVD Player will work with TVs based on the NTSC and PAL standards as well as TVs designed to function with both standards NTSC is the standard TV system used in the USA Canada Japan and many other countries The ...

Страница 50: ...gnal on the Digital Output Press SETUP to exit the AUDIO MENU 1 2 Use the 3 4 keys to select OFF or ON Default setting OFF Dynamic Range Control also called Midnight Mode reduces the variations between loud and soft sounds in DVD movies This lets you turn the volume up to hear softer sounds and dialog and not worry about extremely loud scenes disturbing others Press SETUP to exit the AUDIO MENU Au...

Страница 51: ...ngs Press SETUP to exit the RECORDING MENU 1 2 Use the 3 4 keys to decrease increase the audio volume Default setting 100 Use this setting to adjust the volume of the audio for your recordings The default setting of 100 sends 100 of the signal from your input to the recording You can decrease this value if you wish all the way to 0 which will result in no sound on the recording Press SETUP to exit...

Страница 52: ...nnel you choose To show any channel again after it has been skipped simply select the channel and press ENTER again The SKIPPED icon is removed from the right of the channel 1 2 Press ENTER on Restore Defaults A prompt appears asking if you really want to restore the defaults This option clears any changes you ve made to the TV TUNER setup and restores the default channel list Use the 3 4 keys to ...

Страница 53: ...NTER 2 Use the 3 4 keys to select EDIT LABEL OK to accept the current label or CANCEL to cancel the option 3 Press ENTER to confirm You can rename the DISC LABELS of your DVD R or DVD RW discs You cannot rename the disc label of a DVD R disc that has been FINALIZED 4 Press SETUP to exit You will use the On Screen Keyboard for editing functions like renaming a disc label See page 43 for a complete ...

Страница 54: ...L CONTROL settings and the PASSWORD All stored CHANNELS will be lost Use the 3 4 keys to select YES or NO and press ENTER to confirm 3 Press SETUP to exit Restoring Factory Defaults Setup Menu Restore Defaults 54 Question This action will restore the factory defaults Are you sure you want to continue No Yes Setup Recording Tuner Disc Maintain A V Output General Timer Language Rating Clock Version ...

Страница 55: ...ect Ratio may be set wrong for your Television type Enter the SETUP MENU and select the A V OUTPUT 4 VIDEO menu Try changing the TV SHAPE setting to 4 3 PanScan Pan Scan if you are using a standard TV or 16 9 Wide if your TV is a widescreen type Common Problems and Solutions Troubleshooting Live Recording Will Not Start The Video Input Source may be protected with MacroVision Copy Protection The d...

Страница 56: ...to 22kHz 96kHz Sampling 4Hz to 44kHz DVD Linear Sound 4Hz to 20kHz Audio CD Signal to Noise Ratio 90dB Audio Dynamic Range 90dB Harmonic Distortion 0 001 W PEAK Audio Performance CH DVR 1530 Specifications Specifications Component Video Y 1 0Vp p 75 Ohm Negative Sync Pb Pr 7Vp p 75 Ohm Mini DIN 4 Pin 75 Ohm S Video One Pin Jack 1Vp p 75 Ohm Composite Video Coaxial Digital One Pin Jack 5Vp p 75 Ohm...

Страница 57: ...ng inputs 13 factory defaults 54 TV 10 12 scan mode 11 contents package 15 rf modulator 10 copy protection 3 safety instructions 2 discs 14 scanning channels 20 display button 25 37 screen saver 18 display VFD 8 setup menu 45 54 dv camcorder control 33 skip next previous 23 dvd r 32 slow motion 23 dvd rw 32 specifications 56 standby power 18 editing recordings 42 still picture 23 enter button 6 st...

Отзывы: