background image

TABLE OF CONTENTS

ii

DPT100-S

5. CHARACTER FONTS

5.1 CHARACTER SETS ............................................................................ 5-1

APPENDIX A - ACCESSORIES AND SPARE PARTS

A.1 SPARE PARTS .................................................................................... A-1

Содержание s'print DPT100-S

Страница 1: ...DPT100 S User Manual Portable thermal printer s print www custom it ...

Страница 2: ...rding any errors found in it or suggestions on how it could be improved are appreciated Since products are subject to continuous check and improvement CUSTOM ENGINEERING SPA reserves the right to make changes in information contained in this manual without prior notification COD DOME DPT100 S VERS 1 00 Copyright 2001 CUSTOM ENGINEERING SPA Italy CUSTOM ENGINEERING SPA Str Berettine 2 43010 Fontevi...

Страница 3: ...DPT100 S 2 1 4 3 6 7 5 PRINTER COMPONENTS A DPT100 S Front external view 1 Printer base 2 Cover 3 Paper holder 4 Printing mechanism 5 Multi function ON key 6 Paper exit slot 7 Status Led ...

Страница 4: ...DPT100 S 1 B DPT100 S Under view 1 Serial connector and power supply ...

Страница 5: ...ng the printer On and Off 1 2 1 1 3 Connection with adapter 1 2 1 2 CONFIGURATION 1 3 1 2 1 Printing optimization using the power supply 1 4 1 3 HEXADECIMAL DUMP 1 5 1 4 SIXLOAD 1 5 1 5 MAINTENANCE 1 6 1 5 1 Changing the paper roll 1 6 1 5 2 Cleaning 1 8 2 INTERFACES 2 1 RS232 SERIAL 2 1 3 PRINTER OPERATION 3 1 CONTROL CHARACTERS 3 1 3 1 1 ESC POS emulation 3 1 4 TECHNICAL SPECIFICATIONS 4 1 TECHN...

Страница 6: ...TABLE OF CONTENTS ii DPT100 S 5 CHARACTER FONTS 5 1 CHARACTER SETS 5 1 APPENDIX A ACCESSORIES AND SPARE PARTS A 1 SPARE PARTS A 1 ...

Страница 7: ...ifications of the printer Chapter 5 Contains the character sets fonts used by the printer SYMBOL USED IN THIS MANUAL NOTE Gives important information or suggestions relative to the use of the printer WARNING Information marked with this symbol must be carefully followed to guard against damaging the printer DANGER Information marked with this symbol must be carefully followed to guard against oper...

Страница 8: ...ly and have it repaired by a specialized technician when A The feed connector has been damaged B Liquid has seeped inside of the printer C The printer has been exposed to rain or water D The printer is not functioning normally despite the fact that all instructions in the users manual have been followed E The printer has been dropped and its outer casing damaged F Printer performance is poor G The...

Страница 9: ...range of interface options RS232 serial RS232 IRDA The printer may be powered using an external adapter The desktop version with RS232 interface without battery is intended for the instrumentation retail and general cash register sectors for example terminals for credit card payment It is important to note that s print is the first Custom printer designed with Fig 1 ...

Страница 10: ... rolls and can print up to 24 or 40 1 charaters per line 1 NOTE The 40 column version is downloadable on the Support Download Firmware section from www custom it web site PRINTER DESCRIPTION The printers consists of a ABS V0 casing 1 equipped with a cover 2 under which is housed the paper roll and print mechanism On the front is the multi function key 3 and red LED 4 Fig 2 ...

Страница 11: ...ressing the key quickly will exit the configuration mode while if it is held down for at least a second it is possible to make changes in the individual parameters The red LED displays printer operating status and this check is performed on line Table 1 lists operating statuses and the LED signals connected to them s u t a t s D E L s u t a t s D E L s u t a t s D E L s u t a t s D E L s u t a t s...

Страница 12: ...ion system On one side is a 9 pin female connector fig 1 2 A for the serial port on the other side of the same connector is a RJ11 connector fig 1 2 B and a jack fig 1 2 C for connection to an external adapter fig 1 2 D To supply power to the printer and for the serial connection use the connection cable fig 1 2 that comes packed with the printer and following the instructions listed in the paragr...

Страница 13: ...inter Off Turn off the power supply 1 1 3 Connection with the power supply To supply the printer use the adapter and cable packed with the printer and proceed as follows connect the adapter jack to the cable jack see fig 1 3 and plug the adapter into the electrical mains connect the cable RJ11 connector to the RJ11 connector located under the printer see fig 1 3 Fig 1 3 ...

Страница 14: ...tion Low power High powerD 2 Print density 2 1 0D 1 2 Please note the parameters marked with the symbol D represent the default values 1 Note the printer interface is fixed setted to RS232 2 Note this parameter regulates the type of power supply setting the default value is High power For further details please refers to the 1 2 1 section Fig 1 4 SETUPDEFAULT HEADTEMP C 22 5 BATTTEMP C 25 0 HEAD V...

Страница 15: ...wer supply setting The default value setted during the printer setup is High power With the power supply that comes packed with the printer proceeds as follows 1 if the performances in printing are not considerables in the printer setup configure the Consumption parameter setting the value to Low power 3 3 NOTE if the Consumption parameter is setted to Low power it s advisable not to exceed the bl...

Страница 16: ...al Dump 48 65 78 61 64 65 Hexade 63 69 6D 61 6C 20 cimal 64 75 6D 70 20 66 dump f 75 6E 63 74 69 6F unctio 6E 20 30 31 32 33 n 0123 34 35 36 37 38 39 456789 61 62 63 64 65 66 abcdef 67 68 69 6A 6B 6C ghijkl 6D 6E 6F 70 71 72 mnopqr 73 74 75 76 77 78 stuvwx 79 7A yz 1 4 SIXLOAD The printer has been designed with an easy paper load system to improve handling and simplify use This easy paper loading ...

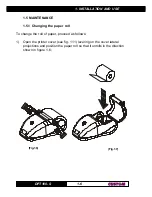
Страница 17: ... 5 1 Changing the paper roll To change the roll of paper proceed as follows 1 Open the printer cover see fig 1 11 levering on the cover lateral projections and position the paper roll so that it unrolls in the direction shown in figure 1 6 Fig 1 7 Fig 1 6 ...

Страница 18: ...1 INSTALLATION AND USE 7 1 DPT100 S Fig 1 8 Fig 1 9 2 Pull up on the edge of the paper and close the cover fig 1 13 3 Tear off the paper The printer is now ready fig 1 14 ...

Страница 19: ... Cleaning To clean the printer use a vacuum cleaner or soft cloth Before cleaning the printer unplug its electrical cord and make sure that the printer is off Do not use alcohol solvents or hard bristled brushes Do not let water or other liquids seep into the printer ...

Страница 20: ...or serial connection a connecting cable fig 2 2 with double connection system is packed with the printer On one side is a 9 pin female connector fig 2 2A to connect to the serial port on the other side of the same connector is a RJ11 connector fig 2 2 B For the layout of signals on the connectors please refer to tables 2 1 and 2 2 Fig 2 1 Fig 2 2 A Fig 2 2 B ...

Страница 21: ...L A N G I S L A N G I S L A N G I S T U O N I T U O N I T U O N I T U O N I T U O N I A A A A A N O I T P I R C S E D N O I T P I R C S E D N O I T P I R C S E D N O I T P I R C S E D N O I T P I R C S E D 1 1 1 1 1 D C D T U O D C D t a e v i t c a n O r e t n i r P n o i t a c i f i t n e d i r e i r r a c a t a D h g i h 2 3 2 S R 2 2 2 2 2 D X T T U O D X R t s o h m o r f t u p t u o l a i r ...

Страница 22: ...RXD DCD CTS DSR 8 9 7 5 6 3 4 2 1 TXD 1 2 3 4 5 6 7 8 9 10 11 12 13 14 15 16 17 18 19 20 21 22 23 24 25 9 pin connector PC s print cable 9 pin connector PC s print cable Fig 2 2 Fig 2 3 The diagrams below show a sample connection between printer and Perso nal Computer using a 9 and 25 pin female connector ...

Страница 23: ...r c s e D 0 0 s r e t c a r a h c l l a m s n i s t n i r P 1 0 h t d i w e l b u o d n i s t n i r P 2 0 t h g i e h e l b u o d n i s t n i r P 3 0 g n i t n i r p d e d n a p x E 4 0 g n i t n i r p r e t c a r a h c l l a m s s e r o t s e R 7 0 r e f f u b a t a d t n i r p l e c n a C A 0 e n i l e n o s d e e f d r a w r o F B 0 n e n i l n s d e e f d r a w r o F D 0 r e f f u b e n i l s ...

Страница 24: ...i h p a r g a o t n i t f i h s e t u l o s b a t e S n I S G n 9 4 D 1 D I r e t n i r p e h t s t i m s n a r T U S G 5 5 D 1 e u l a v t l u a f e d o t s r e t e m a r a p r e t n i r p s t e s e R n W S G n 7 5 D 1 e n i l c i h p a r g i p d 0 0 2 a f o e t y b n s t n i r P The following pages provide a more detailed description of each command H 0 0 H 0 0 H 0 0 H 0 0 H 0 0 Name Small chara...

Страница 25: ...commands 00H 09H do not cancel the print buffer The commands which modify the direction of the characters are only active at the beginning of the line Default Setting in option register by means of front keys Reference 00H 01H 03H 04H Example H 3 0 H 3 0 H 3 0 H 3 0 H 3 0 Name Expanded printing Format ASCII Hex 03 Decimal 3 Description The printer prints in expanded character mode Notes commands 0...

Страница 26: ...the front keys Reference 00H 01H 02H 03H Example H 7 0 H 7 0 H 7 0 H 7 0 H 7 0 Name Cancel print data buffer Format ASCII Hex 07 Decimal 7 Description Deletes all the print data in the current print buffer Notes If data that existed in the previously specified printing area also exists in the currently specified printing area it is deleted Default Reference Example H A 0 H A 0 H A 0 H A 0 H A 0 Na...

Страница 27: ...command is ignored This command clears the line buffer Default Reference 0AH Example To forward feed fast 5 lines at a time 35 0B or 5 and the command 0B H D 0 H D 0 H D 0 H D 0 H D 0 Name Print the line buffer Format ASCII Hex 0D Decimal 13 Description This command prints the line buffer Notes If the line buffer is empty the command is ignored If the CRLF option is set this command is ignored and...

Страница 28: ...Format ASCII Hex 11 Decimal 17 Description Enables graphic mode a line in 24 column mode corresponds to 144 horizontal dots divided into 24 blocks of 6 dots each a line in 40 column mode corresponds to 240 horizontal dots divided into 40 blocks of 6 dots each Notes To obtain graphic printing enter the command 11 at the beginning of each line The format of the byte in graphic configuration is X R P...

Страница 29: ... n Range 1 n 3 49 n 51 Description Transmits the printer ID specified by n follows n n n n n D I r e t n i r P D I r e t n i r P D I r e t n i r P D I r e t n i r P D I r e t n i r P n o i t a c i f i c e p S 9 4 1 D I l e d o m r e t n i r P H 0 5 0 5 2 d e s u t o N f f O o t d e x i F 1 5 3 D I n o i s r e v M O R r e t c a r a h c 4 n o i s r e v M O R n o s d n e p e D Notes This command is e...

Страница 30: ...e This can be useful during switching on in order to avoid the sending of false characters during initialization by the master device L n H n A C S E L n H n A C S E L n H n A C S E L n H n A C S E L n H n A C S E Name Executes n dots line feed Format ASCII ESC A nH nL Hex 1B 41 nH nL Decimal 27 65 nH nL Description Executes n dots line feed Notes Default Reference Example M C S E d d M C S E d d ...

Страница 31: ... mode printing Format ASCII ESC N Hex 1B 4E Decimal 27 78 Description Select normal mode printing the receipt feeds out of the printer with the printing upside down running from right to left Notes Default Setting in option register by means of front keys Reference ESC R Example Q C S E Q C S E Q C S E Q C S E Q C S E Name Enable underlined printing Format ASCII ESC Q Hex 1B 51 Decimal 27 81 Descr...

Страница 32: ... E W C S E Name Prints a graphic line at 200 dpi Format ASCII ESC W Hex 1B 57 Decimal 27 87 Description After receiving this command the printer waits for 48 bytes which correspond to an entire graphic line In fact 48 bytes of 8 bits each correspond to 384 dots per line Notes Default Reference Example a C S E d d a C S E d d a C S E d d a C S E d d a C S E d d Name Selects the number of dot spaces...

Страница 33: ...ion ASCII code Type of bar code I Interleved 2 5 C Code 39 B CodaBar e EAN8 E EAN13 height Number of dot lines in 1 8 mm units position Left hand margin expressed in 1 8 mm units options bit bit 0 bit 1 bit0 check digit is not printed is printed bit3 2 HRI 0 no 1 above 2 below 3 above be low bit5 4 size 0 normal 1 double 2 triple 3 quadruple maximum length Interleaved 2 5 12 characters Code 39 10 ...

Страница 34: ...iguration on the serial port Notes If the printer is using the parallel protocol nothing with be transmitted Default Setting in the option register by means of the front keys Reference ESC B Example The response is on two bytes E g if you receive 30 32 it means that printing is in double height mode q C S E q C S E q C S E q C S E q C S E Name Disables underlined printing Format ASCII ESC q Hex 1B...

Страница 35: ...graphic bank 384 85 dots Format ASCII ESC n1 n2 Hex 1B FA n1 n2 Decimal 27 250 n1 n2 Range 0 n 1 n 2 255 Description Prints the graphics bank from flash n 1specifies the starting dot line 1 85 n 2specifies the number of lines to print Notes If n1 n2 85 the printer only prints 85 n 1 1 dotlines Default Reference Example To print the graphic bank from dotline 10 to dotline 40 send 1BH FAH 0AH 1EH v ...

Страница 36: ...e s u t o N 5 f f O 0 0 0 t c e r r o c e r u t a r e p m e t d a e H n O 0 2 2 3 r o r r e e r u t a r e p m e t d a e H 6 f f O 0 0 0 t c e r r o c e g a t l o v y r e t t a B n O 0 4 4 6 r o r r e e g a t l o v y r e t t a B 7 f f O 0 0 0 f f O o t d e x i F d e s u t o N Default Reference Example n S G n S G n S G n S G n S G Name Set absolute shift into a graphic line Format ASCII GS n Hex 1D...

Страница 37: ...t o N f f O o t d e x i F 1 5 3 D I n o i s r e v M O R r e t c a r a h c 4 n o i s r e v M O R n o s d n e p e D Notes This command is executed when the data is processed in the data buffer Therefore there could be a time lag between command reception and data transmission depending on data buffer status Default Reference Example U S G U S G U S G U S G U S G Name Resets the printer parameters to...

Страница 38: ...r of byte to print d1 dn specify the bytes to print Notes If the bit image data input exceeds the number of dots to be printed on a line the excess data are processed as printable characters d indicates the bit image data Set a corresponding bit to 1 to print a dot or to 0 to not print the dot This command is not affected by the emphasized double strike underline etc print modes except for the ups...

Страница 39: ... N 8 9 5 9 e t a r d u a B e t a r d u a B e t a r d u a B e t a r d u a B e t a r d u a B s p b 0 0 4 8 3 o t 0 0 6 r e f f u b t n i r P r e f f u b t n i r P r e f f u b t n i r P r e f f u b t n i r P r e f f u b t n i r P s e t y b 8 2 1 y r o m e m h s a l F y r o m e m h s a l F y r o m e m h s a l F y r o m e m h s a l F y r o m e m h s a l F K 2 3 y r o m e m s c i h p a r G y r o m e m s...

Страница 40: ...1 i p c 7 2 1 i p c 7 2 1 i p c 7 2 1 s n m u l o c f o r e b m u N 0 4 4 2 3 3 3 3 3 m m H x L s r e t c a r a h C m m H x L s r e t c a r a h C m m H x L s r e t c a r a h C m m H x L s r e t c a r a h C m m H x L s r e t c a r a h C l a m r o N 3 x 2 t h g i e h e l b u o D 6 x 2 h t d i w e l b u o D 3 x 4 h t d i w d n a t h g i e h e l b u o D 6 x 4 Tab 4 2 3 NOTE The 40 column version is do...

Страница 41: ... e p s t u p t u O s n o i t a c i f i c e p s t u p t u O s n o i t a c i f i c e p s t u p t u O e g a t l o v t u p t u O c d V 8 1 120Vac Adaptor s n o i t a c i f i c e p s t u p n I s n o i t a c i f i c e p s t u p n I s n o i t a c i f i c e p s t u p n I s n o i t a c i f i c e p s t u p n I s n o i t a c i f i c e p s t u p n I e g a t l o v t u p n I c a V 0 3 2 e c n e u q e r f t u p ...

Страница 42: ...4 TECHNICAL SPECIFICATIONS 4 4 DPT100 S R 7 5 1 4 5 9 6 64 61 8 8 2 213 9 88 18 4 3 DIMENSIONS Printer dimensions are shown below Fig 4 1 ...

Страница 43: ...5 CHARACTER SETS 1 5 DPT100 S 5 1 CHARACTER SETS The printer has a 224 character font a print out of which is shown below Fig 5 1 ...

Страница 44: ... e h t f o l l o R r e p a p l a m r e h t f o l l o R E P D I L A C P E P D I L A C P E P D I L A C P E P D I L A C P E P D I L A C P r e t p a d A r e t p a d A r e t p a d A r e t p a d A r e t p a d A 8 G U L P I L O P 9 B C 8 G U L P I L O P 9 B C 8 G U L P I L O P 9 B C 8 G U L P I L O P 9 B C 8 G U L P I L O P 9 B C e l b a c l a i r e S e l b a c l a i r e S e l b a c l a i r e S e l b a c...

Отзывы: