


ไว้ ขณะนี้คาปูชิโน่ของท่านเสร็จเรียบร้อย
แล้ว หากท่านต้องการเพิ่มรสชาติ ท่าน
สามารถโรยผงโกโก้เล็กน้อย
7.กดปุ่ม เปิด/ปิด ให้อยู่ในต�าแหน่ง “ ”
เพื่อปิดเครื่อง
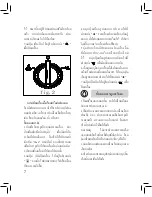
fig.2
กำรสตีมเครื่องดื่มร้อนหรือท�ำฟองนม
ก้านตีฟองนมสามารถใช้ส�าหรับการตีฟอง
นมอย่างเดียว หรือการท�าเครื่องดื่มร้อนอื่นๆ
เช่น ช็อคโกแลตร้อน น�้า หรือ ชา
ขั้นตอนกำรท�ำ
1.น�าแท็งก์บรรจุน�้าออกมาจากเครื่อง จาก
นั้นเปิดฝาแท็งก์บรรจุน�้า
เพื่อเติมน�้าใน
ระดับที่ท่านต้องการ โดยไม่ให้ปริมาณน�้า
เกินขีด “Max” บนแท็งก์ จากนั้นประกอบ
แท็งก์บรรจุน�้าเข้ากับเครื่องในต�าแหน่งเดิม
2.เสียบปลั๊กเครื่องเข้ากับเต้ารับปลั๊ก
3.กดปุ่ม เปิด/ปิดเครื่อง ให้อยู่ในต�าแหน่ง
“ ” จากนั้นไฟแสดงสถานะไฟเข้าเครื่อง
(สีแดง) จะติดขึ้น
4.หมุนปุ่มเลือกรูปแบบการท�างานไปที่
ต�าแหน่ง “ ” รอเครื่องท�าความร้อนสักครู่
จนกระทั่งไฟแสดงสถานะพร้อมใช้ สีเขียว
ติดขึ้น แสดงว่าเครื่องพร้อมใช้งาน
5.จุ่มปลายก้านตีฟองนมลงในเครื่องดื่ม
ที่ต้องการท�าความร้อนหรือนมที่เตรียม
ไว้ หมุนปุ่มเลือกรูปแบบการท�างานไปที่
ต�าแหน่ง “ ” เพื่อเริ่มขั้นตอนการสตีม
6.เมื่ออุณหภูมิของเครื่องดื่มได้ตามต้องการ
แล้วหรือฟองนมขึ้นตามต้องการ ให้หมุนปุ่ม
เลือกรูปแบบการท�างานไปที่ต�าแหน่ง “ ”
7.กดปุ่ม เปิด/ปิด ให้อยู่ในต�าแหน่ง “ ” เพื่อ
ปิดเครื่อง
1.ปิดเครื่องและถอดปลั๊ก รอให้เครื่องเย็นลง
ก่อนการท�าความสะอาด
2.เช็ดท�าความสะอาดภายนอกตัวเครื่องด้วย
ฟองน�้า และ ท�าความสะอาดแท็งก์บรรจุน�้า
ถาดรองน�้า ตะแกรงวางแก้วกาแฟ ด้วยการ
ล้างน�้าปกติ แล้วเช็ดให้แห้ง
หมายเหตุ : ไม่ควรท�าความสะอาดด้วย
แอลกอฮอล์หรือน�้ายาที่มีฤทธิ์กัดกร่อน ห้าม
จุ่มเครื่องลงในน�้าหรือของเหลวใดๆ ทั้งสิ้น
3.ถอดก้านกาแฟออกจากเครื่อง โดยหมุนตาม
เข็มนาฬิกา
4.ล้างท�าความสะอาดอุปกรณ์ภายนอก ทุกชิ้น
ด้วยน�้าและเช็ดให้แห้ง
OFF
OFF
ขั้นตอนกำรดูและรักษำ
7
Содержание RBSESPRESSO
Страница 1: ...Instruction Manual ESPRESSO MACHINE MODEL RBSESPRESSO 1350 W 230 V 50 Hz...
Страница 2: ...1...
Страница 3: ...1350 230 50 CUIZIMATE CUIZIMATE A B C D E F G H I J K L M N O P Q Espresso RBSESPRESSO 2...
Страница 4: ...1 2 3 4 5 6 7 8 9 10 11 12 13 14 15 16 17 18 19 3...
Страница 5: ...20 21 22 23 1 Max 2 Insert Lock 1 3 4 5 6 1 4...
Страница 6: ...20 1 Max 2 Insert Lock 1 3 4 5 O 6 1 1 1 1 2 Insert Lock 1 3 4 5...
Страница 7: ...5 2 6 7 1 2 3 100 70 5 2 4 2 5 2 6 OFF 6...
Страница 8: ...7 fig 2 1 Max 2 3 4 5 6 7 1 2 3 4 OFF OFF 7...
Страница 9: ...1 2 3 2 Max 4 1 100 3 3 4 5 2 2 5 6 2 15 7 4 6 3 8 9 Max 4 6 3 15 6 10 9 3 OFF 8...
Страница 10: ...9...
Страница 11: ...10...
Страница 12: ...2 11...
Страница 23: ...9 9 14 17 9 10310 46 178 3 12 10230 0 2363 7757 62...