background image

15

E. 

Cleaning and Maintenance

n


  We recommend cleaning your coffee maker each time you use it. Be sure the unit is OFF and 

unplugged before cleaning.

n


  Open the lid and remove the grinder assembly (both the cover and the grind compartment). 

n


  Slide out the filter basket holder and remove filter basket cover, gold tone filter and filter 

basket. 

n


  All of these parts can be hand-washed in warm, soapy water and rinsed thoroughly, or cleaned 

in the upper rack of the dishwasher.

n


  We recommend washing the filter basket holder by hand to protect the brushed stainless 

steel finish.

n


  Dry all parts. Do not put any water in the unit once the grinder assembly has been removed.

n


  Wipe the area under the grinder assembly with a damp cloth. If water gets into the grinder 

motor, the motor may become damaged and may malfunction.

n


  Never use rough, abrasive materials or cleansers to clean any part of your coffee maker.

n


  Do not dry the inside of the water reservoir with a cloth, as lint may remain.

DECALCIFICATION

n


  Decalcification refers to removing the calcium deposits which form over time on 

the metal parts of the coffee maker. When both blue and red indicators flash, it is 
time to clean your coffee maker. We recommend decalcifying every month for best 
performance. The frequency depends upon the hardness of your tap water and how 
often you use the coffeemaker.

Directions:

1.  Remove the water filter holder and water filter from the water reservoir.
2.  Fill the water reservoir to the maximum capacity (450ml) with a mixture of 6 parts 

white vinegar and 10 parts water.

3.  Press Grind Off button
4.  Place a container which is 450ml or bigger under the dispenser.
5.  Press and hold both Grind 

&

 Brew and Grind Off buttons for 2 seconds to activate the 

cleaning/decalcification process.

NOTE:

 Blue and red indicators will alternately flash during the cleaning cycle.

6.  Discard solution when flow stops, and return container to coffee maker.
7.  Rinse by repeating operation, this time using 450ml of fresh, cold water.

NOTE:

 One cycle should be sufficient to adequately clean the coffee maker. If there is any

smell or taste of vinegar, run another cycle with fresh, cold water.

Содержание DGB1U

Страница 1: ...One Cup Grind and Brew DGB1U ...

Страница 2: ...pervision or instruction concerning use of the appliance by a person responsible for their safety 3 Children should always be supervised to ensure that they do not play with this product 4 Not for use by children Keep out of reach of children during and after use 5 Always inspect the appliance before use for noticeable signs of damage Do not use if damaged or if the appliance has been dropped Do n...

Страница 3: ...isinart s aim has been to produce the very finest kitchen equipment All Cuisinart products are engineered for exceptionally long life and designed to be easy to use as well as to give excellent performance day after day To learn more about our products and for recipe ideas visit our website www cuisinart co uk ...

Страница 4: ...tion 5 Safety Cautions Wiring Instructions 6 B Before First Use 9 C Brewing Coffee Using Beans 10 D Brewing Coffee Using Pre Ground Beans 13 E Cleaning Maintenance 15 F Troubleshooting 16 UK Guarantee 17 UK After Sales Service 17 ...

Страница 5: ...Tray Grind Brew On Off Button Grind Off Button Charcoal Water Filter and Holder Grinder Cover Filter Basket Cover Gold Tone Filter Filter Basket Water Reservoir Filter Basket Holder Grinder Includes spoon plastic drip tray cover and 100 x No 2 paper filters not shown ...

Страница 6: ... the plug from the mains Never pull the plug out of the mains socket by its lead n This appliance should not be used by adults or children whose lack of experience product knowledge or disability might cause a hazard unless they have been correctly instructed and are adequately supervised n Children should always be supervised to ensure that they do not play with this product n Not for use by chil...

Страница 7: ...nd electronic equipment By ensuring this product is disposed of correctly you will help prevent potential negative consequences for the environment and human health which could otherwise be caused by inappropriate waste handling of this product For more detailed information about the recycling of this product please contact your local council office or your household waste disposal service Safety ...

Страница 8: ...BLUE NEUTRAL BROWN LIVE YELLOW GREEN EARTH As the colours of the wire in the mains lead of this appliance may not correspond with the colour marking identifying the terminals on your plug proceed as follows n The wire which is coloured BLUE must be connected to the terminal which is marked with the letter N n The wire which is coloured BROWN must be connected to the terminal which is marked with t...

Страница 9: ...he filter skin n Flushfilterbyrunningcoldtapwaterthroughholesinbottomofcompartmentfor10seconds n Allow the filter to drain completely n Slide the water filter holder back into the channel in the water reservoir pushing it down to the base of the unit NOTE We recommend changing the water filter every 60 days or after 60 uses and more often if you have hard water Replacement filters can be purchased...

Страница 10: ...ss water comes out into the cup as a small amount is absorbed by the coffee grinds This allows enough room in the cup to add milk Should you drink your coffee black you can fill your cup with water then add an extra splash more into the water reservoir n Remove grinder cover by simply holding the transparent plastic lid and pulling it towards you Add beans using the scoop provided CUP COFFEE Small...

Страница 11: ... number 2 sized paper filter included into the gold tone filter You can use the machine without the paper filter but this means washing out the gold tone filter after each use n If using the paper filter make sure it is completely open and touching the side walls and bottom of the basket n Replace the filter basket cover and push the coffee filter basket compartment back into the unit until in cli...

Страница 12: ...ress the Grind Brew button A blue indicator around the button will light up and the beans will begin to grind After this your coffee will start brewing and will drip slowly into your chosen mug n To stop process at any time press the Grind Brew button again ...

Страница 13: ...ows enough room in the cup to add milk Should you drink your coffee black you can fill your cup with water then add an extra splash more into the water reservoir n Pull out the coffee filter basket compartment by gripping each side of the compartment with one hand whilst holding the machine in place with the other Pull the compartment and it will slide towards you n Remove the filter basket cover ...

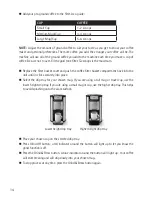
Страница 14: ...offee filter basket compartment back into the unit until in clicks securely into place n Select the drip tray for your chosen mug If you are using a tall mug or travel cup use the lower height drip tray If you are using a small mug or cup use the higher drip tray This helps to avoid splashing onto the work surface Lower height drip tray Higher height drip tray n Place your chosen cup on the select...

Страница 15: ...remain DECALCIFICATION n Decalcification refers to removing the calcium deposits which form over time on the metal parts of the coffee maker When both blue and red indicators flash it is time to clean your coffee maker We recommend decalcifying every month for best performance The frequency depends upon the hardness of your tap water and how often you use the coffeemaker Directions 1 Remove the wa...

Страница 16: ...adjust the proportions according to your own preferences If coffee is too strong either reduce the amount of beans ground coffee or increase the amount of water If coffee is too weak either increase the amount of beans ground coffee or decrease the amount of water Be sure not to fill the grinder with more than six scoops or above the Max Fill line Do not fill the water reservoir with more than 450...

Страница 17: ...ansit The Conair Group Ltd reserves the right to amend terms and specifications without prior notice This guarantee in no way affects your statutory rights UK After Sales Service For further advice on using the appliance or should you need to return your product please contact the Conair Customer Care Line on 03702 406 902 09 00 to 17 00 Monday to Friday or email your enquiry to support cuisinart ...

Страница 18: ......

Страница 19: ......

Страница 20: ...IB 15 275 ...

Отзывы: