background image

Body

13

Seat box assembly

The RZT-S Zero has a bolt together seat box assembly. The individual parts of the seat box are serviced sepa-

rately, not as one complete assembly. This section will be divided into three sections to cover the service procedures 
for the three main parts of the seat box assembly.

Seat box top plate

The seat box top plate will need to be removed to perform service procedures such as:

Removing the deck

Replacing the slotted deck lift links

Replacing the deck lift shaft brackets

Removing the deck motors 

Removing the hub motors

To remove/replace the seat box top plate:

1.     Disconnect the battery pack’s positive lead from the 

contactor assembly by following the procedures 
described in the left pod section of this chapter.

2.

Remove the rear battery cover by following the pro-
cedures described in Chapter 6: Battery Pack and 
Charger.

3.

Remove the left and right pods by following the pro-
cedures described earlier sections of this chapter.

4.

Disconnect the seat switch

5.

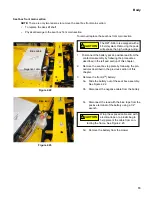
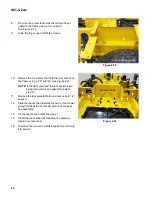
Remove the two nuts that secure the seat bracket to 
the mower using a 1/2” wrench. See Figure 2.18.

6.

Lift the seat off of the mower.

7.

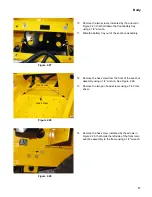
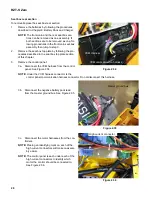
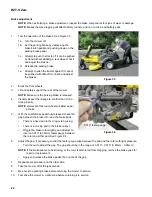
Remove the four screws, indicated by the arrows in 
Figure 2.19
, that secures the front battery cover to 
the mower using a T-30 torx driver.

8.

Lift the front battery cover off of the mower.

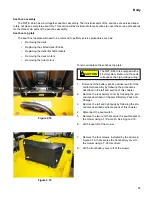
Figure 2.18

Battery

Nuts

!  CAUTION

!  CAUTION

The RZT-S Zero is equipped with a 
48 volt system. Removing the pods 
will expose the high voltage wiring.

Figure 2.19

Содержание RZT-S Zero

Страница 1: ...ied with the equipment No liability can be accepted for any inaccuracies or omission in this publication although care has been taken to make it as complete and accurate as possible at the time of publication However due to the variety of outdoor power equipment and continuing product changes that occur over time updates will be made to these instructions from time to time Therefore it may be nece...

Страница 2: ......

Страница 3: ...ies 29 Rebuilding the Drop Axles 34 Chapter 4 Steering Introduction 39 Wheel Alignment 39 Front Wheels 41 Front Yokes 43 Removal of the Steering Gears 46 Drag Links 50 Steering Sensor 52 Throttle Position Sensor TPS Sensor 55 Steering and TPS Calibration 56 Chapter 5 Electrical System Introduction 57 System Operation 57 Electric Motors 63 Vehicle Control Module VCM 65 Control Panel 67 Controllers ...

Страница 4: ...5 5 Stage Charge 116 Charger Trouble Codes 117 Battery Removal Installation 118 Electric Rider Battery Replacement Check List 127 Charger Trouble Codes 128 Chapter 7 Decks and Lift Shaft Cutting Decks 129 Cleaning the Deck 131 Blades 132 Blade Removal 132 Leveling the Deck 134 Front To Rear pitch Leveling 135 Deck Gauge Wheel Adjustment 136 Deck Lift Shaft Assembly 137 Deck Motor 138 Appendix Asse...

Страница 5: ...they should seek the help of a qualified technician or Cub Cadet Technical Support Fasteners All of the fasteners used on these mowers are sized in fractional inches If a fastener has a locking feature that has worn replace the fastener or apply a small amount of releas able thread locking compound such as Loctite 242 blue Some fasteners like cotter pins are single use items that are not to be reu...

Страница 6: ...environments Chemically resistant gloves when working with chemicals or solvents Respirator when working with chemical or solvents Appropriate tinted eye protection when cutting or welding Flame resistant headgear jacket chaps when cutting or welding WARNING WARNING CAUTION CAUTION Remember that some hazards have a cumulative effect A single exposure may cause little or no harm but continual or re...

Страница 7: ...ng the same procedure two or three times in the manual Description of the RZT S Zero The RZT S Zero is a 48 volt electric zero turn mower that is based on Cub Cadet s RZT S mower platform There are four electric motors that are used on these rid ers One motor connected to each rear wheel through a drop axle Two motors on the deck one for each blade The RZT S Zero also features The only electric ze...

Страница 8: ...volt battery pack 2 Frame E Transmission E Dual infinite speed drop axle D Style series S Deck S 42 010 Customer number The serial number is 1J142H20124 The serial number reads as follows 1 Engineering level B Month of production B February 14 Day of the month 2 Last digit of the year H Plant it was built in H Martin TN 2 Assembly line number 0124 Number of unit built 1J142H20124 17AV2EDS010 Meets...

Страница 9: ...e screw and washer that secures the steering wheel to the steering shaft using a 1 2 wrench See Figure 2 1 1c Lift the steering wheel off of the steering shaft 2 Remove the upper steering column cover 2a Remove the six screws that hold the upper cover to the steering column using a T 30 torx driver See Figure 2 2 2b Unplug the LED headlight 2c Unplug both of the VCM harness connections Figure 2 1 ...

Страница 10: ...bell crank 4 Remove the screw that secures the reverse pedal using a 1 2 wrench See Figure 2 4 5 Remove the forward drive pedal See Figure 2 5 5a Remove the screw that secures the drive pedal to the pedal shaft bell crank using a 1 2 wrench 5b Unhook the drive pedal from the bell crank Figure 2 3 Brake pedal Pedal shaft bell crank Figure 2 4 Reverse pedal Figure 2 5 Forward drive pedal ...

Страница 11: ...ws indicated by the arrows in Figure 2 6 using a T 30 torx driver 7 Remove the nine screws that hold the floor pan to the frame using a T 30 torx driver 8 Lift the floor pan off of the mower 9 Install the floor pan by following the previous steps in reverse order Figure 2 6 ...

Страница 12: ...using a 1 2 wrench 1b Disconnect the battery pack s positive lead from the contactor assembly using a 7 16 wrench See Figure 2 8 Figure 2 7 CAUTION CAUTION The RZT S Zero is equipped with a 48 volt system Removing the pods will expose the high voltage wiring Figure 2 8 Contactor assembly Positive lead Figure 2 9 Positive lead CAUTION CAUTION The battery pack s positive lead is still hot Take measu...

Страница 13: ...g the pro cedures described in Chapter 6 Battery Pack and Charger 4 Remove the two screws indicated by the arrows in Figure 2 11 from the inboard side of the pod using a T 30 torx driver 5 Disconnect the charger harness 6 Remove the screw from the front of the pod using a T 30 torx driver See Figure 2 12 Figure 2 10 Figure 2 11 Charger harness Figure 2 12 Screw ...

Страница 14: ...0 Install the pod by following the previous steps in reverse order NOTE Ensure that the charger harness is recon nected when installing the left pod It is pos sibly to reassemble the mower with the charger disconnected It will run but will not charge the batteries 11 Test drive the mower in a safe area before returning it to service Figure 2 13 Charger door switch ...

Страница 15: ...sing a T 30 torx driver 4 Remove the screw from the front of the pod using a T 30 torx driver See Figure 2 15 5 Remove the two screws indicated by the arrows in Figure 2 16 from the underside of the right pod using a 3 8 wrench 6 Lift the pod enough to gain access to the PTO and key switches 7 Disconnect the key switch 8 Disconnect the PTO switch 9 Lift the pod off of the mower 10 Install the pod ...

Страница 16: ...et See Figure 2 17 4 Disconnect the seat switch 5 Pull the seat switch harness out of the seat bracket 6 Remove the two shoulder bolts and nuts the seat bracket pivots on using a 5 8 wrench and a 1 2 wrench 7 Install the seat be following the previous steps in reverse order NOTE When tightening the shoulder bolts and nuts make sure the shoulders are in the holes of the seat bracket NOTE Be sure to...

Страница 17: ...e lead from the contactor assembly by following the procedures described in the left pod section of this chapter 2 Remove the rear battery cover by following the pro cedures described in Chapter 6 Battery Pack and Charger 3 Remove the left and right pods by following the pro cedures described earlier sections of this chapter 4 Disconnect the seat switch 5 Remove the two nuts that secure the seat b...

Страница 18: ... arrows in Figure 2 20 9d Lift the bracket over the seat bracket studs and off of the mower 10 Remove the six screws indicated by the arrows in Figure 2 21 using a 1 2 wrench 11 Carefully lift the top plate off of the mower while fish ing the seat switch harness thought the slot in the top plate 12 Install the top plate by following the previous steps in reverse order 13 Test drive the mower in a ...

Страница 19: ...ribed in the previous section of this chapter 3 Remove the front 4th battery 3a Slide the battery out of the seat box assembly See Figure 2 22 3b Disconnect the negative cable from the battery 3c Disconnect the lead with the blue tape from the positive terminal of the battery using a 1 2 wrench 3d Remove the battery from the mower Figure 2 22 Blue cable Negative cable CAUTION CAUTION The RZT S Zer...

Страница 20: ...ening in the seat box assembly 6 Fish the positive cable through the opening in the seat box assembly 7 Disconnect the VCM harness from the contactor assembly See Figure 2 25 8 Fish the VCM through the hole in the seat box assembly 9 Fish the PTO switch key switch harness through the opening in the seat box assembly See Figure 2 26 Figure 2 24 Master ground bus Figure 2 25 VCM harness Contactor as...

Страница 21: ...ssembly 12 Remove the hex screw from the front of the seat box assembly using a 1 2 wrench See Figure 2 28 13 Remove the two pan head screws using a T 40 torx driver 14 Remove the hex screw indicated by the arrows in Figure 2 29 that holds the left side of the front main seat box assembly to the frame using a 1 2 wrench Figure 2 27 Figure 2 28 Hex screw Torx screw Figure 2 29 ...

Страница 22: ...s and it is much sim pler to lower the deck onto a 4x4 17 Remove the three hex screws indicated by the arrows in Figure 2 31 using a 1 2 wrench 18 Remove the two screws that attach the right front finger guard to the rear assembly using a 1 2 wrench NOTE If the front and rear assemblies are being removed together skip to the rear seat box section of this chapter 19 Remove the two hex screws indica...

Страница 23: ...eat box assembly See Figure 2 33 Slide the stud assembly out of the front main seat box assembly Install the stud assembly in the new front main seat box assembly 21 Install the front main seat box assembly by following the previous steps in reverse order 22 Test run the mower in a safe area before returning it to service Figure 2 33 Speed nuts ...

Страница 24: ...rol panel 3a Disconnect the VCM harness from the control panel See Figure 2 34 NOTE Under the VCM harness connector is the control panel communication harness connector Do not disconnect this harness 3b Disconnect the negative battery pack lead from the master ground bus See Figure 2 35 3c Disconnect the motor harnesses from the con trollers NOTE Placing an identifying mark on each of the high cur...

Страница 25: ...the right that hold the rear seat box section to the front main section using a 1 2 wrench See Figure 2 38 6 Remove the screw that holds the right rear finger guard to the frame using a 1 2 wrench See Figure 2 39 7 Slide the finger guard off of the mower Figure 2 37 CAUTION CAUTION Do not remove the controller cov ers There are precharge capaci tors inside each of the controllers These capacitors ...

Страница 26: ...ear sections are being removed as one assembly skip to step 13 11 Remove the four elevator bolts and nuts using a 1 2 wrench 12 Slide the rear section towards the rear of the mower enough to clear the front main section of the seat box assembly 13 Lift the rear section off of the mower 14 Install the rear section by following the previous steps in reverse order 15 Test drive the mower in a safe ar...

Страница 27: ...s primarily used as a parking brake but can be used as an emergency brake in case the regenerative braking fails NOTE Regenerative braking happens electrically and there are no parts to service This chapter will only look at the mechanical braking system There is a brake for each drop axle They are activated by depressing the brake pedal The parking brake lever latches the brake shaft The brake sh...

Страница 28: ...properly NOTE Removal of the rear wheel will allow easier access 5 With the clutch brake pedal fully released check the gap between the brake rotor and the brake pads There is a fixed pad in the drop axle housing There is a moving pad in the brake caliper Wiggle the brake rotor slightly and attempt to insert a 0 010 0 38mm feeler gauge between the rotor and either pad See Figure 3 4 6 Adjust the g...

Страница 29: ...e time To service the brake pucks 1 Lift and safely support the rear of the mower 2 Make sure the parking brake is released 3 Remove the rear wheel of the side that is being ser viced 4 Disconnect the brake rod by removing the bow tie clip and sliding the rod out of the brake shaft s bell crank See Figure 3 5 5 Unhook the brake rod from the brake spring 6 Unhook the brake spring from the cam arm S...

Страница 30: ...nch remove the brake puck backing plate and the two brake pins See Figure 3 9 11 Check for free movement of the brake pins A dry lubricant can be used on the brake pins sparingly 12 Slide the brake pins into the caliper 13 Place the backing plate in the caliper Figure 3 7 Mounting screws Figure 3 8 Rotor Figure 3 9 Brake caliper Brake pins Backing plate Brake puck CAUTION CAUTION Never put grease ...

Страница 31: ...n to a torque of 80 120 in lbs 9 13 5 Nm 18 Reconnect the brake rod and spring 19 Adjust the brakes as described in the previous sec tion of this chapter 20 Repeat steps 4 19 on the other side 21 When both sides are completed take the mower off of the jack stands 22 Open the by pass valves and check the parking brake before returning the mower to service With the brakes released the mower should h...

Страница 32: ...o the brake shaft by removing the bowtie clips See Figure 3 12 5 Remove the E rings from the ends of the brake shaft See Figure 3 13 6 Slide the brake shaft to the right enough to clear the brake shaft bushing 7 maneuver the shaft out of the mower 8 Install the shaft by following the previous steps in reverse order 9 Test drive the mower in a safe area before returning it to service Figure 3 11 Br...

Страница 33: ... separately from the drop axle however it is very easy to damage the hub motor housing doing that Cub cadet rec ommends removing the drop axle and hub motor as an assembly and separating the two on the work bench 1 Remove the pods and the seat box top plate by fol lowing the procedures described in Chapter 2 Body NOTE This involves disconnecting the battery pack 2 Disconnect the harness of the mot...

Страница 34: ...ee Figure 3 16 7 Disconnect the brake rod by removing the bow tie clip and sliding the rod out of the brake shaft s bell crank See Figure 3 17 8 Unhook the brake rod from the brake spring 9 Unhook the brake spring from the cam arm See Figure 3 18 Figure 3 16 Screws Figure 3 17 Brake rod Bowtie clip Figure 3 18 Brake spring ...

Страница 35: ...the drive release rod See Figure 3 20 12 Slide the rod out of the mower 13 Safely support the drop axle assembly 14 Remove the two screws that hold the side of the drop axle mounting bracket to the frame using a 1 2 wrench See Figure 3 21 Figure 3 19 Brake shaft return spring Figure 3 20 Spring Figure 3 21 Screws ...

Страница 36: ...gure 3 22 16 Remove the bottom support plate See Figure 3 23 17 While supporting the drop axle assembly remove the two nuts that hold the motor bracket to the frame using a 1 2 wrench See Figure 3 24 18 Lower the drop axle assembly out of the mower Figure 3 22 Screws Figure 3 23 Bottom support plate Figure 3 24 Nuts ...

Страница 37: ...hold the mounting bracket to the drop axle See Figure 3 27 25 Install the drop axle by following the previous steps in reverse order NOTE Do not tighten the mounting screws and nuts until they are all started NOTE Ensure that the washers are at the bolt heads when installing the mounting bracket The axle housing will be damaged if the washers are miss ing NOTE The pointy tipped 3 4 long screws hol...

Страница 38: ...ke puck rotor replacement section of this chapter 4 Remove the push nut that secures the by pass lever to the by pass fork See Figure 3 29 NOTE If the by pass lever or fork are not being replaced the push nut can be left in place 5 Remove the by pass lever NOTE The by pass lever has a very tight fit on the by pass fork 6 Remove the eleven housing screws using a 3 8 wrench 7 Lift the upper housing ...

Страница 39: ...e brake shaft 14 Slide the washer and the spring off of the brake shaft See Figure 3 33 15 Slide the dog clutch off of the brake shaft NOTE The dog clutch is spring loaded to engage the spur gear When the by pass lever is operated the dog clutch slides out of the spur gear This disconnects the Drive axle from the electric motor Figure 3 31 Drive axle Drive gear Bushing Needle bearing Nut Spacer Ba...

Страница 40: ...s for damage and signs of wear NOTE Any parts that have damage or signs of wear must be replaced 20 Re assemble the drop axle by following the previ ous steps in reverse order NOTE When seating the bushings of the brake shaft in the drop axle housing the tab on the bushings must seat in the notch in the hous ing See Figure 3 36 Figure 3 34 Retaining ring Figure 3 35 Input spur gear Bearing Figure ...

Страница 41: ... the drop axle with 10 5 ounces of 737 0300A DurinaTM grease NOTE The drop axle has four different length screws securing the housings together Figure 3 37 shows were the different screws go NOTE Tighten the screws to a torque of 90 120 in lbs 10 14 Nm 21 Test drive the mower in a safe area before returning it to service A 1 4 20 x 1 00 B 1 4 20 x 1 25 C 1 4 20 x 1 50 D 1 4 20 x 2 00 A C C B B D C...

Страница 42: ...RZT S Zero 38 ...

Страница 43: ...on is needed at that wheel The controllers then sends a signal to the wheel motors spinning them at the proper speed Wheel alignment IMPORTANT Check the tire air pressure and wear before attempting to diagnose any problems with the steering or tracking of a RZT S Zero riding mower If the tire circumferences are not equal across the same axles it will greatly affect the performance of the riding mo...

Страница 44: ...he holes in the segment gears See Figure 4 4 11 Install the nuts and bolts that attach the drag links to the segment gears 12 Tighten the drag link ball joint jam nuts 13 Remove all of the alignment pins 14 Install the axle casting covers 15 Install the floor pan following the procedures described in Chapter 2 Body 16 Test drive the mower in a safe area before returning it to service NOTE Do not p...

Страница 45: ...f the yoke NOTE There is a short spacer on each side of the wheel The short spacers slide over the long spacer that the axle bolt passes through See Figure 4 6 4 Slide the long spacer out of the wheel bearings NOTE The long spacer is a tight fit to the bearing and may need to driven out with a hammer and a brass punch 5 Install the front wheel by reversing the previous steps Figure 4 5 Axle bolt F...

Страница 46: ...rive the bearings out of the wheel hub using a drift or pin punch See Figure 4 7 4 Drive in the new bearings using a brass punch or a tube that has the same O D as the bearing See Figure 4 8 5 Install the front wheel 6 Pump grease in the grease fitting on the front wheel until it starts to squirt out of the hub 7 Test drive the mower before returning it to service Figure 4 7 Punch Figure 4 8 Brass...

Страница 47: ...that were under the cover NOTE There is a steering sensor on the left side If the left yoke is to be removed Remove the two screws that hold the steering sensor bracket to the casting using a 7 16 socket See Figure 4 10 NOTE There are two flat washers under the steering sen sor bracket Let the sensor and bracket rest on the floor pan 5 Align the hole of the inboard steering gear with the hole in t...

Страница 48: ...hole in the axle casting 2 Slide one of the 5 16 alignment pins from align ment tool kit 759 05013 through the hole in the axle casting passing all the way through the inboard steering gear See Figure 4 11 3 Slide the yoke into the axle casting from the under side NOTE The flat side of the yoke should be parallel with the box section of the frame See Figure 4 14 4 Slide the wave washer over the yo...

Страница 49: ...rpendicular with the frame facing in Glue the magnet in place using Loctite 495 Super Bonder or an equivalent glue 5f Install the steering sensor and bracket NOTE Two flat washers are trapped between the steering bracket and the axle casting 5g Adjust the steering sensor air gap by following the procedures described in the steering sensor section of this chapter 6 Remove the 5 16 alignment pin 7 I...

Страница 50: ...s section of this chapter 4 Remove the screw and washer that holds the inboard steering gear pivot shaft to the axle casting using a 1 2 wrench See Figure 4 18 NOTE The 5 16 alignment pin can be used to lock the inboard steering gear unless the gear is broken 5 Slide the steering gear out of the axle casting 6 Remove the socket headed cap screw that holds the outboard steering gear to the yoke usi...

Страница 51: ...the right yoke install it so that the RH stamped into the gear is facing up See Figure 4 20 7 Slide the gear off of the yoke 8 Remove the hex screw that holds the steering gear to the shaft using a 9 16 wrench See Figure 4 21 9 Slide the steering gear off of the shaft NOTE The shaft has a double D It may be necessary to drive it off with a hammer and a brass punch Figure 4 20 Figure 4 21 Hex screw...

Страница 52: ... screw to hold the gear to the shaft using a 9 16 wrench 4 Align the bolt in the drag link ball joint with its corre sponding hole in the inboard steering gear while sliding the gear and pivot shaft into place 5 Install the hex cap screw and washer 6 Align the hole of the inboard steering gear with the hole in the axle casting 7 Slide the 5 16 alignment pin through the hole in the axle casting all...

Страница 53: ...p screw acts as the turn stop for the front wheels NOTE The socket head cap screw acts as a travel stop Do not replace it with a hex head screw 12 Install the yoke by following the procedures described in the front yokes section of this chapter 13 Test drive the mower in a safe area before returning it to service NOTE Do not put a mower back into service if it does not react properly to control in...

Страница 54: ...Disconnecting the steering sensor will pro vide greater access to the outer ball joint 5 Turn the steering wheel to bring the sector gears to the center neutral position NOTE Install the 1 4 alignment pin to insure that the sector gears are in the neutral position See Figure 4 26 6 Disconnect the inner drag link ball joint from the sector gear using a pair of 9 16 wrenches 7 Remove the ball joint ...

Страница 55: ...ing the sector gears to the center neutral position NOTE Install the 1 4 alignment pin to insure that the sec tor gears are in the neutral position See Figure 4 29 8 Adjust the ball joints on the threaded drag links to align them with the holes in the segment gears See Figure 4 30 9 Install the nuts and bolts that attach the drag links to the segment gears 10 Tighten the drag link ball joint jam n...

Страница 56: ...edures described in Chapter 3 Body 2 Remove the two screws that hold the yoke cover in place using a 7 16 See Figure 4 31 NOTE There are two spacers with star washers under the cover 3 Disconnect the steering sensor pigtail See Figure 4 32 4 Remove the two screws that hold the steering sen sor bracket to the casting using a 7 16 socket See Figure 4 33 Figure 4 31 Yoke cover Figure 4 32 Steering se...

Страница 57: ...crew that holds the yoke in place and the steering sensor The steering sensor air gap should be between 0 025 0 035 0 64 0 89 mm If it is not 9a Loosen the two screws that hold the top half of the steering sensor bracket to the bottom using a 3 8 wrench 9b Slide a 0 030 0 76 mm non ferrous feeler gauge between the magnet in the head of the screw that holds the yoke in place and the steering sensor...

Страница 58: ... star washers on top of the spacers 11c Position the cover for installation 11d Install the screws using a 7 16 wrench 12 Install the floor pan by following the procedures described in Chapter 2 Body 13 Calibrate the steering sensor by following the procedures described in the Steering and TPS calibration sec tion of this chapter 14 Test drive the mower in a safe area before returning it to servic...

Страница 59: ...using while the actuator is still connected can cause the sensor arm on the TPS to over travel damaging the TPS beyond repair 4 Remove the screw that holds the TPS to the frame using a 3 8 wrench See Figure 4 39 5 Remove the TPS from the mower 6 Install the TPS by following the previous steps in reverse order NOTE If the TPS pig tails are reversed when they are re connected calibrating the sensors...

Страница 60: ...the steering wheel to the right until the axles hit the hard stop 5 Press the right button under the LCD screen 6 Press the mow in reverse button 7 Press the forward drive pedal down until hit hits a hard stop 8 Press the right button under the LCD screen See Figure 4 41 9 Release the drive pedal 10 Press the reverse pedal down until it hits a hard stop 11 Press the left button under the LCD scree...

Страница 61: ...as to prevent the consumer from having easy access to the batteries or any of the electrical wiring To be compliant with this requirement there are covers over the batteries and wires In addition there are baffles under the body pods to prevent access to the wiring and control panel System operation The electrical system on the RZT S Zero differs from that of a traditional Cub Cadet mower in three...

Страница 62: ...ns of the system It receives various inputs from the tractor performs the necessary calcu lations and sends signals to the individual con trollers on the control panel See Figure 5 2 Control panel The control panel consists of A contactor assembly The contactor is a large constant duty relay similar in appear ance to a starter solenoid The contactor is enclosed in a housing with five fuses The con...

Страница 63: ...NOTE This is a 48 volt system DO NOT try to replace the key switch with an after market key switch The 48 volts can cause the after market switch to fail Deck motors The deck motors are 3 phase brushless DC motors with a keyed shaft See Figure 5 6 A 748 0376E blade adapter fits over the shaft to mount a blade NOTE The blades used on the RZT S Zero are specifi cally designed for these mowers to max...

Страница 64: ...th carry the power back to the VCM as an input signal If the two signals do not match the VCM will disable the wheel and deck motors while showing a fault code Charger door switch There is a Single Pole Double Throw SPDT switch on the charger door that send a signal to the VCM telling it if the charger is plugged in or not If the VCM senses that the charger door is open it will shut down and promp...

Страница 65: ...green wire with a black trace The green wire and the green wire with a white trace are the input signals to the VCM NOTE The TPS must be calibrated anytime the sensor is disconnected removed or replaced Steering sensor The steering sensor is a hall effect sensor that measures the rotation of a mag net in the head of the bolt that holds the left front yoke in place See Figure 5 12 NOTE The steering...

Страница 66: ...he deck on or off See Figure 5 13 NOTE A red wire with a white trace splits and car ries 5 volts to the B and C terminals of the PTO switch A black wire with a white trace and a white wire with a black trace carry the input signals back to the VCM Battery pack The battery pack will be covered in Chapter 6 Batteries Figure 5 13 PTO switch ...

Страница 67: ...tenance required However without commutators the motor can not switch the power from coil to coil by itself to keep the motor spinning The switching action is controlled by the con troller There are hall effect sensors in the stator that will send a signal to the controller letting it know the location and speed of the rotor This feedback feature is what allows the motor to be controlled with extr...

Страница 68: ...es that will go in one phase as a positive pulse and leave another as a negative pulse The inputs and outputs are constantly switching so that one phase will be positive one will be negative and the third phase will be zero See Figure 5 16 5 6 7 Figure 5 16 ...

Страница 69: ...ached to the VCM can damage the har ness connectors 2 Depress the VCM s tabs that extend into the slots of the steering column cover while gently prying the bottom edge of the VCM out of the cover See Figure 5 18 3 Pull the yellow VCM cover forward enough to disen gage it from the tabs on the VCM 4 Install the VCM by following the previous steps in reverse order NOTE The VCM will need to be calibr...

Страница 70: ...A A8 BATTERY BAT 5A A9 PRE CHARGE BAT 5A A10 CONTACTOR BAT 5A A11 CONTACTOR BAT 5A A12 LOGIC BAT 5A B1 BRAKE Input 5V 1A B2 CHARGE Input 5V 1A B3 SEAT1 Input 5V 1A B4 SEAT2 Input 5V 1A B5 PTO1 Input 5V 1A B6 PTO2 Input 5V 1A B7 NOT USED B8 SENSOR Output 5V 1A B9 RUN Input BAT 5A B10 NOT USED B11 RUN SUPPLY Output BAT 5A B12 STEER Input 5V 1A B13 STEER Input 5V 1A B14 THROTTLE Input 5V 1A B15 THROT...

Страница 71: ...connect the battery pack s positive lead from the contactor assembly using a 7 16 wrench See Figure 5 20 CAUTION CAUTION Before disconnecting any electrical component take precautions to prevent the component or the wires attached to it from shorting out The most effective means of doing this is to dis connect the positive lead of the battery pack from the contactor assembly IMPORTANT Do not retur...

Страница 72: ...s charge will damage it 6a Remove the controller cover 6b Attach an incandescent test light to the nega tive black wire attached to the controller See Figure 5 22 6c Touch the probe of the test light to the positive red wire connection on the controller NOTE The test light will light up very brightly then quickly dim out Hold the test light probe in place until the light goes out 6d Repeat on all ...

Страница 73: ...art of the control panel 8 Remove the five screws that hold the control panel to the mower using a 1 2 wrench See Figure 5 24 9 Lift the control panel off of the mower 10 Install the control panel by following the previous steps in reverse order Figure 5 23 Motor connectors CAUTION CAUTION Do not remove the controller cov ers There are pre charge capaci tors in the controllers These capacitors wil...

Страница 74: ...1 2 wrench See Figure 5 25 1b Disconnect the battery pack s positive lead from the contactor assembly using a 7 16 wrench See Figure 5 26 2 Remove the left pod by following the procedures described in Chapter 2 Body 3 Disconnect the hall effect and communications con nectors from the controller to be removed See Figure 5 27 Figure 5 25 Figure 5 26 Contactor assembly Positive lead CAUTION CAUTION T...

Страница 75: ...ry brightly then quickly dim out Hold the test light probe in place until the light goes out 5 Remove the five wires from the controller 6 Label each wire with its location 7 Remove the four screws Figure 5 29 that hold the controller in place using a 2 Phillips screwdriver 8 Install the controller by following the previous steps in reverse order 9 Tighten the screws that connect the five wires to...

Страница 76: ... flash warnings such as Blades off Overload Allow motors to cool raise deck Blades Off In Reverse Restart blades Unplug charger Just because a warning message appears on the screen does not mean VCM has recorded a fault code or needs to be brought in for service The warnings are usually operator errors They are designed to get the operator to correct the operating conditions before damage occurs M...

Страница 77: ...battery cover by following the pro cedures described in Chapter 6 Batteries 4 Check the 150 amp main system fuse for continuity NOTE The main system fuse is located between the mid dle battery and the side of the frame See Figure 5 31 If the fuse is blown there is a major short in the system Repair the short before replacing the fuse If the fuse is intact check the rest of the circuit 5 Remove the...

Страница 78: ...MM to pin 7 of the 12 pin connector 12 Measure the voltage at pin 11 of the 16 pin connec tor with the positive probe of the DMM See Figure 5 33 13 If the voltage is 0 the VCM is faulty and must be replaced 14 Measure the voltage at pin 9 of the 16 pin connector with the positive probe of the DMM 15 If the reading is battery voltage the VCM is faulty and must be replaced 16 If the voltage is 0 che...

Страница 79: ... shut down If all connections are good but the mower does not start replace the VCM If there is a faulty connection fix the connection and try to start the mower again Steering faults The steering sensor is a 360o rotary hall effect sensor with a 5 volt input signal The sensor acts like a variable resistor varying the output voltage based on the angle of the magnet s north pole The steering senor ...

Страница 80: ...r can not sense the magnet or the harness is damaged To determine which Remove the floor pan enough to gain access to the steering sensor connector NOTE If the steering sensor is disconnected plug the sensor in and check and see if the VCM can see the sensor now If it was connected Disconnect the steering sensor Set a DMM to read DC voltage Measure the voltage across pins 1 and 2 of the harness co...

Страница 81: ...ting NOTE Travel of the left yoke will cause the magnet to move in and out of the steering sensors range Verify that the steering sensor is parallel to the magnet and that the two shim washers are present under the steering sensor bracket Sensor is not centered over the magnet B The steering angle jumps from one end of the scale to the other The magnet is out of alignment Sensor is not centered ov...

Страница 82: ...reases It should be noted that even if the two sensors where facing the same direction they would most likely not match because of variances from one sensor to the next This is why all of the rotary hall effect sensors must be calibrated When the VCM calibrates the TPS it notes the forward pedals maximum position the reverse peddles maximum position and the neutral position When the drive pedal mo...

Страница 83: ... volts the 4 5 volts are either not getting to the sensor or the return circuit is faulty Check for voltage across pins 8 and 14 of the VCM s 16 pin connector 4 Fully depress the forward drive pedal while observ ing the display A If neither of the sensor values change there is a mechanical failure of the TPS Inspect the TPS linkage and the TPS lever NOTE The TPS lever is susceptible to damage from...

Страница 84: ...ips headed screws that hold one of the hall effect sensor to the TPS bracket See Figure 5 44 Slide the magnet out of the TPS lever Rotate the magnet 180o and re insert it in the TPS lever Re install the hall effect sensor Calibrate the TPS by following the procedures described in Chapter 4 Steering Figure 5 44 Screws ...

Страница 85: ...ultaneously and hold them down for 2 3 seconds See Figure 5 45 NOTE The VCM will store the ten most resent fault codes 2c Scroll through the fault codes by depressing the Fn button while depressing the up or down arrow buttons until a motor fault is seen See Figure 5 44 2d Release the Fn button 2e Depress the down arrow button twice 2f Match the fault code to the table at the end of this chapter T...

Страница 86: ...e controller the reading will be lower than the displayed current because the amp meter will read the average current draw not the phase current draw NOTE Do not try to use an in line amp meter to measure the current draw of this system The current draw will damage multi meters In line shunts are calibrated for 12 volts not 48 volts they will have incorrect readings The deck motors should be withi...

Страница 87: ...onnect it to the opposite controller If the condition follows the motor the motor is bad If the condition follows the controller the controller is bad If the condition disappears it was most likely a bad connection 8 Depress the down arrow button one time to bring up the bus voltage screen See Figure 5 50 This screen shows the voltage at each controller NOTE If one or more of the controllers show ...

Страница 88: ...ttery voltage will charge the pre charge capacitors in each controller The pre charge capacitors prevents a large inrush of current when the master relay is closed When the pre charge capacitors are charged the controllers voltage levels will be equal to battery voltage Once the VCM senses battery voltage in the controllers it will send a signal to the contactor assembly to energize the master rel...

Страница 89: ...er See Figure 5 53 Each controller should have battery voltage A If any controller has 0 volts the fused power lead has blown due to a short Repair the short then replace the control panel B If all of the controllers read 0 volts the pre charge signal is not reaching the controllers 1 Place the positive probe in pin 4 of the breakout adapter See Figure 5 54 2 Place the negative probe on the master...

Страница 90: ...ntrol panel If the VCM reads 0 volts the fault is either the VCM or the harness Test the VCMs output to determine if the fault is in the VCM or the har ness 5 Remove the VCM by following the procedures described in the Vehicle Control Module VCM sec tion of this chapter 6 Install the harness break out adapters 7 Place the positive probe in pin 11 of the 12 pin breakout adapter 8 Place the negative...

Страница 91: ...ault for the controller it was communicating with when the fault occurred NOT the controller connection that has a fault So if the VCM displays an interlock 1 code 32 fault for the right hub there is a 25 chance that the fault is actually at the right hub controller In Figure 5 58 the right hub showed a fault but the communication harness was unplugged from the left deck motor When there are fault...

Страница 92: ...a brown wire early production units may have a red wire with a white trace That wire goes to pin 2 of the seat switch connector and is jumped to pin 4 Pins 1 and 3 are independent return paths to the VCM The orange wire goes to pin 4 of the 16 pin VCM connector and the orange wire with a white trace goes to pin 3 NOTE Both the orange wire and the orange wire with a with trace have a diode in them ...

Страница 93: ...ere is a fault in the jumper from pin 2 to pin 4 If the DMM reads 0 volts at pin 1 and or 3 the seat switch is faulty Charger door switch The charger door switch receives 4 5 volts through a red wire with a white trace A brown wire carries the volt age from the N O contact of the charger door switch to pin 2 of the VCM s 16 pin connector If the charger door is open the VCM will sense an open circu...

Страница 94: ...the DMM is still connected open the charger door If the reading is 0 volts the switch is functional If the reading is 4 5 volts the switch is faulty or the wire is on the N C tab of the switch 10 Remove the VCM by following the procedures described in the Vehicle Control Module VCM sec tion of this chapter 11 Install the harness break out adapters See Figure 5 64 12 Turn the key switch to the ON p...

Страница 95: ... pan by following the procedures described in Chapter 2 Body NOTE Do not disconnect the battery pack while removing the floor pan 8 Inspect the brake switch connection 9 Set the parking brake 10 Place the negative probe of the DMM in the socket of pin 7 on the 12 pin breakout adapter 11 While watching the DMM back probe the red wire with a white trace at the brake switch See Figure 5 66 If the rea...

Страница 96: ... probe of the 12 pin connector to pin 8 of the 16 pin connector 6 Measure the voltage from pin 7 of the 12 pin connector to pin 5 of the 16 pin connector 7 Measure the voltage from pin 7 of the 12 pin connector to pin 6 of the 16 pin connector If the DMM reads 0 volts at pin 8 the VCM is faulty If the DMM reads 4 5 volts at pin 8 and reads 0 volts at pins 5 and 6 the VCM is faulty If the DMM reads...

Страница 97: ...PTO switch If the DMM reads 0 volts at one or both of the Com tabs there is a fault in the harness 18 While watching the DMM back probe the black wire with a white trace at B N O of the PTO switch 19 Back probe the white wire with a black trace at C N O of the PTO switch If the DMM reads 4 5 volts at one or both of the N C tabs there is a short Remove the PTO switch and bench test it If the switch...

Страница 98: ...ttery contactor R Deck L Deck R Hub L Hub Controller Controller Controller Controller Sensor wires RED 5 VOLTS BLACK SIGNAL GROUND GREEN HALL A YELLOW HALL B BLUE HALL C THERMISTOR BROWN Heavy Gauge Wires BLUE PHASE W YELLOW PHASE V GREEN PHASE U Main Fuse Charger port ...

Страница 99: ...tion Only Battery icon blinking Battery voltage greater than 50 8V on power up causing reset of battery state of charge estimate Battery voltage greater than 50 8V on power up causing reset of battery state of charge estimate Blades off Low battery Return home and plug into the charger Information Only Disables Blades Reduces Speed Battery pack state of charge is at 16 or less battery pack dischar...

Страница 100: ...s at pin B1 Brake pedal is not depressed poor connec tion faulty switch dam aged harness To Start Press and hold start stop button Starter disable Won t start until condition met Waiting for operator to press and hold start but ton Sometimes this condition will appear to be met the graphic on the screen changes but the tractor does not start contactor doesn t close This could be a faulty VCM or co...

Страница 101: ... Drive 1 Controller over voltage Batteries over charged usually from regen brak ing Stopped Left hub fault Restart if problem persists contact service Fault Disables Blades and Drive 2 Phase over current Motor pulling too much current short bursts Stopped Left hub fault Restart if problem persists contact service Fault Disables Blades and Drive 4 Current sensor calibration Internal controller issu...

Страница 102: ...topped Left hub fault Restart if problem per sists contact service Fault Disables Blades and Drive 1024 Motor has reached at tem perature of 105oC Motor over loaded faulty Stopped Left hub fault Restart if problem per sists contact service Fault Disables Blades and Drive 2048 Throttle voltage outside range N A Stopped Left hub fault Restart if problem per sists contact service Fault Disables Blade...

Страница 103: ...e 4 Current sensor calibration Internal controller issue Stopped Right hub fault Restart if problem persists contact service Fault Disables Blades and Drive 8 Not used Stopped Right hub fault Restart if problem persists contact service Fault Disables Blades and Drive 16 Controller temperature is over 100oC Controller overheating from the motor pulling too much current usually from being overloaded...

Страница 104: ...roblem per sists contact service Fault Disables Blades and Drive 4096 Instantaneous controller over voltage Batteries over charged usually from regen brak ing Stopped Right hub fault Restart if problem per sists contact service Fault Disables Blades and Drive 8192 Internal error Controller failure Stopped Right hub fault Restart if problem per sists contact service Fault Disables Blades and Drive ...

Страница 105: ...ft deck fault Restart if problem per sists contact service Fault Disables Blades 32 Motor hall sensor fault Disconnected harness connector damaged har ness corrosion faulty motor Overload Slow down or raise deck Fault Disables Blades and Drive 64 Controller under voltage Battery voltage too low poor connection corrosion Blades off Left deck fault Restart if problem per sists contact service Fault ...

Страница 106: ...se deck Fault Disables Blades and Drive 32768 Instantaneous under volt age Momentary drop in bat tery voltage from the motor pulling too much current short bursts Blades off Right deck fault Restart if problem per sists contact service Fault Disables Blades 1 Controller over voltage Batteries over charged usually from regen brak ing Blades off Right deck fault Restart if problem per sists contact ...

Страница 107: ...ng test Controller failure Blades off Right deck fault Restart if problem per sists contact service Fault Disables Blades 512 Instantaneous phase over current Motor pulling too much current short bursts Blades off Right deck fault Restart if problem per sists contact service Fault Disables Blades 1024 Motor has reached at tem perature of 105o C Motor over loaded faulty Blades off Right deck fault ...

Страница 108: ...ables Blades and Drive Interlock 1 code 2 CRC check off throttle cali bration parameters has failed TPS needs to be re cali brated Stopped Drive sensor fault Restart if problem persists contact service Fault Disables Blades and Drive Interlock 1 code 4 Throttle not in neutral when trying to close main contactor Drive pedal being acti vated calibration error Stopped Drive sensor fault Restart if pr...

Страница 109: ...battery voltage Poor connection faulty controller Stopped Left deck comm fault Restart if problem persists contact service Fault Disables Blades and Drive Interlock1 code 32 Network communications timeout Disconnected harness connector damaged har ness corrosion Stopped Right deck comm fault Restart if problem persists contact service Fault Disables Blades and Drive Interlock1 code 32 Network comm...

Страница 110: ...d is not able to read a fault code from the controller Network communications timeout Disconnected harness connector damaged har ness corrosion Stopped Contactor tips welded closed Restart if problem persists contact service Fault Disables Blades and Drive VCM is still powered up but the RUN switch is in the off position and none of the drives are producing regen current VCM is being powered by cu...

Страница 111: ...t Disables Blades and Drive Interlock1 code 8 Detected one or more motors not slowing down after seat switch opened Blades Off PTO switch fault Restart if problem persists contact service Fault Disables Blades Interlock 2 code 1 Dual PTO switches not matched Poor connection faulty switch damaged harness Stopped Brake sensor fault Restart if problem persists contact service Fault Disables Blades an...

Страница 112: ...RZT S Zero 108 ...

Страница 113: ...s releasing gases that are contained in the cells With the AGM cell construc tion the plates are exposed to the gases trapped in the battery The oxygen produced by the positive plates comes into contact with the negative plates This causes a reaction with the negative plate s sponge lead to form lead oxide The lead oxide instantly combines with electrolyte forming lead sulfate and water Thus the o...

Страница 114: ...teries for warranty NOTE An Authorization is required from Cub Cadet before the batteries can be replaced under warranty This requires the technician to fill out a check list prior to calling Cub Cadet for an authorization number The check list will help the technician rule out other possibilities before condemning the batteries NOTE The battery charger must be evaluated with the mower for warrant...

Страница 115: ...ttery 1 or corroded contacts in the charger connectors NOTE The 150 amp main system fuse is next to the 20 amp charger fuse If the main system fuse blows the charger will still see the batteries but the mower will not NOTE If the batteries rapidly reach a fully charged state the charger could be bad or the battery packs capac ity could be diminished 3d Allow the mower to set on charge overnight NO...

Страница 116: ...re 6 2 9 Document the battery codes on the battery check list 10 Inspect the fuses 11 Measure and document the resting voltage of each battery 12 Perform a capacity discharge test on the battery pack by following the procedures described in the capacity discharge test section of this chapter NOTE The battery pack is not considered bad until it falls below 30 amp hours 50 of the rated 1 hour capaci...

Страница 117: ...er equipment repair shops Conductance test that checks the ability of the battery plates to hold a charge Conductance testers are very easy to use and are far less damaging to the battery being tested For these rea sons conductance battery testing is the preferred method of battery testing for starter batteries However because the batteries used on an RZT S Zero are sealed AGM deep cell batteries ...

Страница 118: ...Chapter 2 Body 3 Disconnect the negative cable from the master ground bus 4 Disconnect the positive cable from the contactor assembly 5 Connect the tester to the positive and negative cables coming from the battery pack 6 Start the tester by following the recommendations of the tester manufacturer NOTE The Lester 17770 will test the batteries at their 1 hour rate which is 59 AH for the RZT S zero ...

Страница 119: ... work around Here are some precautions that can help pre vent injuries to the technician Have someone within range of your voice in case of an emergency Have clean running water near by to wash away any acid that may get on the technician Always wear eye and clothing protection and avoid touching eyes If battery acid contacts skin or clothing wash immediately with soap and water If acid contacts a...

Страница 120: ...long as 5hrs 2 STAGE TWO CONSTANT CURRENT CHARGE Bulk Charge Yellow L E D illuminates continuously indicating that the charger is charging the battery at the full rated output 3 STAGE THREE CONSTANT VOLTAGE CHARGE Absorption Charge Yellow L E D remains illuminated continuously but the charger now regulates voltage and not current While the charger maintains a constant voltage the charge current gr...

Страница 121: ... connections Check the battery connections Output Overload Off Flash Flash Heavy current draw check for a short Charge Level Unbalanced Flash Off Off Caused by unbalanced battery condition Example some batteries are at a much higher state of charge than others This may require replacement of the batteries Refer to the equipment s service manual for instructions on servicing the battery pack Excess...

Страница 122: ...gure 6 5 that hold the left access cover in place using a 1 2 wrench This mower has four batteries that need to be installed They must be installed in a specific order to minimize shorting hazards and to prevent improper wiring of the system Never let the battery terminals or any live harness connection contact the frame WARNING WARNING ONTROL PANEL ATTERY ATTERY ATTERY ATTERY Battery Schematic Fi...

Страница 123: ... the mower using a 1 2 wrench See Figure 6 8 4 Lift the seat and seat bracket off of the mower Figure 6 6 Contactor assembly Positive lead Figure 6 7 positive lead CAUTION CAUTION The battery pack s positive lead is still hot Take measures such as taping up the cable lug with electri cal tape or a plastic bag to prevent the cable end from making contact with any metal sur face on the mower See Fig...

Страница 124: ... two studs for the seat bracket 7 Slide the front battery out of the seat box assembly enough to gain access to the battery cables See Figure 6 11 8 Disconnect the wire with the blue tape from the pos itive terminal of the front battery NOTE The battery cable with the blue tape is still connected to battery number three Take measures to prevent the cable from contact ing the mower frame 9 Disconne...

Страница 125: ...that hold the rear of the battery cover in place using a T 30 torx driver and a 7 16 wrench See Figure 6 13 12c Lift the rear battery cover off of the mower 13 Remove the nuts from the battery tray s long J bolts See Figure 6 14 14 Remove the top battery tray and the long J bolts 15 Remove the battery terminal cover Figure 6 12 Screws Figure 6 13 Screws Figure 6 14 battery terminal cover Battery t...

Страница 126: ...ble from contact ing the mower frame 19 Lift the batteries off of the mower 20 Remove the battery bracket See Figure 6 16 20a Remove the two nuts using a 1 2 wrench 20b Lift the bracket off of the battery NOTE The battery bracket fits snuggly onto the battery It may take some force to lift the bracket off NOTE Leaving the J bolts in place will make re installing the bracket easier 21 Disconnect th...

Страница 127: ...cables to the bat teries Tighten the nuts to a torque of 120 180 in lbs 14 20 Nm 3 Attach the wire with the yellow tape to the negative terminal of 1st battery 4 Attach the battery bracket See Figure 6 19 4a Install the J bolts if they were removed 4b Slide the bracket over the battery 4c Install the two nuts that hold the bracket to the J bolts 5 Set Rear Batteries in Bottom Tray NOTE The batteri...

Страница 128: ...ositive terminal 4th battery NOTE In order for the battery to fit properly the leads must be oriented towards the center of the battery when attached to the battery See Figure 6 22 14 Connect the black wire from under left pod to the negative terminal on 4th battery 15 Verify the battery cable connections See Figure 6 23 Set a DMM to read DC volts Touch the positive probe to the positive termi nal...

Страница 129: ...hree carriage bolts 17e Install the lock nuts onto the carriage bolts from the underside of the mower 18 Install the rear battery cover 18a Install the two screws at the front of the rear battery cover using T 30 torx driver See Figure 6 25 18b Install the two nuts and screws that hold the rear of the battery cover in place using a T 30 torx driver and a 7 16 wrench See Figure 6 26 Figure 6 24 Car...

Страница 130: ...sing a 1 2 wrench 20c Run the seat switch harness through the slot in the seat bracket 20d Plug the seat switch harness into the seat switch NOTE Push the excess wire from the wire harness into the seat box hole 21 Charge the batteries 22 Test drive the mower after the batteries have been fully charged NOTE Check all safety and control features Do not put an unsafe mower in to service Figure 6 27 ...

Страница 131: ...e ____________ How many hours did the charger _____ run and could not complete a charge _____ Test run the mower Check for any charger trouble codes refer _____ to back of sheet for trouble codes _____ Check the VCM for fault codes _____ Inspect the mowing blades _____ Repair any fault codes found NOTE Dull blades will greatly reduce run time while mowing _____ Connect the mower s charger to the m...

Страница 132: ...heck the battery connections Output Overload Off Flash Flash Heavy current draw check for a short Charge Level Unbalanced Flash Off Off Caused by unbalanced battery condition Example some batteries are at a much higher state of charge than others This may require replacement of the batteries Refer to the equipment s service manual for instructions on servicing the battery pack Excessive Charging T...

Страница 133: ... the deck lift handle 3 Remove the seat box assembly top plate by following the procedures described in Chapter 2 Body 4 Slide the front 4th battery out of the seat box assem bly enough gain full access to the hole in the frame the motor harnesses pass through See Figure 7 1 5 Disconnect the deck motors high current and hall effect harnesses from the control panel See Figure 7 2 NOTE Marking the c...

Страница 134: ...ross the three connectors to help ensure they are re assembled in the proper order 7 Remove the socket head bolts and nuts that attach the deck lift arms to the deck using a 3 16 hex key and a 1 2 wrench See Figure 7 4 8 Remove the bowtie clip that holds the front deck link to the deck See Figure 7 5 9 Slide the front deck link out of the deck 10 Move the deck lift lever to the highest cutting pos...

Страница 135: ... s allow a garden hose to be attached to the deck to rinse the underside of the deck after each mowing To use the Smart Jet feature 1 Start the mower 2 Drive the mower to a level spot on your lawn near enough for your garden hose to reach 3 Turn off the PTO switch 4 Thread the quick connect coupling onto a garden hose that is attached to a water source 5 Attach the hose with the quick connect coup...

Страница 136: ...h special mulching blades NOTE Mulching with the RZT S Zero will reduce the run time of the mower The cutting deck on the RZT S Zero mower is mounted with a slight rake meaning that the front of the deck is a 1 4 lower than the rear of the deck This is very important to get the proper air flow in the deck so that the blades can make the grass blades stand up to get cut The air flow in the cutting ...

Страница 137: ...while cutting grass NOTE Blades that are mounted upside down increase the risk of impacting an object 7 Test run the mower in a safe place Do not put an unsafe mower back into service Sharpening the blades Remove the blades To properly sharpen the cutting blades remove equal amounts of metal from both ends of the blades along the cutting edges parallel to the trailing edge at a 25 to 30 angle Shar...

Страница 138: ...ge See Figure 7 11 1 With the mower parked on a firm level surface move the deck to the mid height or most commonly used position using the deck lift lever Rotate the blades so that they are perpendicular with the mower frame 2 Measure the distance from the outside of the left blade tip to the ground and the distance from the outside of the right blade tip to the ground Both measurements taken sho...

Страница 139: ...he front tires 2 Measure the distance from the front of the blade tip to the ground and the rear of the blade tip to the ground 3 The front measurement taken should be between 1 4 3 8 less than the rear measurement Determine the approximate distance necessary for proper adjustment and proceed if necessary to the next step 4 Raise or lower the left and right side of the deck by turning the lock nut...

Страница 140: ...ling adjustments The recommended operating tire pressure is Approximately 10 psi for the rear tires Approximately 20 psi for the front tires 2 Check gauge wheels distance from the flat surface below The deck wheels should have between 1 4 1 2 clearance above the ground 3 Remove the shoulder bolt securing the ball wheel to the index bracket 4 Reposition the ball wheel to align with the one of the i...

Страница 141: ...ess the spring arms of the lift bracket while lifting the lift shaft out of the brackets See Figure 7 16 10 Remove both of the deck lift shaft brackets 10a Remove the two screws that hold each one in place using a 3 8 wrench 10b Slide the brackets toward the front of the mower enough for the tab on the under side of the bracket to disengage from the frame 10c Lift the brackets off of the mower NOT...

Страница 142: ...arnesses pass through See Figure 7 17 5 Disconnect the deck motors high current and hall effect harnesses from the control panel See Figure 7 18 NOTE Marking the connectors with a paint marker will make re assembly easier 6 Fish the harnesses out of the mower 7 Remove the blade and blade adapter by following the procedures described in the blade removal sec tion of this chapter 8 Remove the four s...

Страница 143: ...rial from the shipping pallet 1b Remove the plastic wrap and cut any bands or tie straps securing the tractor to the pallet 1c Raise the deck to its highest position 1d Disengage the parking brake 1e Pull out the drive release rods The Z bends in the rods will hook into slots in the frame See Figure 1 1f Carefully roll the tractor off the shipping pallet 1g Release the drive release rods after rol...

Страница 144: ...umn 8 Lay the cover down on the steering column while routing the harness under the cover NOTE The wiring harness is routed under the cover Position the harness so that it will not be damaged by the installation of the cover or any normal control movements 9 Tilt the steering column up 10 Remove the two shoulder screws that hold the top of the front battery cover to the seat box assembly using a T...

Страница 145: ... of the rear cover to the bumper See Figure 7 11c Lift the rear battery cover off of the mower 12 Remove the cardboard box from the battery compart ment See Figure 8 13 Remove the front battery bracket from under the seat box assembly 14 Open the cardboard box 15 Remove the hardware packet from the cardboard box 16 Remove the seat bracket Figure 6 Screws Figure 7 Tie strap Figure 8 Front battery b...

Страница 146: ... and washer from under the steering wheel s center cap 19c Turn the front wheels of the tractor so that they are pointing straight forward 19d Place the steering wheel over the steering shaft so that it is pointing straight forward 19e Install the hex screw and washer to secure the steering wheel to the steering shaft See Figure 10 19f Install the steering wheel center cap 19g Line up the holes in...

Страница 147: ... be helpful in diagnosing the batteries after they have been in service for a while NOTE Only use the nuts supplied with the batteries to attach the battery cables NOTE The battery cables are color coded to assist in the installation of the batteries There is colored tape to identify the different cables The protective boots that are on the ends of the cables are color coded red for positive and b...

Страница 148: ...ll help prevent corrosion of the battery connections NOTE Wipe any petroleum jelly off of the terminal studs before installing the nut 21d Attach bracket that holds 1st battery in place Remove the metal battery bracket from the cardboard box Remove the two short J bolts from the card board box Hook the J bolts into the holes in the frame Slide the bracket onto the battery and the J bolts Install t...

Страница 149: ... rear batteries 21h Place the rear batteries in the bottom tray NOTE The batteries should be standing on end so that the terminals are next to each other See Figure 16 21i Attach the wire with the yellow tape from the 1st battery to the positive terminal of 2nd bat tery See Figure 19 21j Connect the jumper green tape across the two top terminals of the 2nd and 3rd batteries 21k Attach the wire wit...

Страница 150: ... 4th battery NOTE In order for the battery to fit properly the leads must be oriented towards the center of the battery when attached to the battery See Figure 21 21q Connect the black wire from under left pod to the negative terminal on 4th battery NOTE Tighten the terminal nuts to a torque of 10 15 ft lbs 14 20 Nm 21r Verify the battery cable connections Set a DMM to read DC volts Touch the posi...

Страница 151: ...rriage bolts 22e Install the lock nuts onto the carriage bolts from the underside of the mower 22f Install the seat bracket 23 Install the rear battery cover 23a Install the two front battery cover screws using T 30 torx driver See Figure 24 23b Install the two nuts and screws that hold the rear of the battery cover in place using a T 30 torx driver and a 7 16 wrench See Figure 25 Figure 23 Carria...

Страница 152: ...f the seat bracket 25c Run the seat switch harness through the slot in the seat bracket See Figure 27 25d Plug the seat switch harness into the seat switch NOTE Push the excess wire from the wire harness into the seat box hole 26 Install the cargo net 27 Perform the pre delivery checks by following the pre delivery check list 28 Fully charge the batteries 29 Test drive the mower in a safe area NOT...

Страница 153: ...to obtain even tracking Torque wheel bolts to 50 70 ft lbs Check Lights Indicators Check the headlight Check the Vehicle Control Module PTO Deck Set Up Level deck side to side Adjust deck front to rear 1 8 to 1 4 lower in front This units contains four 4 safety inputs Refer to the Operator s Manual Safety Interlock Switches for proper operation operation combinations The switches are as follows Bl...

Страница 154: ...NOTES ...

Страница 155: ......

Страница 156: ...MTD Products Inc Product Training and Education Department FORM NUMBER 769 08008 02 05 2013 ...

Отзывы: