Ctouch laser air Скачать руководство пользователя страница 5

15.  Stand

---Use  only  with  the  trolley  stand  or  wall  mount  specified  by  the 

manufacturer, or sold with the apparatus. Do not place the product on an unstable 
trolley stand or wall mount. Placing the product on an unstable base can cause the 
product  to  fall,  resulting  in  possible  serious  injuries  as  well  as  damage  to  the 
product. When mounting the product on a wall, be sure to follow the manufacturer’s 
instructions. Use only the mounting hardware recommended by the manufacturer.

16.Careful  move

---When  a  trolley  is  used,  be  cautions  when  moving  the 

trolley/apparatus combination to avoid injury from the product tipping over. Sudden 
stops, excessive force and uneven floor surfaces can cause the product to fall from 
the trolley.

Never attempt to move the 

 unless the AC  power cord 

has been disconnected.

17.


Lightning

---Unplug this apparatus during thunder storm or when unused for 

long periods of time.

For added protection during a thunder storm, or when the 

 is left unattended and unused for long periods of time, unplug it from the wall 

outlet and disconnect the antenna. This will prevent damage to the equipment due 
to lightning and power-line surges.

18.  Do  not  use  this  apparatus  near  water

---for  example,  near  a  bathtub, 

washbowl, kitchen sink, laundry tub, in a wet basement or near a swimming pool, 
and the like. 

Do not use immediately after moving from a low temperature to high temperature 
environment, as this causes condensation, which may result in fire, electric shock, 
or other hazards.

19. Clean only with dry cloth

---Unplug this product from the wall outlet before 

cleaning.  Do  not  use  liquid  cleaners  or  aerosol  cleaners.  Use  a  soft  cloth  for 
cleaning.

20.  Ventilation

---Do  not  block  any  ventilation  openings.  Install  the 

 in accordance with the manufacturer instructions. The vents and 

other openings in the cabinet are designed for ventilation. Do not cover or block 
these  vents  and  openings  since  insufficient  ventilation  can  cause  overheating 
and/or shorten the life of the product. Do not place the product on a bed, sofa, rug or 
other similar surface, since they can block ventilation openings. This product is not 
designed for built-in installation; therefore do not place the product in an enclosed 
space such as a bookcase or rack, unless proper ventilation is provided or the 
manufacturer’s instructions are followed.

21.Heat sources

---Do not install near any heat sources such as radiators, heat 

registers, stoves, or other apparatus (including amplifiers) that produce heat.

22.Panel protection

---The display panel used in this product is made of glass. 

Therefore, it can break when the product is dropped or impacted upon by other 
objects. Be careful not to be injured by broken glass pieces in case the display 
panel breaks.

23.Pixel defect

---The display panel is a very high technology product, giving you 

finely detailed pictures. Occasionally, a few non-active pixels may appear on the 
screen as a fixed point of blue, green or red. Please note that this does not affect the 
performance of your product.

WARNING:

  For  continued  safety,  apparatus  with  class  I  construction  shall  be 

connected to a mains socket outlet with a protective earthing connection.

CTOUCH interactive display

CTOUCH interactive 

display

CTOUCH 

interactive display

The apparatus should not be exposed to dripping or splashing liquids 

and  that  no  objects  filled  with  liquids,  such  as  vases,  shall  be  placed  on  the 
apparatus.

3

Important Safety Precautions

Содержание laser air

Страница 1: ...equipment This User Manual includes detailed usage instructions for your product Please read this manual thoroughly Figures and illustrations in this User Manual are provided for reference only and ma...

Страница 2: ...on of Controls 6 Remote Control 8 Connections 10 Basic Operations 12 Menu List 13 Home Page Overview 15 System Settings 16 Network Settings 17 Using USB Multi Media Player 19 Troubleshooting 22 Specif...

Страница 3: ...rniture for example cupboards or bookcases without anchoring both the furniture and the to a suitable support Do not place cloth or other materials between the and supporting furniture Do not let chil...

Страница 4: ...al parts For the same reason do not spill water or liquid on the product 10 Servicing Refer all servicing to qualified service personnel Servicing is required when the apparatus has been damaged in an...

Страница 5: ...ol cleaners Use a soft cloth for cleaning 20 Ventilation Do not block any ventilation openings Install the in accordance with the manufacturer instructions The vents and other openings in the cabinet...

Страница 6: ...rns to normal Do not leave the unit in a hot or cold location Also do not leave the unit in a location exposed to direct sunlight or near a heater or in high humidity as this may cause the cabinet to...

Страница 7: ...play 0 1 2 3 4 5 6 7 8 9 0 1 2 3 4 5 6 7 8 9 USB DVD POWE R TV INFO MENU PC CH VOL P M OK AV VGA ZOOM EXIT SLEEP MUTE HOME INPUT S M HDMI RC J55 0C Remote Control Unpacking Note The illustrations may...

Страница 8: ...wer push to O to cut off Note Power switch can not be covered and should keep the power switch can be conveniently operated Fuse AC IN Plug the AC cord into this jack and into a power outlet 100 240V...

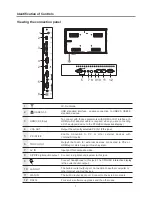
Страница 9: ...6 7 8 9 10 11 12 VGA OUT Output the currently selected PC IN 1 2 3 signal PC IN1 2 3 TOUCH OUT Output the touch for external devices connected to PCx or HDMIx port which support touch system Input por...

Страница 10: ...Play Pause button STOP button Fast forward fast reverse Previous next Return to the previous channel VOLUME UP DOWN Control buttons for USB Multi Media Player Go to USB multi media player Go to DVD mu...

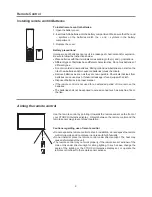
Страница 11: ...y compartment Make sure that the and symbols on the batteries match the and symbols in the battery compartment 3 Replace the cover To install remote control batteries Aiming the remote control Use the...

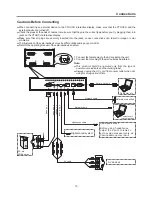
Страница 12: ...tions Before Connecting Connections AV devices Y W R Digital sound system PC etc VGA devices PC OUT Y W R Serial port cable VGA cable AV cable AV adapter Network cable Computer etc Internet devices Ne...

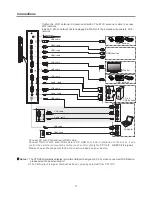
Страница 13: ...rt designed 3 0 2 0 when connect with USB device please select the appropriate port 2 The VGA output is signal of what has been currently selected from PC1 2 3 CTOUCH interactive display Audio cable H...

Страница 14: ...icon is not displayed on the screen Note If the does not receive a displaying signal for a certain time the goes into standby mode CTOUCH interactive display CTOUCH Plug the power cord into anAC powe...

Страница 15: ...of the screen Backlight Color temperature Select the color temperature You can select Warm Cool or Normal Brightness Adjust the brightness Contrast Adjust the contrast Saturation Adjust the color sat...

Страница 16: ...rect password to access Select Change Logo item press OK to access and change Logo Notes 1 Save the logo which you are about to change in the USB stick The logo file sizes should be 512K and rename it...

Страница 17: ...e The layout of menu may vary upon different models you purchased Note If no VGA1 mode will be displayed on the screen internal PC module Touch the screen and drag to the left direction to return to H...

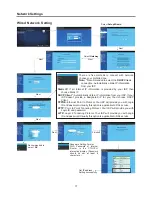
Страница 18: ...s Internal routing setting If the internal AP doesn t work reset via Internal Routing Hardware Reset Input the default UserName admin skip the default password setting as there is no default password...

Страница 19: ...ISP Static IP DHCP Client PPPOE PPTP L2TP If all Internet IP information is provided by your ISP then choose Static IP Automatically obtain IP information from your ISP If your ISP doesn t provide a...

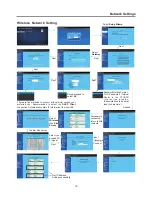
Страница 20: ...nded to select AP Next Network Settings Finished Select Wireless then Site Survey Successfully connected return to Site contents Confirm Site Survey Select your desired Wi Fi signal Connect Input Pass...

Страница 21: ...device data The USB menu may vary in different situation If you want to pull out the USB device please exit USB mode first For instructions on using your USB device refer to the user s manual of your...

Страница 22: ...use Play Pause STOP Previous Next on the remote control to operate Previous photo Play pause Next photo Rotate anti clockwise Rotate clockwise Show information Return to previous menu Video Player Set...

Страница 23: ...at 21 Using USB Multi Media Player Now AB repeat starts To cancel highlight Section replay and toggle it to OFF Return to previous menu Adjust the volume Playing settings Previous movie Play pause Nex...

Страница 24: ...eon signs or hair dryers Good picture no sound The sound may be muted Press MUTE again to cancel Verify if sound should output and or test another source Audio noise Communication problems may occur i...

Страница 25: ...DIF OUT RS232 TOUCH OUT 1 3 1 3 2 1 1 1 1 1 1 Visible screen size 55 inches diagonal 2 2 A About 48 Kg Net 1297 5 115 778 3 1920 1080 0 5 W 1 Design and specifications are subject to change without no...

Отзывы: