


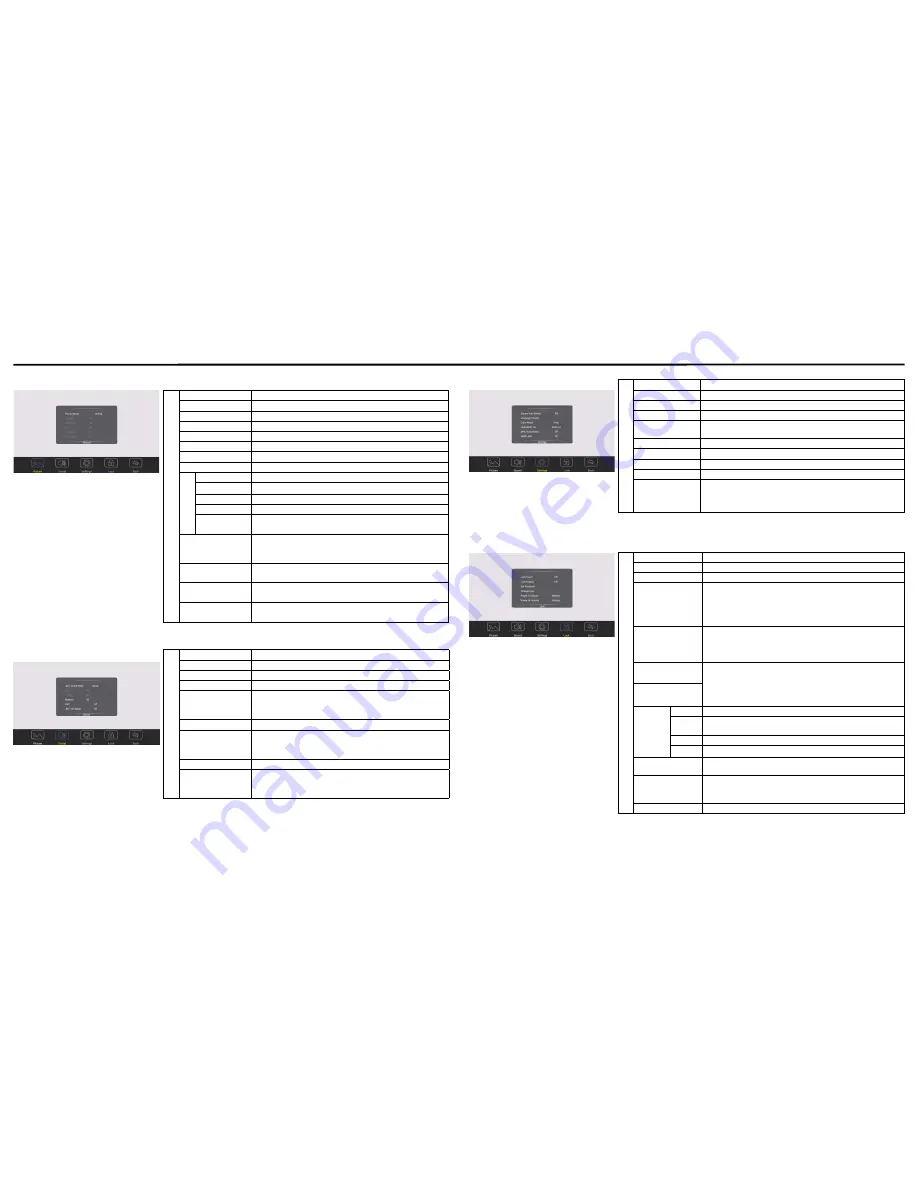
MENU LIST
Adjusting Picture mode
Adjusting Setting menu
Adjusting Sound mode
Adjusting Lock menu
The default password is 0000
Picture Picture Mode
Select picture mode
Contrast
Adjust the contrast
Brightness
Adjust the brightness
Hue
Adjust the image hue (Only for NTSC system)
Sharpness
Adjust the sharpness
Saturation
Adjust the color saturation
Backlight
Set up the overall brilliance of the screen
Energy Save Mode The backlight brightness is decreased
Screen Clock
Adjust the screen size
Phase
Adjust the focus of stable images
H-Position
Move the image right or left
V-Position
Move the image up or down
Auto Adjust
Automatically adjust the image settings such as position
and phase
Color Temperature
Select the color temperature
If you select User, you can set the level of the red/green/
blue as your desired
Zoom Mode
Select the aspect ratio (display proportions) according to
your video signal type or personal preference
OverScan
Adjust the reproduction ratio, you may activate this function
to obtain a cleaner picture
Image NR
Turn on or off the noise reduction mode to reduce picture
noise
Sound JBL Sound Mode
Select sound mode
Bass
Adjust Bass (low sounds)
Treble
Adjust Treble (high sounds)
Balance
Adjust volume level of right and left speakers
AVC
Select [On] to equalize overall volume levels across all
channels
Select [Off] to turn off the auto volume control
JBL LiveStage
Turn the surround sound effect on or off
SPDIF Output
(digital signal only)
Select the digital audio output mode for S/PDIF
Select [RAW] to output audio signal as its original format
Select [PCM] to output audio signal by PCM format
SPDIF Volume
Adjust SPDIF volume
Alone
Turn off the picture on your monitor and listen to the
program audio only
Wake up by any key or touch with two or more fingers
Setting Source Auto Switch Select On to automatically recognition source
Language Change Select on-screen language
Color Range
Select color range (Only for HDMI mode)
HDMI EDID Ver.
Select HDMI EDID Ver.
MHL Auto Switch
Select On to automatically switch to the MHL input when it
connected
HDMI_ARC
Select On to turn on enable HDMI_ARC
HDMI out
Select HDMI output resolution
Movie Mode
Turn on or off the movie mode
Menu Timeout
Select OSD menu display time
Sleep Time
Set the duration of time until the monitor automatically goes
into Standby mode
[Off] / [10 Minutes] / [20 Minutes] / [30 Minutes] / [60 Minutes]
/ [90 Minutes] / [120 Minutes] / [180 Minutes] / [240 Minutes]
Lock Lock Touch
To disable the function of the touch panel
Lock Keypad
In order to lock the CTOUCH buttons
Set Password
Password settings
Change Logo
Set logo
Note: Before setting the logo, save the logo picture (should
be “JPEG” format and size <512KByte) you want to use on
root of USB disk and named “boot0.jpg”. Insert the USB disk
into the USB port on the Android board.
Power on Source
Power on Source Setting, in Memory mode, when the
CTOUCH is turned on, it will automatically switch to the
source where it powered off last time. Otherwise, it is in
setting mode.
Power on Volume
Power on Volume Setting
In Memory mode, when the CTOUCH is powered on, volume
will same as the power off.
In Settings mode, every time the CTOUCH turns on, volume
is the value of this setting.
Volume Settings
Edit Input Source Select the input source you want to label
S o u r c e
Enable
Select Off to the selected source will not show in the source
menu.
Label
Edit the label of the selected input source
Reset
Reset labels to defaults
System ID
Setting the device ID (The ID must be in the range of 0-255,
but 138 and 168 are unused ID, 0 is for broadcast.)
Wake up by gesture Select On to enable two or more fingers touch the bottom of
the screen and drag upward to turn on the CTOUCH when
the CTOUCH is in standby mode.
Restore To Default Reset all settings to factory defaults
13
Содержание CL2M-65UHD
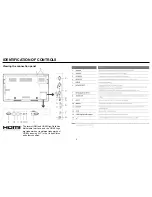
Страница 7: ...IDENTIFICATION OF CONTROLS Viewing the control panel 5...
Страница 12: ...2MEET OPERATING 10 Input Name Password...


