background image

5 - 3

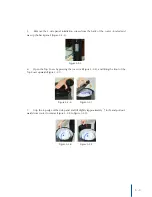
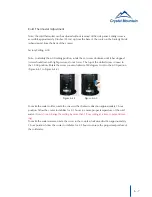
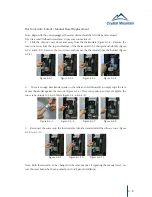
5.     Remove the 2 side panel installation screws from the back of the cooler (located mid 
way up the back panel) (Figure 5-2-5).

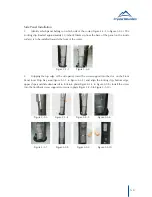
6.     Open the Top Cover by pressing the cover lock(Figure 5-2-6), and lifting the front of the 
Top Cover upwards(Figure 5-2-7).

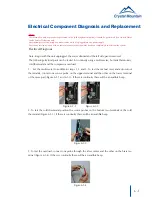
7.     Grip the top edge of the side panel and lift slightly (approximately 

1

/

2

 inch) and pull out-

wards from cooler to remove(Figure 5-2-8 to Figure 5-2-9).

     Figure 5-2-5 

     Figure 5-2-6             Figure 5-2-7  

    Figure 5-2-8            Figure 5-2-9

Содержание Everest POU Series

Страница 1: ...Service Manual 220 240VAC Everest POU Series Water Cooler ...

Страница 2: ...n Front Panel Removal Installation 5 5 Electrical Component Diagnosis and Replacement 6 Electrical Diagnosis 6 1 Wiring and Schematics 6 3 Cold Thermostat Removal and Installation 6 4 Cold Thermostat Adjustment 6 7 Hot Tank Auto Cutout Manual Reset Replacement 6 8 Hot Tank Removal and Replacement 6 9 Hot Tank Heater Band Replacement 6 11 Compressor Relay Overload Protector Replacement 6 12 Cleanin...

Страница 3: ... Standard Cooler Specifications and Performance Data Model Everest 220 240VAC Product Specification Crystal Mountain is taking cooling the waters of the world to new heights with the introduction of the Ever est Its sleek two toned aesthetic will enhance any space The sturdy and ergonomic faucet handles are 7 higher than traditional units which enables effortless dispensing The removable side pane...

Страница 4: ...ROME PLC C140031 A1 WP2A COLD THERMOSTAT REF C100193 K2 EVEREST CUP DISPENSER ONLY BOXED SUB C200216 A2 220V COMPRESSOR RELAY B30H REF C100162 SUB C200243 A3 220V COMPRESSOR OVERLOAD PROTECTOR B30H REF C100163 P1 INDICATOR ASSM CLEAR WINDOW SIL C100010 A4 220V COMPRESSOR COVER B30H REF C100164 P2 1 4 POU PLASTIC ELBOWS MIS C000044 SUB C200193 P3 1 4 O D TUBING SIL C000017 B1 83C CERAMIC AUTO CUTOU...

Страница 5: ...MODEL ESEP2KHL2NC EVEREST POU WATER COOLER WITHOUT CUP 4 6 12 11 H M 2 A 7 3 5 B 8 9 13 14 15 1 P 2 1 Main Parts For Without Cup Dispenser 220V Everest POU Water Cooler Parts Listing 10 ...

Страница 6: ...4 6 12 K2 11 H M 2 A 7 3 5 B 8 9 K1 K Cup Dispenser MODEL ESEP2KHL2CC EVEREST POU WATER COOLER WITH CUP K 13 1 P 2 2 Main Parts For With Cup Dispenser 220V Everest POU Water Cooler Parts Listing 10 ...

Страница 7: ...BLY FAUCET ASSEMBLY and POU KIT ASSEMBLY B5 B4 B3 M1 M2 M3 M5 M6 M4 B6 B Hot Tank Assembly H Reservoir Assembly Note 1 Parts may not appear exactly as shown 2 Parts shown may not be present on all models B7 H1 H2 H3 H4 B1 B2 B8 P1 P2 P4 P5 P6 P7 P3 2 3 220V Everest POU Water Cooler Parts Listing ...

Страница 8: ...EL EVEREST POU SERIES Note 1 Parts may not appear exactly as shown 2 Parts shown may not be present on all models A Refrigeration System A Refrigeration System 2 4 220V Everest POU Water Cooler Parts Listing Jan 26 2014 ...

Страница 9: ...Front Side Everest POU Cooler with Cup Dispenser 12 5 inches 41 7 inches 9 5 inches 11 0 inches 12 9 inches 36 3 inches 5 9 inches ...

Страница 10: ...12 5 inches 12 1 inches 9 5 inches 11 0 inches 36 3 inches 5 9 inches 41 7 inches Front Side Everest POU Cooler without Cup Dispenser ...

Страница 11: ...oler ES E P 2 K H L 2 C Cooler Shape Reservoir Type Type of Lid No of Faucets Body Color Temp Option Insert Color Voltage Optional Description of Product Model Number P Point of Use K Black H Hot Cold L Light Grey 2 220 240V ES Everest E Plastic Reservoir C Cup N No Cup ...

Страница 12: ... while depressing the cold faucet handle Figure 3 3 3 To drain the hot tank unscrew drain cap and remove red silicone plug at the rear of the cooler Figure 3 4 and 3 5 and drain water into a pail or container approx 0 5 gallon or 1 8 L Figure 3 6 Reinstall red silicone plug and drain cap Figure 3 2 Figure 3 3 Figure 3 4 Figure 3 5 Figure 3 6 Figure 3 1 Notice The information and or procedures pres...

Страница 13: ... handles Figure 3 7 and 3 8 and remove faucet handles Figure 3 9 and 3 10 5 To remove the reservoir first remove the POU kit from the reservoir Figure 3 11 release the locking clips Figure 3 12 then slowly lift the reservoir from the cooler Figure 3 13 Figure 3 7 Figure 3 8 Figure 3 9 Figure 3 10 Figure 3 11 Figure 3 12 Figure 3 13 ...

Страница 14: ...tank to finish filling at this point the RSR s set up of the unit is complete Figure 4 5 Note Please allow 20 minutes before drawing water to allow the hot water to reach temperature Should you attempt to draw water from the hot faucet within the 20 minutes you may encounter an air lock This air lock goes away after the hot water reaches temperature so it isn t necessary for the RSR to remain on s...

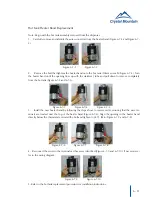
Страница 15: ...locking tabs from the front of the cooler Figure 5 1 3 Figure 5 1 1 Figure 5 1 2 Figure 5 1 3 Cabinet Panel Removal and Installation Notice The information and or procedures presented in the following demonstration s should be performed by a trained Water Cooler Service Technician only Never attempt to service or repair a water cooler while it is plugged into any power supply Prior to any service ...

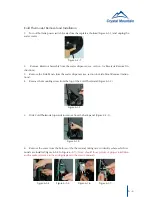
Страница 16: ... front panel located behind Drip tray assembly location Figure 5 2 2 3 Pull outwards on the lower front panel to disengage locking tabs from the front of the cooler Figure 5 2 3 4 Remove the 2 side panel installation screws from the front of the cooler located mid way up the front panel Figure 5 2 4 Figure 5 2 1 Figure 5 2 2 Figure 5 2 3 Figure 5 2 4 ...

Страница 17: ...en the Top Cover by pressing the cover lock Figure 5 2 6 and lifting the front of the Top Cover upwards Figure 5 2 7 7 Grip the top edge of the side panel and lift slightly approximately 1 2 inch and pull out wards from cooler to remove Figure 5 2 8 to Figure 5 2 9 Figure 5 2 5 Figure 5 2 6 Figure 5 2 7 Figure 5 2 8 Figure 5 2 9 ...

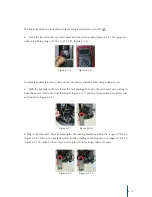
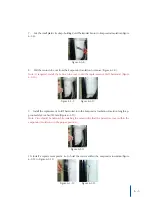
Страница 18: ...he top edge of the side panel insert the screw support into the slot on the Front Panel near Drip Tray area Figure 5 3 3 to Figure 5 3 4 and align the locking clip bottom edge upper clips and slide downwards to lock into place Figure 5 3 5 to Figure 5 3 8 Install the screw into the front back screw supports to secure in place Figure 5 3 9 to Figure 5 3 10 Figure 5 3 1 Figure 5 3 2 Figure 5 3 3 Fig...

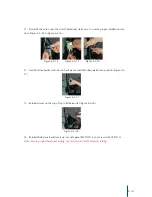
Страница 19: ... 2 the two screws on the bottom Figure 5 4 3 and the one screw at the back Figure 5 4 4 2 With all the screws removed pull the front panel near the base plate forward to re move Figure 5 4 5 to Figure 5 4 6 3 For reassembly align the bottom of the front panel with the appropriate guides in the base plate Figure 5 4 7 Then follow the above steps in reverse order Figure 5 4 1 Figure 5 4 2 Figure 5 4...

Страница 20: ...ition the sensor probes on the bottom two terminals of the cold thermostat Figure 6 1 3 If there is continuity there will be an audible beep 3 To test the overload connect one probe through the silver center and the other on the brass ter minal Figure 6 1 4 If there is continuity there will be an audible beep Figure 6 1 1 Figure 6 1 2 Figure 6 1 3 Figure 6 1 4 Notice The information and or procedu...

Страница 21: ...ched off and the unit unplugged Locate the main lead wire coming in from the power cord to the cold thermostat Figure 6 1 7 position clamp meter around this wire and switch on Figure 6 1 8 6 Plug in the dispenser After an initial spike the reading should be within the range of 0 4 0 9A Figure 6 1 9 Turn on the hot tank switch and the reading should increase to a range of 1 8 2 7A Figure 6 1 10 Cau...

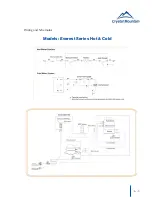
Страница 22: ...6 3 Models Everest Series Hot Cold Wiring and Schematics ...

Страница 23: ...Panel Removal Instruc tions 4 Remove the mounting screw from the top of the Cold Thermostat Figure 6 3 2 5 Slide Cold Thermostat upwards to remove from the back panel Figure 6 3 3 6 Remove the wires from the bottom of the thermostat taking care to identify where which ter minals are installed Figure 6 3 4 to Figure 6 3 7 Note should show picture of proper installation and or make reference to the ...

Страница 24: ... 10 9 Install the replacement Cold Thermostat into the Evaporator Insulation insertion length ap proximately 5 inches 125mm Figure 6 3 11 Note Care should be taken while installing the sensor tube that the protective cover within the evaporator insulation is in the proper position 10 Install a replacement plastic tie to hold the sensor within the evaporator insulation Figure 6 3 12 to Figure 6 3 1...

Страница 25: ...ot on back panel and slide downwards into position Figure 6 3 17 13 Reinstall screw on the top of the cold thermostat Figure 6 3 18 14 Reinstall Side panels and reservoir see side panel SECTION 4 see reservoir SECTION 3 Note Ensure proper thermostat setting see section for Cold Thermostat setting Figure 6 3 14 Figure 6 3 15 Figure 6 3 16 Figure 6 3 17 Figure 6 3 18 ...

Страница 26: ... position Rotate the screw counterclockwise 180 degrees to set to the 6 00 position Figure 6 4 1 to Figure 6 4 2 To make the water colder rotate the screw in the clockwise direction approximately 1 hour position Allow the cooler to stabilize for 2 3 hours to ensure proper temperature of the cold water Note do not change the setting by more than 1 hour setting at a time to prevent freez ing To make...

Страница 27: ...6 5 4 2 There is enough heat transfer paste on the tank and old thermostat to simply wipe the face of new thermostat against the old one Figure 6 5 5 Place into position and evenly tighten the two screws torque to 3 4 6 9 lbf in Figure 6 5 6 to 6 5 8 3 Reconnect the wires onto the thermostat as identified and reinstall the silicone cover Figure 6 5 9 to 6 5 11 Note Both thermostats can be changed ...

Страница 28: ... use a flathead screwdriver to slide up be tween the tube and pipe to release the hoses Be careful not to damage hoses 2 Remove the two screws on the hot tank drain assembly at the back of dispenser Figure 6 6 5 and 6 6 6 3 Slide the silicone cover down and away from the thermostats Figure 6 6 7 Remove and identify the four wires from the thermostats Figure 6 6 8 and 6 6 9 With a Philips screwdriv...

Страница 29: ...cures the hot tank in place Figure 6 6 12 Carefully slide the hot tank out from the bracket Figure 6 6 13 6 Reinstall the new hot tank following the steps in reverse order Reconnect all wires as identi fied if necessary refer to the wiring diagram Reconnect the two hoses as identified and spring clips Figure 6 6 11 Figure 6 6 12 Figure 6 6 13 ...

Страница 30: ...7 5 3 Install the new heater band by following the steps above in reverse order ensuring that the wire ter minals are located near the top of the heater band Figure 6 7 6 Align the opening in the heater band directly below the thermostats reinstall the bolt and tighten to 34 71 lbf in Figure 6 7 7 and 6 7 8 4 Reconnect the wires to the terminals as they were identified Figure 6 7 9 and 6 7 10 If n...

Страница 31: ...ires and or overload black wire Figure 6 8 3 and 6 8 4 Remove relay and overload from compressor Figure 6 8 5 and 6 8 6 3 Install the new overload onto the top pin of the compressor Figure 6 8 7 and push the new re lay onto the two bottom pins below the overload Figure 6 8 8 Reconnect the white wires onto the relay Figure 6 8 9 and the black wire onto the overload Figure 6 8 10 4 Reinstall the cov...

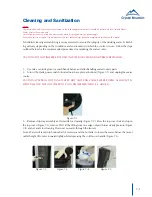
Страница 32: ...e drip tray assembly and set aside for cleaning Figure 7 2 Press the top cover lock and open the top cover Figure 7 3 remove POU kit by lifting from one edge only with slow steady pressure Figure 7 4 and set aside for cleaning Drain excess water through the faucets Note Water will remain in bottom half of reservoir and the hot tank to lower the water below the faucet outlet height tilt cooler forw...

Страница 33: ...ap 5 To remove faucet handles using thumb and forefinger reach inside top front of cooler and squeeze pivot clamp to release faucet handles Figure 7 9 and 7 10 and remove faucet handles Figure 7 11 and Figure 7 12 6 To remove the reservoir release the locking clips Figure 7 13 and slowly lift the reservoir from the cooler Figure 7 14 Figure 7 9 Figure 7 10 Figure 7 11 Figure 7 12 Figure 7 6 Figure...

Страница 34: ...move the cold and hot faucet assemblies from the faucet outlet it is not required to remove the 2 screws Holding one faucet in each hand bend the faucets in the middle upwards until they become separated Figure 7 18 Remove the faucets one at a time by sliding away from the corresponding screw Figure 7 19 to 7 20 Figure 7 17 Figure 7 18 Figure 7 19 Figure 7 20 Figure 7 15 Figure 7 16 ...

Страница 35: ...th the manufacturer s safety instructions and recom mendations and performed by properly trained personnel 12 Remove front bottom panel by removing screw and set aside Figure 7 24 and 7 25 Remove both side panels by removing the 4 screws Figure 7 26 and 7 27 and open top cover to lift panels off locator pins Fig 7 28 to 7 30 Clean all 3 panels using only a mild non abrasive cleaning agent The use ...

Страница 36: ...y coolers the back condenser may be moved back 4 6 by removing the screws that secure the condenser to the back panel Figure 7 40 to 7 43 Use a damp cloth to wipe down the complete back panel the Styrofoam insulation and the compressor Figure 7 44 to 7 46 Replace screws in condenser when cleaning of back panel is complete CAUTION DO NOT CLEAN USING PRESSURE WASHER OR ANY DIRECT WATER CONTACT CAUTI...

Страница 37: ...h 304 grade stainless steel are recommended The use of the descaling agents must be in accordance with the manufacturer s safety instructions and recom mendations and performed by properly trained personnel Note ensure the hot tank is empty and drain plug and cap are in place Figure 7 54 Using a funnel add the descaling solution to the hot tank filling up to the top of the inlet approx 38 7oz 1100...

Страница 38: ...rinse and dry all water contact parts that have been removed 18 Reassemble in reverse order Ensure all seals gaskets are reinstalled properly and install red silicone plug and drain cap Figure 7 60 The use of air pressure test equipment is recommended to verify the re assembly process has been done correctly recommended 1 0 1 2 PSI Figure 7 61 19 Important Prior to plugging in cooler vent the hot ...

Страница 39: ... 62 Do not draw water from the cooler for 30 minutes to let the water cool and heat Optimum water tempera tures will be reached after several hours of operation Crystal Mountain has a policy of continuous development and reserves the right to change specifications without notification Figure 7 62 ...

Страница 40: ...ULATION IN NUMBER HI121H HI121H TF5FMA LOPULEN 5121B LOPULEN 5121B FOMOCON FM090 FOMOCON FM090 FOMOCON FM090 PERBUNAN 3445F YS161 PP 3015 PP K8009 PP 3015 PP 3015 HDPE 8001BL NBR3445 ZH44 ZH9250 MATERIAL SUPPLIER LG LG KRAIBURG BASSELL BASSELL FORMOSA FORMOSA FORMOSA LANXESS YAOSHENG FORMOSA PLASTICS COR PORATION FORMOSA CHEMICAL FIBRE CORPORATION FORMOSA PLASTICS COR PORATION FORMOSA PLASTICS COR...

Страница 41: ...olers with Self contained Mechanical Refrigeration Drinking Water Coolers Cold Hot Drinking Water Coolers Performance Testing Standard for Everest Drinking Water Coolers Household and similar electrical appliances Test code for the determination of airborne acoustical noise General requirements Standard for Drinking Water Coolers Safety of household and similar electrical appliances General requir...

Страница 42: ...tive to bottled water An air filter incorporated into the top of the lid protects the integrity of the water from airborne contaminants The Point Of Use kit uses a primary float with a secondary backup in conjunction with a 1 4in quick con nect fitting with cover to protect the fitting and tubing Easily adaptable the double mechanical float sys tem installs easily onto the coolers ...

Страница 43: ...ducts Inc US Office Warehouse 915 Taylor Rd Unit 3 Gahanna OH 43230 Tel 614 454 1618 Fax 614 866 7765 E mail sales crystalcoolers com Crystal Mountain International Limited Hong Kong Sales Office Room 610 Winfield Commercial Building 6 8a Prat Avenue Tsimshatsui Kowloon Hong Kong Tel 852 2368 1989 Fax 852 3017 6727 E mail cmasia crystalcoolers com Crystal Mountain Products Limited Website www crystal...

Отзывы: