background image

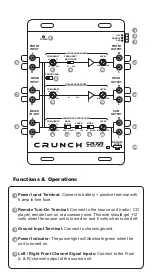
Power Input Terminal:

 Connect to b positive terminal with 

5 amp in-line fuse.

Remote Turn-On Terminal:

 Connect to the source unit (radio / CD 

player) remote turn-on or accessory wire. This wire should get +12 

volts when the source unit is turned on and 0 volts when turned off.

Ground Input Terminal: 

Connect to chassis ground.

Power Indicator:

 The power light will illuminate green when the 

unit is turned on.

Left / Right Front Channel Signal Inputs:

 Connect to the Front 

(L & R) channel output of the source unit.

Functions & Operations 

FRONT 

INPUT

FREQUENCY

L

R

FRONT 

OUTPUT

+12V

REMOTE

GND

POWER

R

L

REAR

INPUT

L

R

REAR

OUTPUT

REMOTE

LEVEL

R

L

MIXED

IN / OUT

L

R

SUB

OUTPUT

R

L

32

400

FREQUENCY

MULTIPLIER

FRONT/REAR

X1

X20

40

70

FREQUENCY

32

400

BASS

BOOST

0dB +12dB

PHASE

MODE

0

180

ST MONO

40

70

LEVEL

MIN

MAX

LEVEL

MIN

MAX

LEVEL

MIN

MAX

FREQUENCY

32

400

40

70

HI-PASS CROSSOVER

HI-PASS CROSSOVER

SUBWOOFER CROSSOVER

CRXR

2/3-way crossover

with remote control

S

x

1

          x

20

1

4

16

18

20

15

14

13

12

10

9

11

6

2
3

17

5

19

7

21

8

22

1

4

2

3

5

Содержание CRXR

Страница 1: ... R L MIXED IN OUT L R SUB OUTPUT R L 32 400 FREQUENCY MULTIPLIER FRONT REAR X1 X20 40 70 FREQUENCY 32 400 BASS BOOST 0dB 12dB PHASE MODE 0 180 ST MONO 40 70 LEVEL MIN MAX LEVEL MIN MAX LEVEL MIN MAX FREQUENCY 32 400 40 70 HI PASS CROSSOVER HI PASS CROSSOVER SUBWOOFER CROSSOVER CRXR 2 3 wa y crossover with remote control S x1 x20 ...

Страница 2: ...metric Equalization circuitry provides a single Octave boost at 12dB at 45Hz to ensure smooth and accurate bass response DC DC Regulated Switching Power Supply This power supply design provides constant voltage regardless of the battery s voltage to ensure constant output performance at all times Frequency Multiplier The front High Pass section is equipped with a frequency multiplier switch that c...

Страница 3: ...ght Front Channel Signal Inputs Connect to the Front L R channel output of the source unit Functions Operations FRONT INPUT FREQUENCY L R FRONT OUTPUT 12V REMOTE GND POWER R L REAR INPUT L R REAR OUTPUT REMOTE LEVEL R L MIXED IN OUT L R SUB OUTPUT R L 32 400 FREQUENCY MULTIPLIER FRONT REAR X1 X20 40 70 FREQUENCY 32 400 BASS BOOST 0dB 12dB PHASE MODE 0 180 ST MONO 40 70 LEVEL MIN MAX LEVEL MIN MAX ...

Страница 4: ...om 32Hz to 400Hz and in the x20 position the frequency range is adjustable from 640Hz to 8KHz This allows for fine tuning Rear Channel High Pass Frequency Selector Allows selection of REAR Channel High Pass frequency from 32Hz to 400Hz Front Channel High Pass Frequency Multiplier In the x1 times one position the Front High Pass frequency is adjustable from 32Hz to 400Hz and the x20 times twenty th...

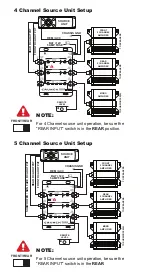
Страница 5: ...or non fading output Remote Level Control This is the under dash mounted bass remote module which adjusts the Low Pass level 18 20 19 21 22 2 Channel Source Unit Setup TO SPEAKERS TO SPEAKERS TO SUBWOOFER S TO SPEAKERS TO SPEAKERS TO SUBWOOFER S L R L R R SOURCE UNIT REM ACC CHASSIS GND FRONT RCA OUTPUT BAT 12V 5 AMP FUSE FRONT 2 CHANNEL AMPLIFIER REAR 2 CHANNEL AMPLIFIER MONO AMPLIFIER REMOTE LEV...

Страница 6: ...FRONT RCA OUTPUT R L R L R L SOURCE UNIT REM ACC CHASSIS GND FRONT RCA OUTPUT BAT 12V 5 AMP FUSE FRONT 2 CHANNEL AMPLIFIER REAR 2 CHANNEL AMPLIFIER MONO AMPLIFIER REMOTE LEVEL REAR RCA OUTPUT TO SPEAKERS TO SPEAKERS TO SUBWOOFER S SUBWOOFER NON FADE RCA OUTPUT FRONT RCA OUTPUT REAR RCA OUTPUT R L R L R L NOTE For 4 Channel source unit operation be sure the REAR INPUT switch is in the REAR position...

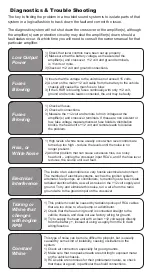
Страница 7: ...isolate parts of that system in a logical fashion to track down the fault and correct the issue The diagnostic system will not shut down the crossover or the amplifier s although the amplifier s own protection circuitry may shut the amplifier s down should a fault status occur At which time you will need to consult the owners manual for that particular amplifier 1 Check that level controls have be...

Страница 8: ...od Components that prove to be defective in materials and workmanship under proper installation and use must be returned to the original authorized Maxxsonics USA Inc retailer from where it was purchased A photocopy of the original receipt must accompany the product being returned The costs associated with removal re installation and freight are not the responsibility of Maxxsonics USA Inc This wa...

Отзывы: