Page 38
Contractor Series Power Amplifiers
Reference Manual
When connecting a step-down transformer, do not ex-
ceed its power rating. Too much power can saturate a
transformer and cause it to appear as a short circuit to
the amplifier. If this happens, no damage should occur,
but the amplifier may run less efficiently, and the sound
quality may be affected.
If Bridge mode and 70V or 100V Operation are used
together, twice the normal output voltage is produced
from a single channel to drive distributed loudspeaker
systems. If you will be using Bridge mode for 140-volt
or 200-volt output, you may need to cross-reference the
ratings of the step-down transformer taps with Crown’s
constant voltage computer (see Section 5.6).
WARNING: Both channels must be configured for
the same output operation (4/8 ohm or 70V/100V)
before switching to Bridge mode. Never change
switch positions with power turned on.
9.4. Output Wiring
You should always install loudspeaker cables of suffi-
cient gauge (wire thickness) for the length used. The
resistance introduced by inadequate output cables will
reduce the amplifier’s power to and motion control of
the loudspeakers. The latter problem occurs because
the damping factor decreases as the cable resistance
increases. This is very important because the amplifier’s
excellent damping factor can be easily negated by us-
ing insufficient cable.
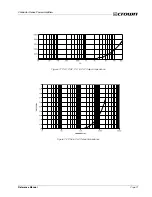
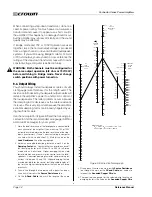
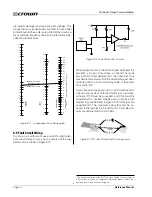
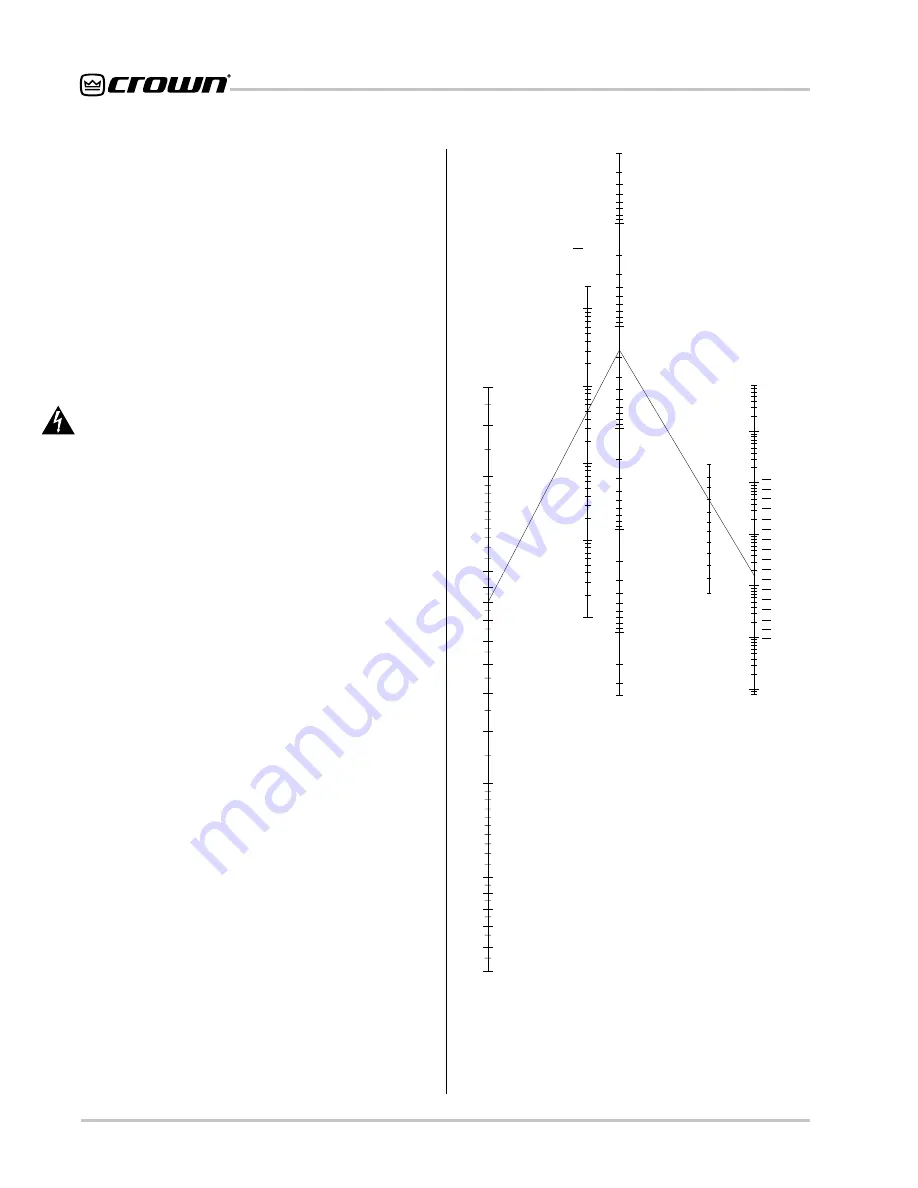
Use the nomograph in Figure 9.9 and the following pro-
cedure to find the recommended wire gauge (AWG or
American Wire Gauge) for your system.
1. Note the load resistance of the loudspeakers connected to
each channel of the amplifier. If you are using 70V or 100V
output, be sure to determine the load resistance of the step-
down transformers (Crown’s constant voltage computer
can help with this, see Section 5.5). Mark this value on the
Load Resistance
line of the nomograph.
2. Select an acceptable damping factor and mark it on the
Damping Factor
line. Your amplifier can provide an excel-
lent damping factor of 400 from 10 to 400 Hz in Stereo
mode with an 8-ohm load. Higher damping factors yield
lower distortion and greater motion control over the loud-
speakers. A common damping factor for commercial appli-
cations is between 50 and 100. Higher damping factors
may be desirable for live sound, but long cable lengths of-
ten limit the highest damping factor that can be achieved
practically.
3. Draw a line through the two points with a pencil, and con-
tinue until it intersects the
Source Resistance
line.
4. On the
2-Cond. Cable
line, mark the length of the cable
run.
40
30
20
15
10
9
8
7
6
5
4
3
2
1
2
5
10
20
50
100
.04
.06
.1
.2
.4
.6
1
2
4
6
10
20
40
5
10
20
50
1
2
100
200
500
1000
2000
5000
8000
5000
1000
500
100
50
10
5
1
.5
.1
.05
.01
#28
#26
#24
#22
#20
#18
#16
#14
#12
#10
#8
#6
#4
#2
#0
#00
#0000
R
LOAD
RESISTANCE
(ohms)
L
R
R
DAMPING
FACTOR
L
S
R
SOURCE
RESISTANCE
(ohms)
S
2-COND.
CABLE
(feet)
ANNEALED
COPPER
WIRE
(AWG)
(ohms/1000 ft.)
Example Shown:
R = 8 ohms; R = 0.016 ohms or D.F. = 500;
Cable Length = 10 ft.; answer: #8 wire
L
S
1
0.5
200
500
1,000
2,000
20,000
5,000
10,000
.01
.001
.02
.004
.006
.002
.0004
.0006
.0002
0.6
0.7
0.8
1.5
0.9
Figure 9.9 Wire Size Nomograph
5. Draw a pencil line from the mark on the
Source Resistance
line through the mark on the
2-Cond. Cable
line, and on to
intersect the
Annealed Copper Wire
line.
6. The required wire gauge for the selected wire length and
damping factor is the value on the
Annealed Copper Wire

