background image

HARDWARE CONTENTS 

(shown actual size) 

3

AA

JJ

DD

EE

HH

CC

LL

MM

NN

FF

BB

GG

 Φ8 Washer


Qty. 11

M5 x 8 mm
Screw 

Qty. 4

M6 x 10 mm

Bolt 

Qty. 4

M6 x 12 mm

Bolt 

Qty.

 8

Φ6
Small Flat 
Washer 

Qty. 4

Reinforced 

Ring

Qty. 1

Wrench


Qty. 1

KK

Wing Nut


Qty. 3

Stainless 
Steel Bolt
 

Qty. 4

SAFETY INFORMATION

Please read and understand this entire ma

nual bef

ore attempting to assem

ble

, operate or install 

the product

.

This manual contains important information about the assembly, operation and maintenance of 
this patio heater. General safety information is presented in these first few pages and is also 
located throughout the manual. Keep this manual for future reference and to educate new users 
of this product. This manual should be read in conjunction with the labeling on the product. Safety
precautions are essential when any mechanical or propane-fueled equipment is involved. These 
precautions are necessary when using, storing, and servicing this item. Using this equipment with the 
respect and caution demanded will reduce the possibilities of personal injury or property damage.
The following symbols shown below are used extensively throughout this manual. Always heed 
these precautions, as they are essential when using any mechanical or fueled equipment.

(not actual size)

(not actual size)

Deco Ring
 

Qty. 1

(not actual size)

 D

ANGER


FOR YOUR SAFETY
If you smell gas:
1. Shut off gas to the appliance.
2. Extinguish any open flame.
3. If odor continues, keep away from the 
appliance and immediately call your gas 
supplier or fire department.

 D

ANGER


Failure to comply with the precautions and 
instructions provided with this heater can 
result in death, serious bodily injury and 
property loss or damage from hazards of fire, 
explosion, burn, asphyxiation, and/or carbon 
monoxide poisoning. Only persons who can
understand and follow the instructions 
should use or service this heater.

M6 Nut

Qty.

 8

M8 x 45mm Bolt 

Qty. 2

M8 Nut

Qty. 2

II

Reflector 
spacer

Qty. 3

Содержание ZCV-2650-AB

Страница 1: ...ZCV 2650 SS ZCV 2650 AB ZCV 2650 SV...

Страница 2: ...O I T P I R C S E D T R A P QUANTITY A Reflector Panel 1 B 1 1 C Head Assembly D Post E Regulator F G H I J Base Bucket preassembled 1 1 1 1 1 2 1 Wheel Kit Gas Hose Cylinder Housing Door preassembled...

Страница 3: ...se precautions are necessary when using storing and servicing this item Using this equipment with the respect and caution demanded will reduce the possibilities of personal injury or property damage T...

Страница 4: ...rborne combustibles or products such as gasoline solvents paint thinner dust particles or unknown chemicals During operation this product can be a source of ignition Keep heater area clear and free fr...

Страница 5: ...inity of this or any other appliance An LP cylinder not connected for use shall not be stored in the vicinity of this or any other appliance WARNING Improper installation adjustment alteration service...

Страница 6: ...ne gas in compliance with local ordinances and codes or with ANS NFPA 58 Turn off propane when not in use SAFETY INFORMATION CAUTION SERVICE SAFETY Keep all connections and fittings clean Make sure pr...

Страница 7: ...the other wheel in the same way Wheel assembly completed as shown in figure 1 step 3 Note To improve stability the preassembled bucket N can be filled with sand or water not included 2 Attach cylinde...

Страница 8: ...B E KK B KK II HH Hardware Used KK 5 x 4 Stainless Steel Bolt 5 Attach reflector spacers II and 8 washers HH to the top of head assembly B Tighten the reflector spacers II Unscrew stainless steel bolt...

Страница 9: ...for storage and handling of liquefied petroleum gas ANS NFPA 58 Your local library or fire department should have this book Storage of an appliance indoors is permissible only if the cylinder is disco...

Страница 10: ...with the connection for the appliance The cylinder used must include a collar to protect the cylinder valve Never connect an unregulated propane cylinder to the heater The propane cylinder must be co...

Страница 11: ...check Apply the soapy solution to all hose and valve connections If you continue to see bubbles after several attempts cylinder valve is defective and should be returned to cylinder s place of purchas...

Страница 12: ...ure any component removed during assembly or servicing is replaced and fastened prior to starting Before Lighting 1 Heater should be thoroughly inspected before each use and by a qualified service per...

Страница 13: ...ils to remain lit all valves should be closed and a waiting period of at least 5 minutes should pass before attempting to light Lighting 1 Turn on the valve on the gas cylinder 2 Press and turn the co...

Страница 14: ...llow flame is detected turn off heater and consult Troubleshooting on page 17 Re lighting 1 Turn control knob to OFF 2 Repeat the Lighting steps on prior page WARNING FOR YOUR SAFETY Be careful when a...

Страница 15: ...After Operation 1 Gas control is in OFF position 2 Gas tank valve is OFF 3 Disconnect gas line Heater is away from gasoline or other flammable liquids or vapors Heater is away from windows air intake...

Страница 16: ...ply to emitter screen or domes Storage Between uses Turn Control Knob OFF Disconnect LP source Store heater upright in an area sheltered from direct contact with inclement weather such as rain sleet h...

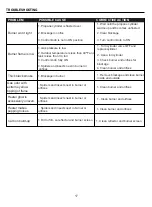
Страница 17: ...r screen 1 Blockage in burner 1 Spiders and insects nest in burner or orifices 1 Spiders and insects nest in burner or orifices 1 Spiders and insects nest in burner or orifices 1 Remove blockage and c...

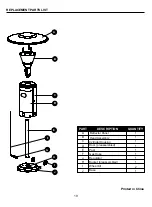
Страница 18: ...in China N O I T P I R C S E D T R A P QUANTITY A Reflector Panel 1 B 1 1 C Head Assembly D Post E Regulator F G H I J Base Bucket preassembled 1 1 1 1 1 2 1 Wheel Kit Gas Hose Cylinder Housing Door...

Отзывы: