CROWN VERITY PS-001 Скачать руководство пользователя страница 8

6

CLEANING AND STORAGE

Crown Verity Inc. Pro Steamers are easily cleaned because of their all stainless steel
construction.

For routine cleaning:

Mix hot water and white vinegar into steamer tank. Let sit for an hour or over night if
convenient. Drain; and rinse with hot water. 

For heavy mineral build-up,

we suggest calcium and lime remover that is safe for use on stainless steel, “C.L.R.” is a
good choice for this. Follow the manufacturer’s instructions and always wash and rinse
thoroughly. 

In all cases, only use cleaning agents that are safe for use on stainless steel. Wash with
mild detergent and rinse thoroughly with plenty of clean, fresh water.

Pro steamers can be thoroughly cleaned inside and out with the use of a pressure
washer. Do not expose regulators, control valves, or decals to high-pressure spray.

STORAGE 

DAY-TO-DAY STORAGE: 

• Disconnect L.P gas cylinders and leave outdoors

• Drain and rinse the Steamer thoroughly for storage 

LONG TERM STORAGE: 

To prepare your Pro Steamer for long-term storage, follow these steps:

• Clean the inside of your Pro Steamer (see cleaning and maintenance section). 

• Store LP cylinders outdoors out of reach of children, away from sources of heat, and

sources of ignition. 

• Cover the Pro Steamer if left outdoors. 

• Cover the supply hose connection(s) with cap(s) or plastic bag and elastic. 
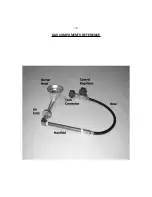
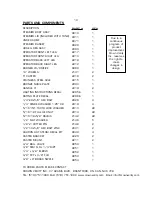
Содержание PS-001

Страница 1: ...ee that your steamer is properly assembled installed and cared for Failure to follow instructions in this manual could result in serious bodily harm and or property damage WARNING Improper installatio...

Страница 2: ...d Storage 6 Cylinders and Regulators 7 Transportation and Storage 8 Hose and Regulators 9 Leak Testing 10 Troubleshooting Guide 11 Gas Components Reference 12 Parts and Components 13 CROWN VERITY INC...

Страница 3: ...rn control regulator to closed position close L P cylinder valve and wait 5 minutes before attemping to re light Keep persons and combustibles such as clothing well away form burner access hole WARNIN...

Страница 4: ...urrounding area clear of all combustible materials gasoline or other flammable liquids This appliance is suitable for use on combustible floors Always level your Pro Steamer front to back side to side...

Страница 5: ...Testing section The burner is properly assembled That any electrical supply cords and or gas supply hoses are kept away from all hot surfaces Your Pro Steamer is positioned in a safe location see Inst...

Страница 6: ...regulator to the OFF position 2 Turn the LP cylinder valve to the OFF position 3 Ensure all burners are extinguished 4 Disconnect LP CYLINDER s from the Pro Steamer when not in use 6 Take care your Pr...

Страница 7: ...tank close the lid and begin timing your food Hint Placing a full basket of cold food into a hot Pro Steamer will reduce the interior temperature keep the burner on high setting until the pro Steamer...

Страница 8: ...ess steel Wash with mild detergent and rinse thoroughly with plenty of clean fresh water Pro steamers can be thoroughly cleaned inside and out with the use of a pressure washer Do not expose regulator...

Страница 9: ...should not exceed 472 mm 18 1 2 in height and 317 mm 12 1 2 in diameter When purchasing a cylinder for your Pro Steamer it must be constructed and marked in accordance with the specifications of a Can...

Страница 10: ...in the vicinity of any heating apparatus or in any high heat area such as a closed car or trunk Do not smoke while transporting a cylinder in your vehicle Do transport and store cylinder s in an upri...

Страница 11: ...anageable amount 10 cubic feet per hour in the event of a hose or regulator failure or a severe leak If it is evident that the flow limiting device has activated the cause of the excessive flow must b...

Страница 12: ...l a repeat test shows no evidence of leakage shut off gas supply while correcting any leaks DO NOT USE THE Pro Steamer IF ANY LEAKS CANNOT BE STOPPED TURN OFF THE GAS SUPPLY VALVE REMOVE THE GAS CYLIN...

Страница 13: ...left open before opening cylinder valve or leak in system causing flow control device to activate Follow proper lighting sequence or correct leak in system Inspect burner for obstructions Slowly and...

Страница 14: ...12 GAS COMPONENTS REFERENCE...

Страница 15: ...1 2 13x5 8 HEX BOLT ZINC CAUTION HOT STEAM DECAL KIT CASTER BRACKET CASTER MOUNT 3 4 BALL VALVE 3 8 FEM FLR x 1 4 MPT 1 4 x 3 8 ELBOW 3 8 FPT x 3 8 FLR 3 8 x 8 BRASS NIPPLE PART 9010 9011 8071 9020 23...

Отзывы: