background image

1

Remove packing materials from unit.

Note:

Save all packing materials.

2

Remove plastic safety cover from A/C plug.

3

Remove tie from A/C cord

PA S S

C L A S S I C

R O C K

P O P

J A Z Z

1

Make sure the unit is plugged in correctly to an
AC outlet.

2

Press the POWER button to turn on the main
power. This button should be left pressed in even
when the unit is not in use. If the main power is 
turned off, all preset radio stations will be lost
and will have to be reprogrammed.

3

Press the STAND BY button to turn on the
unit power. The STAND BY button should be
used to turn the unit on or off.

4

Once the Power is turned on, press the
FUNCTION button to switch between
Tuner/CD/iPod/Aux.

5

While listening to any of the above functions, you
may change the tone of the music by pressing
the EQ button. Each press of the EQ button will
toggle between the following settings:

6

You can also enhance the bass sounds by using
the BBS feature. Press the BBS button to turn
this feature on.

General

Basic Operation

Unpacking

1

Unwind the AC POWER CORD at the back
of the unit and connect it to a power outlet.

2

Plug A/C cord into appropriate outlet.

3

Install 2 AAA batteries (not included) in
remote control.

4

Plug A/C cord into appropriate outlet.

AC

Polarized Plug

Power Source

7

Control Locators

6

Run/Pause

BLUE (B)

DARK BLUE

BROWN

PINK

Increase BLUE

Decrease BLUE

DIY (adjustment of colour by the user)

SMOOTH: 3-colour slow colour change -adjustable

FADE: 7-colour slow colour change -adjustable

STROBE: Colour fade out & fade in -adjustable

7-colour fast colour change

Dimmer (Press and hold + 5 seconds)

WHITE (W)

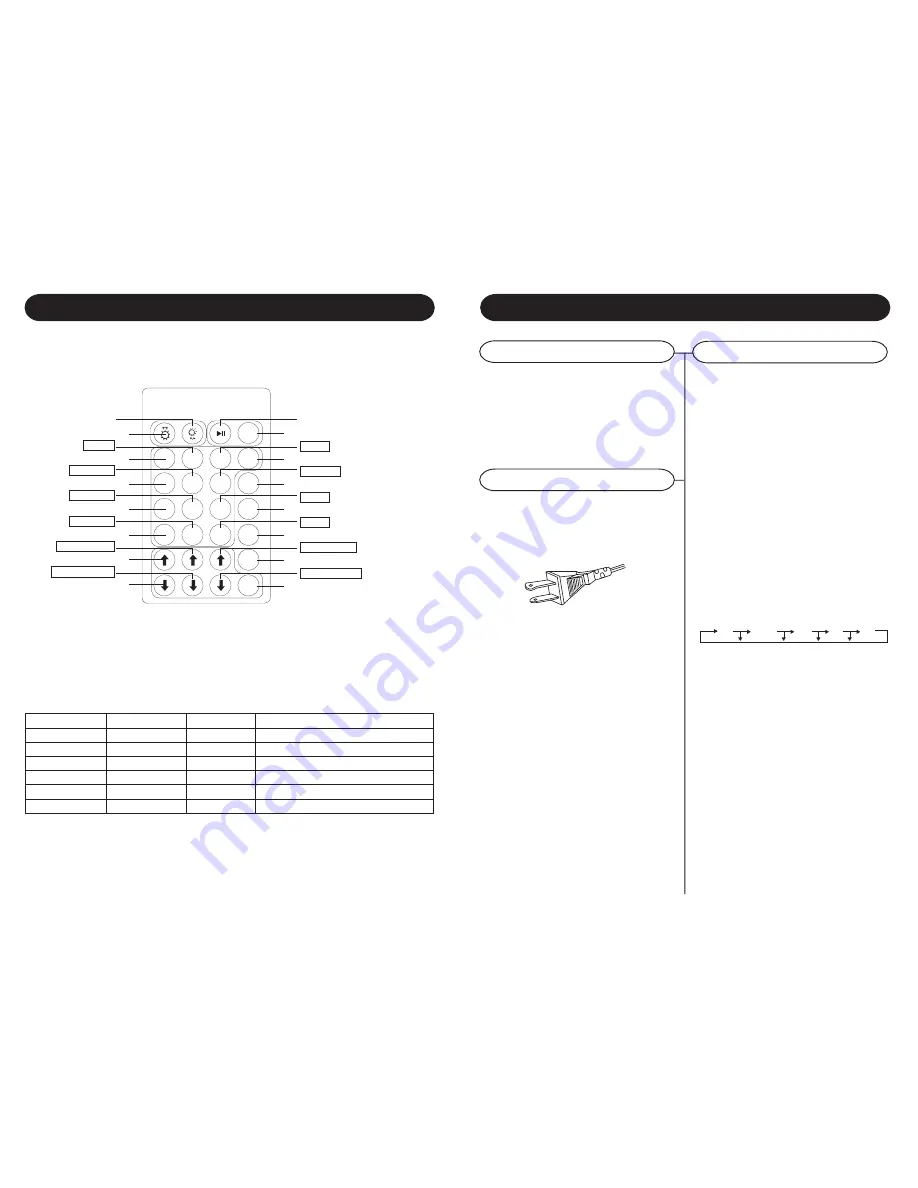
LED LIGHTING CONTROL FUNCTION

To control the LED lighting use the Infra-red Remote Control handset, which has 28 buttons, the function

of each button is as in the table below:

Bri (8 in all)

RED (R)

ORANGE

DARK YELLOW

YELLOW

Increase RED

Decrease RED

Brightness- (8 in all)

GREEN (G)

LIGHT GREEN

BLUE

LIGHT BLUE

Increase GREEN

Decrease GREEN

(2) LIGHTING REMOTE CONTROL

DIY (adjustment of colour by the user)

3- colour slow colour change

7- colour fade change - adjustable

colour fade in & out - adjustable

7- colour fast colour change

Play/Pause

blue

dark blue

brown

Pink

Increase blue

Decrease blue

Dimmer

white

R

G

B

W

FLASH

STROBE

FADE

SMOOTH

DIY

Bri(8 in all)

red

orange

dark yellow

yellow

Increase red

Decrease red

Brightness-(8 in all)

green

light green

Static cyan

light blue

Increase green

Decrease green

Note: This product may be equipped with a

polaized alternating-current line plug (a
plug having one blade wider than the
other.) This plug will fit into the power
outlet only one way. This is a safety
feature. If you are unable to insert the plug
fully into the outlet try reversing the plug,
if the plug should still fail to fit, contact
your electrician to replace your obsolete
outlet. Do not defeat the safety purpose
of the polarized plug.

Содержание Tablet Jukebox CR1205A

Страница 1: ...CR1205A 910 119040 0010 200 Tablet Jukebox www crosleyradio com Instruction Manual ...

Страница 2: ...event damage to the product due to lightning and power line surges 14 Power Lines An outside antenna system should not be located in the vicinity of overhead power lines or other electric light or power circuits or where it can fall into such power lines or circuits When installing an outside antenna system extreme care should be taken to keep from touching such power lines or circuits as contact ...

Страница 3: ...e desired track within the selected album folder 7 Press PLAY PAUSE to begin playback Note You can switch albums folders at any time during playback CD Operation MP3 CD Operation Search by Track name 1 Press FIND ESP once will start to flash on on LCD display 2 Use SKIP or SKIP to select the letter A Z that matches the first letter of the track name you would like to find 3 Once the correct letter...

Страница 4: ...presets If a button is not pressed within 5 seconds during programming the jukebox will automatically exit program mode Note A maximum of 30 radio FM stations for and 10 AM stations can be stored into memory Tablet Operation Tablet Operation 5 8 Radio Operation POWER AM FM AUX FIND ESP MO ST PRESET UP SCAN SKIP SCAN SKIP PRESET DOWN PLAY PAUSE PROGRAM INTRO STOP 4 3 6 0 9 8 7 2 5 1 RANDOM REPEAT V...

Страница 5: ... Crosley Radio directly to participate in the one year protection program Crosley 1 Year Warranty Program CALL TOLL FREE 1 800 926 7801 You will need to contact our offices M F 8am 5pm EST to obtain an RA Return Authorization Number You will be instructed to send the unit at your cost to our offices in its original packaging or reasonable substitute to prevent damage You will need to clearly mark ...

Страница 6: ...the internal speakers will not work Note External speakers are not included with the jukebox General CD Operation ConnectingExternalSpeakers By selecting Random Mode the jukebox will randomly select and play songs from the CD loaded in the jukebox To enable Random Play follow the steps below 1 Press RANDOM once to enable random play mode RANDOM will appear on the display 2 Press RANDOM again to ex...

Страница 7: ...d Memory and 000 P 01 will show on the display 2 Press SKIP or SKIP to select the desired track 3 Press PROGRAM to store the selected track 00 and P 02 will be shown on the display 4 Repeat steps 2 and 3 to program additional tracks into memory if needed 5 Press PLAY PAUSE to begin playback of the programmed tracks Note a up to 64 tracks can be programmed b If programming songs from MP3 CD s which...

Страница 8: ...Increase BLUE Decrease BLUE DIY adjustment of colour by the user SMOOTH 3 colour slow colour change adjustable FADE 7 colour slow colour change adjustable STROBE Colour fade out fade in adjustable 7 colour fast colour change Dimmer Press and hold 5 seconds WHITE W LED LIGHTING CONTROL FUNCTION To control the LED lighting use the Infra red Remote Control handset which has 28 buttons the function of...

Отзывы: