background image

29

28

AIR FILTER CLEANING

   NOTICE:  Do not operate the engine without an air cleaner 

element as this will cause damage to the inner parts of 

the engine. In unusually dusty conditions regular cleaning 

or replacing is required.

The foam filter element of the dirty air filter will restrict the air 

flow to the fuel system and reduce the engine performance. 

If the generator is used in a dusty area, the maintenance 

frequency of the air filter’s foam filter element is higher than 

that in the maintenance requirements.

1.  Wash the filter element in warm soapy water and let it dry 

naturally, or clean and dry it in a non – flammable solvent.

2.  Dip the filter element into clean oil and squeeze out excess 

oil. If there is too much oil left in the filter element, start 

the engine and the engine will smoke.

3.  Use a damp cloth to remove dirt from the inside of the air 

filter’s cover. Take care to prevent dust from entering the 

air ducts which leads to the fuel system.

Spark Arrester

The spark arrester must be cleaned every 100 hours to 

maintain engine performance. Ensure exhaust outlet and 

engine is cold before cleaning and maintenance.
To remove and clean the spark arrester.

1.  Loosen two M5x12 pan head bolts and remove mounting 

cover, muffler mesh cover and spark collector.

2.  Clean the muffler’s mesh cover and the cumulative carbon 

on the spark collector with a steel wire brush.

3.  Refit and tighten the spark arrester.

   NOTICE: Clean with steel wire brush gently to avoid 

damage or scratch to muffler mesh and spark arrester. 

The spark arrester must not be broken or cracked. If it is 

damaged, it must be replaced.

Spark Plug

   NOTICE:  Incorrect spark plug can cause damage to the 

engine.

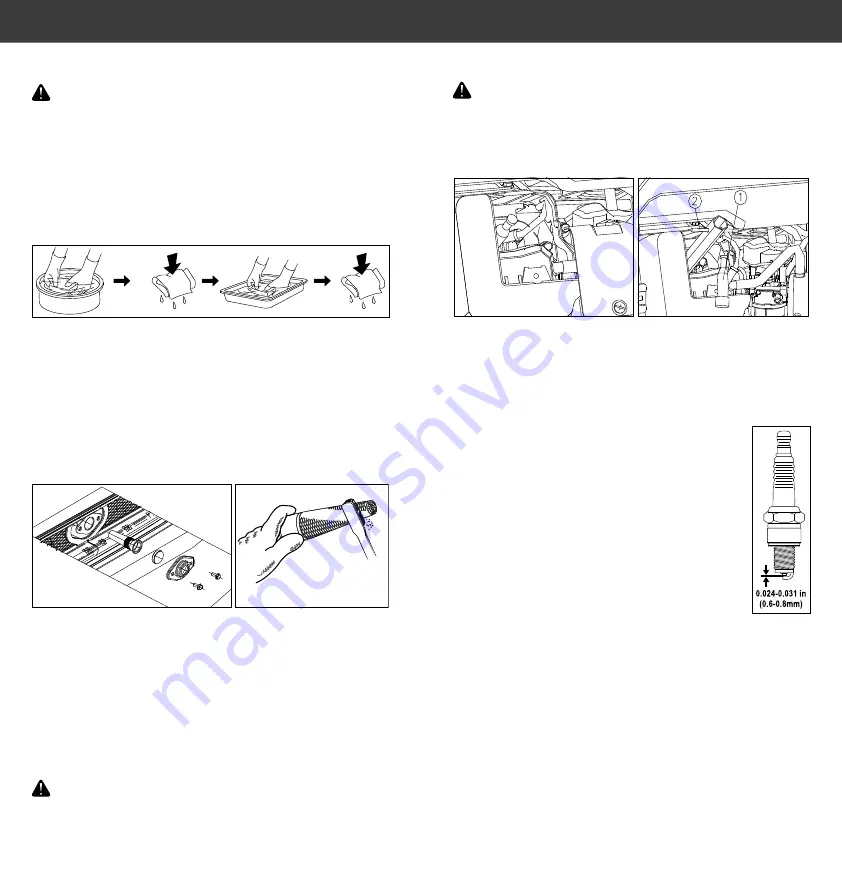
To replace or clean the spark plug use the spark plug spanner 

kit supplied. Allow engine to cool before attempting to 

remove the spark plug.

1.  Rotate the lock 90° counterclockwise, and open left 

maintenance door.

2.  Loosen bolt of spark plug’s maintenance cover and remove.

3.  Remove the spark plug cap, remove dirt and dust from 

around the spark plug.

4.  Use the spark plug spanner and rotate counter-clockwise 

and remove the spark plug.

5.  Check the spark plugs. Replace the spark plug,  

if the electrode is worn or burnt, or if the 

insulator is cracked or broken. Standard spark 

plug: NGK BPR7ES, clearance of spark plug: 

0.6-0.8mm.

6.  After ensuring that the spark plug is in good 

condition, fix the spark plug gently to the 

head of the cylinder by hand to prevent 

thread damage caused by force.

7.  After the spark plug is fixed, tighten it with the 

spark plug spanner. If the used spark plug is to 

be reinstalled, tighten 1/8-1/4 circle manually 

after fixing the spark plug and before 

tightening it to the specified position. If the newly installed 

spark plug is to be reinstalled, tighten 1/2 circle manually 

after fixing the spark plug and before tightening it to the 

specified position. Torque: 13.3 LBS. Ft (18 N.M, 1.8kg.m)

8.  Install the spark plug cap.

9.  Install spark plug maintenance cover and tighten 

maintenance cover’s bolts.

10. Close the left maintenance door, and rotate the lock 90° 

clockwise.

NOTE

: Spark Plug Type: NGK BPR7ES

NOTE

:  If the spark plug is installed without torque wrench, a 

better estimation method is to tighten 1/4-1/2 circle 

manually, but the spark plug should be tightened to the 

specified torque.

Содержание Cromtech 7000ie

Страница 1: ...CROMTECH 7000ie OPERATION MANUAL INVERTER GENERATOR...

Страница 2: ...claim under the warranty you must return the product with proof of purchase to the closest warranty agent or to the place of purchase Where a failure does not amount to a major failure Crommelins Mac...

Страница 3: ...lert Symbol including DANGER You WILL be KILLED or SERIOUSLY HURT if you don t follow instructions WARNING You CAN be KILLED or SERIOUSLY HURT if you don t follow instructions CAUTION You CAN be HURT...

Страница 4: ...ation Do not place flammable objects close to the exhaust when generator is operating Keep at least one metre away from flammable materials Do not use in confined spaces WARNING Do not connect to a ho...

Страница 5: ...t see or smell PETROL AND ITS VAPOUR ARE FLAMMABLE AND EXPLOSIVE Keep away from heat sparks ame sources DO NOT refuel when operating GENERATORS PRODUCE ELECTRICITY THAT CAN CAUSE SERIOUS INJURY OR DEA...

Страница 6: ...or 17 Air filter 18 Frame shock absorber bracket left 19 Left maintenance door 20 Spark plug 21 Combination switch 22 Tank cover front Control Panel Diagram 1 2 3 4 5 6 9 10 11 12 7 8 INVERTER GENERAT...

Страница 7: ...t Button to start the engine Recoil Starter When battery voltage is too low or flat use the manual recoil starter to start the engine ESC Throttle Switch ESC THROTTLE STANDARD TURBO ECO 1 2 3 ECO When...

Страница 8: ...If there is no display after replacing the battery with new one please contact your dealer b The screen interface displays the contents of 21 22 and 23 2 display interfaces in total NOTE The interfac...

Страница 9: ...the contents of 9 displayed with Bluetooth and 10 are also displayed at the same time 5 When the engine switch is in the ON position and the engine is either running or not the screen interface will...

Страница 10: ...ngine starts and produces power Ground Earth Terminal The ground terminal on this generator is connected to NON current carrying parts of the generator frame and to each AC outlet Before attaching a g...

Страница 11: ...engine in a closed area or it may cause unconsciousness and death within a short time Operate the engine in a well ventilated area The generator has been shipped without engine oil Do not start the en...

Страница 12: ...f connecting NOTE You can have multiple devices paired to the device however only one connected at a time APP START APPLE 1 On your Apple device visit the App Store 2 In the App Store search for ILONC...

Страница 13: ...electrical equipment 2 Turn the ESC Throttle to the Standard position 3 Disconnect all electrical equipment from the AC socket 4 Manual stopping press and release the start switch button on the contr...

Страница 14: ...ed appliance s will shut off and the output indicator green will go OFF Stop engine and investigate the problem Determine if the cause is a short circuit in a connected appliance or an overload correc...

Страница 15: ...l gauge 10 Rotate the lock 90 clockwise and close right maintenance door Oil Specification Table Use four stroke oil SAE 10W30 is recommended for regular use However when the average temperature in yo...

Страница 16: ...must not be broken or cracked If it is damaged it must be replaced Spark Plug NOTICE Incorrect spark plug can cause damage to the engine To replace or clean the spark plug use the spark plug spanner k...

Страница 17: ...l of the battery and tighten the installation bolt 4 Install the battery band 5 Reinstall battery maintenance cover and tighten the bolts NOTICE The generator must not run without the battery maintena...

Страница 18: ...NG TRANSPORTATION Before transportation allow the generator set to cool completely To prevent fuel spillage when transporting or during temporary storage the generator should be secured upright in its...

Страница 19: ...ut 15 ml of oil into the cylinder Turn the Engine Switch to the OFF position Crank the engine by pulling the manual recoil starter a few times to lubricate the cylinder Refit the spark plug and mainte...

Страница 20: ...Capacity 1 45 litres Spark Model No NGK BPR7ES Starting mode Recoil start Electric start APP start Generator Length x Width x Height 950x765x773 mm Wheel Solid 2 x 250mm Net weight 130kg WIRING DIAGR...

Страница 21: ...659 PO Box 352 BENTLEY WA 6982 Email reception crommelins com au www crommelins com au Crommelins Operations Pty Ltd trading as Crommelins Machinery The Crommelin Group and Crommelins Australia ABN 11...

Отзывы: