background image

l

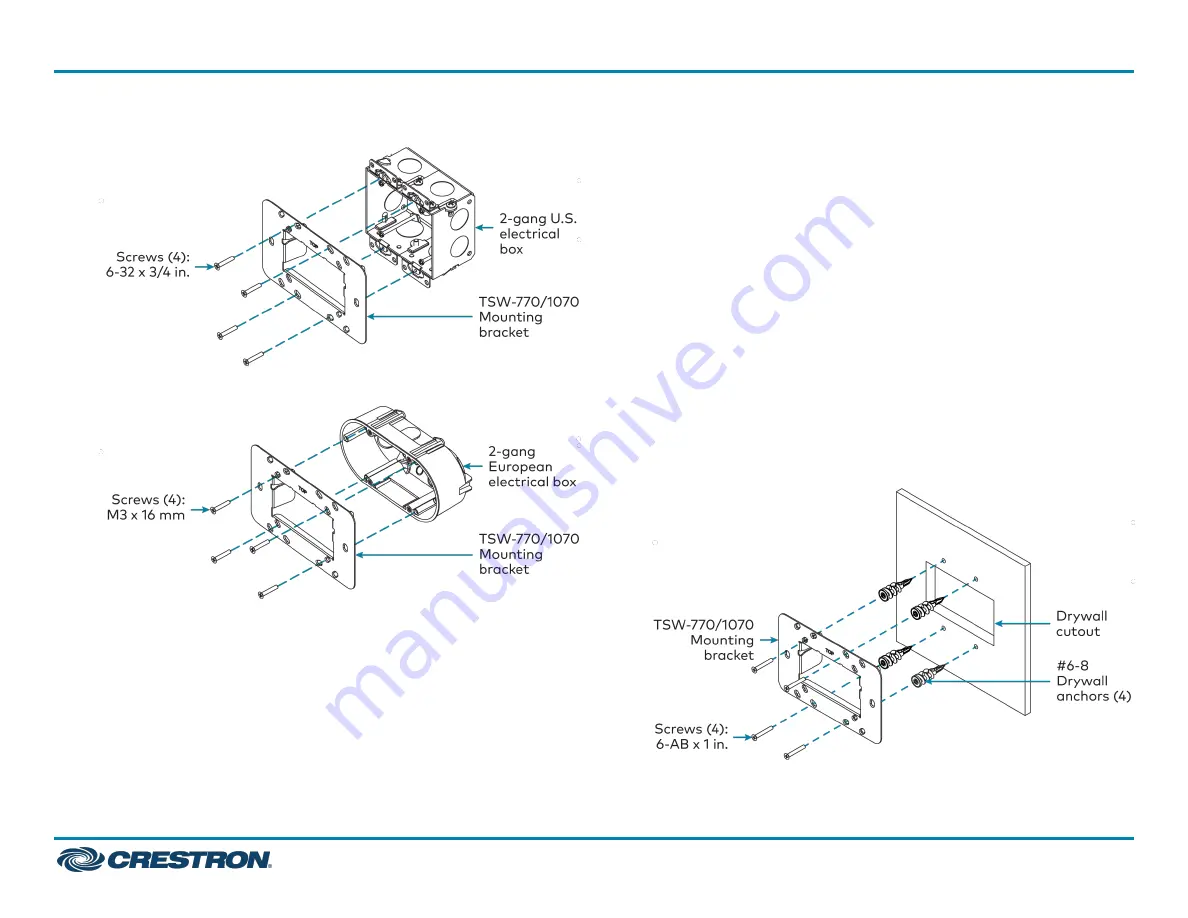
For U.S. installations, use the four 6-32 x 3/4 in. screws.

l

For European installations, use the four M3 x 16 mm screws.

l

For U.K. installations (not pictured), use the two M3.5 x 25 mm
screws to attach the mounting bracket to the electrical box. Insert
the screws through the center openings in the left and right sides of
the mounting bracket.

Drywall Mounting

Mounting hardware is provided with the touch screen for drywall
installations without an electrical box. Using this hardware will ensure
that the bracket is completely flush with the touch screen to provide
maximum magnetic force.

To install the mounting bracket into drywall:

1. Using the inside of the mounting bracket as a template, cut a

2–1/8 x 3-5/8 in. (54 x 92 mm) hole into the drywall. Ensure the
template is level prior to cutting the hole.

2. Align the mounting bracket with the cutout and ensure it is level.

3. Use one of the anchors to make a center mark in the drywall through

the four 2-gang openings in the template. Refer to the image below
for the required mounting holes.

4. Screw the four anchors into the drywall using the center marks as a

reference.

5. Attach the mounting bracket to the anchors using the four 6-AB x

1 in. screws as shown in the image below.

2

TSW-770R and TSW-1070R

Quick Start

7 in. and 10.1 in. Wall Mount Touch Screens, Crestron Home™ OS Version

Содержание TSW-1070R Series

Страница 1: ...ox a 2 gang European electrical box or a 2 gang U K electrical box The touch screen also installs into drywall NOTES l Additional mounting options are possible using the following mounting accessories...

Страница 2: ...aximum magnetic force To install the mounting bracket into drywall 1 Using the inside of the mounting bracket as a template cut a 2 1 8 x 3 5 8 in 54 x 92 mm hole into the drywall Ensure the template...

Страница 3: ...uded release key Use the two M2 x 4 mm screws to attach the security bracket to the touch screen rear housing as shown in the following illustration To remove the touch screen after installation use t...

Страница 4: ...f the mounting bracket If the touch screen is not level after installation pull it out of the mounting bracket and loosen the screws holding the bracket into place This procedure allows the mounting b...

Страница 5: ...Device Setup Screens To access the built in setup screens place five fingers on the display and hold for 15 seconds The main Setup screen is displayed TSW 1070 shown Use the setup screens to configure...

Страница 6: ...cessed a dialog box is displayed asking the user to create an admin account A similar message is displayed when connecting to the device in Crestron Toolbox software if an admin account has not alread...

Страница 7: ...pplication on the touch screen 1 From the Crestron Home application tap Discover Home to discover a Crestron Home system on the network or tap Add Manually to enter connection information for a Crestr...

Страница 8: ...s that cover Crestron products are listed at www crestron com legal patents Certain Crestron products contain open source software For specific information visit www crestron com opensource Crestron t...

Отзывы: