background image

Dual AC Power Control Module


Crestron

 ST-PC 

Configuration Manager is where programmers “build” a Crestron control system by 
selecting hardware from the 

Device Library

.  In Configuration manager, drag the 

PRO2 from the 

Control Systems

 folder of the

 Device Library

 and drop it in the upper 

pane of the 

System Views

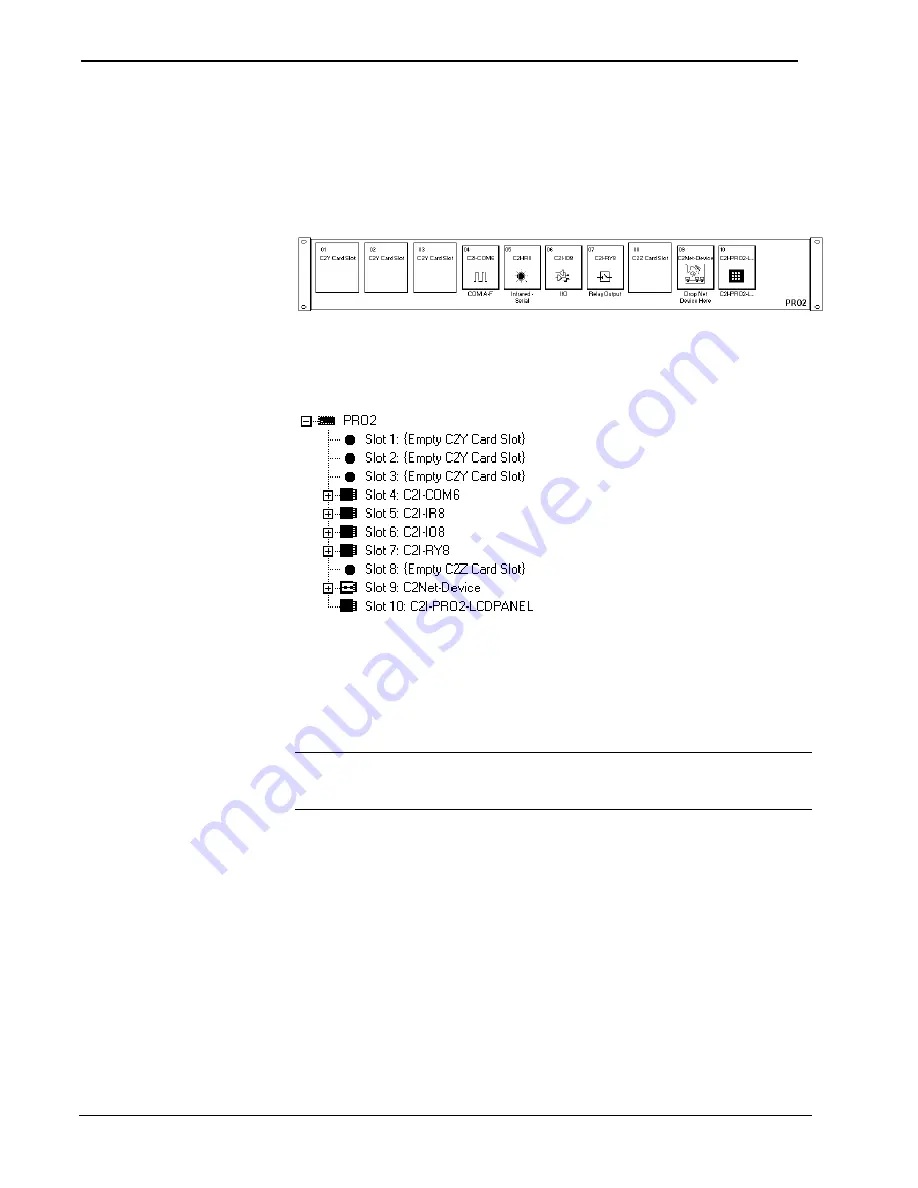
. The PRO2 with its associated communication ports is 

displayed in the

 System Views

 upper pane. 

PRO2 System Views 


The 

System Views

 lower pane displays the PRO2 system tree (refer to the following 

graphic). This tree can be expanded to display and configure the communication 
ports. 

Expanded PRO2 System Tree 


C2Net-Device Slot in Configuration Manager 

To incorporate an ST-PC into the system, drag the ST-PC from the Cresnet Control 
Modules | Cresnet Power Control Modules folder of the 

Device Library

 and drop it 

in 

System Views

. The PRO2 system tree displays the ST-PC in Slot 9, with a default 

Net ID of 2C as shown in the following illustration. 

NOTE:

 The first ST-PC in a system is preset with a Net ID of 2C when its symbol is 

dragged into the upper pane of 

System Views

. Additional ST-PC units are assigned 

different Net ID numbers as they are added. 

10  

  Dual AC Power Control Module: ST-PC Operations 

Guide – DOC. 5708A 

Содержание ST-PC

Страница 1: ...Crestron ST PC Dual AC Power Control Module Operations Guide ...

Страница 2: ...n by the Technical Documentation department at Crestron Electronics Inc 15 Volvo Drive Rockleigh NJ 07647 1 888 CRESTRON All brand names product names and trademarks are the property of their respective owners 2003 Crestron Electronics Inc ...

Страница 3: ...ookup 7 Programming Software 9 Earliest Version Software Requirements for the PC 9 Programming with SIMPL Windows 9 Uploading 12 Communication Settings 13 Uploading a SIMPL Windows Program 15 Problem Solving 16 Troubleshooting 16 Further Inquiries 17 Future Updates 17 Return and Warranty Policies 18 Merchandise Returns Repair Service 18 CRESTRON Limited Warranty 18 Operations Guide DOC 5708A Conte...

Страница 4: ......

Страница 5: ...ad sockets A and B of 10 Amp maximum 6 Amp maximum for the STI PC There are several unique features of the ST PC Two momentary pushbutton switches on the front panel of the unit can be programmed to toggle the relays via the control system The pushbutton switches locally toggle a relay when the control system is inactive During network activity the relays assume the state dictated by the control s...

Страница 6: ...Connectors NET POWER A Two 6 pin RJ type connectors One 3 pin AC connector ST PC One 3 conductor six foot cable STI PC POWER B One 3 pin AC connector ST PC One 3 conductor six foot cable STI PC 12 VDC 0 5A One Male receptacle for external power pack POWER IN One 3 conductor cable Rack Space 1 unit high unit wide Environmental Temperature 41 to 113 F 5 to 45 C Environmental Humidity 10 to 90 RH non...

Страница 7: ...anels There are four LEDs on the front panel that indicate the unit s current status There are also two momentary pushbutton switches that are used to toggle the relay states The two switches are located to the right of the POWER A B LEDs on the front panel All connections are made on the back of the unit The proper domestic and international power cords and plugs are used on the ST PC and STI PC ...

Страница 8: ... INC N J 07626 POWER A POWER IN 120 220VAC 10A MAX OUTPUT COMBINED 50 60HZ POWER B CRESTRON STI PC Physical Views STI PC PWR A C CONTROLLER NET POWER B POWER A 1 70 in 4 32 cm 7 07 in 17 96 cm CRESTRON CRESTRON 6 13 in 15 57 cm 6 32 in 16 05 cm 6 94 in 17 63 cm 1 50 in 3 81 cm NET NET 5A 12VDC CRESTRON ELECTRONICS INC N J 07626 POWER A POWER IN 125 VAC 10A MAX OUTPUT COMBINED 50 60HZ POWER B 4 Dua...

Страница 9: ...module to a Cresnet control system When the module is part of the Cresnet system power may be supplied via NET if within system power and cable length limits the supplied power pack is optional and need not be attached Two NET ports are available so that network units can be daisy chained together Review the latest revision of the Network Modular Cable Requirements Doc 5682 Net Connectors PIN SIGN...

Страница 10: ...network ID as the ST PC POWER A This LED illuminates when the unit plugged into the POWER A three prong socket connector at the back panel is on relay is engaged A momentary pushbutton switch toggles the A relay between its two states when the control system is inactive When the control system is active the LED is under program control and must have its functionality programmed Refer to ST PC Symb...

Страница 11: ...is the only unit connected to the control system 2 Open the Crestron Viewport 3 From the Viewport menu select Functions Set Network ID The software checks the baud rate and then opens the Set Network ID window 4 In the Set Network ID window select the device requiring a Net ID change from the Current Network Devices text window 5 Select the new Net ID for the device from the Choose the new network...

Страница 12: ...O AC OUTLET DEVICE REQUIRING AC POWER CONTROL POWER A POWER IN POWER B 50 60HZ 10A MAX OUTPUT COMBINED 90 125VAC Cresnet NOTE USE ST CNB SOLD SEPARATELY TO CONNECT ST PC TO CRESNET DEVICE REQUIRING AC POWER CONTROL Hookup Connections for STI PC OPTIONAL POWER PACK 1000 mA NET G 24 Z Y CRESTRON ELECTRONICS INC N J 07626 5A 12VDC POWER B DAISY CHAIN TO ADDITIONAL NETWORK DEVICES NET NET POWER A PLUG...

Страница 13: ... Crestron Viewport version 3 35 or later Programming with SIMPL Windows NOTE The following assumes that the reader has knowledge of SIMPL Windows If not refer to the extensive help information provided with the software NOTE The following are file extensions for programs that include an ST PC developed for specific control system types smw source file spz compiled file for 2 series bin compiled fi...

Страница 14: ...c This tree can be expanded to display and configure the communication ports Expanded PRO2 System Tree C2Net Device Slot in Configuration Manager To incorporate an ST PC into the system drag the ST PC from the Cresnet Control Modules Cresnet Power Control Modules folder of the Device Library and drop it in System Views The PRO2 system tree displays the ST PC in Slot 9 with a default Net ID of 2C a...

Страница 15: ...he Net ID as shown in the following figure ST PC Device Settings Window NOTE SIMPL Windows automatically changes the Net ID values of a device added to a program if a duplicate device or a device with the same default Net ID already exists in the program Always ensure that the hardware and software settings of the Net ID match For Net ID hardware setting details refer to Identity Code on page 7 Op...

Страница 16: ...stems they are not available with the ST CP or CN Series control systems To add a device extender right click the ST PC in Program View point to Insert Device Extender and select the desired device extender To program a device extender expand the ST PC in Program View and drag the device extender to Detail View Uploading Assuming a PC is properly connected to the entire system Crestron programming...

Страница 17: ...d Crestron has tested the following devices with good results Belkin large model F5U103 I O Gear GUC232A Keyspan USA 19QW Other models even from the same manufacturer may not yield the same results The procedure in this section provides details for RS 232 communication between the PC and the control system If TCP IP communication is preferred consult the latest version of the Crestron e Control Re...

Страница 18: ...alternatively press Alt D to open the Port Settings window Setup Communications Settings Command 3 Select RS 232 as the connection type Verify that an available COM port COM 1 is shown after this step is selected and that all communication parameters and necessary options from the Port Settings window are selected as shown after this step Click the OK button to save the settings and close the wind...

Страница 19: ...s 1 Start SIMPL Windows 2 Select File Open to view the Open window navigate to the SIMPL Window file smw and click Open 3 Select Project Transfer Program Upload via Crestron Viewport 1 Verify that the procedure for Communication Settings that begins on page 13 has been performed 2 As shown after this step select File Transfer Send Program Alternatively press Alt P from the Viewport menu File trans...

Страница 20: ...stem Network devices are not communicating to the control system From the Viewport poll the network F4 to verify communication ST PC is not receiving power Confirm that power pack securely plugged into outlet and that the connector is properly attached to the ST PC Verify that proper cables are securely attached to ST PC NET connectors for Cresnet system only Green PWR LED does not illuminate Inco...

Страница 21: ...e online help section of the Crestron website www crestron com to ask questions about Crestron products First time users will need to establish a user account to fully benefit from all available features Future Updates As Crestron improves functions adds new features and extends the capabilities of the ST PC additional information may be made available as manual updates These updates are solely el...

Страница 22: ...nt lamps are not covered This warranty extends to products purchased directly from CRESTRON or an authorized CRESTRON dealer Purchasers should inquire of the dealer regarding the nature and extent of the dealer s warranty if any CRESTRON shall not be liable to honor the terms of this warranty if the product has been used in any application other than that for which it was intended or if it has bee...

Страница 23: ...Crestron ST PC Dual AC Power Control Module Operations Guide DOC 5708A Dual AC Power Control Module ST PC 19 This page intentionally left blank ...

Страница 24: ...Crestron Electronics Inc Operations Guide DOC 5708A 15 Volvo Drive Rockleigh NJ 07647 11 03 Tel 888 CRESTRON Fax 201 767 7576 Specifications subject to www crestron com change without notice ...

Отзывы: