background image

Crestron 

C2N-SSC-2


ILT Shade Controller


Operations & Installation Guide - DOC. 6318 

ILT Shade Controller: C2N-SSC-2  


33


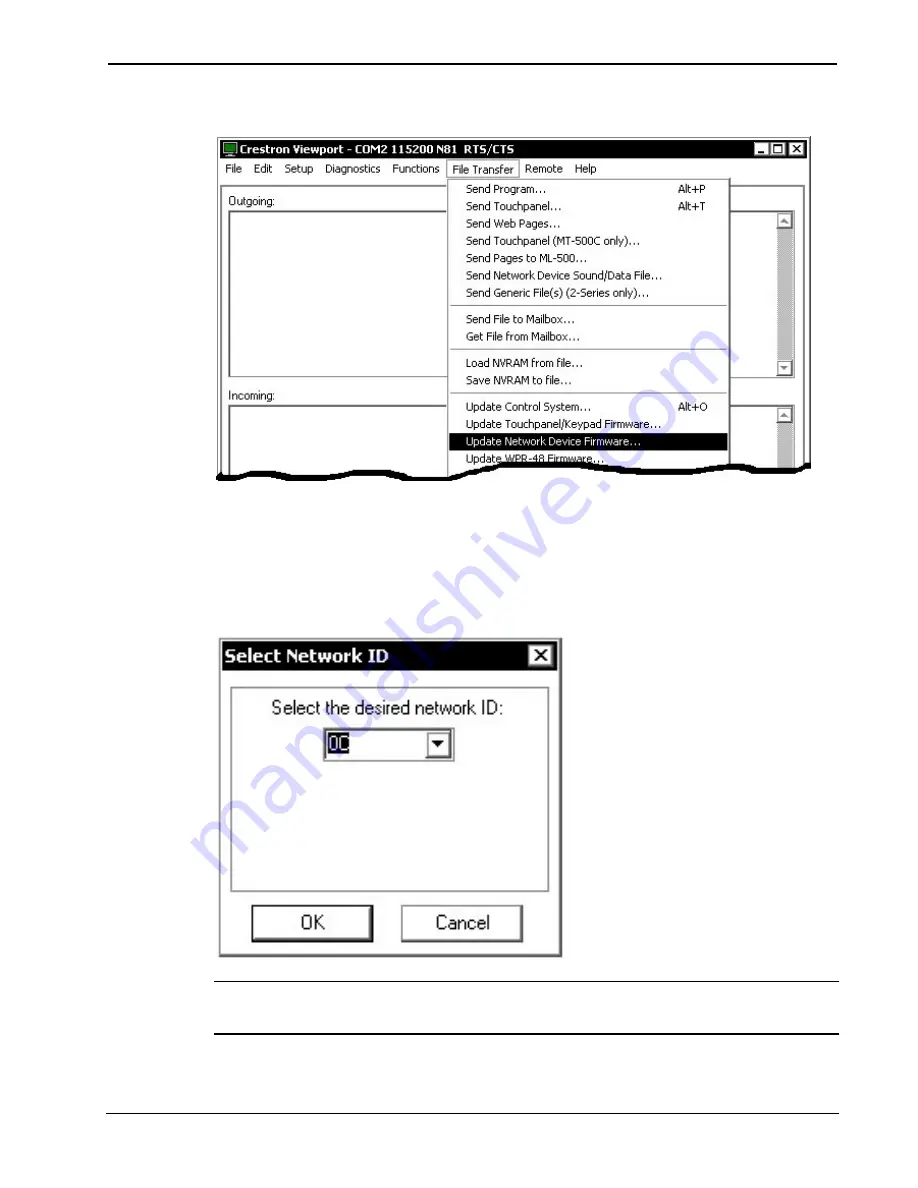
File Transfer | Update  Network Device Firmware Command 


3.  As shown in the “Select Network ID” window, select the Net 

ID of the C2N-SSC-2, and then click 

OK

. The “Open” 

window appears (refer to the graphics below and on the next 
page). 

“Select Network ID” Window 


NOTE:

 When transferring a Cresnet file (touchpanel project/ firmware), 

lower the port speed baud rate to 38400 to match the Cresnet bus speed. 

Содержание C2N-SSC-2

Страница 1: ...Crestron C2N SSC 2 ILT Shade Controller Operations Installation Guide...

Страница 2: ...by the Technical Documentation department at Crestron Electronics Inc 15 Volvo Drive Rockleigh NJ 07647 1 888 CRESTRON All brand names product names and trademarks are the property of their respectiv...

Страница 3: ...Identity Code 8 Installation 12 Programming Software 16 Programming with Crestron SystemBuilder or D3 Pro 18 Programming with SIMPL Windows 18 Uploading and Upgrading 27 Communication Settings 27 Upl...

Страница 4: ......

Страница 5: ...or each shade Commands to move to a specific location will position the shades relative to the full range of travel between these upper and lower limits Subsequent commands to move a shade in the open...

Страница 6: ...on 5 12 63X UPZ or later3 Version 5 10 11W UPZ or later3 Version 3 18 09m l c or later Version 4 02 04S UPZ or later3 Operating Temperature 41 to 122 F 5 to 50 C Humidity 10 to 90 RH non condensing Ov...

Страница 7: ...ng and controls on the front surface The bottom edges of the cover faceplate extend to form two flanges with screw slots for convenient mounting on any flat surface Interface connectors are mounted on...

Страница 8: ...ILT Shade Controller Crestron C2N SSC 2 4 ILT Shade Controller C2N SSC 2 Operations Installation Guide DOC 6318 Physical Views continued...

Страница 9: ...lower limit Refer to Setting Shade Limits and Direction of Travel on page 13 Indicators The only indicators on the Shade Controller are the three LEDs on the face of the unit The PWR LED green indicat...

Страница 10: ...ce Labelling NOTE This device complies with part 15 of the FCC rules Operation is subject to the following two conditions 1 this device may not cause harmful interference and 2 this device must accept...

Страница 11: ...work unit to be connected must be taken into consideration If Cresnet units are to be daisy chained on the run the Cresnet power usage of each unit to be daisy chained must be added together to determ...

Страница 12: ...FE The Net ID of each unit must match an ID code specified in the SIMPL Windows program Refer to Setting the Net ID in Device Settings on page 20 for details of the SIMPL Windows procedure Refer to no...

Страница 13: ...Net ID Method A Cresnet address settable ID 1 Ensure that the Shade Controller is the only device connected to the control system 2 Open the Crestron Viewport 3 From the Viewport menu select Function...

Страница 14: ...These procedures are for TSID enabled network devices during the initial configuration of a Cresnet system or when such devices are being added replaced 1 Ensure that all Shade Controllers are connect...

Страница 15: ...TION This function does not prevent you from setting duplicate IDs Be sure to check current assignments before entering the desired Cresnet ID number 5 Enter the Cresnet ID that the device should be s...

Страница 16: ...appropriate button to obtain the corresponding number NOTE Enter serial numbers including spaces exactly as they appear on the unit label Alpha characters in serial numbers or TSID numbers may be ente...

Страница 17: ...nd the other end to the control system 3 Connect the modular cable from the shade s to the Shade Controller RJ 11 port s If a longer modular cable is required fabricate using standard 4 wire modular c...

Страница 18: ...limit on release When not in limit setting mode hold button down for 10 seconds to reverse Shade 1 orientation SETUP LED gives confirming flash when reversal is executed Down Button J In limit settin...

Страница 19: ...period ends Upon release of the button the upper limit of travel will be stored in the ILT shade If necessary repeat the procedure until the shade is correctly positioned Setting Shade 1 Lower Limit P...

Страница 20: ...hade 1 has now been reversed For shade 2 verify that the unit is not in limit setting mode SETUP LED is not illuminated and then press and hold the down j button for at least 10 seconds The SETUP LED...

Страница 21: ...he beginning programmer and much faster for all programmers However it does not allow the degree of control and flexibility that SIMPL Windows does Crestron SystemBuilder comes with templates for all...

Страница 22: ...PL Windows VT Pro e and the Crestron Database Both access these tools behind the scenes enabling you to easily create robust systems Programming with SIMPL Windows NOTE The following are acceptable fi...

Страница 23: ...r drag the PRO2 from the Control Systems folder of the Device Library and drop it in the upper pane of the System Views The PRO2 with its associated communication ports is displayed in the System View...

Страница 24: ...tem is preset with a Net ID of 0C when its symbol is dragged into the upper pane of System Views Additional units are assigned different Net ID numbers as they are added C2Net Device Slot 9 Setting th...

Страница 25: ...changes Net ID values of a device added to a program if a duplicate device or a device with the same Net ID already exists in the program Always ensure that the hardware and software settings of the...

Страница 26: ...ILT Shade Controller Crestron C2N SSC 2 22 ILT Shade Controller C2N SSC 2 Operations Installation Guide DOC 6318 C2N SSC 2 Symbol in SIMPL Windows Programming Manager...

Страница 27: ...input and stops on release High 1 rising edge Close Low 0 falling edge Stop Digital input Sh1_OpenFull Opens Shade 1 to the upper limit of travel on the rising edge of the input High 1 rising edge Ope...

Страница 28: ...e output High 1 Last direction open Low 0 Last direction not open Digital output Sh1_LastDirClose Indicates that the current direction of movement is toward the lower limit If not currently moving ind...

Страница 29: ...for 20 seconds High 1 level sensitive Close shade Low 0 falling edge Stop and set upper limit Digital input Sh1_LowerLimUp Opens Shade 1 while the input is high and sets the lower travel limit on rele...

Страница 30: ...the position 0000h No movement 00xxh where xx is any value between 01 and FF Lower limit FFxxh where xx is any value between 100 and FF Upper limit Analog output Sh1_PosReport Reports the position of...

Страница 31: ...and VT Pro e Tools Viewport or as a standalone utility The Viewport utility accomplishes multiple system tasks primarily via an RS 232 or TCP IP connection between the control system and a PC It is us...

Страница 32: ...procedure in this section provides details for RS 232 communication between the PC and the control system If TCP IP communication is preferred consult the latest version of the Crestron e Control Ref...

Страница 33: ...after this step From the Viewport menu select Setup Communications settings alternatively press Alt D to open the Port Settings window Setup Communications Settings Command 3 Select RS 232 as the con...

Страница 34: ...ons Guide for the control system being used for exact parameter selection 4 To verify communication select Diagnostics Establish Communications Find Rack This should display a window that gives the CO...

Страница 35: ...that the procedure for Communication Settings that begins on page 27 has been performed 2 As shown after this step select File Transfer Send Program alternatively press Alt P from the Viewport menu ba...

Страница 36: ...firmware upgrade file has the extension upg To take advantage of all the C2N SSC 2 features it is important that the unit contains the latest firmware available Please check the Crestron website www...

Страница 37: ...Firmware Command 3 As shown in the Select Network ID window select the Net ID of the C2N SSC 2 and then click OK The Open window appears refer to the graphics below and on the next page Select Networ...

Страница 38: ...ck Open to begin the transfer Serial Number Assignment These procedures are to be used for Shade Controllers that just received a firmware upgrade enabling TSID support where it was not previously ava...

Страница 39: ...er service representative Shade Controller Troubleshooting TROUBLE POSSIBLE CAUSES CORRECTIVE ACTION Faulty connection to the ILT shade Check the connection from the C2N SSC 2 to the shade Shade motor...

Страница 40: ...lp section of the Crestron website www crestron com to ask questions about Crestron products First time users will need to establish a user account to fully benefit from all available features Future...

Страница 41: ...verlay components are covered for 90 days batteries and incandescent lamps are not covered This warranty extends to products purchased directly from CRESTRON or an authorized CRESTRON dealer Purchaser...

Страница 42: ...ILT Shade Controller Crestron C2N SSC 2 38 ILT Shade Controller C2N SSC 2 Operations Installation Guide DOC 6318 This page intentionally left blank...

Страница 43: ...Crestron C2N SSC 2 ILT Shade Controller Operations Installation Guide DOC 6318 ILT Shade Controller C2N SSC 2 39 This page intentionally left blank...

Страница 44: ...restron Electronics Inc Operations Installation Guide DOC 6318 15 Volvo Drive Rockleigh NJ 07647 11 04 Tel 888 CRESTRON Fax 201 767 7576 Specifications subject to www crestron com change without notic...

Отзывы: