background image

Содержание 917.378571

Страница 1: ...er Responsibilities Service Adjustments Repair Parts Caution Read and Follow all Safety Rules and instructions Before Operating This Equipment 145946 08 11 94 Printed in U S A IIIIIIIIIIIIIIIIIIIII IIIIIIIIIIIII IIII IIIIIIIIIIIII IIII IIII III I IIIIIIIIIIIIIIIIIIIIIIII IIII IIIIII ...

Страница 2: ...rts Keep clear of the discharge opening at all times Always stop the engine whenever you leave or are not using your mower or before crossing driveways walks roads and any gravel covered areas Never direct discharge of matedal toward bystanders nor allow anyone near the mower while you are operating it Before cleaning inspecting or repairing your mower stop the engine and make absolutely sure the ...

Страница 3: ...arest Sears store for details CUSTOMER RESPONSIBILITIES Read and observe the safety rules o Follow a regular schedule in maintaining caring for and using your lawn mower Follow the instructionsunder Customer Responsibilities and Storage sections of this owner s manual l ij 11 IIII LIMITED TWO YEAR WARRANTY ON CRAFTSMAN POWER MOWER For two years from date of purchase when this Craftsman Lawn Mower ...

Страница 4: ...cement t0 Drive Wheels t0 Engine 11 Lubrication 11 Spark Plug 1 Cutting Levels 7 E Engine Air Filter 11 Oil Change 11 Oil Level 11 Oil Type 11 Starting 8 Stopping 8 Sto rage 15 H Handle Adjustment Assembly 5 Cutting Height 7 L Lubrication Engine 11 Lawn Mower 9 M Maintenance Agreement 3 Maintenance Schedule 9 Mowing Tips 8 Oil O Engine 11 Storage 15 Operation Drive Control 7 Engine Control 7 Grass...

Страница 5: ...rrect tools as necessary to ensure proper tightness All parts such as nuts washers bolts etc necessary to complete the assembly have been placed in the parts bag TO REMOVE LAWN MOWER FROM CARTON Remove loose parts included with mower Cut down two end corners of carton and lay end panel down flat Remove all packing materials except padding between upper and lower handle and padding holding operator...

Страница 6: ...ars rotary walk behind power lawn mowers conform to the safety standards of the American National Standards Institute and the U SoConsumer Product Safety Commission The blade turns when the engine is running OPERATOR PRESENCE CONTROL must be held down to the handle to start the engine Release to stop the engine STARTER HANDLE used for starting the engine DRIVE CONTROL LEVER used to engage power pr...

Страница 7: ...rol bar slightly until the drive control disengages Hold operator presence control bar down to handle to con tinue mowing withoutself propelling To keep drive control engaged when turning corners push down on handle and lift front wheels off ground while turning lawn mower TO ADJUST CUTTING HEIGHT See Fig 5 Raise wheels for lowcut and lower wheels for high cut Wheels are set in low cut for shippin...

Страница 8: ...ving clumps of grass clippings For extremely heavy cutting reduce the width of cut by overlapping previously cut path and mow slowly_ For better grass bagging and most cutting conditions the engine speed shouldbe set inthe fast _ position For side discharge lawn mowers cutting in a counter clockwise direction starting at the outside of the area to be cut spreads grass clippings more evenly and put...

Страница 9: ...er as instructed in this manual Some adjustments will need to be made periodically to properly maintain your unit All adjustments in the Service and Adjustments section of this manual should be checked at least once each season Once a year replace the spark plug clean or replace air filter element and check blade forwearo Anewspark plug and clean new air filter element assures proper air fuel mixt...

Страница 10: ... balanced_ An unbalanced blade will cause eventual damage to lawn mower or engine_ The blade can be sharpened with a file or on a grinding wheel Do not attempt to sharpen while on the mower To check blade balance drive a nail into a beam or wall Leave about one inch of the straight nail exposed Place center hole of blade over the head of the nail If blade is balanced it should remain in a horizont...

Страница 11: ...d by using a dirty air filter Replace the air filter every year more often if you mow in very dusty dirty conditions TO SERVICE AIR FILTER See Fig 1 Loosen screw and tilt cover as shown Carefully remove cartridge Clean by tapping gently on a flat surfacer If very dirty replace cartddge CAUTION Petroleum solvents such as kerosene are not to be used to clean cartridge They may cause deteriora tion o...

Страница 12: ...gof your lawn mower is providedto prevent the possibilityof injury resulting from objects being thrown out of the dis charge opening into the operator mowing position if the dischargeguard becomes damaged it shouldbe replaced_ TO REMOVE REPLACE DRIVE BELT See Fig 12 o Remove drive cover_ Remove belt by pushing down on gear case puUey _ Turn lawn mower on its side with carburetor and fuel cap upo R...

Страница 13: ...s See Fig_ 15 Turn the handle over and reassemble the hairpin cotters that have been removed Reassemble the starter rope guide Reassemble the controls and the operator presence control bar to the upper handle CAUTION The operator presence con _ trol bar must pivot freely to permit blade brake engagement when control bar is released Do not overtighten the fas teners holding the controls to the up p...

Страница 14: ...adadjusting screw It was pre set at the factory FINAL ADJUSTMENT Place engine speed control lever in IDLE or SLOW _ position Adjust idle RPM by turning idle speed adjusting screw to obtain 1700 RPM Next tum idle mixture screw in clockwise lean mixture until engine just starts to slow_ Then turn idle mixture screw out counter clockwise rich TOP NO LOAD IDLE SPEED ADJUSTING SCREW IDLE MIXTURE SCREW ...

Страница 15: ...TURE WHICH LEADS TO SEPARATION AND FORMATION OF ACIDS DURING STORAGE ACIDIC GAS CAN DAMAGE THE FUEL SYSTEM OF AN ENGINE WHILE IN STORAGE_ o Drain the fuel tank o Start the engine and tel it run until the fuei lines and carburetor are empty Never use engine or carburetor cleaner products in the fuel tank or permanent damage may occur Use fresh fuel next season NOTE Fuel stabilizer is an acceptable ...

Страница 16: ...REPAIR PARTS CRAFTSMAN 22 ROTARY LAWN MOWER MODEL NO 917 378571 o_ 25 26 19 16 31 35 62 39 4o 36 42 45 26 _ 39 38 4O 4 5C 1 52 56 51 52 53 _ ...

Страница 17: ...ng Locknut Support Bracket Left Support Bracket Right Hex Head Bolt 3 8 16 x 3 4 Wheel Adjusting Bracket Spacer Selector Spring Selector Knob Axle Arm Assembly Rear Spring Washer H W 42 142748 43 88017 44 57143 45 83923 46 107339X 47 59289 48 55187 49 STD541425 50 851201X004 5t 134612 52 850998 53 851084 54 850263 55 851074 56 700973 57 851514 59 700869X479 60 751772X479 62 48324 63 84596 64 87677...

Страница 18: ...REPAIR PARTS CRAFTSMAN 22 ROTARY LAWN MOWER MODEL NO 917 378571 Co 26 24 27 26 Z6_ v 28 i ...

Страница 19: ...elt 35 48323 Hex Washer Head Screw 10 24 x 1 2 36 132010 Clip Guide Housing 37 137052 Carnage Bolt 1 4 20 x 2 39 75192 Locknut 10 24 40 850848 Felt Washer 41 137090 Washer 1 2 x 1 1 2 x 134 42 702511 Selector Knob 43 751809 Dust Cover 44 751810 Pinion 45 86012 E Ring 46 851552 Wheel Tire Assembly Wheel Bushing Flat Washer Retainer Clip Hubcap Drive Cover Decal Pan Head Tapping Screw 10 24 x 2 3 4 ...

Страница 20: ...0 x 1 1 4 Engagement Bracket Shifter Seat Grooved Pin 1 8 x 5 8 Gear Case Halves Kit Includes Key Nos 4 5 and 7 earing orm Shaft Drive Shaft Hardened Washer Clutch Yoke Bushing KEY PART NO NO DESCRIPTION 13 86447 Plug 14 137050 Helical Gear 15 750436X Clutch Jaw 16 750369 Grease 17 12000003 E Ring 18 850848 Hi Pro Key 19 81585X004 Spring Bracket NOTE To reseal housing halves use Locktite No_ 515 P...

Страница 21: ...BRIGGS STRATTON 4 CYCLE ENGINE MODEL NO 128802 TYPE NO 1519 23 J f634 124 127 r l 1 I _ _ 134 H 137 116 _ 21 ...

Страница 22: ...IGGS STRATTON 4 CYCLE ENGINE 27O _ 592 54 625 52 _615 _40 230 34 572 _ _ 307 24 3 306 15 MODEL NO 128802 TYPE NO 1519 23 1 20 22 a42__ k REQUIRES SPECIAL TOOLS TO INSTALL SEE REPAIR INSTRUCTION MANUAL 22 ...

Страница 23: ...BRIGGS STRATTON 4 CYCLE ENGINE MODEL NO 128802 TYPE NO 1519 23 842 _ 524 0 116 Q 634 617 977 CARBURETOR GASKET SET _J_ 883 104 I__ __ 134 _ 127 116 0 617 634 I i21CAReU ETOR KI_ 334 _188A 23 ...

Страница 24: ...BRIGGS STRATTON 4 CYCLE ENGINE MODEL NO 128802 TYPE NO 1519 23 949 304 363 57 L illl illl t 69 456 51s 69A 461 _332 455 23 24 ...

Страница 25: ...ston 005 Oversize Rod Connecting Rod Connecting 020 Undersize Screw Connecting Rod Valve Exhaust Valve Intake Spring Valve Retainer Valve Spring Tappet Valve Gear Cam KEY PART NO NO DESCRIPTION 47 493737 Slinger Oil 52 272199 Gasket Intake Elbow 54 94526 Screw Hex Head 55 492831 Housing Rewind Starter 56 493824 Pulley Rewind Starter 57 262594 Spring Rewind Starter 58 280399 Rope Rewind Starter Cut...

Страница 26: ... Screw Sems 92987 Nut Hex Screw Hex Head Fastener Crank Governor Seal Intake Elbow Bracket Carburetor Switch Stop Tube Fuel intake KEY PART NO NO DESCRIPTION 634 Washer Shaft Sold in Kit Only 635 66538 Elbow Spark Plug 670 280512 Spacer Fuel Tank 670A 493823 Spacer Bracket 741 262598 Gear Timing 842 280966 Seal O Ring 843 272616 Sleeve Lever 847 495263 Tube Assembly Oil 851 493880 Terminal Ignitio...

Страница 27: ...s is too high or wheel height is too lowo 2 Rear of lawn mower housing blade dragging ngrass 3 Grass catcher too fuff 4 Handle height position not right for you CORRECTION 1 Clean replace air filter 2 FH fuel tank 3 Drain tank and refill with fresh clean fuel 4 Drain fuel tank and carburetorand refiil tank with fresh gasoline 5 Connect wire to plug 6 Replace spark plug 7 Tighten blade bolt or repl...

Страница 28: ...nd on a decal attached to the rear of the lawn mower housing The model number for your engine will be found on the blower housingof the engine AU parts listed herein may be ordered from any Sears Roebuck and Co Service Center Department and most Retail Stores WHEN ORDERING REPAIR PARTS ALWAYS GIVE THE FOLLOWING INFORMATION PRODUCT LAWN MOWER MODEL NUMBER 917 378571 ENGINE MODEL NO 128802 TYPE NO 1...

Страница 29: ...O Convertible Montaje Operaci6n Responsabilidades del Cliente Servicio Ajustes Partes de Repuesto Precaucibn Lea y siga todas ias reglas e intrucciones de seguridad antes de operar este equipo 145946 08 11 94 IMPRESO EN LOS ESTADOS UN1DOS ...

Страница 30: ...n rode memento Siempre pare el motor cuando se vaya o cuando no est_ usando su segadora o antes de atravesar las entradas para autos los senderos caminos y _reas cubiertas de ripio Nunca dirija la descarga del material hacia los espectadores ni permita a nadie cerca de la segadora mientras la est_ operando Antes de limpiar inspeccionar o de reparar la segadora pare el motor y est_ completamente se...

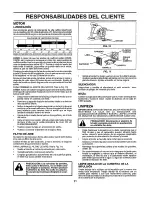
Страница 31: ...tenimiento Sears P6ngase en contactocon sutienda Sears mdscercana para informarse sobre los detalles RESPONSABILIDADES DEL CLIENTE Lea y observe las reglas de seguddad Siga un programa regular de mantenimiento cuidado y uso de su segadorao Siga las instrucciones descritas en las secciones Responsabilidades del Cliente y Almacenamiento de este Manual del DueSo_ GARANTfA LIMITADA DE DOS ANOS PARA LA...

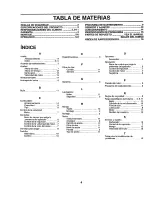
Страница 32: ...7 Control de la velocidad dot motor 7 Control de la zona del motor 7 Consejos para segar 8 Cuchilla Af lamiento I0 Cambio 10 E Especificaciones 3 F Filtro de Alto Cambio 11 Servicio 11 G Garanfla 3 L Lubricacidn Motor 11 Segadora 9 M Mango Ajuste 12 Montaje 5 Montaje 5 Motor Almacenamiento 14 Arranque 8 Cambio de aceite 11 Fil ro de aire 11 Nivel de aceite 11 Parada 8 Tipo de aceite 11 O Opciones ...

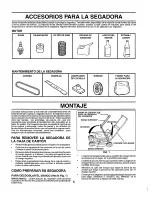
Страница 33: ...r que se aprieten adecuadamente PARA REMOVER LA SEGADORA DE LA CAJA DE CARTON Remueva laspartes sueltas que se incluyencon lasegadora Code las dos esquinas de los extremes de la caja de cart6n y tienda el panel del extreme piano Remueva todo e material de empaque excepto la cuba entre el mango superior y _l inferior y la curia que sujeta Ia barra de los control que exige la presencia del operador ...

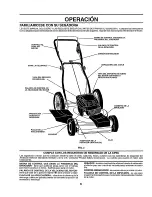
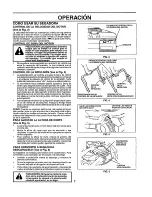
Страница 34: ...e se conducen desde la parte de atr_s rotatodas Sears cumplen con los estdndares de seguridad de American Nat onal Standards Institute y de la U So Consumer Product Safety Commission La cuchilla gira cuando el motor est func onando 11 illll i ill i ilJlllllllll i ill i ll ll ll i BARRA DE CONTROL QUE EXIGE LA PRESENCIA DEL OPERADOR tiene que sujetarse abajo junto con el mango para hacer arrancar e...

Страница 35: ...uelta en las esquinas empuja el mango hacia abajo y tevante las ruedas delanteras fuera del suelo al girar la segadora AV1SO Cuando su segadora est nueva las ruedas de impul si6n pueden rotar sin qua el control de la impulsi6n est _engan chado cuando las ruedas se levantan del suelo Esto es normal y debe parar despu_s de unas pocas horas despu_s det comien zo de la operaci6n PARA AJUSTAR LA ALTURA...

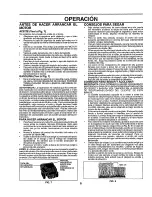
Страница 36: ...MULAClON DE CESPED Y BASURA VEA LIMPIEZA EN LA SECClON DE RESPONSABILIDADES DEL CLIENTE DE ESTE MANUAL guardado pot un peri odode 30 d as o m_s Vacfe el estanque del combustible haga arrancar el motor y h galo funcionar hasta que lasIfneas del combustible y el carburador queden vacfos La pr6xima temporada use combustible nuevo Vea las Instruccto nes Para EI Nmacenamiento para m_s informaci6n_Nunca...

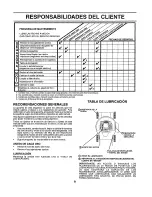
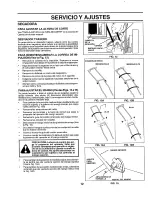
Страница 37: ...a garantfa el operador tiene que mantener la segadora seg0 n las instruccionesdescritas en este manual Hay algunos ajustes que se tienen que hacer en forms peri6dica pars poder mantener su untdad adecuadamente Todos los ajustes en la secci6n de Servicio y Aiustes de este manual tienen que set revisados pot Io menos un vez por eada temporada Una vez al afio cambie la bujfa limpte oeambie el element...

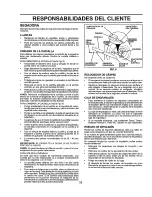
Страница 38: ...na cuchilla que no estd balanceada va a producir eventualmente da_o en la segadora o en el motor o La cuchilla puede afflarse con una lima o en una rueda rectificadora No trate de afilarla mienhas se encuentra an la segadora Para reviser el balance de la cuchil a clave un clave en una viga o en la pared Deje alrededor de una pulgada deun clave recto expuesto Ponga el agujero central de la cuchilla...

Страница 39: ...ciones muy potvorosas o suc as PARA LIMPIAR EL FILTRO DE AIRE Yea la Fig 11 Suelte el torniilo e incline la cubierta para removerloo Cuidadosamente remueva el cartucho Lfmpielo golpe_ ndolo suavemente en una superlicie plana Si est_ muy sucio cambie el cartucho PRECAUCI6N Los soiventes de petr61eo tales come el kerosene no se deben usar para limpiar el cartucho Pueden producir el deterioro de _ste...

Страница 40: ...Para cambiar de la posici6n mediana baja a mediana alta tas secci6n superior y la inferior del mango tendrdn que darse vuelta Vea la Fig 13B Remueva las abrazaderas del cable Remueva los controlesy la barra de control que exige la presencia del operador det mango superior Remueva la gufa del cord6n arrancador del mango inferior Remueva las clavijas de horquilla Desconecte el mango inferiorde los p...

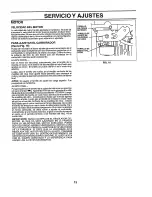
Страница 41: ...ontrolde la velocidad dal motor en posici6n en vacJoolento m Ajuste las RPM en vac ogirando el tornillo de ajuste de lavelocidad envaclo para obtener t700 RPM Luego gire el tornillode mezcla en vac o hacia adentro en el senttdode las manillas de reloj mezcla pobre hasta que el motor apenas arranque a lento Luego gire el tomil o de mezcla en vac o hacia afuera en el sentido contrario de las manilla...

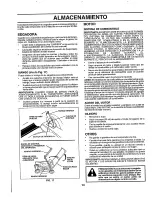
Страница 42: ...LM_ACENAMIENTO LA GASOLINA AClDiCA PUEDE DANAR EL S1STEMA DE COMBUSTIBLE DE UN MOTOR DURANTE EL PERIODO DE ALMACENAMIENTO Drene el estanque de combustible Haga arTancar el motor y d_jeio funcionar hasta que ias l heMSdef combustibley el carburador est6n vac os Nunca use los productos para limpieza del carburador odel motor en el eslanque de combuslible pues se pueden producir daSos permanentes Use...

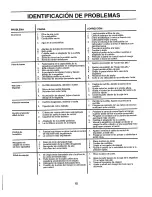
Страница 43: ...n de la altura del mango no adecuada para usled CORRECCION Limpie cambie el fi tro de aim Liana el estanque de combustibfe 3 Drene el estanque y vuelva a Itenado con combustible limpio y nuevo 4 Drene el estanque de combuslible y el carburador y vuefva a Ilenar el estanque con gasolina nuevao 5o Conecte el alambre a ta bujfao 6o Cambie la bujfa_ 7 Apriete et perno de la cuchilla o cambie el adapta...

Страница 44: ...te trasera de la caja de la segadora El nl3mero del modelo de su motor se encuentra en la caja det ventilador del motor Partes de repuesto se pueden ordenar a trav6s de cualquiera de los Centros Departamentos de Servicio de Sears Roebuck and Cm yen la mayor a de sus tiendas CUANDO ORDENE PARTES DE REPUESTO SIEMPRE DE LA INFORMACI _N SIGUIENTE PRODUCTO SEGADORA o NL_MERODEL MODELO 917 378571 MODELO...

Отзывы: