background image

Содержание 320.17542

Страница 1: ...stand and follow all Safety Rules and Operating Instructions in this Manual before using this product Sears Roebuck and Co Hoffman Estates IL 60179 U S A Visit our Craftsman website www craftsman com WARRANTY o SAFETY o UNPACKING o DESCRIPTION o ASSEMBLY o OPERATION o ADJUSTMENTS o MAINTENANCE ...

Страница 2: ... UNITED STATES FOR FREE REPLACEMENT This warranty does not include expendable parts such as lamps batteries bits or blades If this Craftsman product is used for commercial or rental purposes this warranty applies for only 90 days from the date of purchase This warranty gives you specific legal rights and you may also have other rights which vary from state to state Sears Roebuck and Co Hoffman Est...

Страница 3: ...re to obey this safety warning CAN result in death or z_WARN_NG i serious injury to yourself or to others Always follow the safety precautions to reduce the risk of fire electric shock and personal injury Failure to obey this safety warning MAY result in personal CAUTION injury to yourself or others or property damage Always follow the safety precautions to reduce the risk of fire electric shock a...

Страница 4: ...fluence of drugs alcohol or medication A moment of inattention while operating power tools may result in serious personal injury_ 4 DRESS properly DO NOT wear loose clothing or jewelry Pull back long hair Keep your hair clothing and gloves away from moving parts_ Loose clothing or long hair can be caught in moving parts Air vents often cover moving parts and should also be avoided AVOID accidental...

Страница 5: ... hands of untrained users 7 MAINTAIN tools with care Keep cutting tools sharp and clean Properly maintained tools with sharp cutting edges are less likely to bind and are easier to control 8 CHECK for misalignment or binding of moving parts breakage of parts and any other condition that may affect the tool s operation tf damaged have the tool serviced before using Many accidents are caused by poor...

Страница 6: ...overheating of tool For this tool an AWG American Wire Gauge size of at least 14 gauge is recommended for an extension cord of 25 fL or less in length Use 12 gauge for an extension cord of 50 fL Extension cords 100 ft or longer are not recommended Remember a smaller wire gauge size has greater capacity than a larger number 14 gauge wire has more capacity than 16 gauge wire 12 gauge wire has more c...

Страница 7: ... approved fixed base Failure to heed this warning could result in personal injury and damage to the motor 4 MAKE SURE the motor housing does not move up or down when clamped in the fixed base If motor is not securely clamped in base adjustments will not be accurate 54 DO NOT HAND HOLD THE ROUTER IN AN UPSIDE DOWN OR HORIZONTAL POSITION The motor can separate from the base if not properly attached ...

Страница 8: ...esult in serious personal injury If using a router table large bits 22 23 24_ 25 26 27 28 29 30 should be used for edging only BE SURE CUTTER BIT is centered in template guide applications to avoid DO NOT REMOVE more than 1 8 inch template guide sold separately prior to personal injury or damage to finished work in a single pass Excessive depth of cut can result in loss of control that could resul...

Страница 9: ...ury Always use NIOSHIOSHA approved respiratory protection appropriate for the dust exposure Direct particles away from face and body ADDITIONAL RULES FOR SAFE OPERATION z_ WARNBNG BE SURE to read and understand all instructions Failure to follow all instructions listed below may result in electric shock fire and or serious personal injury 1 Know your power tool Read this operator s manual carefull...

Страница 10: ...accidental starting which could cause serious personal injury 1 The Edge Guide is screwed down with a wing nut into the top of the storage carrying case 2 The Sawdust Extraction Hood is secured in the top of the case with hook and loop strap_ 3 The Parts Bag is tucked inside the sawdust hood s extraction chute Open the Parts Bag to locate the following 2 Screws used to attach hood to base o 1 4 in...

Страница 11: ...of the operating features and safety requirements our fixed base router has a precision built electric motor and it should only be connected to a 120 volt 60 Hz AC ONLY power supply normal household current _ DO NOT operate on direct current DC This large voltage drop will cause a loss of power and the motor will overheaL If the router does not operate when plugged into a correct 120 volt 60 Hz AC...

Страница 12: ...rovide high visibility of bit and workpieceo 9 Durable Non Marring Sub Base glides smoothly over workpiece Sub base has cutter bit opening of 1 4 inch Do Not Use a bit with a cutter diameter larger than 11 4 in as it will not pass through the sub base openingF 10 Base constructed of Die cast aluminum to provide durabiJity and stability tl Motor housing constructed of High Density Nylon and Precisi...

Страница 13: ... Grip Spindle Lock Self Releasing Coltets Nuts System 1 4 and 1 2 inch CoHets Nuts 1 4qn installed at factory On Off Toggle Switch Motor Housin Clear Plastic Chip Shield Non Marring Sub Base Replaceable Brushes sold eparateiy Engages Motor Housing Coarse Adjustment Dia Depth Indicator Ring uick lamp Motor hanging stem Edge locking knob Guide Mounting Slot St Extraction Hood e Guide g Knob Edge Gui...

Страница 14: ...er cutter bits that have a cutter bit diameter larger than 1 _14 inches as they will not fit through the sub base opening and will cause damage to the sub base the motor and could cause serious personal injury to the operator NOTE The sub base installed on this router has an opening of 1ll4 inches To use cutting bits with a larger diameter use a sub base with a larger opening sold separately at Se...

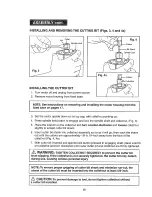
Страница 15: ...r bit shank into collet nut assembly as far as it will go then back the shank out until the cutters are approximately 1 8 to 1 4 inch away from the face of the colletinut Fig 4 4a 7 With cutter bit inserted and spindle lock button pressed in engaging shaft place wrench on collet nut and turn clockwise until router cutter bit and Collet nut are firmly tightened _ WARNING TIGHTEN COLLET NUT SECURELY...

Страница 16: ... immediately NOTE The collet nut is self releasing it is NOT necessary to strike the collet nut to free the router cutter bit If cutter bit seems stuck after use loosen collet nut a little more until it releases CUTTER BiTS Get faster more accurate cutting results by keeping cutter bits clean and sharp Remove all accumulated pitch and gum from cutter bits after each use When sharpening cutter bits...

Страница 17: ... adjustment knob is pressed in 7_ After all adjustments are made close the motor clamp securely Fig_ 5 REMOVING MOTOR FROM BASE see Fig 5 1_ Turn motor off and unplug from power source 2 Place router fixed base motor housing on flat surface 3 With back of router facing you open the motor clamp A 4 Push in coarse adjustment knob B to release motor housing keystrip C from gear in base while you lift...

Страница 18: ... quickly lower or raise the cutter bit to a larger or approximate depth setting Micro Adjustments NOTE Be sure the worm gear system is engaged before making fine adjustments Test it by turning the Fine Adjustment Dial C clockwise and counter clockwise to see if the bit lowers and raises If it does not press in the Coarse Adjustment Knob and turn the Fine Adjustment Dial until the gears engage then...

Страница 19: ... 0 mark on Depth Indicator Ring D is lined up with the r mark on base Release the Coarse Adjustment Knob making sure the 0 stays lined up with the mark Place the router on two level scrap workpieces positioned so the cutter bit can be lowered below the subbase see Fig 8 Turn the Fine Adjustment Dial C clockwise to lower the bit to the desired depth of cuL Turn the dial counterclockwise to raise th...

Страница 20: ...our router motor is turned ON and OFF by the toggle switch located on the top cap of the motor housing The left side of the toggle switch hood as you face it is marked 1 for On and the right side as you face it is marked O for Off TO TURN THE MOTOR ON Push the toggle switch to the left side marked 1 or On TO TURN THE MOTOR OFF Push the toggle switch to the right side marked O or Off Always hold th...

Страница 21: ...ers the motor housing This green light is always on when router motor is plugged into power source HEAVY DUTY EDGE GUIDE Fig 10 Your Fixed Base Router comes with a Heavy Duty Edge Guide This edge guide can be used as an aid in routing applications such as decorative edging straight edge planning and trimming grooving dadoing and slotting To assemble onto fixed or plunge bases simply insert edge gu...

Страница 22: ...l hardwoods larger diameter cutter bits 4 18 000 Softwoods plastics counter 5 20 000 tops smaller diamete cutter bits 6 25_000 The speed charts above indicate the relationship between speed settings and the cutting application Exact settings are determined by operator experience and preference and also by recommendations by manufacturers of cutter bits ELECTRONIC FEEDBACK CIRCUITRY The router s el...

Страница 23: ... control your router has two handles one on each side of the router base When operating the router always hold it firmly with both hands see Fig 11 _ Turn the router On let the motor build to its full speed then gradually feed the cutter bit into the workpiece_ ALWAYS be alert and watch what you are doing NEVER operate the router when you are fatigued EDGE ROUTING Fig 11 With depth of cut set plac...

Страница 24: ...ity cuts INTERNAL ROUTING Figs 12 12a 12b and 13 1o With depth of cut set tilt router and place on workpiece with leading edge of sub base contacting workpiece first Fig t2 2 Turn motor On and let motor build up to its full speed being careful not to let cutter bit contact workpiece 3_ To begin your cut gradually feed the cutter bit into the workpiece until the subbase is level with the workpiece ...

Страница 25: ...orkpiece 2 Choose the appropriate bit 3_ Rout the pattern in two or more passes Do not exceed 1 8 in depth of cut in a single pass This will help provide better control as well as serve as a guide on the next passes Fig 14 NOTE A core box or V groove bit is often used for routing letters and engraving objects Straight bits and ball mills are often used to make relief carvings Veining bits are used...

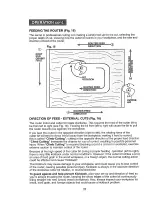
Страница 26: ...de board must have exactly the same contour straight or curved as the workpiece edge if it is positioned so that its edge is flush with the workpiece edge the bit will make a full cut in as far as the bit radius On the other hand if the guide is positioned as shown in Fig_ 15a out from the workpiece edge the bit will make less than a full cut which will alter the shape of the finished edge NOTE Th...

Страница 27: ...rection Climb Cutting increases the chance for loss of control resulting in possible personal injury When Climb Cutting is required backing around a corner for example exercise extreme caution to maintain control of the router Because of the high speed of the cutter bit during a proper feeding operation left to right there is very little kickback under normal conditions However if the cutter bit s...

Страница 28: ...en making this type of cut around curves When the guide is positioned as shown in Fig 17a the router travel should be from left to right and clockwise around curves If there is a choice the set up in Fig 17 is easier to use but there is the possibility of Climb Cutting around curves In either case Fig 7 or Fig 17a the sideways thrust of the router cutting is always against the guide as is proper F...

Страница 29: ... become so stow and the bites become so large that chips become partially cut off causing splintering and gouging of the workpiece The router will make clean smooth cuts if allowed to run freely without the overload of forced feeding You can detect forced feeding by the sound of the motor Its usual high pitched whine will sound lower and stronger as it loses speed Holding the router against the wo...

Страница 30: ...hips thrown from the bit j CAUTION ALWAYS have the chip shield deflector in place on the base when operating the router WARNING ALWAYS turn motor off and unplug router from power source before making any adjustments or installing accessories Failure to turn motor off and unplug router could result in accidental starting which can cause serious personal injury DUST COLLECTION WITH DUST EXTRACTION H...

Страница 31: ...ng compound or plaster During any use on these materials it is extremely important that the tool is cleaned frequently by blowing with an air jet WARNING Always wear safety goggles or safety glasses with side shields during power tool operations or when blowing dust If operation is dusty also wear a dust mask ROUTINE MAINTENANCE iX WARNING DO NOT at any time let brake fluids gasoline petroleum bas...

Страница 32: ...t This will avoid a break in period 4 Insert new brush assemblies into guide channels with the carbon part going in first being certain to fit the two metal ears into their slots in the channel Fig 2I 5 Remember to replace both end caps after inspecting or servicing brushes Tighten the caps snugly but do not over tighten The router should be allowed to RUN IN run at no load without a cutter bit fo...

Страница 33: ... Steel or Carbide Tipped High Speed Steel for all your routing needs shown to the right is an example of bits available I 8 in r 3 8 in r 1 4 in r straight _ s t 0h straight 5 16 in j _ 1 2_ n 3 4 in straight II straight straight 3 8 in dove tail 1 2 in dove tail i 1 2 in round nose 1 2 in 90 d v groove 1 2 x l in _ 3 8xli2 in flush trim flush trim 1 in 1 4 in flush trim _ ush trim 3 8 in _keyhole...

Страница 34: ...16 in classic cove with bead bead cove _ classic cove bead I 4 in roman ogee 3 3 8 in rabbeting _z4 inl vdi n_ng 1 2 in core box 1 2 in mortising Roman ogee rabbeting veining core box mortising 114 in panel pilot panel pilot 1 a 8 in 45 chamfer chamfer z_ WARNING Only use router tables with proper guarding for the cutter bit and with on board switch controlled receptacles Failure to use router tab...

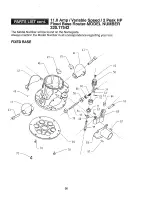
Страница 35: ... Base Router MODEL NUMBER 320 17542 The Model Number will be found on the Nameplate Always mention the Model Number in all correspondence regarding your tool Motor Unit 2 ____ 1 _ 2 r_ 4I iJ i t 11 tt J i t J t iI I I i t tI S _ j _6 27 N 30 ...

Страница 36: ...abne Speed 2 Peak HP Fixed Base Router MODEL NUMBER 320 17542 The Model Number will be found on the Nameplate Always mention the Model Number in all correspondence regarding your tool FIXED BASE 45 45 59 58 60 63 36 ...

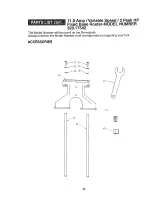
Страница 37: ...Variable Speed 2 Peak HP FRxedBase Router MODEL NUMBER 320 17542 The Model Number witl be found on the Nameplate_ Always mention the Model Number in all correspondence regarding your tool ACCESSORIES 77 o 72_ 37 ...

Страница 38: ...2 5620017000 Screw 2 13 4870073000 Switch 1 31205370 0 0 iii i ilBrush cap 2 15 4960019000 Carbon Brush 2 16 2800005000 Brush Holder 2 17 4810002000 Power Cord 18 3121050000 Cord Guard j 1 19 3121494000 Middle Housing 1 20 3520130000 Bearing Holder 21 3 21049000 Gasket 1 22 3700249000 Gasket 1 23 5610048000 Screw 2 24 2740116000 Stato r 1 25 31214 95000 Fan Baffle 1 26 5700008000 Bearing 1 27 2750...

Страница 39: ...00 I 3121539000 3121647000 3550615000 5650172000 3550613000 Adj ust_ n g Koo_ i Rubber Pole indicator Ring Worm i_iate Shaft 1 1 1 1 1 1 56 57 58 59 6O 61 62 3121648000 3550579000 3520141000 3520147000 3660167000 3700848000 5620065000 Button Gear Shaft Gear Lock Gear Spring Plate Screw I 1 1 1 1 t 1 1 63 64 65 562O332000 3550596000 3420395000 Lock Nut Screw Vaccum Adapter Mounting Plate iii i i i ...

Страница 40: ... water heaters 1 800 4 1VIY HOrvIE Anytime day or night I 800 469 4663 USA and Canada www sears com w _v searsoc a Our Home For repair of carry in products like vacuums lawn equipment and electronics call or go on line for the nearest Sears Parts and Repair Center 1 800 488 1222 Anytime day or night USA only www sears corn SearsBrands LLC _i_Registered Trademark TM Trademark m Service Mark of Sear...

Отзывы: