background image

2

TABLE OF CONTENTS

© Sears Brands, LLC

WARRANTY STATEMENT

MODEL NUMBER

PRODUCT SPECIFICATIONS

Warranty Statement  .  .  .  .  .  .  .  .  .  .  .  .  .  .  .  .  .  .  .  .  .  .  .  .  .  .  .  .  .  .page 2
Safety Instructions   .  .  .  .  .  .  .  .  .  .  .  .  .  .  .  .  .  .  .  .  .  .  .  .  .  .  .  .  .  .  .page 3
Assembly   .  .  .  .  .  .  .  .  .  .  .  .  .  .  .  .  .  .  .  .  .  .  .  .  .  .  .  .  .  .  .  .  .  .  .  .  .  .  .  .page 7
Operation    .  .  .  .  .  .  .  .  .  .  .  .  .  .  .  .  .  .  .  .  .  .  .  .  .  .  .  .  .  .  .  .  .  .  .  .  .  .page 11
Service and Maintenance    .  .  .  .  .  .  .  .  .  .  .  .  .  .  .  .  .  .  .  .  .  . page 15

Off-Season Storage  .  .  .  .  .  .  .  .  .  .  .  .  .  .  .  .  .  .  .  .  .  .  .  .  .  .  .  .  . page 20
Troubleshooting   .  .  .  .  .  .  .  .  .  .  .  .  .  .  .  .  .  .  .  .  .  .  .  .  .  .  .  .  .  .  . page 21
Repair Protection Agreement  .  .  .  .  .  .  .  .  .  .  .  .  .  .  .  .  .  .  . page 24
Español  .  .  .  .  .  .  .  .  .  .  .  .  .  .  .  .  .  .  .  .  .  .  .  .  .  .  .  .  .  .  .  .  .  .  .  .  .  .  .  . page 25
Contact Numbers   .  .  .  .  .  .  .  .  .  .  .  .  .  .  .  .  .  .  .  .  .  .  .  .  .  .  . Back Cover

Engine Oil:     

5W-30

Oil Capacity:     

20 ounces

Fuel: 


Unleaded Gasoline

Fuel Capacity:   

2 .3 quarts

Spark Plug:     

F6RTC (Sears Part #951-10292)

Spark Plug Gap:  

0 .020” to 0 .030”

Model Number  ________________________________
Serial Number  _________________________________
Date of Purchase  _______________________________

Record the model number, serial number, 

and date of purchase above .

CRAFTSMAN LIMITED WARRANTY

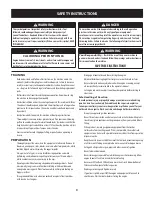
FOR TWO YEARS from the date of sale, this product is warranted against defects in material or workmanship. 
WITH PROOF OF SALE, a defective product will receive free repair or replacement at option of seller.
For warranty coverage details to obtain free repair or replacement, visit the web page:  www.craftsman.com/warranty 
This warranty covers ONLY defects in material and workmanship. Warranty coverage does NOT include:
• 

Expendable items that can wear out from normal use within the warranty period, including but not limited to augers, auger paddles, drift cutters, 
skid shoes, shave plate, shear pins, spark plug, air cleaner, belts, and oil filter. 

• 

Standard maintenance servicing, oil changes, or tune-ups.

• 

Tire replacement or repair caused by punctures from outside objects, such as nails, thorns, stumps, or glass. 

• 

Tire or wheel replacement or repair resulting from normal wear, accident, or improper operation or maintenance.

• 

Repairs necessary because of operator abuse, including but not limited to damage caused by over-speeding the engine, or from impacting objects 
that bend the frame, auger shaft, etc.

• 

Repairs necessary because of operator negligence, including but not limited to, electrical and mechanical damage caused by improper storage, 
failure to use the proper grade and amount of engine oil, or failure to maintain the equipment according to the instructions contained in the 
operator’s manual.

• 

Engine (fuel system) cleaning or repairs caused by fuel determined to be contaminated or oxidized (stale). In general, fuel should be used within 30 
days of its purchase date. 

• 

Normal deterioration and wear of the exterior finishes, or product label replacement.

This warranty is void if this product is ever used while providing commercial services or if rented to another person. 
This warranty gives you specific legal rights, and you may also have other rights which vary from state to state.

Sears Brands Management Corporation, Hoffman Estates, IL 60179

Содержание 247.881980

Страница 1: ...sit our website www craftsman com CAUTION Before using this product read this manual and follow all safety rules and operating instructions Operator s Manual SAFETY ASSEMBLY OPERATION MAINTENANCE ESPAÑOL Form No 769 10063A July 28 2015 22 SNOW THROWER Model No 247 881980 ...

Страница 2: ...including but not limited to augers auger paddles drift cutters skid shoes shave plate shear pins spark plug air cleaner belts and oil filter Standard maintenance servicing oil changes or tune ups Tire replacement or repair caused by punctures from outside objects such as nails thorns stumps or glass Tire or wheel replacement or repair resulting from normal wear accident or improper operation or m...

Страница 3: ...e Gasoline is extremely flammable and the vapors are explosive Serious personal injury can occur when gasoline is spilled on yourself or your clothes which can ignite Wash your skin and change clothes immediately Use only an approved gasoline container Never fill containers inside a vehicle or on a truck or trailer bed with a plastic liner Always place containers on the ground away from your vehic...

Страница 4: ... or collector openings Do not unclog chute assembly while engine is running Shut off engine and remain behind handles until all moving parts have stopped before unclogging Use only attachments and accessories approved by the manufacturer e g wheel weights tire chains cabs etc When starting engine pull cord slowly until resistance is felt then pull rapidly Rapid retraction of starter cord kickback ...

Страница 5: ...properly and not worn excessively Failure to do so can result in accidents injuries or death DO NOT MODIFY ENGINE To avoid serious injury or death do not modify engine in any way Tampering with the governor setting can lead to a runaway engine and cause it to operate at unsafe speeds Never tamper with factory setting of engine governor NOTICE REGARDING EMISSIONS Engines which are certified to comp...

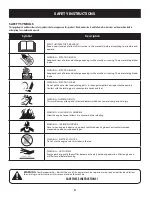
Страница 6: ...g parts in the auger impeller housing or chute assembly Contact with the rotating parts can amputate hands and feet WARNING THROWN OBJECTS This machine may pick up and throw and objects which can cause serious personal injury WARNING GASOLINE IS FLAMMABLE Allow the engine to cool at least two minutes before refueling WARNING CARBON MONOXIDE Never run an engine indoors or in a poorly ventilated are...

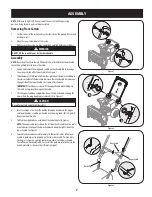
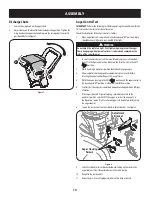
Страница 7: ...e of the lower handle See Figure 3 for reference IMPORTANT It will be necessary to lift the upper handle while sliding up this cable tie to prevent damage to the cable 3 Lift the upper handle up and position it over the lower handle aligning the holes where the wing knobs were removed A in Figure 2 CAUTION Be careful not to bend or kink the cables 4 Insert a carriage screw from the outside through...

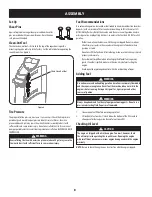
Страница 8: ...ting dirt dust or water in the fuel tank DO NOT use E85 gasoline Refuel in a well ventilated area with the engine stopped Do not smoke or allow flames or sparks in the area where the engine is refueled or where gasoline is stored Do not overfill the fuel tank After refueling make sure the tank cap is closed properly and securely Be careful not to spill fuel when refueling Spilled fuel or fuel vapo...

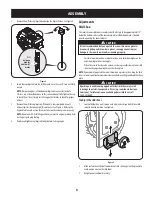
Страница 9: ...ve plate Adjust them downward if desired prior to operating the snow thrower CAUTION It is not recommended that you operate this snow thrower on gravel as it can easily pick up and throw loose gravel causing personal injury or damage to the snow thrower and surrounding property For close snow removal on a smooth surface raise skid shoes higher on the auger housing to lower shave plate When the are...

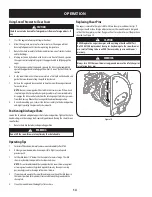
Страница 10: ...ration section Make sure the throttle is set in the FAST position 3 While standing in operator s position behind unit engage auger 4 Allow auger to remain engaged for approximately ten seconds before releasing the auger control Repeat this several times 5 With the engine running in the FAST position and the auger control in the disengaged UP position walk to the front of the machine 6 Confirm that...

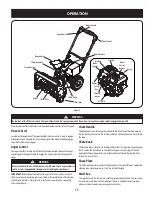
Страница 11: ...of the chute opening Use the chute handle to turn the chute assembly in the direction you wish to throw the snow Chute Knob The distance snow is thrown can be adjusted by either raising or lowering the upper chute Loosen the chute knob on the side of the upper chute to adjust Pivot the upper chute to desired position and retighten the chute knob Raising the chute throws the snow further Shave Plat...

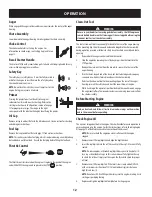
Страница 12: ...tead of a 1 4 turn cap as described in Step 2 In this instance do not fully tighten the cap to check the oil level Simply rest the cap on the threads to check for proper oil level 3 Remove the oil filler cap dipstick If the level is low slowly add oil 5W 30 with a minimum classification of SF SG until oil level registers between high H and low L NOTE Do not overfill Overfilling with oil may result...

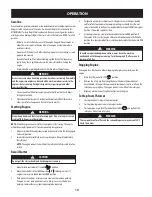
Страница 13: ...ttempttoturn thesafetykey NOTE The engine cannot start without the safety key fully inserted into the switch Recoil Starter CAUTION Do not pull the starter handle while the engine is running 1 Move throttle control to FAST rabbit position 2 Move choke control to the CHOKE position cold engine start If engine is warm place choke control in RUN position 3 Push primer three times making sure to cover...

Страница 14: ... and pivot upper chute to desired position Tighten the chute knob making sure the carriage bolt is correctly positioned Raising the chute throws snow further 1 Rotate chute handle to desired operating position WARNING Do not lift the snow thrower at any time by the chute handle Operating Tips 1 Formostefficientsnowremoval removesnowimmediatelyafteritfalls 2 Discharge snow downwind whenever possibl...

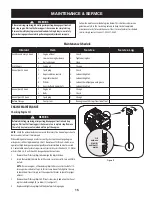
Страница 15: ...il filler cap dipstick If level is low slowly add oil until oil level registers between high H and low L See Figure 11 4 Replace and tighten cap dipstick firmly before starting engine Fill between high H and low L marks Figure 11 Maintenance Schedule Beforeservicing repairing lubricatingorinspecting disengageallcontrols andstopengine Waituntilallmovingpartshavecometoacompletestop Removethesafetyke...

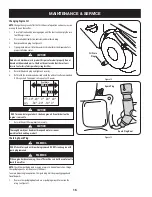
Страница 16: ...securely 6 Refill with the recommended oil and check the oil level See Recommended Oil Usage chart The engine s oil capacity is 20 ounces 30º 20º 10º 0º 0º 20º 40º 20º 5W 30 0W 30 40º Synthetic CAUTION DO NOT use non detergent oil or2 stroke engine oil It could shorten the engine s service life 7 Reinstall the oil filler cap dipstick securely CAUTION Thoroughly wash your hands with soapand water a...

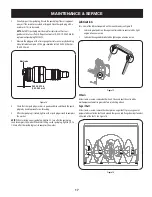
Страница 17: ...er the spark plug is seated tighten with a spark plug wrench to compress the washer NOTE When installing a new spark plug tighten 1 2 turn after the spark plug seats to compress the washer When reinstalling a used spark plug tighten 1 8 to 1 4 turn after the spark plug seats to compress the washer Lubrication For a view of the lubrication points on the snow thrower see Figure 15 1 Lubricate pivot ...

Страница 18: ...l skid shoes Tighten securely Adjusting Auger Cable Refer to page 10 of the Assembly section for instructions on adjusting the auger control cable Check Belts Follow instructions below to check condition of the belts every 50 hours of operation 1 Remove the plastic belt cover on the front of the engine by removing the self tapping screw shown in Figure 18 and pressing the plastic tabs to release t...

Страница 19: ...gure 20 Drive Belt IMPORTANT Because gas could leak from the carburetor when servicing auger belt run the engine until the fuel tank is empty as instructed in Replacing Belts 1 Tip the snow thrower up and forward so that it rests on the auger housing 2 Remove the spring that connects the transmission to a bolt on the engine frame See Figure 20 NOTE It may be easier to first remove the flange lock ...

Страница 20: ...n any areas that are susceptible to rust Store in a clean dry and well ventilated area away from any appliance that operates with a flame or pilot light such as a furnace water heater or clothes dryer Avoid any area with a spark producing electric motor or where power tools are operated WARNING Never store snow thrower with fuel in tank indoors or in poorly ventilated areas where fuel fumes may re...

Страница 21: ...ars Parts Repair Center Loss of power 1 Spark plug wire loose 2 Gas cap vent hole plugged 1 Connect and tighten spark plug wire 2 Remove ice and snow from gas cap Be certain vent hole is clear Unit fails to propel itself 1 Drive cable in need of adjustment 2 Drive belt loose or damaged 1 Adjust drive control cable Refer to Service and Maintenance section 2 Replace drive belt Refer to Service Maint...

Страница 22: ...uent purchaser that the outdoor equipment is 1 designed built and equipped so as to conform with all applicable regulations and 2 free from defects in materials and workmanship that cause the failure of a warranted part for a period of two years The warranty period begins on the date the outdoor equipment is delivered to an ultimate purchaser or first placed into service Subject to certain conditi...

Страница 23: ...he need for repair or replacement of the part That notwithstanding any adjustment of a component that has a factory installed and properly operating adjustment limiting device is still eligible for warranty coverage Further the coverage under this warranty extends only to parts that were present on the off road equipment purchased The following emission warranty parts are covered if applicable 1 F...

Страница 24: ...esolution phone support from a Sears representative Think of us as a talking owner s manual Once you purchase the Repair Protection Agreement a simple phone call is all that it takes for you to schedule service You can call anytime day or night or schedule a service appointment online The Repair Protection Agreement is a risk free purchase If you cancel for any reason during the product warranty p...

Отзывы: