background image

Act1 Electrofusion Welder 


06/06/2011 

www.ProcessPipes.co.uk 

Pg 2 


Index 


Operating Controls................................................................................3 
Safety Notes ..........................................................................................4 
Product Specification ............................................................................5 
Intended Use .........................................................................................6 
Introduction ..........................................................................................6 
Delivered Items .....................................................................................6 
Electrical Safety .....................................................................................7 
Using the Equipment.............................................................................8 
Manual Welding ....................................................................................9 
Extreme Low Temperature Operation ................................................10 
Set Up Options ....................................................................................11 
Information .........................................................................................12 
Fault Finding........................................................................................13 
Maintenance .......................................................................................16 
Disposal ...............................................................................................17 
Calibration and Warranty....................................................................17 
Declaration of Conformity...................................................................20 
Service and Repair...............................................................................21 
Quick Start Guide ................................................................................22 
Jointing Guide…………………………………………………………………………………23 

Содержание Act1

Страница 1: ...Act1 Electrofusion Welder ...

Страница 2: ...ended Use 6 Introduction 6 Delivered Items 6 Electrical Safety 7 Using the Equipment 8 Manual Welding 9 Extreme Low Temperature Operation 10 Set Up Options 11 Information 12 Fault Finding 13 Maintenance 16 Disposal 17 Calibration and Warranty 17 Declaration of Conformity 20 Service and Repair 21 Quick Start Guide 22 Jointing Guide 23 ...

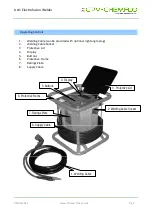
Страница 3: ...ing Cable can be provided with optional right angle plug 2 Welding Cable Socket 3 Protective Lid 4 Display 5 Buttons 6 Protective Frame 7 Ratings Plate 8 Supply Cable 1 Welding Cable 8 Supply Cable 6 Protective Frame 7 Ratings Plate 2 Welding Cable Socket 5 Buttons 4 Display 3 Protective Lid ...

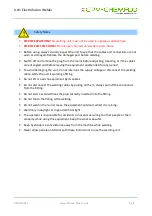
Страница 4: ...upt the supply voltage or disconnect the welding cable while the unit is welding a fitting Do not lift or pull the equipment by its cables Do not disconnect the welding cables by pulling on them always pull off the connectors from the fitting Do not start a weld without the pipe correctly inserted into the fitting Do not touch the fitting while welding Do not weld in the rain or leave the equipmen...

Страница 5: ...to 60 Hz Supply Current 2 1 to 30 A ac true rms Supply Power 2 3 500 W peak at 0 15 APF Supply Voltage 3 230 V ac 20 40 to 60 Hz Supply Current 3 1 to 15 A ac true rms Supply Power 3 3 500 W peak at 0 15 APF Supply Protection Class 1 Earthed Data log memory Not available Data download upload Not available Weight 28 kg Size 38 cm x 38 cm x 39 cm Protection Level IP65 1 An extended temperature unit ...

Страница 6: ...ribution networks This welding unit has been designed to comply with the International Organization for Standardization standard ISO12176 2 2000 Plastic pipes and fittings equipment for fusion jointing polyethylene systems part 2 electrofusion Introduction This manual gives instructions on the correct assembly and safe use of your welding unit It is important that you read these instructions caref...

Страница 7: ...ound from the reel to stop inductive heating effects The cable dimensions should be as follows 110 Volt operation 230 Volt operation Up to 63mm diameter Up to 63mm diameter 2 5mm2 cable 30m 1 5mm2 cable 40m Up to 180mm diameter Up to 180mm diameter 2 5mm2 cable 20m 1 5mm2 cable 25m Over 180mm diameter Over 180mm diameter 4 0mm2 cable 10m 2 5mm2 cable 20m It is recommended for increased electrical ...

Страница 8: ...d off along with some features like the cooling time This manual details all available modes and features For information on how to customise the welding unit see the Set Up section later on in this manual The welding unit is fitted with an alpha numeric keypad which is used by the operator to input data Down the right hand side there are four Quick Keys A B C D These act as quick shortcut keys th...

Страница 9: ...he new voltage When the correct time and voltage have been selected press the A Quick key to accept them The display will now ask for the START button to be pressed Press Start to begin welding During the weld the display will show the set welding time the remaining welding time the set welding voltage and the welding power generated in the fitting The unit will also monitor the welding to make su...

Страница 10: ...en the temperature inside the unit is below 15o C the following operation will apply Plug the welding unit into the correct supply voltage and switch it on The internal case heater will switch on and an indicator light will show on the lid next to the display When the internal temperature warms to the correct level the case heater will switch off the indicator light will switch off and the electro...

Страница 11: ...bration period can be set between 1 month and 99 months or turned off For 28 days prior to the calibration expiry date the unit will prompt that the calibration is due and will count down the remaining days When the calibration has expired it can be set to warn the operator or lock the unit Owner Details The owner details shown when the unit is first switched on can be entered or changed Download ...

Страница 12: ...nu Select more options and then enter the password A I N F followed by the A Quick Key The serial number and part number of the unit are shown The calibration date and calibration period are also shown Press the A Quick Key and the following weld counters are shown Total weld count weld count at last calibration welds done since last calibration ...

Страница 13: ...ngs Let the unit cool down and the fault will clear If this happens when the unit is cold then there could be a bad connection on one of the internal plugs In this case the unit will need to be returned for repair 4 No calibration This fault happens when the unit has no calibration This will normally not show and if the unit has been calibrated would be caused by a fault with the internal memory R...

Страница 14: ...d by a generator that is too small If a large fitting is welded then a large amount of power will be needed from the generator If it can not supply this power then it will stall and the voltage will drop away Check that the generator is the correct size if needs be try another generator It could be caused by the use of long extension leads If a large fitting is welded then a high current will be t...

Страница 15: ...and it must be returned for repair 24 Shorted turn detected in fitting While welding the unit has detected a sharp increase in welding current This is normally caused by a shorted turn happening in the fitting An increase OF 10 If this happens then it is most likely a faulty fitting This must be replaced If the fault persists then it could be a fault within the unit 25 User stop button pressed The...

Страница 16: ...onents and broken covers or housings There are no user serviceable parts inside the unit It should be returned to an approved service agent for repair and calibration It is recommended that the unit is calibrated every twelve months After use clean the outside of the unit with a soft brush or cloth Carefully wind up and store the cables around the frame in the location provided ...

Страница 17: ... Waste Electrical and Electronic Equipment WEEE when no longer suitable for use this equipment must be separately collected and sent for recycling According to the European Directive 2005 95 EC Restriction of Hazardous Substances RoHS this equipment does not contain more than the agreed levels of lead cadmium mercury hexavalent chromium polybrominated biphenyl PBB and polybrominated diphenyl ether...

Страница 18: ...of the product Operation outside the products specifications Improper site preparation or site maintenance Faulty pipe or fitting Extent of Warranty Subject to the conditions and limitations of warranty Advance Welding warrants that its electrical products will be free from defects in materials and workmanship for a period of twelve months and its mechanical products for six months from the date o...

Страница 19: ...duct this warranty statement shall be deemed modified by the minimum necessary to be consistent with such local law To the extent allowed by local law the remedies provided in this warranty statement are the customer s sole and exclusive remedies This equipment has been designed for use with the range of fittings and pipe available at the time of its design and development Advance Welding can acce...

Страница 20: ... harmonised standards under the New Approach directives and has been CE marked accordingly The applicable standards are 89 336 EEC Electromagnetic compatibility 73 23 EEC Low voltage equipment 98 37 EC Machinery safety More detailed information is available on our web site at www ElectrofusionWelding com On behalf of Advance Welding K M Wilkinson ...

Страница 21: ...chard Works Spen Vale Street Heckmondwike West Yorkshire WF16 0NQ United Kingdom Tel 0870 609 3257 Fax 0870 752 6139 Email sales advancewelding co uk Web www ElectrofusionWelding com For sales service and repair CPV LTD Woodington Mill East Wellow Romsey Hampshire SO51 6DQ 44 0 1794 322884 44 0 1794 322885 sales cpv co uk www cpv co uk ...

Страница 22: ...ect the supply cable to the correct voltage and switch it on The unit will power up and go to the main menu Press the A Quick key to select Manual welding Enter the required welding time Press the Start button The time will count down to zero as the fitting is being welded Any faults will be indicated on the display At the end of the weld disconnect the welding cable to reset the unit Press the St...

Страница 23: ... is shown and which can be hired from CPV Ltd It is vitally important that the correct procedures are followed when making an electrofusion joint and the following steps are mandatory for this process Step 1 Cleanliness Cleanliness and correct preparation are vital to a good installation The welding surfaces of the peeled pipe and electrofusion fitting must be kept clean dry and grease free After ...

Страница 24: ... peeling tool the pipe ends to the marked insertion depth It is vitally important that the pipe surface oxidised layer is removed otherwise good welding will not be achieved Also enough pipe material must be removed to allow the pipe to fit into the electrofusion coupler without having to use excessive force Step 3 Electrofusion Couplers Remove the electrofusion fitting from its PE bag Do not touc...

Страница 25: ...e of supplying the correct power and voltage 39 5v such as that hired out by CPV Ltd Switch the machine on and the screen will show a welcome message along with the software version and date Subsequent instructions are detailed in the Manual Welding Instructions on Page 7 Adjust fusion times as follows If ambient temperature is 30o C deduct 5 If ambient temperature is 20o C use fitting time If amb...

Страница 26: ... is to keep the welding surfaces of the pipe and electrofusion couplers spotlessly clean They must also be properly clamped and aligned to eliminate stress on the pre welded joint The appropriate use of tarpaulins and shelters must therefore be considered before starting the job and used whenever conditions dictate Health and Safety See the Health and Safety COSHH guidelines for polypropylene HS P...

Страница 27: ......

Отзывы: