background image

3DJH0DVWHU18VHU*XLGH

3DSHU3DWK

3DSHU3DWK

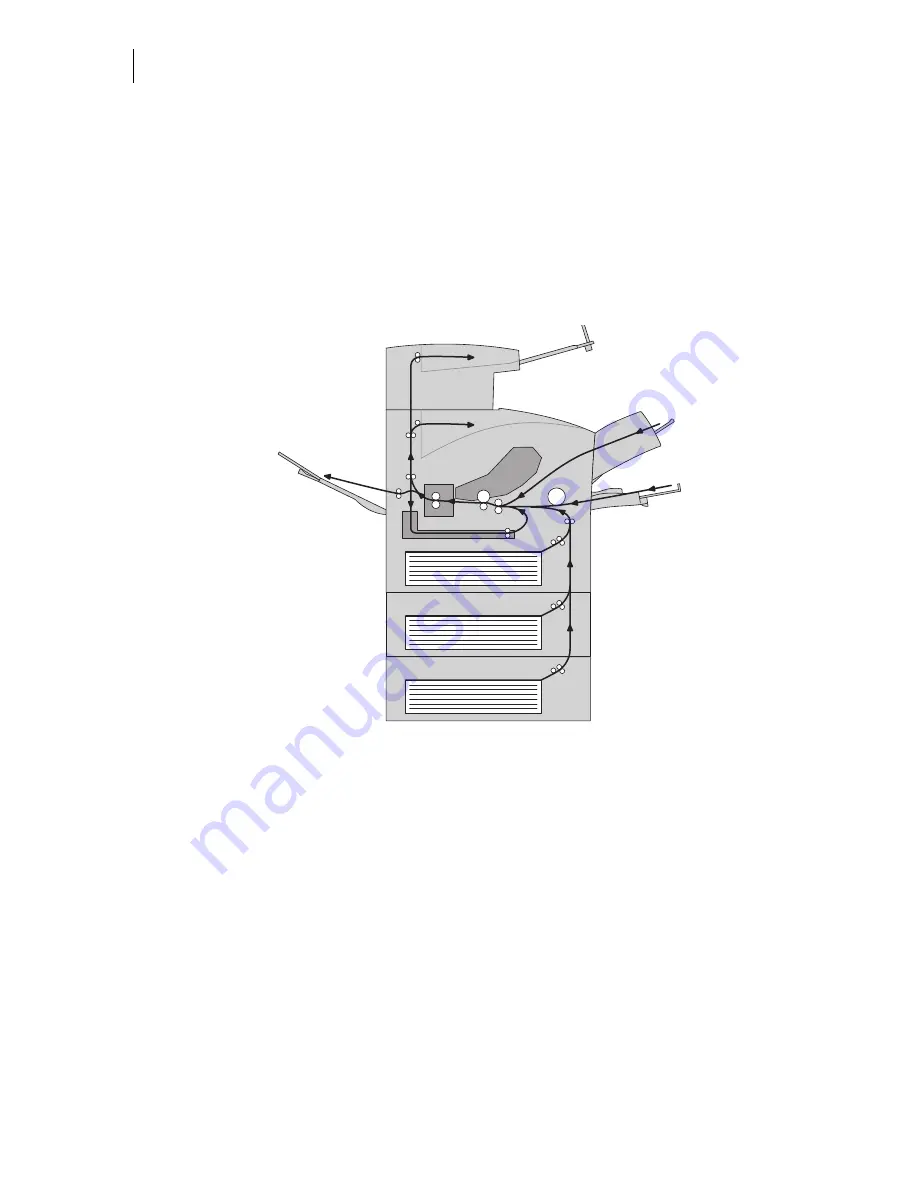
The following figure shows the path that paper travels through the printer: 

1. The paper is initially fed from the front paper tray or one of the other paper trays. 

2. The image is transferred from the photosensitive drum onto the paper. 

3. The fuser fixes the toner permanently on the paper. 

4. After passing through the duplexer, if installed, the paper is fed once more through steps (2) 

and (3). 

5. The paper emerges onto the output tray, or the offset output tray if installed.

)LJXUH3DSHU3DWK

 ◆      ◆      ◆

Содержание PageMaster 260N

Страница 1: ...260N User Guide Rev 002...

Страница 2: ...Q 5LQJ QWHUQDWLRQDO XVLQHVV 0DFKLQHV RUSRUDWLRQ QWHO QWHO RUSRUDWLRQ 0LFURVRIW 06 26 LQGRZV 0LFURVRIW RUSRUDWLRQ 1RYHOO DQG 1HW DUH 1RYHOO QF 7KH 1 5 67 5 ORJR 8QLWHG 6WDWHV QYLURQPHQWDO 3URWHFWLRQ JH...

Страница 3: ...3ULQWHU 2ULHQWDWLRQ RQYHQWLRQV ERXW WKH 3ULQWHU HDWXUHV YDLODEOH RQILJXUDWLRQ KDSWHU HWWLQJ 6WDUWHG 6DIHW 3UHFDXWLRQV DQGOLQJ WKH 3ULQWHU 3DFNDJH RQWHQWV 520 RQWHQWV 3ULQWHU RFDWLRQ 5HTXLUHPHQWV 3ULQW...

Страница 4: ...3RUW 6HOHFWLQJ 3ULQW 0HGLD 3DSHU DQG 3ULQW 0HGLD 7R YRLG RUUHFW 3DSHU 6WRUDJH 3ULQW 0HGLD DSDFLWLHV 3ULQW 0HGLD HLJKW 7 SH DQG 6L H RDGLQJ WKH 8QLYHUVDO 3DSHU 7UD RDGLQJ WKH URQW 7UD KDSWHU 8QGHUVWDQG...

Страница 5: ...KRUW LVWDQFH 0RYLQJ WKH 3ULQWHU D RQJ LVWDQFH 6WRULQJ WKH 3ULQWHU IRU RQJ 3HULRGV RI 7LPH KDSWHU 7URXEOHVKRRWLQJ QVWDOODWLRQ 3UREOHPV QRSHUDWLYH 3ULQWHU 1R 5HDG 0HVVDJH 1RLVH 6PRNH RU 6PHOO 3DSHU DPV...

Страница 6: ...HGHUV QVWDOOLQJ 2QH 3DSHU HHGHU QVWDOOLQJ 7ZR 3DSHU HHGHUV 7HVWLQJ WKH 6KHHW HHGHU 6HOHFWLQJ 3ULQW 0HGLD 3DSHU DQG 3ULQW 0HGLD 7R YRLG RUUHFW 3DSHU 6WRUDJH 3ULQW 0HGLD HLJKW 7 SH DQG 6L H RDGLQJ 3ULQW...

Страница 7: ...HGHU 3UREOHPV 0DLQWDLQLQJ WKH QYHORSH HHGHU OHDQLQJ WKH WHULRU RI WKH QYHORSH HHGHU KDSWHU 8VLQJ WKH 2IIVHW DWFK 7UD ERXW WKH 2IIVHW DWFK 7UD 0DMRU RPSRQHQWV RI WKH 2IIVHW DWFK 7UD QVWDOOLQJ WKH 2IIVH...

Страница 8: ...OH 8VLQJ WKH DUG LVN 2SWLRQ DQG 8VHU ODVK 00 0RGXOH 8VLQJ WKH 3RZHU 2Q LOHV HDWXUH WHQGHG HDWXUHV 8VLQJ WKH DUG LVN RU 8VHU ODVK 2SWLRQ QVWDOOLQJ WKH 56 56 6HULDO QWHUIDFH 8VLQJ WKH 56 56 6HULDO QWHUI...

Страница 9: ...5HY Preface Q WKLV KDSWHU Welcome on page 2 About this Manual on page 2 About the Printer on page 4...

Страница 10: ...onment requirements of the printer KDSWHU 8VLQJ WKH 3ULQWHU This chapter provides information concerning the daily use of the printer including procedures for connecting the printer and loading print...

Страница 11: ...HJXODWRU RPSOLDQFHV This appendix describes cautions to take when installing transporting or operating the printer and also includes the applicable regulatory compliances 3ULQWHU 2ULHQWDWLRQ Throughou...

Страница 12: ...features Quality printing at a high speed The printer has an output of 26 pages per minute with a resolution up to 1200 dpi Flexible use of paper sources and delivery methods The base configuration of...

Страница 13: ...emory 128 MB Resolutions 600 x 600 dpi and 1200 x 1200 dpi Paper Input One 550 sheet universal paper tray for A4 Letter Legal and one 100 sheet front tray for paper transparencies envelopes and other...

Страница 14: ...3DJH0DVWHU 1 8VHU XLGH ERXW WKH 3ULQWHU...

Страница 15: ...DSWHU About this Chapter on page 1 2 Safety Precautions on page 1 3 Package Contents on page 1 4 Printer Location Requirements on page 1 5 Parts of the Printer on page 1 8 Optional Printer Accessories...

Страница 16: ...3DJH0DVWHU 1 8VHU XLGH ERXW WKLV KDSWHU This chapter reviews the contents of the printer packaging explains the parts of the printer and describes the space and environment requirements of the printer...

Страница 17: ...e printer is very heavy and should always be lifted by two people The weight of the printer without paper tray toner cartridge and paper is about 51 lbs 23 kg Never attempt to lift the printer alone T...

Страница 18: ...mentation designed to help you fully utilize the printer and also contains Adobe PostScript fonts that match those available on the printer Remote Control Software RCS CD ROM The RCS CD ROM contains r...

Страница 19: ...m 6SDFH 5HTXLUHPHQWV A certain amount of space is required for proper operation of the printer and also for performing printer maintenance and replacing consumables Use the following figures to plan f...

Страница 20: ...3DJH0DVWHU 1 8VHU XLGH 3ULQWHU RFDWLRQ 5HTXLUHPHQWV LJXUH 6LGH YLHZ RI WKH SULQWHU LQFKHV PP LQFKHV PP LQFKHV PP...

Страница 21: ...ace Exposed to direct sunlight Subject to vibrations Exposed to water and high humidity Exposed to magnetic fields Subject to extreme variations in temperature and humidity Near an open flame Exposed...

Страница 22: ...PHWKRG RI IHHGLQJ SDSHU WR WKH SULQWHU FFRPPRGDWHV YDULRXV SULQW PHGLD LQFOXGLQJ HQYHORSHV WUDQV SDUHQFLHV DQG ODEHOV 7UD WHQVLRQ OORZV RX WR ORDG ODUJH SDSHU VL HV LQ WKH IURQW WUD 3DSHU H LW VORW 3...

Страница 23: ...ULGJH QWHJUDWHG FDUWULGJH FRQWDLQV WKH WRQHU DQG WKH SKRWRVHQVLWLYH GUXP 87 21 7KH IXVHU EHFRPHV YHU KRW ZKLOH WKH SULQWHU LV RSHUDWLQJ I RX QHHG WR UHPRYH WKH GUXP FDUWULGJH WR UHPRYH D SDSHU MDP WXU...

Страница 24: ...QWHU LJXUH RQWURO 3DQHO LVSOD 6KRZV HUURU PHVVDJHV DQG RWKHU VWDWXV PHVVDJHV DOVR GLVSOD V PHQXV VXEPHQXV DQG VHWWLQJV QGLFDWRUV 6KRZ SULQWHU VWDWXV 3XVKEXWWRQV OORZ RX WR QDYLJDWH WKURXJK PHQXV SODFH...

Страница 25: ...es as installed on the printer LJXUH 2SWLRQDO FFHVVRULHV 2IIVHW DWFK 7UD ROGV DQG VHSDUDWHV ODUJH SULQW MREV E RIIVHW WLQJ XSOH HU QDEOHV WZR VLGHG SULQWLQJ 6KHHW HHGHU ROGV D VKHHW SDSHU WUD DQG SURY...

Страница 26: ...paper tray or one of the other paper trays 2 The image is transferred from the photosensitive drum onto the paper 3 The fuser fixes the toner permanently on the paper 4 After passing through the dupl...

Страница 27: ...age 2 2 Connecting the Printer to the AC Outlet on page 2 3 Turning Power On and Off on page 2 4 Connecting the Printer to the Host Computer on page 2 5 Selecting Print Media on page 2 15 Loading the...

Страница 28: ...8VHU XLGH ERXW WKLV KDSWHU This chapter provides information concerning the daily use of the printer including procedures for connecting the printer and loading print media and guidelines for selectin...

Страница 29: ...KH 2XWOHW Use the following procedure to connect the power cord and turn the printer on Insert the power cord into the AC connector on the rear of the printer Verify that the power switch of the print...

Страница 30: ...message indicates that the printer is warming up and is not ready to print After about 65 seconds the status message changes to Ready indicating that the printer is ready to print 127 I DQ HUURU PHVVD...

Страница 31: ...e text Parallel is shown on the second line of the display Press the SELECT button to enter the parallel submenu Verify that the second line of the display contains the text On or press the NEXT butto...

Страница 32: ...l the desired mode is shown on the second line of the display The available mode settings include Bidirectional and Standard Press the SELECT button to select the mode that you specified in the previo...

Страница 33: ...tory of your Windows 95 CD ROM We do not supply this update To find out if your hardware operating system combination supports USB run the free program USBREADY EXE available from www usb org Microsof...

Страница 34: ...is installed in your system It is possible to have working hardware but not have a physi cal port in which case the proper connector must be purchased from the system supplier 127 6 VWHPV PDGH LQ DQG...

Страница 35: ...ttach it to the same connector 127 7KH 86 SULQWHU SRUW FUHDWHG LV DVVRFLDWHG ZLWK WKH DFWXDO SRUW WR ZKLFK WKH GHYLFH LV DWWDFKHG I WKH SULQWHU LV DWWDFKHG WR D GLIIHUHQW KDUGZDUH SRUW D QHZ 86 SULQWH...

Страница 36: ...ate setup program or your system may announce that New Hardware has been found In either case install the driver required for your printer at this time After the printer has been installed make sure t...

Страница 37: ...device and as such may be plugged into any available USB port on the Macintosh including the one on the keyboard Open the Desktop Printer Utility installed when you installed the Apple Laser Writer S...

Страница 38: ...e SELECT button to enter the interface menu Press the NEXT button until the text Port is shown on the second line of the display Press the SELECT button to enter the port submenu Press the NEXT button...

Страница 39: ...ipt 3 Press the SELECT button to select the interpreter that you chose in the previous step After you have pressed the SELECT button the first line of the display should contain the text USB Setup and...

Страница 40: ...WKH RVW RPSXWHU 86 5HVRXUFHV If you would like more information about USB refer to the www usb org website This organiza tion is responsible for the determining the USB standard and has a number of F...

Страница 41: ...bon paper Is an envelope that is embossed is made of extremely thick paper or is padded Is an envelope that has metal clasps Is an envelope with gummed or adhesive surfaces Is a sheet of labels that h...

Страница 42: ...ay can hold the following quantities of non standard print media Envelopes 10 Transparencies 30 Labels 30 Standard Paper 100 Other paper Stack Height 11 5mm Standard Postcard 30 127 SHFW D VOLJKW UHGX...

Страница 43: ...rformance and print quality meet your expectations 3DSHU 6RXUFH 0HWHU HLJKW 3DSHU 7 SH DQG HHG LUHFWLRQ 3DSHU 6L HV FFRPPRGDWHG 8QLYHUVDO 3DSHU 7UD PDLQ WUD DQG RSWLRQDO VKHHW SDSHU IHHGHU R QRW XVH O...

Страница 44: ...to adjust the size of the area that holds paper 127 7KH IROORZLQJ SURFHGXUH VKRZV RX KRZ WR ORDG SDSHU LQWR WKH PDLQ SDSHU WUD 7R ORDG SDSHU LQWR WKH RSWLRQDO VKHHW SDSHU IHHGHU VLPSO FRPSOHWH WKH SU...

Страница 45: ...paper you are using is longer than A4 297 cm press the square green button on the bottom of the paper tray to release the rear of the tray and pull the tray out to extend it Squeeze the right width gu...

Страница 46: ...move it Align the edges of the paper and place it in the center of the paper tray with the side to print on facing down 127 7R DYRLG SDSHU MDPV DQG RWKHU SDSHU WUDQVSRUWDWLRQ SUREOHPV PDNH VXUH WKH OH...

Страница 47: ...eze the right width guide lift it up and adjust the guides to match the paper width Squeeze the length guide lift it up and adjust the guide to match the paper length Grasp the paper tray with both ha...

Страница 48: ...RDGLQJ WKH 8QLYHUVDO 3DSHU 7UD Push the paper tray completely into the printer making sure the tray is properly seated Use the paper level indicator on the front right of the printer to determine when...

Страница 49: ...following guidelines when loading the front tray Do not mix print media in the front tray for example do not load a stack that includes both envelopes and standard paper Load only one type of print m...

Страница 50: ...ce to be printed faces up Load the stack of paper into the front tray by sliding the stack between the paper guides and then pushing the paper stack into the tray until it will not go any further Chec...

Страница 51: ...2 Control Panel Features on page 3 2 Navigating the Control Panel Menus on page 3 4 Menu Structure on page 3 6 Paper Menu on page 3 8 Interface Menu on page 3 10 PS Menu on page 3 13 PCL Menu on page...

Страница 52: ...on the front of the printer and contains the display indicators and pushbuttons that allow you to view and change the printer settings The figure below shows the control panel features LJXUH RQWURO 3D...

Страница 53: ...J D MRE 3ULQWHU LV 7 1 D SDUWLDO MRE KDV EHHQ SULQWHG DQG WKH SULQWHU LV ZDLWLQJ IRU DGGLWLRQDO MRE GDWD UHHQ 32 5 LV RII 32 5 LV RQ 3RZHU 6DYHU 0RGH 21 HOORZ 3ULQWHU LV QRW LQ HUURU PRGH 7KHUH LV DQ...

Страница 54: ...XT or PREVIOUS button If you press the NEXT button repeatedly the second line of the display cycles through the main menus in the following order Paper Menu Interface Menu PS Menu PCL Menu System Menu...

Страница 55: ...LJXUH 1DYLJDWLQJ WKH 3DSHU 0HQX 1 Press the MENU button on the control panel 2 Press the NEXT button until the text Paper Menu is shown on the second line of the dis play 3 Press the SELECT button to...

Страница 56: ...S QWHUSUHWHU RUPDW 0RGH HOD 2XW ORVH LQDU 36 1HWZRUN 6HWXS QWHUSUHWHU RUPDW 1HWZRUN GGUHVV 3 GGUHVV 6XEQHW 0DVN HIDXOW 5RXWHU 3 DQQHU 3 HOD 2XW ORVH RVW 1DPH P 16 RFDO LQN P 16 RVW 1DPH P 16 6YF 1DPH...

Страница 57: ...dition to the main menus listed above the printer also provides a status menu that allows you to view the current printer settings for the input and output trays and the toner cartridge 6WDWXV URQW 7U...

Страница 58: ...3URFHGXUH IRU KDQJLQJ 6HWWLQJ RSLHV 7KLV VXEPHQX DOORZV RX WR FKDQJH WKH QXPEHU RI FRSLHV SULQWHG 1XPEHUV 3UHVV 1 7 RU 35 9 286 WR LQFUHDVH RU GHFUHDVH WKH QXPEHU RI FRSLHV SULQWHG 3UHVV 6 7 WR VDYH W...

Страница 59: ...W SHV 3UHVV 6 7 WR VHW D VL H RU W SH ODQN 3DJHV 7KLV VXEPHQX DOORZV RX WR FKRRVH WR HLWKHU SULQW RU QRW SULQW EODQN SDJHV RI D GRFXPHQW 3ULQW 3ULQW R 1RW 3ULQW 3UHVV 1 7 RU 35 9 286 WR WRJJOH EHWZHHQ...

Страница 60: ...PHQXV HIDXOW 6HWWLQJ YDLODEOH 6HWWLQJV 3URFHGXUH IRU KDQJLQJ 6HWWLQJ 3RUW 7KLV VXEPHQX DOORZV RX WR FKRRVH WKH W SH RI LQWHUIDFH 3DUDOOHO 2Q 1HWZRUN DUG 2Q 86 2Q 3DUDOOHO 2Q 2II 1HWZRUN DUG 2Q 2II 86...

Страница 61: ...W 1DPH PRGHOQDPH QWHUSUHWHU XWR 6ZLWFK 3 3RVW6FULSW RUPDW 1RUPDO LQDU 5DZ 1HWZRUN GGUHVV 3 GGUHVV XVHU VSHFLILHG 6XEQHW 0DVN XVHU VSHFLILHG HIDXOW 5RXWHU XVHU VSHFLILHG 3 DQQHU 2II 2Q 3 2II 2Q HOD 2XW...

Страница 62: ...U XWR 6ZLWFK RUPDW 5DZ HOD 2XW ORVH 2II LQDU 36 2II QWHUSUHWHU XWR 6ZLWFK 3 3RVW6FULSW RUPDW 5DZ 1RUPDO LQDU HOD 2XW ORVH 2II 2Q LQDU 36 2Q 2II 3UHVV 1 7 RU 35 9 286 WR VFUROO WKURXJK WKH 17 535 7 5 2...

Страница 63: ...able to access and change the PostScript settings 6XEPHQXV HIDXOW 6HWWLQJ YDLODEOH 6HWWLQJV 3URFHGXUH IRU KDQJLQJ 6HWWLQJV 3ULQW 36 UURUV 7KLV VXEPHQX DOORZV RX WR FKRRVH WR HLWKHU SULQW RU QRW SULQW...

Страница 64: ...able to access and change the PCL settings 6XEPHQXV HIDXOW 6HWWLQJ YDLODEOH 6HWWLQJV 3URFHGXUH IRU KDQJLQJ 6HWWLQJ 2ULHQWDWLRQ 7KLV VXEPHQX DOORZV RX WR FKRRVH WKH RULHQWDWLRQ RI WKH SDJH 3RUWUDLW 3RU...

Страница 65: ...QG 2 3UHVV 6 7 WR VDYH WKLV VHWWLQJ LQHV 3HU 3DJH 7KLV VXEPHQX DOORZV RX WR FKDQJH WKH QXPEHU RI OLQHV SHU SDJH 3UHVV 1 7 RU 35 9 286 WR LQFUHDVH RU GHFUHDVH WKH OLQHV SHU SDJH 3UHVV 6 7 WR VDYH WKLV...

Страница 66: ...WR VDYH WKLV VHWWLQJ 3DUDPHWHU 9DOXHV 7KLV VXEPHQX DOORZV RX WR VSHFLIL ZKLFK 3 HVFDSH VHTXHQFH SDUDPHWHU YDOXHV VKRXOG EH DVVRFLDWHG ZLWK HDFK VSHFLILF VHOHFWLRQ 3DSHU 6RXUFH URQW 7UD 3DSHU 6L H HFX...

Страница 67: ...LDQR VSDQRO 3UHVV 1 7 RU 35 9 286 WR VFUROO WKURXJK WKH DYDLODEOH ODQJXDJHV QJOLVK UHQFK UDQFDLV HUPDQ HXWVFK WDOLDQ WDOLDQR RU 6SDQLVK VSDQRO 3UHVV 6 7 WR FKRRVH DQG VHW WKH ODQJXDJH 3RZHU 6DYHU 7KLV...

Страница 68: ...7 WR VDYH WKLV VHWWLQJ 3DJH RPSUHVVLRQ 7KLV VXEPHQX DOORZV RX WR WXUQ SDJH FRPSUHVVLRQ RQ RU RII 2II 2Q 2II 3UHVV 1 7 RU 35 9 286 WR WRJJOH EHWZHHQ 21 DQG 2 3UHVV 6 7 WR VDYH WKLV VHWWLQJ DWDVWUHDP0D...

Страница 69: ...ing table to access and change the system settings 6XEPHQXV HIDXOW 6HWWLQJ YDLODEOH 6HWWLQJV 3URFHGXUH IRU KDQJLQJ 6HWWLQJ 5HVROXWLRQ 7KLV VXEPHQX DOORZV RX WR VHW WKH UHVROXWLRQ GSL GSL GSL GSL 3UHVV...

Страница 70: ...Print Sum mary Print Test and Print Fonts 5 Use the procedures in the following table to execute the functions XQFWLRQV 3URFHGXUH IRU HFXWLQJ XQFWLRQ 5HVHW 3ULQWHU 7KLV IXQFWLRQ UHVHWV WKH SULQWHU 3UH...

Страница 71: ...KURXJK WKH PHGLD VL H PHGLD W SH DQG OHYHO VHWWLQJV IRU WKH URQW 7UD 3UHVV 6 7 WR YLHZ D VSHFLILF VHWWLQJ 7UD 7KLV VXEPHQX DOORZV RX WR YLHZ WKH FXUUHQW 0HGLD 6L H 0HGLD 7 SH DQG HYHO IRU 7UD 3UHVV 1...

Страница 72: ...3DJH0DVWHU 1 8VHU XLGH 6WDWXV 0HQX...

Страница 73: ...his Chapter About this Chapter on page 4 2 Upgrading Printer Firmware on page 4 2 Replacing Printer Components on page 4 3 Cleaning the Printer on page 4 18 Moving the Printer on page 4 20 Storing the...

Страница 74: ...g Firmware Using the Parallel Interface To upgrade the printer using the parallel interface go to the DOS prompt and use the copy com mand to copy the new file to the printer For example type copy new...

Страница 75: ...e toner cartridge box horizontally not on end Keep the cartridge out of the reach of children and in an area where the temperature remains between 32 F and 95 F and the humidity remains between 15 to...

Страница 76: ...the printer 2 Press the button on the top of the printer to open the front cover and pull the cover all the way open 3 Remove the old toner cartridge from the printer and carefully place it on the dr...

Страница 77: ...ents 6 Grasp the toner cartridge firmly and pull the sealing tape straight out from the cartridge 7 Slide the pegs on the toner cartridge into the channels on the inside of the printer and lower the t...

Страница 78: ...ause the fuser life to be shorter NOTE In the following procedure the left and right sides of the printer are those to the left and right of a person facing the rear of the printer NOTE If you are usi...

Страница 79: ...r cover and pull the cover toward you to open it 3 Remove the screws that secure the fuser to the printer 4 Grasp the metal brackets on the sides of the fuser and pull the fuser toward you to remove i...

Страница 80: ...260N User Guide Replacing Printer Components 6 Insert the new fuser into the printer making sure it is securely seated 7 Secure the fuser to the printer by replacing and tightening the screws 8 Close...

Страница 81: ...er out of the feeder paper trays into the printer These feed rolls wear with normal use and eventually become coated with paper dust and must be replaced Fre quent feed jams in the front tray or main...

Страница 82: ...er off by pressing the O on the power switch on the right side of the printer and disconnect the AC power cord from the wall outlet 2 Remove the paper tray of the feeder that you intend to replace rol...

Страница 83: ...lip the retaining tabs on the end of the feed roll and nudger roll and remove the rolls from their shafts 5 Push the new feed roll and nudger roll onto their shafts until the retaining tabs click into...

Страница 84: ...al stopper plate inside the printer so it returns to its normal position 7 Press the locks on the left and right of the retard roll inside the paper tray and lift the lever to open the retard roll cov...

Страница 85: ...uide 4 13 Replacing Printer Components 9 Push the new retard roll onto the shaft until the retaining tab clicks into place Make sure the retaining tab is toward the right side of the printer 10 Close...

Страница 86: ...ng sure the tray is properly seated Replacing the BTR Roller The BTR roller assists in the transfer of the image to the paper The BTR wears with normal use The normal life of the BTR is about 200 000...

Страница 87: ...2 Push the button on top of the printer to release the front cover and pull the front cover toward you to open it 3 Remove the toner cartridge from the printer NOTE To prevent stains place the toner...

Страница 88: ...oth ends of the BTR roller pull it toward you and llift it out of the printer 6 Position the new BTR roller so the gear is at the right end of the roller Insert the left end of the shaft into the left...

Страница 89: ...s the BTR roller down until it locks firmly in place 8 Insert the pegs on the toner cartridge into the channels inside the printer and push the toner cartridge into the printer 9 Close the front cover...

Страница 90: ...owing procedure to clean the exterior of the printer 1 Turn the printer off by pressing the O on the power switch on the right side of the printer and disconnect the AC power cord from the wall outlet...

Страница 91: ...need to be cleaned unless a paper jam drops toner onto the paper path or you accidentally spill toner inside the printer when installing a new toner cartridge Use the following procedure to clean the...

Страница 92: ...have two individuals facing each other from the front and the rear of the printer grasp the recessed areas on each side of the printer Do not lift the printer by grasping any area other than these rec...

Страница 93: ...idge into the original shipping box or boxes 9 Once the printer is in the new location refer to the Installation Guide included in the origi nal printer packaging for installation instructions Storing...

Страница 94: ...4 22 PageMaster 260N User Guide Storing the Printer for Long Periods of Time...

Страница 95: ...Q WKLV KDSWHU About this Chapter on page 5 2 Installation Problems on page 5 2 Paper Jams on page 5 4 Print Image Quality Problems on page 5 18 Miscellaneous Problems on page 5 22 Warning Messages an...

Страница 96: ...If the finished prints delivered to the output tray display image problems such as image black spots or vertical lines on the page refer to Print Image Quality Problems on page 5 18 and complete the p...

Страница 97: ...Q KHFN WKH SRZHU VZLWFK 6HH 6WHS RQQHFWLQJ WKH 3RZHU RUG DQG 7XUQLQJ WKH 3ULQWHU 2Q RQ SDJH RI WKH QVWDOODWLRQ XLGH 7KH SRZHU FRUG LV QRW SURSHUO SOXJJHG LQWR DQ RXWOHW RU LQWR WKH FRQQHFWRU RQ WKH UH...

Страница 98: ...e fuser 3 Check the inside of the printer for any obviously broken or detached parts If you find a bro ken part contact your retailer or sales representative 4 Check the exterior of the printer for br...

Страница 99: ...rprets that to mean that the paper has stopped between two sensors along the paper path The printer then displays a Paper Jam error message that corresponds to that specific jam When paper gets jammed...

Страница 100: ...r dust Occasional paper jams usually require minor user intervention that involves reloading the paper or cleaning the feed rolls Frequent paper jams can be caused by anything from foreign material in...

Страница 101: ...the jam occurred while feeding from the front paper tray remove all paper from the front tray including any paper that may be jammed inside the tray 3 If the jam occurred while feeding from the main...

Страница 102: ...the paper tray 5 Remove any jammed paper from the inside of the paper tray well 6 If the jam occurred while feeding from Tray 2 or 3 remove the paper tray associated with that feeder and remove any j...

Страница 103: ...ea on the front cover to open it 10 Return the front cover to its original position pressing on the center of the cover to close it securely OHDULQJ DQ 3DSHU DP If an E3 error message appears on the p...

Страница 104: ...the cover and open the front cover 4 Remove the toner cartridge from the inside of the printer 127 7R SUHYHQW VWDLQV SODFH WKH WRQHU FDUWULGJH RQ D VXUIDFH FRYHUHG ZLWK QHZVSDSHU RU RWKHU GLVSRVDEOH...

Страница 105: ...ont cover pressing on the center of the front cover until it closes securely OHDULQJ DQ DP If an E4 error code precedes the error message on the first line of the control panel display paper has jamme...

Страница 106: ...is paper jammed in the space behind the rear cover remove it 4 If you are using the duplexer push the green tabs toward the center of the duplexer and pull the duplexer toward you to remove it 87 21 7...

Страница 107: ...it release levers on the left and right sides of the fuser and remove the jammed paper 6 Return the fuser release levers to their original position 7 If you removed the duplexer insert the duplexer in...

Страница 108: ...wn on the display screen there is a paper jam in the duplexer Use the following procedure to clear a duplex paper jam 1 If you are using the paper tray in its extended position remove the paper tray f...

Страница 109: ...x area 4 Push the green tabs on the sides of the duplexer toward the center of the duplexer and grasp the recessed areas on the sides of the duplexer and remove it from the printer 5 Push the tabs lab...

Страница 110: ...xer unit 7 Slide the tabs on the left and right sides of the duplexer into the channels inside the printer and push the duplexer completely into the printer 8 Push the green tabs on the sides of the d...

Страница 111: ...sage on the first line of the control panel display paper has jammed at the offset catch tray Use the following procedure to clear a paper jam in this loca tion 1 Pull on the recessed area on the rear...

Страница 112: ...4 Squeeze the latch on the upper part of the rear cover and pull the cover toward you to open it If there is paper jammed in the space behind the rear cover remove it 127 I WKH SDSHU WUD LV LQ WKH H W...

Страница 113: ...broken compo nent These problems may require you to call a service technician to determine and correct the problem This section describes possible quality problems during printing Go through the list...

Страница 114: ...WV 5HSODFH WKH WRQHU FDUWULGJH KDUDFWHU YRLGV 7KH SULQW PHGLD LV RXWVLGH WKH UHFRPPHQGHG VSHFLILFDWLRQV 7KH WRQHU FDUWULGJH LV ROG RU GDPDJHG 8VH WKH UHFRPPHQGHG SULQW PHGLD 5HSODFH WKH WRQHU FDUWULGJ...

Страница 115: ...U VXSSO PD EH GHIHFWLYH 3XOO RXW WKH VHDOLQJ WDSH YRLG DGGLQJ SDSHU WR D QHDUO IXOO VWDFN 5HSODFH WKH WRQHU FDUWULGJH 5HSODFH WKH WRQHU FDUWULGJH RQWDFW RXU GHDOHU RU DQ DXWKRUL HG VHUYLFH SURYLGHU 3D...

Страница 116: ...D 5HPRYH WKH PRLVW PHGLD DQG ORDG QHZ GU PHGLD 5HSODFH WKH WRQHU FDUWULGJH 9HUWLFDO EODQNV 7KH WRQHU FDUWULGJH LV QRW LQVWDOOHG FRUUHFWO 7KH WRQHU FDUWULGJH LV ROG RU GDPDJHG 5HPRYH WKH WRQHU FDUWULGJ...

Страница 117: ...ality New paper may correct the problem 2 Replace the toner cartridge with a new one The toner cartridge may have reached end of life or is damaged 3 Disconnect then reconnect the interface cable that...

Страница 118: ...or service 1 Make sure that you push the I on the main power switch to turn on the printer 2 Check to make sure the AC power cord is firmly plugged into the AC wall outlet and that the other end of th...

Страница 119: ...e other end of the cable is firmly connected to the computer There may be a bad connection between the printer and the computer Reconnecting both ends should reestablish a more reliable electrical con...

Страница 120: ...grills or objects stuck in the fans Remove any objects from the fan grill If you see a broken grill or cover call for service An object or part of a broken fan grill may be bushing against the fan and...

Страница 121: ...is plugged into the same AC wall outlet as the printer plug either the printer or the radio television into another AC outlet Electrical noise may be transmitted through the AC line You can reduce the...

Страница 122: ...2 Error messages use both lines of the display and indicate conditions that prevent the printer from operating The first line of an error message contains the error code and type of error while the s...

Страница 123: ...S RYHU 7KH WRS FRYHU LV RSHQ ORVH WKH WRS RU UHDU FRYHU RYHU 2SHQ ORVH 5HDU RYHU 7KH UHDU FRYHU LV RSHQ ORVH WKH RIIVHW WUD FRYHU 7RQHU DUW QVWDOO 5HVHW 7KH WRQHU FDUWULGJH LV QRW LQVWDOOHG RU DQ LQFR...

Страница 124: ...HPRYHG RU KDV IDLOHG 2IIVHW 7UD DLO DOO 6HUYLFH 7KH RIIVHW FDWFK WUD ZDV UHPRYHG RU KDV IDLOHG 2SWLRQ 7UD DLO DOO 6HUYLFH 2QH RI WKH RSWLRQDO WUD V KDV IDLOHG XSOH DLOXUH DOO 6HUYLFH 7KH GXSOH HU ZDV...

Страница 125: ...uplexer Q WKLV KDSWHU About this Chapter on page 6 2 About the Duplexer on page 6 2 Installing the Duplexer on page 6 2 Testing the Duplexer on page 6 5 Solving Duplexer Problems on page 6 5 Removing...

Страница 126: ...then reverses the direction and pulls the printed page back into the printer to print the second side The printer can image two pages at a time therefore the duplex unit will process two pages sides...

Страница 127: ...ll the duplexer 1 Turn the printer off and remove the AC plug from the AC wall outlet 2 If you are using the paper tray in its extended position remove the paper tray from the printer 3 Squeeze the ta...

Страница 128: ...eft and right sides of the duplexer into the channels inside the printer and push the duplexer completely into the printer 5 Push the green tabs on the sides of the duplexer out toward the sides of th...

Страница 129: ...6 6 and complete the recommended procedure If the printer control panel displays an error message or an error code refer to Interpreting Duplexer Error Codes below If you have a duplexer problem but...

Страница 130: ...noperative after reinstallation remove it from the printer so you can run tests on the printer without the duplexer affecting the tests 5 Print a few sheets of text or images to make sure the printer...

Страница 131: ...f the printer and pull the rear cover toward you to open it 3 Remove any jammed paper from the duplex area 4 Push the green tabs on the sides of the duplexer toward the center of the duplexer and gras...

Страница 132: ...d 1 below out toward the sides of the duplexer and open the duplexer 6 Remove any jammed paper from inside the duplexer unit 7 Slide the tabs on the left and right sides of the duplexer into the chann...

Страница 133: ...ter If you are experiencing one of the problems listed below and there is no error message shown on the control panel display refer to the procedures in the following sections to check the possible ca...

Страница 134: ...ine the printer driver settings to make sure the duplexer is available as an installed option 5 If the duplexer is correctly set as an installed option reload the printer driver software The printer d...

Страница 135: ...ns on installing the drivers 5 Call your service technician This problem may be caused by a malfunctioning or broken component that requires service XSOH 0DNHV 8QXVXDO 1RLVHV The following characteris...

Страница 136: ...dure to remove the duplexer 1 Turn off the printer and disconnect the AC power cord from the AC wall outlet 2 If you are using the paper tray in its extended position remove the paper tray from the pr...

Страница 137: ...LGH 5HPRYLQJ WKH XSOH HU 4 Pull the duplex unit toward you while sliding the left and right tabs inward then grasp the recessed areas on the sides of the duplex unit and remove it from the printer 5 C...

Страница 138: ...3DJH0DVWHU 1 8VHU XLGH 5HPRYLQJ WKH XSOH HU...

Страница 139: ...et Paper Feeders on page 7 3 Testing the 550 Sheet Feeder on page 7 11 Selecting Print Media on page 7 11 Loading Print Media on page 7 13 Solving 550 Sheet Feeder Problems on page 7 17 Maintaining th...

Страница 140: ...s all of the operating power that is needed by the feeder and motors and circuit boards internal to the feeder provide the feeder with drive and operational logic At the start of a print run the feede...

Страница 141: ...oard inserts and packing tape Locate and set aside the small plastic bag containing three thumbscrews 2 Place the paper feeder on a sturdy level surface 127 R QRW PRYH WKH SULQWHU RQFH WKH SDSHU IHHGH...

Страница 142: ...O on the power switch on the left front of the unit 127 QVWDOOLQJ WKH SDSHU IHHGHU ZKLOH WKH SULQWHU LV RQ PD GDPDJH WKH SULQWHU RU SDSHU IHHGHU 4 Disconnect the power cord from the AC outlet and from...

Страница 143: ...ith the pegs on the paper feeder and lower the printer onto the paper feeder 127 H VXUH WR ORZHU WKH SULQWHU JHQWO RPSRQHQWV LQVLGH WKH SULQWHU PD EH GDPDJHG E ORZHULQJ WKH SULQWHU TXLFNO 8 Insert the...

Страница 144: ...to the AC outlet and turn the printer on by pressing I on the power switch on the left front of the printer 127 I DQ HUURU PHVVDJH DSSHDUV RQ WKH FRQWURO SDQHO GLVSOD VHH KDSWHU 7URXEOHVKRRWLQJ QVWDOO...

Страница 145: ...WKH SDSHU IHHGHU LV LQVWDOOHG 3 Align the three holes on the bottom of the upper feeder with the three stubs on the lower feeder and place the upper paper feeder on top of the lower paper feeder 4 Ins...

Страница 146: ...the power switch on the left front of the printer 6 Disconnect the power cord from the AC outlet and from the printer 127 QVWDOOLQJ WKH SDSHU IHHGHU ZKLOH WKH SULQWHU LV RQ PD GDPDJH WKH SULQWHU RU W...

Страница 147: ...t onto the two stacked paper feeders aligning the pegs on the upper paper feeder with the holes on the bottom of the printer 127 H VXUH WR ORZHU WKH SULQWHU JHQWO RPSRQHQWV LQVLGH WKH SULQWHU PD EH GD...

Страница 148: ...rays for both paper feeders 12 Insert the paper trays all the way into the paper feeders making sure each tray is properly seated 13 Connect the AC power cord to the printer and the AC wall outlet 14...

Страница 149: ...e print media that meet the guidelines for use with this printer Print media that is not recommended for use with this printer may cause frequent paper jams or poor print quality 3DSHU DQG 3ULQW 0HGLD...

Страница 150: ...DQG 6L H The 550 sheet feeder has paper guides that allow you to accommodate paper with the following dimensions Paper Width 98 4mm minimum to 215 9mm maximum Paper Length 148 5mm minimum to 355 6mm...

Страница 151: ...to adjust the size of the area that holds paper 127 7KH IROORZLQJ SURFHGXUH VKRZV RX KRZ WR ORDG SDSHU LQWR WKH PDLQ SDSHU WUD 7R ORDG SDSHU LQWR WKH RSWLRQDO VKHHW SDSHU IHHGHU VLPSO FRPSOHWH WKH SUR...

Страница 152: ...you are using is longer than A4 297 cm press the square green button on the bottom of the paper tray to release the rear of the tray and pull the tray out to extend it 4 Squeeze the right width guide...

Страница 153: ...he edges of the paper and place it in the center of the paper tray with the side to print on facing down 127 7R DYRLG SDSHU MDPV DQG RWKHU SDSHU WUDQVSRUWDWLRQ SUREOHPV PDNH VXUH WKH OHQJWK DQG ZLGWK...

Страница 154: ...e right width guide lift it up and adjust the guides to match the paper width 8 Squeeze the length guide lift it up and adjust the guide to match the paper length 9 Grasp the paper tray with both hand...

Страница 155: ...unning out of paper or a paper jam in a specific area of the paper feeder Some error codes indicate much more serious problems that may require the help of a service technician If the paper feeder is...

Страница 156: ...so you can run tests on the printer alone 4 Print a few sheets of paper through the main paper tray or the front tray to make sure the printer is still operational If the printer is operational when...

Страница 157: ...error code precedes the error message on the first line of the control panel display paper has jammed somewhere between the paper source feed area and the toner cartridge If you are using the optional...

Страница 158: ...ay solve this feeder problem Proceed one step at a time until the problem is solved you may not need to complete the entire procedure If one of the steps in this procedure corrects the problem but the...

Страница 159: ...nd covers When a door is closed the interlock switch is activated and the feeder can operate When a door is open the inter lock switch is not activated and the feeder cannot operate If a door is not f...

Страница 160: ...eeder 5HSODFLQJ HHG 5ROO 1XGJHU 5ROO DQG 5HWDUG 5ROO Rubber feed rolls drive sheets of paper out of the feeder paper trays into the printer These feed rolls wear with normal use and eventually become...

Страница 161: ...HU 2 Remove the paper tray of the feeder that you intend to clean and set it on a flat level surface 3 Pull the metal stopper plate down 4 Unclip the retaining tabs on the end of the feed roll and nud...

Страница 162: ...5 Push the new feed roll and nudger roll onto their shafts until the retaining tabs click into place Make sure the tabs are toward the right side of the printer 6 Release the metal stopper plate insi...

Страница 163: ...DLQLQJ WKH 6KHHW HHGHU 7 Press the locks on the left and right of the retard roll inside the paper tray and lift the lever to open the retard roll cover 8 Unclip the retaining tab on the retard roll a...

Страница 164: ...U XLGH 0DLQWDLQLQJ WKH 6KHHW HHGHU 9 Push the new retard roll onto the shaft until the retaining tab clicks into place Make sure the retaining tab is toward the right side of the printer 10 Close the...

Страница 165: ...the paper tray well on the printer 12 Push the paper tray all the way into the printer making sure the tray is properly seated 5HPRYLQJ WKH 6KHHW HHGHU Use the following procedure to remove the 550 s...

Страница 166: ...d from the AC outlet 3 Close the front tray and remove any printed sheets from the paper output tray 4 Remove the paper trays from the 550 sheet feeder and the printer 87 21 5HPRYLQJ RU LQVWDOOLQJ WKH...

Страница 167: ...LVWDQFH Use the following procedure to move the printer and 550 sheet feeder a short distance 1 Turn the printer off by pressing the O on the power switch on the back of the printer 2 Unplug the AC po...

Страница 168: ...in paper tray 7 Reach inside the open top tray and locate the two thumbscrews that are at the front left and front right of the feeder 8 Unscrew the two thumbscrews to release the feeder from the prin...

Страница 169: ...About the Envelope Feeder on page 8 2 Installing the Envelope Feeder on page 8 2 Testing the Envelope Feeder on page 8 4 Selecting Print Media on page 8 4 Loading the Envelope Feeder on page 8 6 Solvi...

Страница 170: ...e installing the envelope feeder verify that you have received the following items in the ship ping box QVWDOOLQJ WKH QYHORSH HHGHU Use the following procedure to install the envelope feeder 1 Turn th...

Страница 171: ...s packaging and place it on a level surface Remove any cardboard inserts and packing tape 3 Pull on the recessed area on the front of the printer to open the front tray 4 Remove the gear cover on the...

Страница 172: ...rint media that meet the guidelines for use with this printer Print media that is not recommended for use with this printer may cause frequent paper jams or poor print quality 3DSHU DQG 3ULQW 0HGLD 7R...

Страница 173: ...tally Store reams of paper in an area away from both direct sunlight and high humidity Open sealed reams only when you are ready to load the paper into the paper tray and always close and seal partial...

Страница 174: ...aper holder align the four corners of the stack of envelopes or postcards and gently insert them into the envelope feeder until they reach the back of the feeder 127 R QRW XVH HQYHORSHV RU SRVWFDUGV W...

Страница 175: ...error code refer to Interpreting Envelope Feeder Error Messages on page 8 9 If you have an envelope feeder problem but the printer control panel does not display an error message or error code refer...

Страница 176: ...3UREOHPV 2 Squeeze the tabs on the rear cover and pull the cover toward you to open it 3 Lift up the fuser release levers at the left and right side of the fuser unit 4 Remove the caps green on the i...

Страница 177: ...ble cause of the error and the action to take to correct the problem If the control panel shows an error message that concerns another part of the printer refer to Chapter 5 Troubleshooting for a comp...

Страница 178: ...nd then firmly close all of the printer and feeder doors and covers Interlock switches monitor the position of printer doors and covers When a door is closed the interlock switch is activated and the...

Страница 179: ...nter driver software running on the host computer may be damaged Reinstalling the software is an easy and inexpensive way to isolate or eliminate the problem Refer to the DRIVERS folder on the Electro...

Страница 180: ...e appearance of the envelope feeder 1 Turn the printer off by pressing O on the power switch on the right side of the printer 2 Remove the plug of the AC power cord from the AC wall outlet 3 Using a s...

Страница 181: ...Offset Catch Tray on page 9 2 Installing the Offset Catch Tray on page 9 3 Testing the Offset Catch Tray on page 9 7 Solving Offset Catch Tray Problems on page 9 7 Maintaining the Offset Catch Tray on...

Страница 182: ...ches to the top rear of the printer and can hold up to 500 printed sheets and also sorts printed sheets using an offset The printer supplies all of the operating power that is needed by the offset cat...

Страница 183: ...aged contact your dealer Throughout this procedure the different sides of the printer are referred to as front rear left and right The front of the printer is the side that holds the control panel The...

Страница 184: ...K 7UD 127 QVWDOOLQJ WKH RIIVHW FDWFK WUD ZKLOH WKH SULQWHU LV RQ PD GDPDJH WKH SULQWHU RU WKH RIIVHW FDWFK WUD Squeeze the latch on the top left of the rear cover to release the cover then open the re...

Страница 185: ...t off of the printer Lower the offset catch tray onto the printer while inserting the stub at the front of the offset catch tray into the hole on the top of the printer Insert the tabs on the back of...

Страница 186: ...3DJH0DVWHU 1 8VHU XLGH QVWDOOLQJ WKH 2IIVHW DWFK 7UD Close the rear cover Lift up the paper guide and open the offset tray Pull the tray all the way out and lift the paper stop...

Страница 187: ...h tray If the feeder does not feed paper or if the control panel displays an error message refer to Solving Offset Catch Tray Problems on page 9 7 6ROYLQJ 2IIVHW DWFK 7UD 3UREOHPV When there is a prob...

Страница 188: ...installation procedure and carefully repeat all of the installation steps If the offset catch tray is still inoperative after reinstallation remove it from the printer so you can run tests on the prin...

Страница 189: ...h tray Use the following procedure to clear a paper jam in this loca tion Pull on the recessed area on the rear of the offset catch tray to open the rear cover Remove any jammed paper from the interio...

Страница 190: ...ng one of the problems listed below and there is no error message shown on the control panel display refer to the procedures in the following sections to check the possible causes of the specific prob...

Страница 191: ...tioning or broken component that requires service 2IIVHW DWFK 7UD 2SHUDWHV UUDWLFDOO The following characteristics define this offset catch tray problem The offset catch tray does not function correct...

Страница 192: ...oving parts and causing the noise Call your service technician This problem may be caused by a malfunctioning or broken component that requires service 2IIVHW DWFK 7UD ZLOO QRW 2IIVHW The following ch...

Страница 193: ...e power switch on the right side of the printer Remove the plug of the AC power cord from the AC wall outlet Using a soft cloth slightly damp with cold water wipe the offset catch tray covers and tray...

Страница 194: ...VHW DWFK 7UD Push the paper stop into the output tray Lift the paper guide and fold up the output tray Turn the printer off by pressing O on the power switch on the front left of the printer and disco...

Страница 195: ...7UD Squeeze the latch on the upper left of the rear cover of the printer and pull the cover toward you to open it Press the tabs on the rear of the offset catch tray to release it and lift it off of t...

Страница 196: ...m of the printer and lift the printer Carefully carry the printer to the new location Once the printer and offset catch tray are in the new location refer to the printer Installation Guide included in...

Страница 197: ...1 8VHU XLGH 0RYLQJ WKH 2IIVHW DWFK 7UD Repack the offset catch tray components in the original packaging Once the offset catch tray is in the new location refer to Installing the Offset Catch Tray on...

Страница 198: ...3DJH0DVWHU 1 8VHU XLGH 0RYLQJ WKH 2IIVHW DWFK 7UD...

Страница 199: ...9 See Using the Hard Disk Option and User Flash DIMM Module on page 10 14 See Using the Power On Files Feature on page 10 17 See Extended Features Using the Hard Disk or User Flash Option on page 10...

Страница 200: ...the printer power switch is set to the OFF O position and unplug the power cord from the AC outlet 2 Loosen the thumbscrews at the top and bottom of the left side cover by turning them in a counter cl...

Страница 201: ...n until the DIMM snaps and locks into place NOTE 64MB of memory is standard in the 26ppm printer however you can install up to two 256MB modules for a total of 516MB Replacing the Printer Side Cover 1...

Страница 202: ...MMs 2 Slide the side cover towards the front of the printer to install it 3 Tighten both thumbscrews in a clockwise direction 4 Connect the power cord to the wall outlet and turn the printer power swi...

Страница 203: ...Option 1 Carefully review the safety precautions in the front of this guide before starting this installa tion procedure 2 Ensure that the printer power switch is set to the OFF O position and unplug...

Страница 204: ...nwards to remove it 5 Locate the area of the controller identified as Hard Disk 6 Align the hard disk within the designated area and gently move up to ensure the 50 pin male connector of the hard disk...

Страница 205: ...supporting bracket should be aligned with the hole in the control ler Insert the plastic rivet through the aligned holes 8 Insert the top part of the left side cover into the printer Ensure the locki...

Страница 206: ...Slide the side cover towards the front of the printer to install it 10 Tighten both thumbscrews in a clockwise direction 11 First connect the power cord to the wall outlet and then turn the printer p...

Страница 207: ...e procedure for installing the user FLASH DIMM Module on the controller assembly in the printer The procedure is divided into four main steps Removing the Printer Side Cover Installing FLASH DIMMs on...

Страница 208: ...e left side cover by turning them in a counter clockwise direction 3 Slide the cover towards the rear of the printer and then downwards to remove it Installing the user FLASH DIMM on the Controller As...

Страница 209: ...ule in user FLASH DIMM vertically as shown below When properly seated gently push down until the DIMM snaps and locks into place Replacing the Printer Side Cover 1 Insert the top part of the left side...

Страница 210: ...Installing the user FLASH DIMM Module 2 Slide the side cover towards the front of the printer to install it 3 Tighten both thumbscrews in a clockwise direction...

Страница 211: ...Installing the user FLASH DIMM Module 4 Connect the power cord to the wall outlet and turn the printer power switch to the ON I position...

Страница 212: ...table The shaded areas denote additional features and settings relevant to the Hard Disk option NOTE 1 The Flash Menu and Disk Menu will only appear when the respective FLASH SIMM and or Hard Disk opt...

Страница 213: ...ctories Using the PCL and PostScript Power On Files Feature Power on Files Defined If an optional FLASH SIMM or Hard Disk option is installed in your printer your printer has the capability of storing...

Страница 214: ...in the PostScript operation the SearchOrder parameter in the device parameter set estab lishes the priority for file operations When both devices are installed the SearchOrder value for the hard disk...

Страница 215: ...If either or both of the optional storage devices are installed an additional parameter will be supported in the System Parameter set This parameter is an integer parameter called StartupMode and is s...

Страница 216: ...cussed in this section are designed to work with the Hard Disk Option However if no Hard Disk Option is installed but a User Flash Option is installed these features will utilize the User Flash Option...

Страница 217: ...10 19 Extended Features Using the Hard Disk or User Flash Option 1 Press the Printing Properties button printer icon 2 Click on the Printing Preferences button 3 Click on the Paper Quality button and...

Страница 218: ...ed The print job data is saved on the Hard Disk or User Flash Option The job will be saved in the Job Library folder A sub folder in the Job Libaray folder will be created if necessary for the user as...

Страница 219: ...ved Jobs on your desktop go to the Start menu left click on Settings left click on Printers and then click on your printer driver icon right click and follow the menu to the Proper ties menu 1 You are...

Страница 220: ...r 260N User Guide Extended Features Using the Hard Disk or User Flash Option 3 Now scroll down to the Job Type Section of the menu 4 When you click on Job Type three job types are available Normal Sav...

Страница 221: ...rint this document if you know the PIN number Working with Saved Jobs There are two ways to work with Saved Jobs One is through the front panel menus the other is through the printer web pages Please...

Страница 222: ...Press SELECT to choose the desired Print Job Job Name Copies Select 1 99 1 Press NEXT or PREVIOUS to increase or decrease each digit of the two digit number 2 Press SELECT set one digit and move to t...

Страница 223: ...ames 2 Press SELECT to choose the desired User Folder Delete Job1 1 Press NEXT or PREVIOUS to scroll through the Print Job Names 2 Press SELECT to choose the desired Print Job to Delete DELETE SAVED J...

Страница 224: ...Installing the RS 232C RS 422 Serial Interface 1 Carefully review the safety precautions in the front of this guide before starting this installation procedure 2 Ensure that the printer power switch...

Страница 225: ...sary to remove the controller from your printer to install the serial interface For clarity the following illustrations depict a controller removed from the printer When facing the front of the contro...

Страница 226: ...ssembly to the two respective thumbscrews on the controller assembly bracket firmly seat the 80 pin male connector on the underside of the interface to the 80 pin female connector on the controller as...

Страница 227: ...the top part of the left side cover into the printer Ensure the locking tab aligns with the hole in the printer s side 9 Slide the side cover towards the front of the printer to install it 10 Tighten...

Страница 228: ...RS 232C RS 422 Serial Interface 11 Connect the power cord to the wall outlet and turn the printer power switch to the ON I position The installation of your RS 232C RS 422 serial interface option in...

Страница 229: ...nu structure is enhanced as shown in this table The shaded areas denote additional features and settings relevant to the RS 232C RS 422 interface Menu Paper Menu Interface Menu Port Parallel Serial Pa...

Страница 230: ...selections becomes available within a SERIAL SETUP submenu of the INTER FACE menu when the RS 232C RS 422 serial interface is installed None Even Odd DTR Ready Busy On Off DTR Onl Offl On Off DTR Erro...

Страница 231: ...ELECTIONS Auto Switch PCL Postscript 3 DEFAULT Auto Switch AVAILABLE SELECTIONS Normal Binary Raw DEFAULT Raw AVAILABLE SELECTIONS RS232 RS422 DEFAULT RS232 AVAILABLE SELECTIONS 1200 2400 4800 9600 19...

Страница 232: ...r XON Ready Busy XON Onl Offl AVAILABLE SELECTIONS Off On DEFAULT Off AVAILABLE SELECTIONS Off On DEFAULT Off AVAILABLE SELECTIONS Off On DEFAULT Off AVAILABLE SELECTIONS Off On DEFAULT Off AVAILABLE...

Страница 233: ...er printer via the serial interface option from an OpenVMS system either directly connected to the system or through a network device such as a terminal server It is recommended that DECprint Supervis...

Страница 234: ...appearing on the printer s control panel Sources of help information and technical support are also discussed Control Panel Error Messages The format of control panel error messages is NETx ERROR y Pi...

Страница 235: ...ufacture is the best source of help Technical Support Technical Support is available world wide Please refer to your point of purchase for the appropriate contact in your area When calling for assista...

Страница 236: ...he printer and not necessarily the serial interface Using the Custom Paper Size Feature There are two ways to work with the Custom Paper Size Feature One is through the front panel menus the other is...

Страница 237: ...hree digit number to set the length of your paper When the length of paper is correct press the SELECT button 12 Press RETURN until you exit out of all the submenus and return to READY Printer Driver...

Страница 238: ...10 40 PageMaster 260N User Guide Using the Custom Paper Size Feature 3 Click on the Advanced button 4 Click on the Paper Size button...

Страница 239: ...ustom Paper Size Feature 5 Scroll down to Custom Page Size and click 6 Then enter the width and height of your custom paper size 7 Click the OKAY button until you exit out of the driver menu You are n...

Страница 240: ...5HY Appendix A Safety Notes and Regulatory Compliance Q WKLV SSHQGL About this Appendix on page A 2 Safety Notes on page A 2 Regulatory Compliance on page A 2...

Страница 241: ...and contact your point of purchase The fuser becomes very hot in normal operation If a paper jam has occurred turn the power off and wait at least 10 minutes before removing the drum cartridge and to...

Страница 242: ...iver Connect the equipment and the reciever to outlets that are on different circuits Consult with the dealer or an experienced radio television technician to help Always use the power cord provided w...

Страница 243: ...3DJH0DVWHU 1 8VHU XLGH 5HJXODWRU RPSOLDQFH...

Отзывы: