background image

Specifications • Safety 

2

Description

This submersible sump pump is designed for 

home sumps. The permanent split capacitor 

motor is oil filled, sealed for cooler running, 

and has automatic-reset thermal protection. 

Ball bearings on the motor shaft never need 

lubrication. The power cord is a 3-wire, 

grounding-type cord.

Specifications

Power supply  ..................... 115V, 60 HZ., 15 Amp Circuit
Liquid Temp. Range ......................... 32°F to 70°F(0°-21°C)
Individual Branch Circuit Required (min.) ............15 Amps
Discharge: ............................................1-1/2” Female NPT

This pump is designed for use in a residential 

sump only. Pump water only with this pump.
NOTICE: This unit is not designed as a waterfall 

or fountain pump, or for applications involving 

salt water or brine! Use with waterfalls, 

fountains, salt water or brine will void warranty.
Do not use where water recirculates.
Not designed for use as a swimming pool drainer.
NOTICE: Read this owner’s manual for 

installation, operation, and safety information.

General Safety Information

Your automatic sump pump should give years 

of trouble-free service when correctly installed, 

maintained, and used. However, interruption 

of power to the pump, dirt/debris in the sump, 

flooding that exceeds the pump’s capacity, 

electrical or mechanical failure in the pump, 

etc., may prevent normal pump operation. To 

help prevent damage from flooding, purchase 

a secondary AC sump pump, a DC backup 

sump pump, and/or a high water alarm. See 

Troubleshooting in this manual for information 

about common sump pump problems and 

remedies. 

 Hazardous voltage. To reduce the 

risk of hazardous or fatal electrical shock, 

follow instructions A through D, below:
A.  This pump has an approved 3-conductor 

power cord with 3-prong, grounding-type plug. 

Connect the pump only to a properly grounded, 

3-prong outlet. If the sump pump circuit has 

a 2-prong outlet, replace it with a grounded 

3-prong outlet installed according to code.

B.  Unplug the pump before handling or servicing 

it. If your basement floor is wet, turn off all 

power before walking on it. If the shut-off box 

is in the basement, call your electric company 

or hydro authority to shut off service to the 

house, or call your local fire department 

for instructions. After turning off the power, 

remove the pump for service.

C.  Protect the electrical cords from sharp objects, 

hot surfaces, oil, and chemicals. Avoid kinking 

the cords. Replace damaged or worn cords.

D.  Do not lift the pump by the power cord.

 Risk of fire. Plastic pipe glue 

is extremely flammable. Follow the glue 

manufacturer’s instructions when assembling 

glued plastic pipe.

 Burn hazard. Motors may run hot. 

Allow 20 minutes to cool before handling.
1.  Know the pump application, limitations, and 

potential hazards.

2.  Do not use this pump in water with fish 

present; oil from the motor can kill fish.

3.  Drain the system completely before servicing it.
4.  To prevent a flexible discharge line from 

whipping, which could cause injury or damage, 

fasten it down before starting the pump.

5.  Before each use, check any hoses in the system 

for weakness or wear. Make certain that all 

connections are tight.

6.  Periodically inspect the sump, the pump, 

and the piping for debris and foreign objects. 

Perform routine cleaning as required.

7.  Personal Safety:

a.  Wear safety glasses at all times when 

working with pumps.

b.  Keep your work area clean, uncluttered 

and properly lighted; put away all unused 

tools and equipment.

c.  Keep visitors at a safe distance from the 

work area.

d.  Make workshop child-proof with padlocks 

and master switches. Remove any 

starter keys.

8.  This pump installation must meet all applicable 

laws, codes, and ordinances.

Tools Required:
Pipe wrench, Strap Wrench, or Slip-Joint Pliers,
Hacksaw, Screw Driver, File or Sandpaper
Materials Required:
1-1/2” ABS or PVC Pipe with Cement to match
Threaded Adapter (Pipe to Pump)
Check Valve – Purchase an FP0026-10 (goes 

in the discharge line) or FP0026-6D (goes in 

the pump discharge). If your check valve does 

not have an 1/8” anti-airlock hole, drill one in 

the discharge pipe just above where it screws 

into the pump discharge. Be sure to install the 

check valve so that the flow will be away from 

the pump.

California Proposition 65 Warning

This product and related accessories 

contain chemicals known to the State of 

California to cause cancer, birth defects or other 

reproductive harm.

Содержание CLZT7450

Страница 1: ...n sobre el funcionamiento instalación o mantenimiento de la bomba Llame al 800 535 4950 Español Paginas 11 19 2014 Pentair Ltd All Rights Reserved CL965 06 16 14 Models CLZT7450 6764 0213 OWNER S MANUAL Submersible Plastic Sump Pumps MANUAL DEL USUARIO Bomba sumergibles para sumideros 293 Wright Street Delavan WI 53115 Phone 800 535 4950 Fax 800 526 3757 www tractorsupply com ...

Страница 2: ... electric company or hydro authority to shut off service to the house or call your local fire department for instructions After turning off the power remove the pump for service C Protect the electrical cords from sharp objects hot surfaces oil and chemicals Avoid kinking the cords Replace damaged or worn cords D Do not lift the pump by the power cord Risk of fire Plastic pipe glue is extremely fl...

Страница 3: ...rews into the pump discharge Install the check valve above this hole but keep it as close to the pump as possible Be sure the hole is below the waterline and below the check valve 2D To reduce noise and vibration cut the discharge pipe near the pump and fasten a short length of rubber hose 1 7 8 48 mm I D e g radiator hose into it with hose clamps 3 Place the pump in the sump make sure that nothin...

Страница 4: ...pump to a suitable electrical ground such as a grounded water pipe a properly grounded metallic raceway or a ground wire system Do not cut off the round ground pin 6 After you have installed the piping check valve and float switch the pump is ready for operation Check the pump by filling the sump with water and observing the pump s operation through one complete cycle For switch settings see Elect...

Страница 5: ...e water in the sump see off switch setting below If you are running the pump manually and water stops coming out of the discharge the pump has probably run dry Shut it off immediately and check the water level Figure 7 LIFT The vertical distance the pump actually lifts water The higher the lift the lower the flow NOTICE The friction caused by water running through the pipe will also on longer pipe...

Страница 6: ... Assembly 1 PS17 54 2 Impeller1 1 PS5 34P 3 Vertical Float Switch Assembly 1 FPS17 66 P2 NOTICE If motor fails replace entire pump 1 See Page 8 for impeller replacement instructions All fasteners are 8 32 x 1 2 stainless steel Purchase locally 6763 0213 2 1 6621 0812 3 4 ...

Страница 7: ...the switch after first checking that switch is functional Restricted discharge obstacle or ice in the piping Unplug the pump remove it from the sump and clean the pump and piping Restricted intake screen Unplug the pump remove it from the sump and clean the intake screen and impeller Pump operates but delivers little or no water Low line voltage If the voltage is below 110 volts check the size of ...

Страница 8: ...oosens to the right Step 3 Thread the new impeller onto the motor shaft as shown left hand thread tightens to the left Step 4 With the pump upside down reinstall lower volute ensuring arrows and rib indicators are aligned Re mount the motor on the base Be sure to mount it so that the switch is clear of the discharge and all other obstructions in the sump Last Run the pump through one complete cycl...

Страница 9: ...commercial rental applications Sewage Pumps DO NOT return a sewage pump that has been installed to your retail store Contact CountyLine Customer Service Sewage pumps that have seen service and been removed carry a contamination hazard with them If your sewage pump has failed Wear rubber gloves when handling the pump For warranty purposes return the pump s cord tag and original receipt of purchase ...

Страница 10: ...this page intentionally left blank ...

Страница 11: ...o llame a su empresa o autoridad de servicio eléctrico para que corte el servicio a la casa o llame a su departamento local de bomberos para obtener instrucciones al respecto Después de desconectar la corriente eléctrica saque la bomba para realizar los trabajos de reparación o mantenimiento C Proteja los cordones eléctricos de objetos filosos superficies calientes aceite y sustancias químicas Evi...

Страница 12: ...e retención 2D Para reducir el ruido y las vibraciones corte la tubería de descarga cerca de la bomba y fije un tramo de manguera de caucho corto 1 7 8 48 mm de diámetro interior por ejemplo una manguera de radiador en la misma con abrazaderas para manguera 3 Coloque la bomba en el sumidero verifique que nada interfiera con el funcionamiento del interruptor Para modelos de interruptores anclado el...

Страница 13: ...una tubería de agua conectada a tierra una canalización metálica debidamente conectada a tierra o un sistema de cable a tierra No corte la punta redonda de conexión a tierra 6 Después de haber instalado la tubería la válvula de retención y el interruptor de flotador la bomba estará lista para funcionar Inspeccione la bomba llenando el sumidero de agua y observando su funcionamiento por un ciclo co...

Страница 14: ...rga es probable que la bomba esté seca consulte las graduaciones de apagado del interruptor abajo Apáguela inmediatamente y verifique el nivel del agua LEVANTE ALTURA El levante la altura es la distancia vertical efectiva a la cual la bomba levanta el agua Cuanto más alto sea el levante menor será el flujo AVISO La fricción provocada por el agua que corre a través de la tubería también reducirá el...

Страница 15: ...3P 3 Unidad del interruptor de flotador vertical 1 FPS17 66 P2 AVISO Si falla el motor reemplace toda la bomba Consulte la página 24 para obtener las instrucciones sobre cómo reemplazar el impulsor Todas las fijaciones son 8 32 x 1 2 de acero inoxidable En venta localmente CLZT7450 6763 0213 2 1 6621 0812 3 4 ...

Страница 16: ...dor La bomba no se apaga Interruptor de flotador defectuoso Reemplace el interruptor de flotador Descarga restringida obstáculo o hielo en la tubería Desenchufe la bomba sáquela del sumidero y limpie la bomba y la tubería Flotador obstruido Mueva la bomba en el sumidero o elimine la obstrucción Malla de admisión restringida Desenchufe la bomba sáquela del sumidero y limpie la malla de admisión y e...

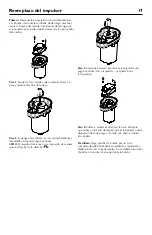
Страница 17: ...gún se ilustra AVISO El impulsor tiene una rosca izquierda de manera que se afloja hacia la derecha Paso 3 Enrosque el nuevo impulsor en el eje del motor según se ilustra rosca izquierda se aprieta hacia la izquierda Paso 4 Vuelva a montar el motor en la base Verifique que se haya colocado de manera que el interruptor quede despejado de la descarga y de toda otra obstrucción en el sumidero Por últ...

Страница 18: ...caciones comerciales o de alquiler Bombas cloacales NO devuelva una bomba cloacal que se haya instalado a su tienda minorista Comuníquese con el Departamento de Atención al Cliente de CountyLine Las bombas cloacales que hayan estado en servicio y se hayan removido pueden representar un peligro de contaminación Si su bomba cloacal ha fallado Use guantes de caucho cuando manipule la bomba Para los f...

Страница 19: ...this page intentionally left blank ...

Страница 20: ......

Отзывы: