
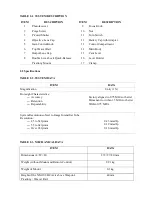


5
Special Wrench
- an instrument used for repositioning the adapter in the NM-108
BC battery cap, depending on the battery being installed.
1
6
CR123А Battery
- a single lithium battery used to power the NM-108 BC.
1
7
Soft Case
- used for carrying / storage of the NM-108 BC and its accessories.
1
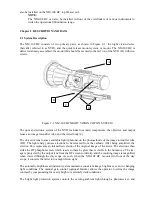
2.4 Key Features
•
Converts your daytime scope, sight, or binoculars into a night vision ones
•
Mounts in front of any day scope with no re-zeroing required
•
Available in a variety of high performing Gen 2+ and Gen 3 image intensifier tube options
•
Wireless remote control
•
Both automatic and manual gain control
•
Powered by a single AA or CR123A battery
•
Bright light cut-off system
•
Bright light cut-off and low battery indications in the viewing area
•
Interrupting time 60 minutes (optional feature)
•
Filled with dry nitrogen to prevent internal fogging
•
Mounts on Picatinny / Weaver rail with a quick release mount
•
Mil Standard compliant
2.5 System Limitations
The NM-108 BC requires some ambient light (moonlight, starlight, etc.) to operate. Factors that can
reduce natural night light and negatively affect the efficiency and operation of the NM-108 BC in-
clude: rain, fog, sleet, snow, and smoke; passing cloud cover and objects that produce shadows; and
low-contrast environments such as snow-covered territory, sandy deserts, large bodies of water or
grassy hills.
Chapter 3. OPERATING INSTRUCTIONS
3.1 Installation and Mounting
CAUTION:
To protect the image intensifier tube when the device is not in use or when it is being operated
in daylight, keep the protective objective lens cap securely fitted over the lens.
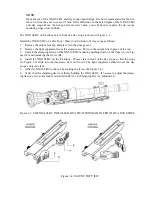
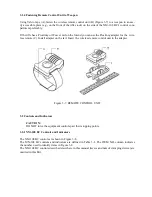
3.1.1 NM-108 BC Battery Installation
NOTE:
At operating temperatures below -20 °C , alkaline battery life will be severely reduced. Under
said conditions, the use of lithium battery is recommended.
CAUTION:
Ensure that the device is off before installing a battery.
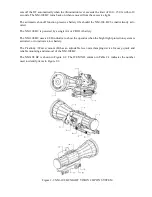
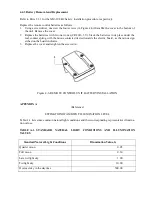
Install the battery as follows (refer to Figure 3-1):
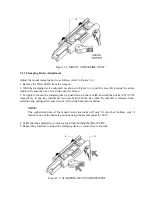
1. Unscrew the battery cap (E) and check the position of the adapter (D). See Figure 3-2 for the cor-
rect positioning of the threaded adapter, which changes depending on the battery being installed.
2. If necessary, change the adapter position in the cap. Use the special wrench.


