background image

Part 1 – Introduction

9

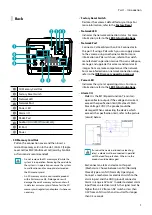
Back

1

2345

6
7
8

9

0

8

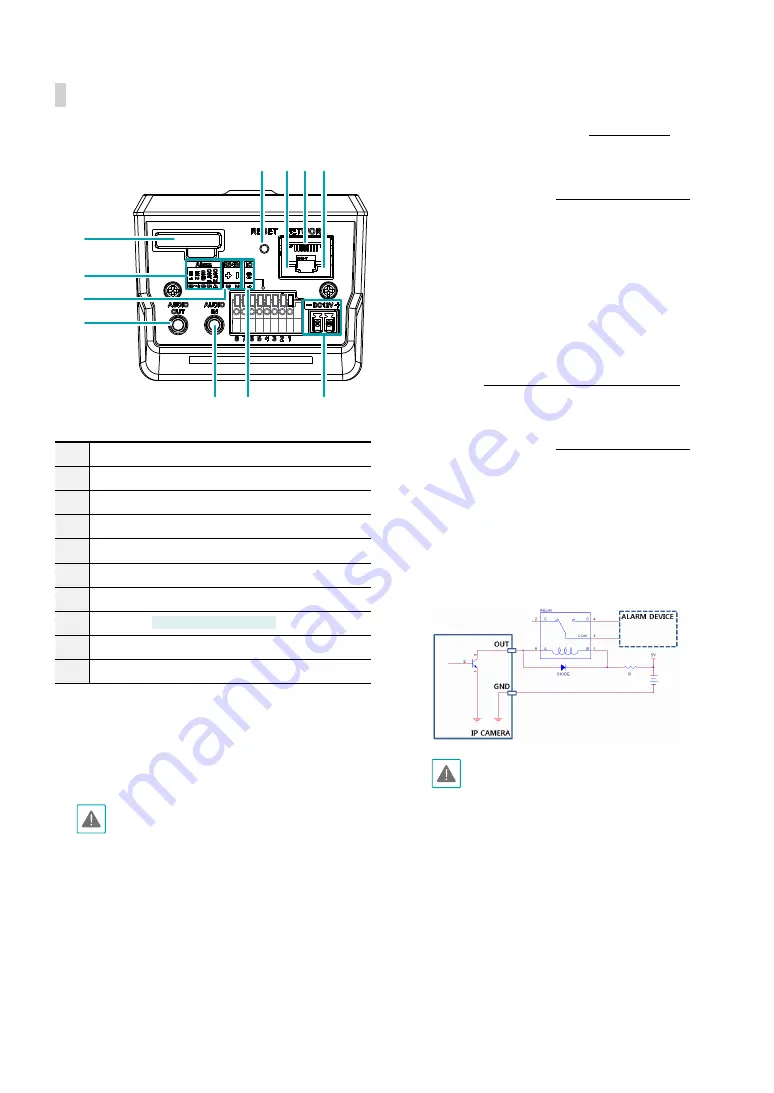
1

SD Memory Card Slot

2

Factory Reset Switch

3

Network LED

4

Network Port

5

Power LED

6

Alarm I/O

7

RS485 Port

8

Audio I/O 

DC-B4501X model only

9

IO Port

0

Power


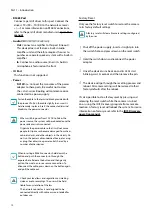
SD Memory Card Slot


Pull on the connection cover and then insert a 
microSD memory card into the slot. (An SLC (Single 
Level Cell) or MLC (Multi Level Cell) card by SanDisk 
or Transcend is recommended)


Do not remove the SD memory card while the 
system is in operation. Removing the card while 
the system is in operation can cause the system 
to malfunction and/or corrupt data stored on 
the SD memory card.


An SD memory card is a consumable product 
with a finite service life. Prolonged use will 
damage the card's memory sectors and result 
in data loss or memory card failure. Test the SD 
memory card regularly and replace it whenever 
necessary.


Factory Reset Switch

Restores the camera's default factory settings. For 
more information, refer to the 

Factory Reset

.


Network LED

Indicates the network connection status. For more 
information, refer to the 

LED Status Indications

.


Network Port

Connect a Cat5e cable with an RJ-45 connector to 
this port. If using a PoE switch, you can supply power 
to the camera using an ethernet cable. For more 
information on PoE switch use, refer to the switch 
manufacturer's operation manual. You can configure, 
manage, and upgrade this camera and monitor its 
images from a remote computer over the network. 
For more information on network connection setup, 
refer to the 

IDIS Discovery operation manual

.


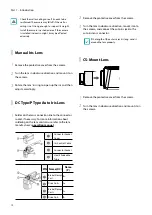
Power LED

Indicates the system's operating status. For more 
information, refer to the 

LED Status Indications

.


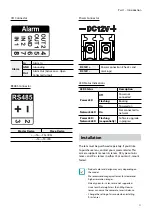
Alarm I/O


 -

Out

: It is the BJT (Bipolar Junction Transistor) - 

open collector output. If the voltage and current 
exceed the specification limit (Max load: 30mA, 
Max Voltage: 5VDC), the product could be 
damaged. When connecting the device which 
exceeds the specification limit, refer to the picture 
(circuit) below.

If used with an external inductive load (e.g. 
relay), a diode must be connected in parallel 
with the load for protection. Otherwise, the 
product could be damaged.

 -

In

: Connect an alarm-in device to this port. 

(Mechanism: Choose between an NC (Normally 
Closed) type or an NO (Normally Open) type) 
Connect a mechanical or electrical switch to the 
alarm in port and the GND (ground) connector. 
Alarm in range is 0V to 5V. In order to detect alarm 
input from an electrical switch, the signal must be 
higher than 4.3V from an NC switch or less than 
0.3V from an NO switch and must last for longer 
than 0.5 seconds.

Содержание DirectIP DC-B Series

Страница 1: ...Powered by DC B Series Installation Manual DC B4501X DC B4501X A ...

Страница 2: ...manufacturer is not responsible for any problems resulting from the use thereof The information contained herein is subject to change without notice Revisions or new editions to this publication may be issued to incorporate such changes It is recommended that first time users of this network camera and individuals who are not familiar with its use seek technical assistance from their retailer rega...

Страница 3: ...ble system This will prevent damage to the equipment due to lightning and power line surges If thunder or lightning is common where the equipment is installed use a surge protection device 10 Overloading Do not overload wall outlets and extension cords as this can result in the risk of fire or electric shock 11 Objects and Liquids Never push objects of any kind through openings of this equipment a...

Страница 4: ...ers should contact either the retailer where they purchased this product or their local government office for details of where and how they can take this item for environmentally safe recycling Business users should contact their supplier and check the terms and conditions of the purchase contract This product should not be mixed with other commercial wastes for disposal Copyright 2021 IDIS Co Ltd...

Страница 5: ...m 8 Back 9 Installation 11 Manual Iris Lens 12 DC Type P Type Auto Iris Lens 12 CS Mount Lens 12 C Mount Lens 13 Dimensions 13 Part 2 Camera Connection 14 With DirectIP NVR based Layout 14 With non DirectIP NVR based Layout 15 Part 3 Appendix 16 Troubleshooting 16 Specifications 17 Table of Contents ...

Страница 6: ...ording reliability Remote monitoring via web browser or remote software Automatic web casting code HTML generation Up to 10 simultaneous remote connections IP filtering HTTPS SSL IEEE 802 1X and configurable user authority levels for greater security Network bandwidth limitation and MAT features for more efficient use of network bandwidth Easy network access via UPnP Universal Plug and Play functi...

Страница 7: ...roduct check inside the box to make sure all the following accessories are included External appearances and colors of the accessories may vary depending on the model Network Camera C Mount Ring Terminal Block Protective Cover attaches to camera Quick Guide ...

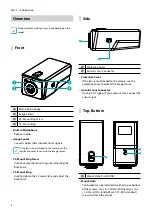
Страница 8: ... the mount ring after adjusting the Back Focus CS Mount Ring Used to tighten the CS mount lens and adjust the Back Focus Side 1 2 1 Protective Cover 2 Auto Iris Lens Connector Protective Cover If the lens is not attached to the camera use the protective cover to protect the image sensor Auto Iris Lens Connector If using a DC type or P type auto iris lens connect the auto iris jack Top Bottom 1 1 1...

Страница 9: ...E switch you can supply power to the camera using an ethernet cable For more information on PoE switch use refer to the switch manufacturer s operation manual You can configure manage and upgrade this camera and monitor its images from a remote computer over the network For more information on network connection setup refer to the IDIS Discovery operation manual Power LED Indicates the system s op...

Страница 10: ...arpet or a rug or plug the cable into a power outlet shared by a number of other devices When inserting a RS485 connector hold down the button and push the connector in through the exposed hole Release the button and then gently pull on the wire to ensure a secure connection To disconnect the cable press down on the button again and pull the cable out Check your local laws and regulations on makin...

Страница 11: ... Flashing sequentially Software upgrade in progress Installation The lens must be purchased separately If you d like to purchase a lens contact your camera retailer This camera supports manual iris lenses DC type auto iris lenses and P iris lenses in either CS mount or C mount format Product color and design may vary depending on the model We recommend megapixel lenses for clearer and higher resol...

Страница 12: ... on the lens connection line to the connector socket if necessary For more information about soldering on the lens control wire refer to the lens manufacturer s operation manual 1 Connector Socket Cover 2 Iris Control Cable 3 Connector Socket 4 Heat Shrinkable Tube PIN Name DC Name P 1 Brake Damp Coil B 2 Drive Coil A 3 Brake Damp Coil A 4 Drive Coil B 2 Remove the protective cover from the camera...

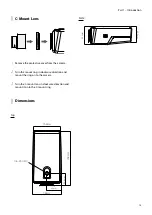
Страница 13: ... cover from the camera 2 Turn the mount ring in clockwise direction and mount the ring on to the camera 3 Turn the C mount lens in clockwise direction and mount it on to the C mount ring Dimensions top 75 9mm 1 4 20 UNC 150mm 33 9mm 39mm 78mm Side 63 5mm 52 9mm ...

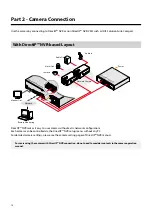
Страница 14: ...Power Remote Monitoring Monitor Out Alarm Out Sensor In Audio In Network DirectIP NVR makes it easy to use cameras without extra network configurations Each camera can be controlled via the DirectIP NVR setup menu without any PC For detailed camera settings please see the camera setting pages of DirectIP NVR manual For users using the camera with DirectIP NVR connection do not need to consider con...

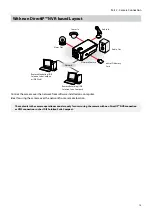
Страница 15: ...ite Compact microSD Memory Card Alarm Out Sensor In Audio Out Audio In Control the camera over the network from software installed on a computer Ideal for using the camera over the network from a remote location The contents in the camera operation manual are only for users using the camera with non DirectIP NVR connection or VMS connection such as IDIS Solution Suite Compact ...

Страница 16: ...s picking up an overly bright light source adjust the camera s position angle accordingly Video color appears incorrect Check the white balance settings If using the Auto option it may take some time for the white balance to be adjusted Images are blinking If the camera is pointed at the sun or a fluorescent lamp adjust the camera s angle away Lost the admin ID and password and unable to connect t...

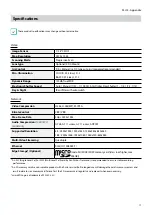
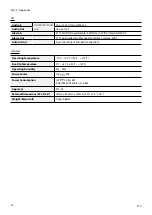
Страница 17: ...l CBR VBR Max Frame Rate 30ips 2592x1944 Audio Compression DC B4501X model only G 726 G 711 u Law G 711 a Law ADPCM Supported Resolution 4 3 2592x1944 1920x1440 1280x960x 640x480 16 9 2592x1456 1920x1080 1280x720 640x360 Multi Video Streaming Quadruple Ethernet RJ45 10 100BASE T Edge Storage Optional micro SD SDHC SDXC memory card class 6 or higher max 256GB An SLC Single Level Cell or MLC Multi L...

Страница 18: ...ors Max load 30mA Max voltage 5VDC Auto Iris Out 4 pin mini din jack standard connection General Operating Temperature 10 C 50 C 14 F 122 F Boot Up Temperature 0 C 50 C 32 F 122 F Operating Humidity 0 90 Power Source 12V PoE Power Consumption 12V 0 5A 6W PoE IEEE 802 3af Class 2 5 6W Approval FCC CE External Dimensions W x H x D 78mm x 63 5mm x 150mm 3 07 x 2 5 x 5 9 Weight Main Unit 0 3kg 0 66lb ...

Страница 19: ......

Страница 20: ...IDIS Co Ltd For more information please visit at www idisglobal com ...

Отзывы: