background image

2-4 


FLOOR PLAN 


Machine top view 


Содержание SH-510LDMM

Страница 1: ...COSEN SAWS SH 510LDMM Semi Automatic Linear Guided Double Miter Cutting Horizontal Band saw Standard model Instruction Manual The Pinnacle of Cutting Performance Cosen Mechatronics Co Ltd ...

Страница 2: ......

Страница 3: ...943 1031 web www cosensaws com For China email service cosensaws cn phone 86 152 50127815 web www cosensaws cn Instruction Manual SH 510LDM Semi Automatic Linear Guided Double Miter Cutting Horizontal Band saw Standard model Ver 1 2018 01 30 2018 by COSEN MECHATRONICS CO LTD No part of this publication may be photocopied or otherwise reproduced without the prior written permission of COSEN Printed...

Страница 4: ......

Страница 5: ...our hands clothing or gloves are caught by the running blade Make sure any use of fire is prohibited in the shop and install a fire extinguisher or other fire control device near the machine when cutting titanium magnesium or any other material that produces flammable chips Never leave the machine unattended when cutting flammable materials Use a water soluble cutting fluid on this machine Oil bas...

Страница 6: ...ce has been clamped firmly If the workpiece is not securely clamped it will be forced out of the vise during cutting Take preventive measures when cutting thin or short pieces from the work to keep them from falling It is dangerous if the cut pieces fall Use roller tables at the front and rear sides of the machine when cutting long work It is dangerous if the work piece falls off the machine Turn ...

Страница 7: ...2 Machine Parts Identification 2 3 Floor Plan 2 5 Section 3 Moving Installation 3 1 Location Environment 3 1 Unpacking Inspecting 3 2 Lifting 3 3 Illustration Lifting Points 3 5 Removing Shipping Bracket 3 6 Cleaning 3 6 Installing 3 6 Supplying Hydraulic Oil 3 6 Supplying Coolant 3 7 Connecting Electric Power 3 7 Leveling Anchoring 3 8 Installing Roller Table Optional 3 9 Installing Fire Control ...

Страница 8: ...nning the Machine 4 26 Cutting Operation 4 27 Starting an Automatic Cutting 4 28 Using Top Clamp for Bundle Cutting 4 28 Terminating a Cutting Operation 4 29 Section 5 Electrical System 5 1 Electrical Circuit Diagrams 5 1 Section 6 Hydraulic System 6 1 Hydraulic Diagrams 6 1 Section 7 Bandsaw Cutting A Practical Guide 7 1 Introduction 7 1 Saw Blade Selection 7 2 VISE LOADING 7 3 BladeBreak In 7 4 ...

Страница 9: ...n 9 Troubleshooting 9 1 Introduction 9 1 Precautions 9 2 General Troubles Solutions 9 2 Minor Troubles Solutions 9 3 Motor Troubles Solutions 9 3 Blade Troubles Solutions 9 4 Sawing Problems Solutions 9 5 Re Adjusting the Roller Table 9 12 Section 10 Parts 10 1 Spare Parts Recommendations 10 1 Part List 10 2 Section 11 Warranty 11 1 Warranty 11 1 ...

Страница 10: ......

Страница 11: ...afety related symbols indicating important information that you should take note of prior to use of the machine or part of its functions These important safety instructions do not cover all possible situations that might occur It is your responsibility to take caution and follow procedures stated in this manual when installing maintaining and operating your machine Cosen will not be liable for dam...

Страница 12: ...a sharp saw blade and keep the machine in its best and safest performance by following a periodical maintenance schedule Wear proper apparel during operation and when servicing the machine Some personal protective equipment is required for the safe use of the machine e g protection goggles Moving parts should be kept in proper alignment and connection with the machine Check for breakage mounting a...

Страница 13: ...er the machine is running Do not remove any of these safeguard devices under any circumstances except when servicing the machine Even skilled service technicians should still take cautions when performing repairs or service on the machine with any of these protectors removed It is the responsibility of the user to make sure all these elements are not lost and damaged Take note of the following mai...

Страница 14: ...re that the machine will stop whenever the wheel covers are open This device is to protect users from being cut by the running saw blades Among all these safety switches some of them are used to protect the users and some of them are used to prevent damage to saw blades the workpiece and the machine itself etc We have taken every precaution to prevent injury or damage and to provide safe and econo...

Страница 15: ...o assure that the machine will stop whenever the wheel covers are open This device is to protect users from being cut by the running saw blades Among all these safety switches some of them are used to protect the users and some of them are used to prevent damage to saw blades the workpiece and the machine itself etc We have taken every precaution to prevent injury or damage and to provide safe and...

Страница 16: ...1 6 Illustration Emergency Stop Emergency Stop Button ...

Страница 17: ...hine or on the accessories DANGER Running Blade Blade runs through this area Keep your hands away from a running blade to avoid severe injury The arrow indicates direction of the blade Cutting Hazard KEEP COVER CLOSED KEEP HAND OFF while the blade is running Turn power off before opening cover Failure to follow the warning can result in severe injury Hazardous Voltage TURN POWER OFF before servici...

Страница 18: ...1 8 Illustration Safety Labels ...

Страница 19: ...he prescribed maintenance schedule Refer to Section 8 2 If maintenance does not seem to solve the problem follow the troubleshooting procedures under Section 9 CE COMPLIANCE Cosen s CE model is designed to satisfy regulations of the Council Directive on the approximation of the laws of the Member States relating to machinery 2006 42 EC Annex I Essential health and safety requirements relating to t...

Страница 20: ......

Страница 21: ...tically when the saw blade is broken protecting both the operator and the machine Convenience High Performance The machine is designed in the way that the operation and adjustment can be easily performed The machine will stop automatically when out of stock Dual valve system is designed to achieve optimal cutting performance with the simple setting of feed rate and perspective cutting pressure for...

Страница 22: ...x 1 33 x 0 04 Tension Hydraulic with automatic blade breakage detection Guide Interchangeable tungsten carbide Cleaning Steel wire brush with flexible drive shaft driven by main motor Motor Output Saw Blade 3 HP 2 2kW Hydraulic 1 HP 0 75 kW Coolant Pump 1 8 HP 0 1 kW Tank Capacity Hydraulic 32 5 L Coolant 60 L Workbed Height 780 mm 30 7 Gross Weight 2 900 kgs 6 380 lbs Floor Space L x W x H 2562 2...

Страница 23: ...2 3 MACHINE PARTS IDENTIFICATION Control panel Vise Motor Saw bow Idle wheel Drive wheel Vise hydraulic cylinder Chip conveyor optional ...

Страница 24: ...2 4 FLOOR PLAN Machine top view ...

Страница 25: ...2 5 Machine front view ...

Страница 26: ...2 6 Machine side view ...

Страница 27: ...pection Refer to Section 2 General Information Specification for machine dimensions and floor space Environment Well lighted 500 lumen at minimum Floor kept dry at all times in order to prevent operators from slipping Away from direct exposure to the sunlight Room temperature between 5 C to 40 C Humidity level kept at 30 95 without condensation to avoid dew on electric installation and machine Awa...

Страница 28: ...attention to machine surface equipments furnished and the electrical and hydraulic systems for damaged cords hoses and fluid leaks In the event of damage caused during shipping please contact your dealer and consult about filing a damage claim with the carrier Your machine comes in with a set of tools for you to maintain the machine The accessories furnished are as follows 1 Tool box 1 pc 2 Grease...

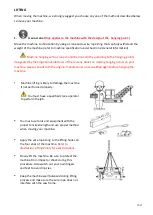
Страница 29: ...on your machine please consult with the original manufacturer or its qualified agent before hanging the machine Machine lifting is likely to damage the machine if not performed properly You must have a qualified crane operator to perform the job You must use tools and equipment with the proper tensile strength and use proper method when moving your machine Apply the wire rope sling to the lifting ...

Страница 30: ... lifting points designated by the original manufacturer If there is any doubt on missing lifting points on your machine please consult with the original manufacturer or its qualified agent before lifting the machine Machine lifting is likely to damage the machine if not performed properly You must have a qualified forklift operator to perform the job You must apply proper forklift technique to avo...

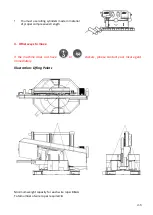
Страница 31: ... of proper compressive strength 4 Other ways to move If the machine does not have or stickers please contact your local agent immediately Illustration Lifting Points Minimum weight capacity for each wire rope 3 ton Total number of wire ropes required 4 ...

Страница 32: ...are prone to rust Do not remove the rust preventive grease with a metal scraper and do not wipe the painted surfaces with solvent as doing so would damage surface paint INSTALLING Cosen s bandsaw machine is relatively easy to install Follow these six easy steps to install your machine Supplying hydraulic oil Open the filler cap and fill the hydraulic oil tank to above 2 3 or full level Check the s...

Страница 33: ...ant level remaining in the tank Always check the coolant supply before starting the machine If the coolant pump is started without enough coolant supply in the tank the pump and its drive motor may be damaged Refer to specification chart under Section 2 General Information for tank capacity Consult your coolant supplier for bandsaw use regarding coolant type and mix ratio ...

Страница 34: ...e machine circuit breaker switch on the electrical compartment door is turned to OFF 3 Remove the screw securing the electrical compartment and then open the door 4 Pull the power supply cable and grounding conductor through the power supply inlet into the electrical compartment Shown right 5 Connect the power supply cable to the circuit breaker N F B to the R S and T terminals and connect the gro...

Страница 35: ...hine is likely to vibrate fix the machine to the floor with anchor bolts Shock absorption steel plates are provided and can be placed under each leveling bolt to prevent their sinking into the concrete floor Installing roller table optional The roller table is used to support long material at the rear and or the front of the machine If you have ordered the optional roller table for cutting long ma...

Страница 36: ... turn off the power 2 Fix the saw frame using the shipping bracket that originally came with the machine 3 If you are shipping the machine pack the machine carefully with industrial plastic wraps to protect it from dust 4 Use a crane or forklift to raise it If a crane is used to lift the machine ensure that the lifting cable is properly attached to the machine 5 Do not forget to include the equipm...

Страница 37: ...ES OPTIONAL ACCESSORIES UNROLLING INSTALLING THE BLADE ADJUSTING WIRE BRUSH PLACING WORKPIECE ONTO WORKBED POSITIONING WORKPIECE ADJUSTING BLADE SPEED ADJUSTING COOLANT FLOW BREAKING IN THE BLADE TEST RUNNING THE MACHINE CUTTING OPERATION USING TOP CLAMP FOR BUNDLE CUTTING TERMINATING A CUTTING OPERATION ...

Страница 38: ...material in place before cutting long workpieces Always make sure the material is clamped firmly in place before starting to cut Do not remove jammed or cut off pieces until the blade has come to a full stop Keep fingers away from the path of the blade Protection devices should be in place at all times For your own safety never remove these devices Disconnect machine from the power source before m...

Страница 39: ...he material is flammable Never take your eyes off the machine while in operation Cutting fluid For cooling and lubrication purpose we recommend you use water soluble cutting fluids The following table lists out its pros and cons for your reference Pro Con Have a high cooling effect Not flammable Economical Does not require cleaning of the cut products Remove machine paint Lose its rust protection ...

Страница 40: ...operator must fully understand the function of each switch and button before operating the machine No Control 1 Blade speed display 2 Blade speed control knob 3 Power indicator lamp 4 Last cut function ON OFF 5 Projection lamp ON OFF 6 Hydraulic ON OFF button 7 Saw blade ON OFF button 8 Coolant Spray switch 9 Emergency stop button 10 Vise open clamp switch 11 Saw bow up button 12 Saw bow down butt...

Страница 41: ... under the workbed Turning the knob clockwise increases the blade speed 3 Power indicator lamp When the lamp is on it indicates the power to the machine is turned on 4 Last cut function ON OFF STOP ON When the mode is selected the blade will automatically stop and the hydraulic system will shut down in 10 seconds after the current cut is finished ...

Страница 42: ... until the operator lets go of the button or until the vises are fully opened When turning the switch to the right the vises will clamp until the operator lets go of the button Turn and hold the switch to the right for three seconds and let go of it the vise will automatically close until it is fully clamped 11 Saw bow up button When this button is pressed the saw bow rises until the operator lets...

Страница 43: ...n a good cutting result choose the right cutting pressure by turning the knob until it points to your material on the color chart 2 Blade descend speed control knob This knob is used to adjust the descend speed of the saw blade Turning the knob clockwise increases the blade descend speed Blade descend speed is a determining factor to a good cutting time and quality cutoff surface Set the blade des...

Страница 44: ... detector Besides detecting the blade speed the speed motion detector also functions as a safety device The speed motion detector protects operators and the machine by preventing blade overloads and consequent damages if a saw blade breaks or skids Once blade breakage or slippage is detected the drive wheel will stop in 10 seconds Inverter This inverter is installed inside the machine base It is u...

Страница 45: ...saw blade teeth so that blade life can be extended Keep hands away from the transmission shaft and the brush while the wire brush is running Turn off the hydraulic motor or the main power switch before performing maintenance or cleaning on the wire brush drive system Hydraulic top clamp device The device is installed on the saw bow Used for cutting bundles the top clamp will hold the material tigh...

Страница 46: ...ssure valve As a regular maintenance remove the chip conveyor and clean all chip deposits inside Vibration Damper Vibration damper roller is installed on the left saw arm It reduces the high frequency noise while cutting large work piece Blade Deviation Detector Calibration Procedure This device detects blade deviation If the blade deviates beyond the preset range the machine will stop automatical...

Страница 47: ...switch until the deviation value is within 0 03 mm 5 Tighten inner nut back then the outer nut If the deviation value is not changing while adjusting the proximity switch try pulling below roller If deviation value is still not changing it means the proximity switch is broken 2M Roller Table The optional 2M roller table supports the work material and ensures the material is fed in smoothly Spray d...

Страница 48: ...e work piece The operator can use the light as reference to adjust the cutting dimension of the work piece UNROLLING INSTALLING THE BLADE Always wear leather gloves and protection glasses when handling a blade Unrolling the blade Please follow the procedures illustrated below ...

Страница 49: ...djacent rollers Step 11 Place the blade to the drive wheel and press the back of the blade against the flange of the drive wheel Step 12 Make sure the back of the blade is also pressed against the flange of the idle wheel Step 13 Turn the tension controller handle to position to obtain blade tension Step 14 Make sure the sides of the blade are in close contact with the carbide inserts and then tig...

Страница 50: ... vise open close switch to the right until the workpiece is securely clamped confirm cutoff point 2 Press the saw bow down button to lower the saw bow until it descends to just about 10mm 0 4 inch above the workpiece precision position 3 Adjust until the cutoff point on the workpiece aligns with the blade line ADJUSTING BLADE SPEED Step 1 Set the flow control to 0 position Step 2 Press the saw bla...

Страница 51: ...flow amount If the chips are granulated decrease the coolant flow amount BREAKING IN THE BLADE When a new saw blade is used be sure to first break in the blade before using it for actual extended operation Failure to break in the blade will result in less than optimum efficiency To perform this break in operation the following instructions should be followed Step 1 Reduce the blade speed to one ha...

Страница 52: ...sassemble shipping brackets and bolts Step 2 Install roller table optional Step 3 Turn on the relay switch in the control box Step 4 Elevate the saw bow If your coolant pump is in reverse and the machine cannot run please change the electrical phase Step 5 After the saw bow ascends extend the quick approach device optional Step 6 Remove the rust prevention grease with cleaning oil or kerosene Step...

Страница 53: ...ed to at least wider than the width of the workpiece Step 3 Position your workpiece Step 4 Clamp the workpiece Step 5 Turn the cutting pressure control knob to adjust blade cutting pressure according to the material Step 6 Adjust blade descend speed control knob to obtain a suitable blade descend speed for your material Step 7 Start running the blade Before you start cutting check again that there...

Страница 54: ... the work bed The purpose of bundle cutting is to prevent cut pieces from scattering across the work bed Step 4 For subsequent cutting procedures refer to the instructions under cutting operation TERMINATING A CUTTING OPERATION STOP To terminate a cutting operation press either the saw bow up button or the saw blade stop button The saw blade will stop running when the saw bow up button or the saw ...

Страница 55: ...5 1 Section 5 ELECTRICAL SYSTEM ELECTRICAL CIRCUIT DIAGRAMS ...

Страница 56: ...5 2 ...

Страница 57: ...5 3 ...

Страница 58: ...5 4 ...

Страница 59: ...5 5 ...

Страница 60: ...5 6 ...

Страница 61: ...6 1 Section 6 HYDRAULIC SYSTEM HYDRAULIC DIAGRAMS ...

Страница 62: ...6 2 ...

Страница 63: ...7 1 Section 7 BANDSAW CUTTING A PRACTICAL GUIDE INTRODUCTION SAW BLADE SELECTION VISE LOADING BladeBreak In SOLUTIONS TO SAWING PROBLEMS ...

Страница 64: ...nds for the minimum tooth distance in the toothing interval Constant Variable Min Max 4 Set The bending of teeth to right or left to allow clearance of the back of the blade through the cut 5 Width The nominal dimension of a saw blade as measured from the tip of the tooth to the back of the band 6 Thickness The dimension from side to side on the blade 7 Gullet The curved area at the base of the to...

Страница 65: ...blade from binding in the cut It may be either a regular set also called a raker set or a wavy set The regular or raker set is most common and consists of a pattern of one tooth to the left one tooth to the right and one which is straight or unset This type of set is generally used where the material to be cut is uniform in size and for contour cutting Wavy set has groups of teeth set alternately ...

Страница 66: ...band speed for the material to be cut 2 Reduce the feed force rate to achieve a cutting rate 20 to 50 of normal soft materials require a larger feed rate reduction than harder materials 3 Begin the first cut at the reduced rate Make sure the teeth are forming a chip Small adjustments to the band speed may be made in the event of excessive noise vibration During the first cut increase feed rate for...

Страница 67: ...e and longer life of the band saw machine a maintenance schedule is necessary Some of the daily maintenance usually takes just a little time but will give remarkable results for the efficient and proper operation of cutting BASIC MAINTENANCE It is always easy and takes just a little effort to do the basic maintenance But it always turns out to be a very essential process to assure the long life an...

Страница 68: ...the saw blade Replace the wire brush if it is worn out After ending a day s work Please remove saw chips and clean the machine with discharging the cutting fluid when work has been completed Do not discharge cutting fluid while the saw blade is operating because it will cause severe injury on operator s hand Be sure the saw blade is fully stop it will be performed after working inspection Every 2 ...

Страница 69: ...wer 2 Ambient temperature 5 40 3 Relative humidity 30 95 without condensation 4 Atmosphere use a plastic canvas to cover machine to avoid excessive dust acid fume corrosive gases and salt 5 Avoid exposing to direct sunlight or heat rays which can change the environmental temperature 6 Avoid exposing to abnormal vibration 7 Must be connected to earth TERMINATING THE USE OF THE MACHINE Waste disposa...

Страница 70: ...e oil of 600 hours of using Change it every year Regularly Omala oil HD220 Mobil Gear 630 Hydraulic system Inspect half a year Change oil every year Regularly Shell Tellus 32 Mobil DTE oil Light Hydraulic 24 Bearing Inserts Oil with lubricant but not excess Daily Shell R2 Band wheel Oil with lubricant but not excess Weekly Cylinder Oil with lubricant but not excess 6 Monthly Wire brush Oil with lu...

Страница 71: ... disable the machine from operating Generally speaking the system troubles in this machine model can be classified into three types namely GENERAL TROUBLES MOTOR TROUBLES and BLADE TROUBLES Although you may have other troubles which can not be recognized in advance such as malfunctions due to the limited life span of mechanical electric or hydraulic parts of the machine We have accumulated enough ...

Страница 72: ...er to Operating Instructions Adjusting Feed Excessive blade speed Refer to Operating Instructions Speed Selection Improper blade selection Refer to Operating Instructions Blade Selection Cannot make square cut Dull blade Replace blade Guide rollers not adjusted properly Refer to Adjustments Rear vise jaw not adjusted properly Set fixed vise jaw 90 to blade Excessive head pressure Reduce head press...

Страница 73: ... Install correct fuses or circuit breakers Motor fail to develop full power Power output of motor decreases rapidly with decrease in voltage at motor terminals Power line overloaded with lights appliances and other motors Reduce the load on the power line Undersize wires or circuit too long Increase wire sizes or reduce length of wiring General overloading of power company s facilities Request a v...

Страница 74: ...n drive wheel while cutting Wheels out of line Adjust wheels Blade line Run out or Run in Guides out of line For a straight and true cut realign guides check bearings for wear Excessive pressure Conservative pressure assures long blade life and clean straight cuts Support of blade insufficient Move saw guides as close to work as possible Material not properly secured in vise Clamp material in vise...

Страница 75: ...lamped workpiece Check and correct Excessively hard material surface Soften material surface Excessive cutting rate Reduce cutting rate Non annealed workpiece Replace with suitable workpiece Insufficient or lean cutting fluid Add fluid or replace Vibration near machine Relocate machine Non water soluble cutting fluid used Replace Air in cylinder Bleed air Broken back up roller Replace Use of non s...

Страница 76: ...h Material 18 Used Band Is Long On The Tooth Edge 9 Discolored Tips Of Teeth Due To Excessive Frictional Heat 19 Used Band Is Short On The Tooth Edge 10 Heavy Wear On Both Sides Of Band 20 Broken Band Shows A Twist In Band Length 1 Heavy Even Wear On Tips and Corners Of Teeth Probable Cause A Improper break in procedure B Excessive band speed for the type of material being cut This generates a hig...

Страница 77: ...eless wheel B Loose or improperly positioned side guides C Blade not perpendicular to cut D Blade rubbing against cut surface on return stroke of machine head E The teeth rubbing against a part of machine such as chip brush assembly guards etc 4 Chipped Or Broken Teeth Probable Cause A Improper break in procedure B Improper blade selection for application C Handling damage due to improper opening ...

Страница 78: ...y positioned chip brush C Excessive feeding rate or feed pressure D Movement or vibration of material being cut E Improper tooth pitch for cross sectional size of material being cut F Improper positioning of material being cut G Insufficient sawing fluid due to inadequate supply improper ratio and or improper application H Hard spots in material being cut I Band speed too slow for grade of materia...

Страница 79: ...y improper ratio and or improper application B Excessive band speed C Improper feeding rate D Band installed backwards 10 Heavy Wear On Both Sides Of Band Probable Cause A Chipped or broken side guides B Side guide adjustment may be too tight C Insufficient flow of sawing fluid through the side guides D Insufficient sawing fluid due to inadequate supply improper ratio and or improper application 1...

Страница 80: ...tt weld breaks See Observations 5 15 and 16 14 Heavy Wear In Only The Smallest Gullets Probable Cause A Excessive feeding rate B Too slow of band speed C Using too fine of a tooth pitch for the size of material being cut 15 Body Breaking Fracture Traveling In An Angular Direction Probable Cause A An excessive twist type of stress existed B Guide arms spread to capacity causing excessive twist from...

Страница 81: ... or short 19 on tooth edge C Cutting a tight radius 18 Used Band Is Long On The Tooth Edge Probable Cause A Side guides are too tight rubbing near gullets B Excessive preload band riding heavily against back up guides C Worn band wheels causing uneven tension D Excessive feeding rate E Guide arms are spread to maximum capacity F Improper band tracking back edge rubbing heavy on wheel flange 19 Use...

Страница 82: ...adjust TOOL measuring Measurement Horizontal balance Procedure 1 Screw or loosen the adjusting bolt to attain the horizontal balance leveling between the roller table and the machine frame 2 Ensure that the machine frame is not struck by the loaded material on the feeding table 3 Check the leveling by the measuring tool 4 After finished the adjusting fix the roller table If the feeding table and t...

Страница 83: ...IONS The following table lists the common spare parts we suggest you purchase in advance Part Name Part Name Saw blade Coolant tank filter Wire brush Steel plates Carbide inserts Rollers Bearings Belt Hydraulic tank leak proof gasket Duster seal Rubber washer Snap ring Oil seal O ring ...

Страница 84: ......

Страница 85: ...d normally acceptable practices This warranty does not apply if the machine has been altered or modified without our prior written consent In the case of components or units purchased by Seller including work holding devices tool holders motors and controls the warranty shall not exceed that received by Seller from the supplier of such components or units Seller will not assume responsibility for ...

Страница 86: ......

Страница 87: ......

Страница 88: ...Vertical Plate Saws Horizontal Billet Saws NC CNC Band Saws Structural Miter Cutting Saws Automatic Band Saws Visit our website at www cosen com COSEN MECHATRONICS CO LTD ...

Отзывы: