background image


- 18 -

Please use Lube ‘N Walk, or a non petroleum based silicone such as “Napa 8300” (available at most stores). 

TO APPLY LUBRICANT TO THE WALKING BELT 

Position the walking belt so that the seam is located on top and in center of the walking board. 

Insert the spray nozzle into the spray head of the lubricant can. 

While lifting the side of the walking belt, position the spray nozzle between the walking belt and the board 

approxinateluy6” from the front of the treadmill. Apply the silicone spray to the walking board, moving from 

the front of the treadmill to the rear. Repeat this on the other side of the belt. Spray approximately 4 

seconds on each side. 

Allow the silicone to “set” for 1 minute before using the treadmill.   


REMARK: When the treadmill is over load by any case, for the using safety   

the fuse will be broken and the power will be cut off . Change a 

new fuse and start again. 

Содержание AC700

Страница 1: ...TREADMILL MANUAL AC700...

Страница 2: ...itness equipment Do some warm up exercise before use you ll get twice the result with half the effort Such as follows extend the neck up and down twist the waist left and right level push forwards upr...

Страница 3: ...the treadmill on a solid level surface 2 Keep the area behind the treadmill clear 3 The treadmill running mat will not stop immediately if any object becomes caught in the mat or rollers IN EMERGENCY...

Страница 4: ...ide to side 13 Don t continuously use this equipment over an hour 14 Care should be taken when mounting and dismounting the unit 15 Do not place any liquids on any part of the treadmill 16 To prevent...

Страница 5: ...5 EXPLORE DRAWING...

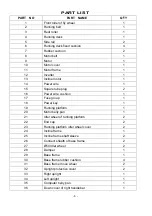
Страница 6: ...2 16 Power wire cushion 1 17 Fuse group 1 18 Power key 1 19 Running platform 1 20 Motor belly pan 1 21 Idler wheel of running platform 2 22 End cap 2 23 Running platform idler wheel cover 2 24 Inclin...

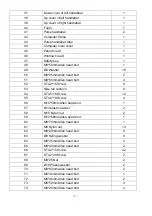
Страница 7: ...T4 2 15 Screw 8 53 Side rail cushion 8 54 ST4 5 16 Screw 14 55 ST4 2 10 Screw 4 56 M10 50mm Allen head bolt 1 57 13 plastic washer 2 58 M10 Nylon nut 2 59 M10 60mm Allen head bolt 1 60 M8 70mm Allen h...

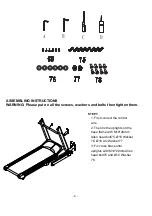
Страница 8: ...SON CHART For your convenience we have identified the hardware used in the assembly of this product The chart below is provided to help you to identify items that may be unfamiliar to you NO DESCRIPTI...

Страница 9: ...s washers and bolts then tighten them STEP1 1 First connect the control wire 2 Then fix the uprights on the base frame with M10 20mm Allen head bolt75 10 Washer 76 10 Arc Washer 77 3 Fix cross brace o...

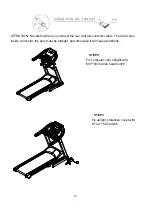
Страница 10: ...two console controller wires There are pins inside connector the pins must be straight and otherwise it will cause problems STEP2 Fix computer onto upright with M8 15mm Allen head bolt78 STEP3 Fix up...

Страница 11: ...stration To drop down treadmill 1 Strike the damper as shown by the arrow on left side 2 Hold on to the top end covers and pull down the treadmill slowly on the ground To fold up the treadmill Both ha...

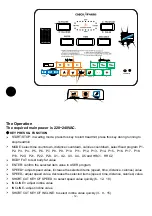
Страница 12: ...P14 P15 P16 P17 P18 P19 P20 P21 P22 P23 U1 U2 U3 U4 U5 and HRC1 HRC2 BODY FAT to test body fat value ENTER confirm the selected item value in USER program SPEED adjust speed value increase the selecte...

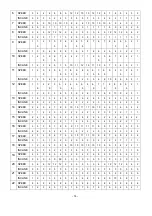
Страница 13: ...to start treadmill treadmill will run at the lowest speed press speed key to select speed value Calories window display countdown treadmill will stop to run when calories window display 0 FIXED PROGR...

Страница 14: ...3 4 4 5 5 6 6 6 6 5 5 4 4 3 3 2 1 INCLINE 0 2 2 2 3 3 2 2 2 2 2 2 3 3 2 2 2 2 1 0 14 SPEED 2 4 5 6 7 8 9 10 10 11 11 10 10 9 8 7 6 5 4 2 INCLINE 1 1 2 2 3 3 2 2 2 2 2 2 2 3 3 2 2 1 1 1 15 SPEED 2 4 6...

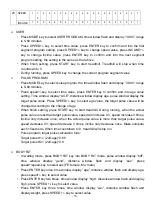
Страница 15: ...ge When finish setting press START key to start treadmill During running when the actual pulse value is less than target pulse value speed will increase 0 3 speed increase 3 times incline only increas...

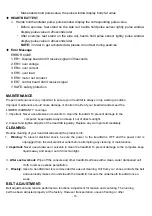
Страница 16: ...ents to clean the treadmill To prevent damage to the computer keep liquids away and keep it out of direct sunlight 2 Inspect and tighten all parts of the treadmill regularly Replace any worn parts imm...

Страница 17: ...back towards the center Repeat the above procedure until the walking belt is centered It may be necessary to set walking belt tension once you have completed this procedure if the belt feels like it i...

Страница 18: ...e walking belt position the spray nozzle between the walking belt and the board approxinateluy6 from the front of the treadmill Apply the silicone spray to the walking board moving from the front of t...

Отзывы: