background image

6

7

Ref. ID 301, Rev. A 

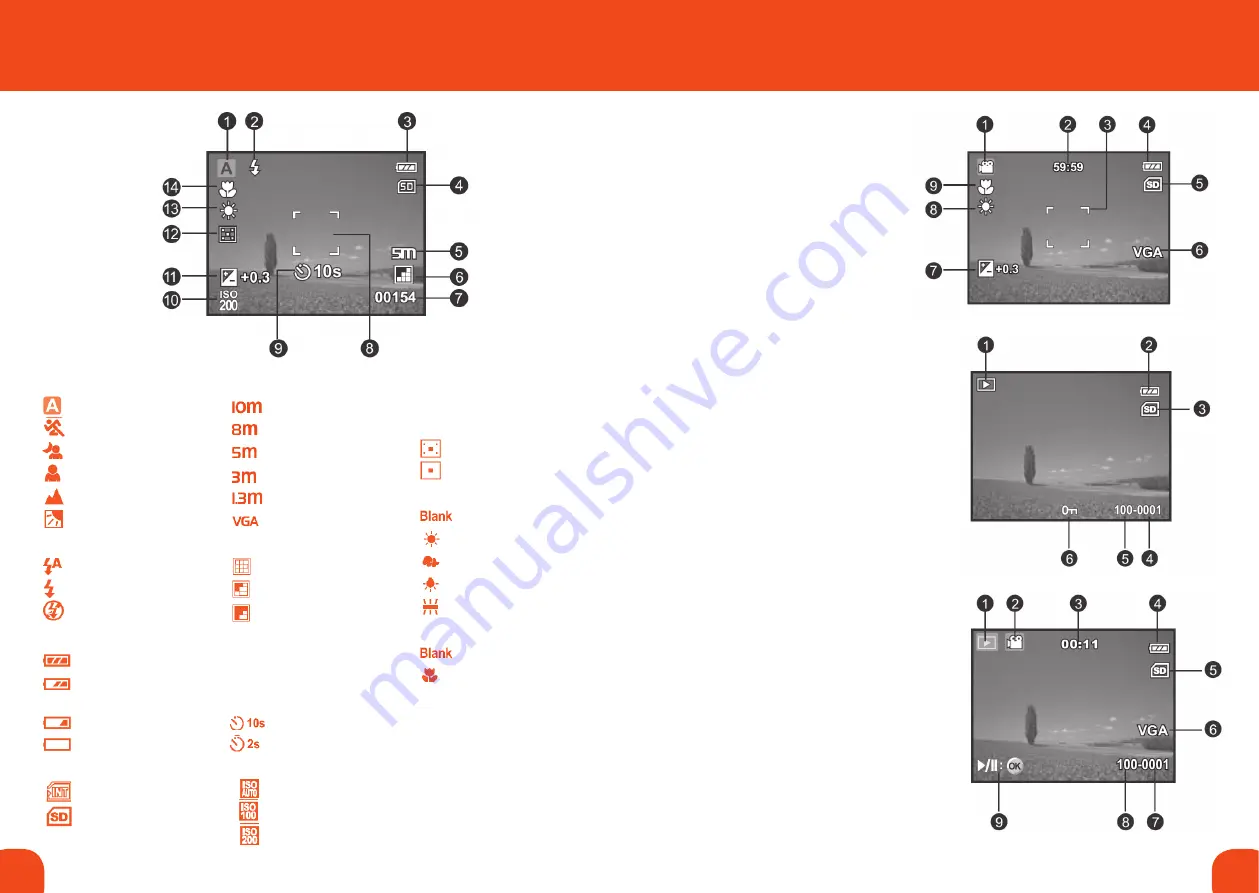
LCD Monitor Display

1.  mode indication
   

Auto Mode


Sport Mode


Night Mode


Portrait Mode


Landscape Mode


Backlight Mode

2.  Flash mode
   

Auto Flash


Force Flash


Flash Off

3.  Battery condition
   

Full battery power


Medium battery  


power


Low battery power


No battery power

4.  Storage
   

Internal memory


SD/SDHC memory  


card

5.  Image size resolution
   

3648 x 2736


3264 x 2448


2560 x 1920


2048 x 1536


1280 x 960


640   x 480

6.  Image quality
   

Fine


Standard


Economy

7.  available number  
  of shots
8.  main focus area
9.  Self-timer icon
   

10 sec.


2. sec

10. 

ISo


Auto


100


200

11. 

exposure  


compensation

12. 

metering


Average


Spot

13. 

w.Balance


Auto


Daylight


Cloudy


Tungsten


Fluorescent

14. 

Focus setting


Normal (Blank)


Macro (not available  


on this model).

Video mode
1.  Mode icon
2.  Available recording time
3.  Main focus area
4.  Battery condition
5.  Storage media
6.  Video Resolution
7.  Exposure compensation
8.  White balance
9.  Focus setting

Playback mode 
Still image playback
1.  Play mode
2.  Battery condition
3.  Storage media
4.  File number
5.  Folder number
6.  Protect icon

Playback mode 
Video playback
1.  Play mode
2.  Mode icon
3.  Total recorded time 
4.  Battery condition
5.  Storage media
6.  Video resolution
7.  File number
8.  Folder number
9.  Playback indicator

Содержание Centurion XP Series

Страница 1: ...S a f e r Fa s t e r B e t t e r CENTURION XP SERIES USER GUIDE Email sales cord ex com www cordexinstruments com Ref ID 301 Rev A II 2 G I M2 Please visit our website for more information www alpine...

Страница 2: ...ance 20 Playback Menu 22 Delete 22 Copy to Card 22 Slide Show 22 Protect 22 Thumbnail 22 Setup Menu 23 Format 23 Beep 23 Language 23 Auto Off 23 System Reset 23 Light Freq 24 8 DOWNLOADING FILES 25 Sy...

Страница 3: ...imer LED Battery Compartment 1 2 3 4 5 6 1 2 3 4 5 side View USB Connector compartment 1 6 1 rear View LCD Monitor Screen OK Button Digital Zoom Button 4 Way control button Up button Menu button Right...

Страница 4: ...lf timer icon 10 sec 2 sec 10 ISO Auto 100 200 11 Exposure compensation 12 Metering Average Spot 13 W Balance Auto Daylight Cloudy Tungsten Fluorescent 14 Focus setting Normal Blank Macro not availabl...

Страница 5: ...power on again NEVER OPEN THE BATTERY OR USB COMPARTMENTS IN A HAZARDOUS ENVIRONMENT Choosing the Language Specify in which language menus and messages are to be displayed on the LCD monitor 1 Press t...

Страница 6: ...you do not want to use the camera s automatic settings select a special Scene Mode see Setting the Scene Mode below 5 Press the shutter button to capture the image Setting the Scene Mode The camera ha...

Страница 7: ...ce such as the sun behind it When the sky accounts for a large area on the screen negative compensation People illuminated by a spotlight in particular against dark background Printed matter with whit...

Страница 8: ...camera 1 Press the button The last image appears on the screen 2 Select the desired video clip with the p q buttons 3 Press the OK button A press of thep q buttons during playback allows fast forward...

Страница 9: ...operate during slide show All still images in the folder are played back automatically Video files display the first frame image and are not played back Protecting Images Set the data to read only to...

Страница 10: ...you delete image number 240 the next captured image will be numbered 241 even though 240 no longer exists In other words an image number is retired when an image is deleted and will not be reused or...

Страница 11: ...center of the screen is measured and the exposure is calculated White Balance Sets the white balance for a variety of lighting conditions and permits images to be captured that approach the condition...

Страница 12: ...er to White Balance on page 20 Playback Menu In the mode choose which settings are to be used for playback 1 Press the button 2 Press the MENU button 3 Select the desired option item with the p q butt...

Страница 13: ...sk space 128MB hard disk space CD ROM drive CD ROM drive Available USB port Available USB port Setup Menu Set your camera s operating environment 1 Press the MENU button 2 Select the Setup menu with t...

Страница 14: ...for image storage Supports SD SDHC memory card up to 4GB optional File format Image format JPEG video format Motion JPEG Lens F no f 3 0 Focus Length 6 47 mm equivalent to 39mm on a 35mm camera Focus...

Страница 15: ......

Отзывы: