background image

67

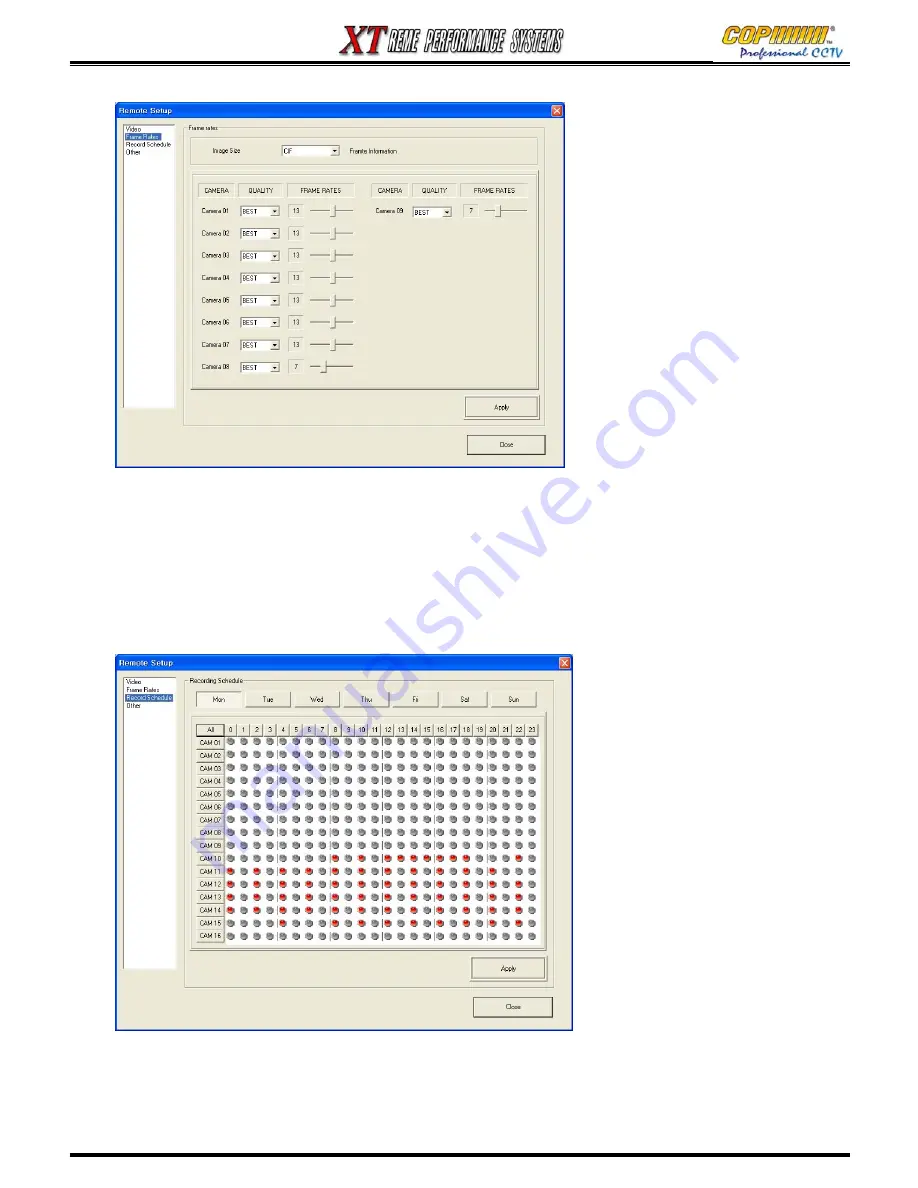
16-3-2 FRAME RATE

The Recording set-up can be adjusted from this screen.

1) Image size (Resolution) : The Resolution for the whole DVR can be adjusted (This applies to ALL 
cameras, and if changed all of the frame rates will change). Note: CIF=360 x 288.

2) Individual Camera recording setup: The image quality and frame rate can be selected for each 
camera. (For additional information please refer to section 3.3 on Page 20.)

16-3-3  RECORD SCHEDULE 

1) Recording schedule : The Schedule can be defined for each day of a week, and recording can be 
setup in hour-long segments. Each hour selected for recording will be shown in red mark. Click ‘All’
to apply the same setup for all the cameras. 

16. CMS

Содержание XT Series

Страница 1: ...4 Channel DVR manual Rev 2 2 September 2006 XT Series ...

Страница 2: ...EL Graphic Symbol Explanation This symbol is intended to alert the user to the presence of important operating and maintenance servicing instructions in the literature accompanying the product This symbol is intended to alert the user to the presence of uninsulated dangerous voltage within the product s enclosure that may be of sufficient magnitude to constitute a risk of electric shock to persons...

Страница 3: ...er ventilation is provided or the manufacturer s instructions have been adhered to 10 Lightning For added protection for this product during a lightning storm or when it is left unattended and unused for long periods of time unplug it from the wall outlet and disconnect the cable system This will prevent damage to the product due to lightning and power line surges 11 Overloading Do not overload wa...

Страница 4: ...back 68 16 CMS Remote Monitoring Software 54 16 1 Display Mode 54 16 2 Setup Mode 58 16 3 Remote Setup Mode 66 1 1 FRONT PANEL FUNCTIONS 5 2 Quick Start Power On 8 3 2 SETUP LIVE 16 3 3 SETUP REC 22 3 4 SETUP STORAGE 30 3 6 SETUP AUDIO 41 4 SEARCH 42 4 1 TIME SEARCH 42 4 2 EVENT SEARCH 43 4 3 FILE SEARCH 44 5 STATUS 45 12 POP Picture on Picture 50 6 AUDIO 45 7 BACKUP 46 8 PTZF Pan Tilt Zoom Focus ...

Страница 5: ...rch Menu 9 Fast Rewind Button Plays backward upto 128x normal speed Reverse frame by frame playback when play paused 10 Play Pause Button Pauses and re starts playback 11 Stop Button Stops playback and reverts display to Live mode 12 Fast Forward Button Plays forward upto 128x normal speed Advance frame by frame playback when play paused 14 PIP Button Shows Picture In Picture on Main Monitor 16 Se...

Страница 6: ...s connectors for Alarm and Telemetry cables 6 Main Monitor Output 2 x BNC Composite Video Output Two BNC Female Socket 7 Main Monitor Output S VIDEO S Video Output One 5 Pin DIN Socket 8 Audio Output One Audio Output Phono RCA Socket 9 Ethernet Port RJ45 Socket for connection to a LAN Network Device 11 Main Monitor Output VGA VGA Video Output One 15 Pin D Type Socket 12 RS 232 Connection Port for ...

Страница 7: ...ton Displays Exits Playback Search Menu 13 Log Button Displays Exits the Log Menu 14 Fast Rewind Button Plays backward upto 128x normal speed Reverse frame by frame playback when play paused 15 Play Pause Button Pauses and re starts playback 16 Fast Forward Button Plays forward upto 128x normal speed Advance frame by frame playback when play paused 17 Stop Button Stops playback and reverts display...

Страница 8: ...structions to change the password 1 Live images date and time will appear on the screen 2 A 00 B 00 or NONE will be displayed in the bottom of left corner to show HDD presence and usage NOTE In some rare instances the DVR may automatically select NTSC as the display type Main Symptom Camera Images appear to Stutter Almost Time Lapsed in appearance To change the display type back to PAL disconnect ...

Страница 9: ...2 4 Current STATUS Time Setup 2 QUICK START 1 Press the Function Menu and select Status from the Menu Or Press the Status Button on the IR Remote 2 The current Status of the DVR will be displayed as below 3 Settings cannot be changed from here Exit the Status Display Press Status or Menu button Then Press the Record Button The DVR will record continuously at the quality and frame rate as shown 4 I...

Страница 10: ...DD s can be performed Setup Menus Navigation To navigate the Setup Menu and the Sub Menus the cursor buttons are used in conjunction with the ENTER button to enter a Sub Menu and the MENU button to exit any Sub Menus Within some Sub Menus the cursor buttons can be used to change parameters along with the Number Buttons NOTE If parameters are changed in this way the ENTER button is used to save the...

Страница 11: ...ge the USER PASSWORD in the same way as the above from that Sub Menu ADMIN PASSWORD Used for system start and setup changes USER PASSWORD Used only when the system starts after power up 3 1 SETUP SYSTEM SETUP SYSTEM ADMIN ENTER NEW ADMIN PASSWORD _ _ _ _ SETUP SYSTEM ADMIN CONFIRM NEW ADMIN PASSWORD _ _ _ _ 3 SETUP SETUP SYSTEM LIVE REC STORAGE NETWORK SENSOR ALARM AUDIO SETUP SYSTEM ADMIN PASSWOR...

Страница 12: ...3 Press ENTER button to save the changes 4 A warning message appears after any change to the Time or Date Press ENTER button to accept 5 If the time or date has been adjusted to an earlier time any previous recordings with an overlapping time will be deleted as shown in the diagram above SETUP SYSTEM PASSWORD CHECK ADMIN ON USER ON CHECK PASSWORD OFF ON OFF SETUP SYSTEM TIME SETUP YEAR 2005 MONTH ...

Страница 13: ... SETUP SYSTEM TIME FORMAT YY MM DD TIME FORMAT YY MM DD DD MM YY MM DD YY DD MM YY EX CURRENT DATE 2005 2 30 FORMAT DISPLAY YY MM DD 2005 12 30 30 12 2005 12 30 2005 DD MM YY MM DD YY SETUP SYSTEM TIME OSD FORMAT TOP WHITE TIME OSD FORMAT TOP WHITE TOP BLACK BOTTOM WHITE BOTTOM BLACK OFF BOTTOM WHITE 2005 06 20 12 30 05 TOP WHITE BOTTOM BLACK TOP BLACK BOTTOM WHITE OFF 2005 06 20 12 30 05 2005 06 ...

Страница 14: ...l not affect the Time Date Display settings 2 Press MENU after the change is completed SETUP SYSTEM TIME STAMP FORMAT TOP WHITE TIME STAMP FORMAT TOP WHITE TOP BLACK BOTTOM WHITE BOTTOM BLACK OFF BOTTOM WHITE 2005 06 20 12 30 05 TOP WHITE BOTTOM BLACK TOP BLACK BOTTOM WHITE OFF 2005 06 20 12 30 05 2005 06 20 12 30 05 2005 06 20 12 30 05 3 SETUP SETUP SYSTEM ADMIN PASSWORD USER PASSWORD PASSWORD CH...

Страница 15: ...l be carried out by COP SecurityTechnicians within COP Security Premises 3 1 10 SETUP SYSTEM DEFAULT SETUP 1 To restore the Factory Default Settings select DEFAULT SETUP in the System Setup Menu 2 Press the ENTER button to execute the default setup Press the MENU button to exit the menus CHANGE VGA FREQ 50HZ VGA FREQ 60HZ 50HZ SETUP SYSTEM DEFAULT SETUP WARNING Are You Sure ENTER YES MENU NO 3 SET...

Страница 16: ...ng buttons and press the ENTER button to access the selected sub menu 2 Use the number buttons to select the individual channel dwell time Range 0 to 9 seconds 3 buttons are used to move onto another channel Press the ENTER button to complete setup SETUP LIVE SEQUENCE DWELL FULL CAMERA NAME CAMERA STATUS CAMERA COLOR PTZF PROTOCOL PTZF ID SETUP LIVE S DWELL FULL NO SEC NO SEC CHANNEL 01 2 CHANNEL ...

Страница 17: ...se Cursor buttons to highlight STATUS for the camera to be Hidden and press the ENTER button to display the options Select HIDE for the camera to be Hidden Covert and press the enter button to select 3 Press MENU button to exit the Sub Menus Example Cameras 1 3 10 16 have been setup as HIDE SETUP LIVE CAMERA NAME NUMBER NAME CAMERA 01 CAM 01 CAMERA 02 CAM 02 CAMERA 03 CAM 03 CAMERA 04 CAM 04 TEXT ...

Страница 18: ...button on PTZF next to the camera to be controlled The list of available Telemetry Protocols will appear 3 Highlight the desired protocol by using the buttons and press the ENTER button to select 4 Press the MENU button to exit the Sub Menus Note The PTZ control from this DVR is performed in Steps for fine control please use a Joystick SETUP LIVE CAMERA COLOR NUMBER COLOR CAMERA 01 DEFAULT CAMERA ...

Страница 19: ...rsor buttons to highlight the ID Number for the camera to be controlled 3 Change the ID Number using the Number Buttons Press the ENTER button to save the changes 4 Press the MENU button to exit the Sub Menu PAN TILT camera connection ID setup SETUP LIVE PTZF ID NUMBER PTZF ID CAMERA 01 000 CAMERA 02 000 CAMERA 03 000 CAMERA 04 000 RS 485 PTZ 001 PTZ 002 PTZ 003 PTZ 004 PTZ 255 3 SETUP SETUP LIVE ...

Страница 20: ...20 3 SETUP ...

Страница 21: ...x 576 Very High resolution for specific uses This resolution is designed for high quality images from mainly static images If used to record images of moving scenes some blurring may be present on playback Recording Quality Settings There are four quality settings that are adjustable for each camera input The names of these speak for themselves BEST HIGH NORMAL and BASIC These set the image compre...

Страница 22: ...by using buttons and press the ENTER button to select 4 Repeat 1 to 3 for all cameras to be adjusted Note The Frame Rate setting applies to each camera 1 Use the Cursor buttons to highlight the frame rate setting for the camera to adjust 2 Press the ENTER button on RATE and then frame rate setup window will be shown 3 Highlight the desired rate by using buttons and press the ENTER button to select...

Страница 23: ...U button to exit the Sub Menu PLAY DE INTERLACE OPTION The playback display can be optimised if the highest resolution setting of 720 x 576 is used If an Analogue CCTV Monitor is used as the Main Monitor the De Interlace Option should be set to ON If a VGA Monitor is used as the Main Monitor the De Interlace Option should be set to OFF 1 Highlight on off by using the buttons press the ENTER button...

Страница 24: ...he least sensitive and 9 is the most sensitive To save this change press ENTER Note If OFF is displayed select Area before Sensitivity 3 Use the Cursor Buttons to highlight the AREA adjacent to the camera to be adjusted 4 Press ENTER to show the Motion Detection Area setup window 5 If NO masking is to be used Use Cursor ENTER buttons to select ALL 6 If masking IS to be used Use Cursor ENTER button...

Страница 25: ... Press the MENU button to exit the Matrix OPTIONS From this Sub Menu the duration of the recording both Pre Post Event for an Event Trigger is set The Event Pop Up option is also selectable from this Sub Menu If one Event is detected by the DVR the camera that is linked to that Event can Pop Up to Full Screen on the Main Monitor Output Screen If more than one Event is triggered in the same period ...

Страница 26: ...buttons to select the period or None the recording will continue for AFTER the event has stopped 3 Press the MENU button to exit the Sub Menu 1 Highlight POP UP DISPLAY using buttons press ENTER button to show the On Off List 2 Use the Cursor and ENTER Buttons to select either ON or OFF 3 Press the MENU button to exit the Sub Menu 3 SETUP SETUP REC EVENT OPTIONS POST RECORD TIME 10 SEC PRE RECORD ...

Страница 27: ...he camera channel to be recorded and the start of the hour or All Day for that channel to record 4 Press the ENTER button to toggle between v Recording ON or o Recording OFF 5 Press the MENU button to exit the Matrix Example Recording setup for Monday 3am to 6am and Saturday 7pm to 11pm 5 If the Cursor is moved to highlight a day SU MO etc the ENTER button can be used to select all 24 of the Hour ...

Страница 28: ...2 Highlight the file s in turn to be locked by using the buttons Press ENTER button to toggle this file between L Lock or U Unlock 3 Press the MENU button to exit the File List SETUP REC REC PROPERTY REC OPTION EVENT REC SCHEDULE REC DELETE REC LOCK UNLOCK REC DELETE ALL REC WARNING DELETE FILE 0338 20050806_125000 600s D U ARE YOU SURE ENTER YES MENU NO DELETE FILE LIST 0338 20050806_125000 600s ...

Страница 29: ...ng buttons and press ENTER button 2 The Confirmation window will show Press the ENTER button to perform the deletion 3 Press the MENU button to exit the Sub Menu Note It is not possible to perform this function whilst the DVR is Recording Recording must be stopped beforehand Constant or Schedule Recording SETUP REC REC PROPERTY REC OPTION EVENT REC SCHEDULE REC DELETE REC LOCK UNLOCK REC DELETE AL...

Страница 30: ...te the oldest data with new Recordings 3 Press the MENU button to exit the Sub Menu Formatting the HDD s 1 Highlight FORMAT for the HDD to format by using buttons and press the ENTER button 2 The Confirmation window will show Press the ENTER button to perform the format 3 Repeat 1 2 for the second HDD if fitted 4 Press the MENU button to exit the Sub Menu SETUP STORAGE OVER WRITE YES HDD A FORMAT ...

Страница 31: ...R it is noted and entered onto the CMS Remote Monitoring Software Computer The CMS Remote Monitoring Software is designed to be a feature rich Monitoring Software that can perform a number of additional functions beyond the Core features of Live Remote Monitoring Remote Playback of Recorded Images Remote Recording Setup These Core Features have been tested for their performance and stability in ne...

Страница 32: ... DVR will then automatically try to acquire an IP address from the network 2 If the DVR fails to acquire an IP address please check your network connection or ask your Network Administrator for further assistance 3 5 3 PPPOE Use only if you have a PPPoE enabled PC ADSL connection Otherwise Ignore Use the buttons as described above for Static IP 1 Select PPPOE from the Sub Menu 2 Enter the ID and p...

Страница 33: ...h item in this Sub Menu you will need to use the and ENTER buttons to input the text information from your DDNS Provider into the DVR 3 For the final item ACTIVATE you have a choice of two DDNS Providers ipupdater com OR dyndns org Select one of these for the DVR to update it s DDNS settings 4 Press the MENU button to exit the Sub Menus SETUP NETWORK DDNS DOMAIN USER ID GROUP ID AUTH KEY ACTIVATE ...

Страница 34: ... press ENTER button to display the List 2 Using buttons navigate the list to highlight the range required Press ENTER button to select If you want to use it the default Port Range used by the CMS Software is 7620 to 7624 3 Press the MENU button to exit the Sub Menus SETUP NETWORK NETWORK PASSWORD ENTER NEW NETWORK PASSWORD _ _ _ _ SETUP NETWORK NETWORK PASSWORD CONFIRM NEW NETWORK PASSWORD _ _ _ _...

Страница 35: ...LIENT LOGIN ID PASSWORD 1 2 3 4 SETUP NETWORK DVR ID ID 3 5 7 NET DVR ID For the DVR to be recognised by the CMS Remote Monitoring Software it must have a Name DVR ID This must be the same name in both the DVR and the CMS Software Advice ALL UPPER CASE 1 Highlight NET DVR ID using buttons and press ENTER button to show current name 2 Press ENTER to show character map 3 Use the and ENTER buttons to...

Страница 36: ...NT 10 IP 000 000 000 000 SETUP NETWORK EVENT SERVER CC SYSTEM SERVER CMM CHANNEL SERVER 3 5 9 EVENT SERVER This function is not supported at present May 2006 3 SETUP SETUP NETWORK TYPE STATIC DDNS NET PASSWORD NET CLIENT PORT NET CLIENT ID NET DVR ID NET CLIENT ADDR EVENT SERVER NETWORK THROUGHPUT SETUP NETWORK TYPE STATIC DDNS NET PASSWORD NET CLIENT PORT NET CLIENT ID NET DVR ID NET CLIENT ADDR ...

Страница 37: ... Matrix 2 Use the cursor buttons to highlight NO or NC next to the Channel number to change 3 Press the ENTER button to display the sensor type selection window 4 Highlight the choice of sensor type using the buttons and press the ENTER button to select 5 Press the MENU button to exit the Sub Menu SETUP SENSOR ALARM SENSOR TYPE ALARM MOTION MANAGER ALARM SENSOR MANAGER ALARM BUZZER ALARM OUTPUT AL...

Страница 38: ...tput ON or o Alarm Output OFF 4 Press the MENU button exit the Sub Menu Note For these settings to take effect the Alarm Output must be enabled See Page 41 3 6 2 SETUP ALARM SENSOR ALARM SENSOR MANAGER This Sub Menu selects the alarm outputs to be triggered by specific Sensor Inputs 1 Select ALARM SENSOR MANAGER using buttons and press ENTER button to select SETUP SENSOR ALARM SENSOR TYPE ALARM MO...

Страница 39: ...UP ALARM SENSOR ALARM BUZZER This Sub Menu enables the DVR Buzzer to sound when an Alarm Trigger has occurred 1 Highlight ALARM SENSOR using button and press ENTER to select the Sub Menu 2 The Buzzer Setup Window displays the current status Press ENTER to change this setting 3 Use the cursor and ENTER buttons to select ON or OFF as required 3 Press the MENU button to exit the Sub Menu SETUP SENSOR...

Страница 40: ...RM OUT PERIOD using buttons and press ENTER button to enter 2 The current Alarm Output duration will be displayed If this is to be changed press ENTER 2 Using the Cursor buttons highlight the period for the Alarm outputs to remain active 3 Press the ENTER button to apply the selection 4 Press the MENU button to exit the Sub Menu SETUP SENSOR ALARM SENSOR TYPE ALARM MOTION MANAGER ALARM SENSOR MANA...

Страница 41: ...P AUDIO 3 SETUP NO SETUP REQUIRED This DVR has 4 Video Inputs 1 2 3 4 This DVR has 4 Audio Inputs A B C D Channel 1 is assigned to A Channel 2 is assigned to B Channel 3 is assigned to C Channel 4 is assigned to D ...

Страница 42: ...tons to select a day and press the ENTER button 6 The TIME window will be shown use the buttons to highlight the Hour on the Hour Bar 7 Use the button to drop to the Minute Bar Use the buttons to highlight the Minute 8 Press the ENTER button to start the Playback from the Date Time selected 9 Once Playback has started use the Play controls to find the specific incident 10 To end the Playback press...

Страница 43: ... Fifth column shows what caused the Event e g MD Motion Detection The last column shows the channel s that triggered the Event Recording 7 Press the ENTER button to start the Playback from the start of the recorded Event This recording duration is defined by the Pre and Post Recording duration set in the Event Recording Setup SEARCH TIME SEARCH EVENT SEARCH FILE SEARCH SEARCH CALENDAR 2005 07 SUN ...

Страница 44: ...he Time that the File started HHMMSS The fourth column shows the size of the file in seconds The Fifth column shows the type of file The last column shows if the file is Locked L or Unlocked U 7 Press the ENTER button to start the Playback from the start of the recorded File 8 Press the STOP button to end playback SEARCH TIME SEARCH EVENT SEARCH FILE SEARCH SEARCH CALENDAR 2005 07 SUN MON TUE WED ...

Страница 45: ...ll screen STATUS S W VERSION VO 9 0 BY 16 07 11 05 20 40 HDD A 75G 10 57 HDD B NOT MOUNTED NETWORK STATIC 192 168 1 200 MAC 0 e b5 0 5 ea DDNS DDNS OFF REC SIZE 720X480 CH RT QUAL CH RT QUAL CH RT QUAL CH RT QUAL 1 8 STD 5 8 STD 9 8 STD 13 8 STD 2 8 STD 6 8 STD 10 8 STD 14 8 STD 3 8 STD 7 8 STD 11 8 STD 15 8 STD 4 8 STD 8 8 STD 12 8 STD 16 8 STD S W VERSION DVR firmware version and the date of pro...

Страница 46: ...e of Backup can be made 4 The first Option Media Type will be highlighted 5 If you need to change the Media Type press ENTER 6 The List of Media Type Options will be displayed Use and ENTER buttons to select 7 Press button twice File Format will always be Native to highlight BACKUP TYPE 8 Press ENTER to display the choice of FILE or TIME 9 Use and ENTER buttons to select the desired choice As most...

Страница 47: ...e the File Size from the information entered and will display the file size ready for Backup If this selection will not fit onto the CD R or USB device please start the selection again 19 Press the button once to highlight BACKUP Press ENTER to start the Back up If you want to abort the Backup use the and ENTER buttons to select CANCEL 20 When the Backup has been completed press the MENU button to...

Страница 48: ... show the Sub Menu Or use Buttons on IR Remote 3 Press P T or Z F button to show up PTZF camera control window 4 Enter the camera number that you want to control 5 Control PAN TILT by buttons ZOOM FOCUS by buttons IRIS by buttons PAN TILT CH 00 SWING ENTER ZOOM FOCUS Z F F Z CH 00 7 BACKUP 8 PTZ Pan Tilt Zoom Focus ...

Страница 49: ...rom this Sub Menu the system log can be searched to display the System Log file for various Log Events 1 Press the LOG button to display the log search window 2 Using the and ENTER buttons 3 The details of each EVENT LOG entry are shown below EVENT LOG VIEW LOG VIEW ALL MOTION SENSOR ALARM V LOSS SENSOR HDD FILE DB POWER NET FROM 2005 11 05 00 00 TO 2005 11 05 23 59 OK CANCEL Display the log file ...

Страница 50: ...ithin the main screen 2 Select the camera number of small screen and press PIP button again to change main screen and small screen 3 Move the location of the small screen by using buttons 4 Press any Division button to close PIP 10 SPOT 11 PIP Picture in Picture 12 POP Picture on Picture ...

Страница 51: ...play modes press the SEQ button This will start the Quad Screen Sequence display 1ch sequence display press 1ch screen division then press SEQ button Channels 1 2 3 4 will be displayed in order 14 SCREEN SPLIT 1 You can select screen division 1 4 9ch by division button on the controller 1ch screen division press 1ch screen division button every time to change the next screen division1 2 3 4ch 4ch ...

Страница 52: ...ve Save bmp image file during playback Watermark Checker Will warn if Watermark has been compromised Play Playback buttons stop play fast step Division Screen division 4 division 1 division 9 division 16 division 15 BACKUP VIEWER 1 2 4 5 15 BACKUP VIEWER 5 3 ...

Страница 53: ...ads the selected file 4 Playback and screen division buttons can be used whilst Playback is running Use the Stop button before pressing any other Playback Buttons 5 A Still image bmp file can be created once the playback has been paused using Stop button 6 Press the Save Button a window will appear so that you can chose where to save your image 15 BACKUP VIEWER ...

Страница 54: ...ction options for various screen division displays Main System Utility buttons Click to access to the main functions setup display search setup network connection remote search snapshot Sub System Utility buttons click to access to the detailed functions network status zoom sensor control Site Maps audio playback 1 2 4 1 2 3 4 16 CMS 3 ...

Страница 55: ...t on the screen 2 Click the SETUP DISPLAY button 3 A camera selection window will show select one camera image to be displayed in that segment Any camera can be displayed in any segment B SETUP SEARCH REMOTE SEARCH Refer to the next chapter for more detailed information C NETWORK Click this button to start or end a network connection A connection will only be started after the SETUP has been compl...

Страница 56: ...ll be able to control devices at the DVR site using the alarm outputs Message Board Not available May 2006 The details are displayed of sensor and control detection events in the message board in real time Click the Message Board Icon to show the Message Board Window click the Icon again to close the window ICON 16 CMS PTZ Control This must be enabled in the DVR and CMS Setup Menus Refer to each M...

Страница 57: ...ght mouse button and drag to the desired new position 16 CMS Audio data Transmission Only use for a single DVR network connection Click the camera segment you want to listen in to then click the PLAY button The button will turn red and show STOP when enabled To stop listening click it again Warning Click the STOP button before selecting a different camera segment Note for this function the DVR sho...

Страница 58: ...a default password of 1234 To Register a New User for higher security 1 Enter a new User Name into the User Name Field 2 Enter your choice of password into the Password Field Confirm when required 3 Select a User Group from the Drop Down List 4 Left Mouse Click on the Register New User Button 5 Select suitable privileges for the new user My Image change the image to your preference such as company...

Страница 59: ... Click on Add Site from SITE Screen 2 Select STANDALONE DVR from the DVR Type drop down list 3 Site name The DVR Name must be entered here exactly the same as the NET DVR ID entry in the Network Setup within the DVR See Page 34 4 Device Select the computer s network device and the device name will be shown below 5 Connect by Ethernet select Site IP and enter the Site IP address The Default port is...

Страница 60: ...Site Info Press this button and the information for the highlighted site connection is shown Remote setup If a site is connected Use Pre Connect if necessary you can make changes to the setup of that site See 16 3 on Page 65 Name I O You can change the name of sensor and control Double click Enter name and it will be enabled to enter the name 16 CMS ...

Страница 61: ...ion to show the information of site software version If that Site is connected Pre connect When this button is pressed it will make the Network connection to the highlighted site and allow you to view the setup information from the site Export This button exports log of the CMS to a file C CMS_2 LOG 16 CMS ...

Страница 62: ...e Site Name has been assigned to each Screen Segment a row of camera icons will appear to the right Four for XT04 Using the mouse one camera icon on each line can be selected highlighted in Red to be displayed in that segment When all the above has been selected this OSD Layout can be saved Click with the mouse on the button and an entry will appear in the adjacent window Click on the Name to rena...

Страница 63: ...me Select the DVR from which the Back up images are to be saved from 2 Frame rate This is pre set 3 Save drive Select the Hard Disk Drive where the Back ups are to be saved to We would recommend that if you use this feature a dedicated HDD is used Do Not use the HDD that your Operating System runs from 16 CMS ...

Страница 64: ...arm sound when EMC is activated Open the folder and select wave file 4 Auto pop up when EMC is activated by motion or sensor control the event will come up with monitoring screen or single screen 5 EMC activation after setup is completed go to monitoring mode Click log out button and you can see EMC standby button Select it it will go to EMC mode EMC icon will be generated on the right corner of t...

Страница 65: ...ntroller option Check multiple controller if there are different controller protocols for each PTZ camera Check Single controller if there is one controller protocol for all PTZ cameras Tool tip An explanation is shown if the mouse is moved over the relevant function key 16 2 6 OTHER 16 CMS ...

Страница 66: ... the area normally showing the 16 way display If not checked a window will show the that image in it s normal size Restore Pressing this button will set the CMS Software back to the latest registry backup file If you need to restore the latest setting value you can apply it If you have to re install the CMS software on the same PC apply the latest setting value so you don t need to carry out the f...

Страница 67: ...0 x 288 2 Individual Camera recording setup The image quality and frame rate can be selected for each camera For additional information please refer to section 3 3 on Page 20 16 3 3 RECORD SCHEDULE 1 Recording schedule The Schedule can be defined for each day of a week and recording can be setup in hour long segments Each hour selected for recording will be shown in red mark Click All to apply the...

Страница 68: ...e password register a new user delete user depends on that user s privileges 16 4 1 SEARCH This function allows for the searching of recordings stored on a DVR currently connected over a Network to the CMS Software Whilst the CMS Software is in display mode click the Remote Search button The search screen will be displayed as shown below Calendar Click the Calendar Icon to show the calendar window...

Страница 69: ...r The columns will then be displayed in minutes Then Click on the appropriate Minute Column Header 4 The desired Search Start Time should now be displayed in the bottom right corner of the Time Table Window Minimise the Time Table Window 5 Click on the Play Button at the bottom of the Main Screen The recordings will now be playing Please allow a few seconds for the Network to start the download of...

Страница 70: ...70 ...

Отзывы: