background image

51 

7.23  HACCP DATA EXPORT VIA USB STICK 


  Open the machine or installation compartment. 


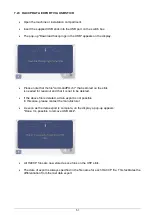
  Insert the supplied USB stick into the USB port on the switch box. 


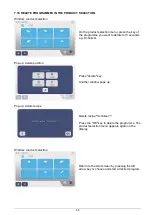
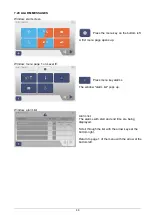
  The pop-up "Download haccp logs in the USB" appears on the display. 


  Please note that the file"commandPU.chr" that is stored on the stick 

is needed for read-out and that it is not to be deleted. 
 

  If the above file is deleted, a data export is not possible. 

In this case, please contact the manufacturer. 
 

  As soon as the data export is complete, on the display a pop-up appears: 

"Done. It´s possible to remove USB stick". 


  All HACCP files are now stored as csv-files on the USP stick. 


  The date of export is always specified in the file name for each HACCP file. This facilitates the 

differentiation from the last data export.  


Содержание 10x GN 1/1

Страница 1: ...1 User Manual EN Cool Compact Blast Chiller Blast Freezer Vintos Vintos 4x GN 1 1 8x GN 1 1 10x GN 1 1 13x GN 1 1 ...

Страница 2: ...ling cycle Vintos and Vintos 13 15 7 5 Blast freezing cycle Vintos and Vintos 16 18 7 6 Combined cycle Vintos 19 21 7 7 Slow speed cooking cycle Vintos 22 24 7 8 Thaw cycle Vintos 25 27 7 9 Prove cycle Vintos 27 29 7 10 Storage cycle Vintos 30 31 7 11 Defrost cycle Vintos and Vintos 32 7 12 Sterilization cycle Vintos 33 7 13 Smart level control cycle Vintos and Vintos 34 36 7 14 Manual cycle Vinto...

Страница 3: ...xport via USB stick 51 53 8 Maintenance 54 55 8 1 Safety 54 8 2 Cleaning 54 8 3 Care 54 8 4 Extraordinary maintenance 55 9 Warranty and customer service 55 10 Disposal and recycling 55 11 Wiring diagrams 56 61 12 EU Declaration of Conformity 64 ...

Страница 4: ...ce the temperature of food products from 65 C to 18 C in 240 minutes When using the blast chiller depending on the food product the most appropriate cooling cycle can be set Once a cycle is complete the appliance switches into a storage mode Please note that blast chillers blast freezers can only preserve and store food for up to 36 hours 3 GENERAL INFORMATION The appliance is to be used exclusive...

Страница 5: ...any kitchen utensils or kitchen tools into the protective covers for electrical or mechanical parts Use appropriate and compatible tools for maintenance When not in use switch off the appliance and disconnect from the power grid Any failure to adhere to these rules may compromise the safety of the appliance and the user The manufacturer takes no responsibility in the event of any modifications to ...

Страница 6: ... transport and equipment for transporting the unit For the use of appropriate means of transport check the weight of the blast chiller Caution NEVER turn the appliance upside down or lay it on its side when transporting Doing so could damage the unit and affect the functioning of the refrigeration circuit 6 2 UNPACKING AND INSTALLING Before installing unpack the unit carefully Move the still packe...

Страница 7: ...ld be between 16 C and 32 C A minimum clearance of 50 mm must be maintained on all sides to ensure a proper air circulation The various packaging elements must be disposed of appropriately in accordance with the regulations that are in force in the country where the unit is used In any case the environment is not to be contaminated with any parts of the packaging material 6 3 ELECTRICAL CONNECTION...

Страница 8: ...icated on the rating plate label The main switch must be accessible near the unit and may only be used for one unit at a time The earth wire existing on site must be connected to the corresponding earth terminals of the unit No adapters multiple sockets extension cables or cables with non approved cross sections may be used The local standards must be adhered to For details on the electrical opera...

Страница 9: ...itch panel adhere to the wire and terminal numbers 6 4 3 CONNECTION TO REFRIGERANT LINE Connect the liquid line of the condensing unit to the liquid line of the blast chiller If the refrigeration unit is installed at a higher level than the blast chiller the pipes must be equipped with appropriate siphons Connect the suction line of the condensing unit to the suction line of the blast chiller Open...

Страница 10: ...10 7 CONTROL 7 1 OVERVIEW BASIC FUNCTIONS VINTOS Start screen chill Start screen freeze Start screen controller Start screen basic settings Page 2 start screen controller Page 2 basic settings ...

Страница 11: ...NTOS Start screen chill Start screen thaw Start screen slow speed cooking Start screen controller Start screen basic settings Page 2 basic settings Page 2 start screen controller Start screen freeze Start screen combi Start screen prove ...

Страница 12: ... socket The start screen now appears on the display Start screen After pressing the menu key the first page of the controller menu appears on the display Page 1 controller menu The upper left key allows access to the basic settings of the controller such as date language etc Basic settings Check all factory settings according to your country and time zone Correct if necessary If all data is set co...

Страница 13: ...p up preparing machine cooling The display indicates the air temperature Once the setpoint of 15 C is reached a pop up unit pre cooled appears The run key takes you to a product selection menu with preset recipes for blast chilling various products as well as on the second page to the manual function and to the smart level control function Product selection Use the arrow key on the bottom right to...

Страница 14: ... of the process The elapsed time is displayed below Display of the air temperature The controller detects automatically if the core probe is inserted and displays this after a running time of 5 min If the core probe is not inserted and detected the unit runs automatically in the time programme cycle On the right hand side the individual steps of the cycle are displayed You can recognise the curren...

Страница 15: ... the digit first and then the negative sign Confirm with OK The display jumps back to the cycle steps interface Window cycle steps If all entries are correct confirm with the OK key The display jumps back to the chill cycle interface Cycle interface chill At the end of the cycle an end of cycle pop up appears with HACCP data and the unit runs in storage mode at an air temperature of 3 C Press the ...

Страница 16: ...eparing machine cooling The display shows the air temperature When the setpoint of 30 C is reached the window preparing machine cooling pops up Press Run The display shows the product selection with preset recipes for blast freezing various products a manual function as well as the smart level control function Use the arrow key on the bottom right to scroll through the product selection menu and s...

Страница 17: ...ure and below of the core temperature probe if it has been inserted The controller automatically detects whether the core probe has been inserted and displays this after a running time of 5 min If the core probe has not been inserted and detected the time programme cycle runs automatically Right side The individual steps of the cycle are displayed The small light blue arrow and the light blue snow...

Страница 18: ... pops up Enter the desired value First the digits then the negative sign Press OK to save the entered value The display jumps back one step to the cycle steps interface Pressing the OK key again takes you back to the cycle interface freeze End of cycle freeze At the end of the cycle the pop up appears end of cycle with HACCP data The unit runs in storage mode at an air temperature of 18 C By press...

Страница 19: ...n key Unit immediately starts the combined cycle Pop up preparing machine heating The display indicates the air temperature Once it reaches the set value of 60 C the pop up machine ready appears Pop up machine ready heated Press OK the display shows the product selection with the corresponding preset combination recipes of the various products as well as a manual function ...

Страница 20: ...end of cycle The displayed time may change repeatedly during the cycle depending on the progress and core temperature The elapsed time is displayed below the bar Left side Display of the air temperature and below of the core temperature probe if it has been inserted The controller automatically detects whether the core probe has been inserted and displays this after a running time of 5 min If the ...

Страница 21: ...op up change values air setpoint By pressing the air setpoint key for example the air setpoint window pops up Enter the desired value First the digits then the negative sign Press OK to save the entered value The display jumps back one step to the cycle stages interface By confirming with the OK key again you return to the cycle interface combi End of cycle combi At the end of the cycle the pop up...

Страница 22: ...ly runs the slow speed cooking cycle Pop up preparing machine heating The display shows the air temperature Once the set value of 60 C is reached the pop up machine ready heated opens Pop up machine ready heated Press OK the display shows the product selection menu with the corresponding preset recipes for slow speed cooking of various products as well as a manual function and the smart level cont...

Страница 23: ...cycle The displayed time may change repeatedly during the cycle depending on the progress and core temperature The red bar below the date shows the time range of where the process is at The elapsed time is displayed below the red bar Left side Display of the air temperature and below of the core temperature probe if it has been inserted The controller automatically detects whether the core probe h...

Страница 24: ...es air setpoint By pressing the air setpoint key for example the air setpoint window pops up Enter the desired value First the digits then the negative sign Press OK to save the entered value The display jumps back one step to the cycle stages interface By confirming with the OK key again you return to the cycle interface slow speed cooking End of cycle slow speed cooking At the end of the cycle a...

Страница 25: ...key The pop up ready at appears on the display for entering as to when you need the product thawed Pop up ready at Start key The unit starts the thaw cycle and finishes at the displayed time Pop up HACCP opens Pop up HACCP Fill out the input mask employee author product weight Press the OK key to confirm On the display the cycle interface thaw appears ...

Страница 26: ...e temperature probe cannot be used during thawing Right side The individual cycle steps are displayed The small blue or red arrow indicates the unit s current cycle step The red product key takes you to the set cycle steps The dark blue line below the freeze thaw symbol indicates which step of the cycle the controller is in You can use the corresponding key to select which step of the cycle you wa...

Страница 27: ...thaw End of cycle thaw At the end of the cycle the pop up appears End of cycle with the HACCP data The unit runs in storage mode at an air temperature of 3 C By pressing the On Off key the unit switches off The finished product can be removed The start screen appears on the display 7 9 PROVE CYCLE VINTOS Start screen Press the prove key Product selection menu Select product and confirm the selecti...

Страница 28: ...ired end time can be set Confirm entries with OK The HACCP input screen pops up Cycle interface prove Center large digits set end time Small digits date of end of cycle The red bar below the date shows the time range of where the process is at The elapsed time is displayed below the bar Left side Display of the air temperature A core temperature probe cannot be used during proving Right side The i...

Страница 29: ...re Pop up change values air setpoint By pressing the air setpoint key for example the air setpoint window pops up Enter the desired value First the digits then the negative sign Press OK to save the entered value The display jumps back one step to the cycle stages interface By confirming with the OK key again you return to the cycle interface prove End of cycle prove At the end of the cycle the po...

Страница 30: ...ns up Selection menu Make your selection chill freeze warm Depending on your selection a pop up appears preparing machine cooling preparing machine freezing preparing maching heating Pop up preparing machine cooling Press Pull down key Unit starts Once the set setpoints of 3 C chill 18 C freeze 60 C heat are reached the pop up machine pre cooled appears Press OK and the cycle interface storage app...

Страница 31: ...idually adapt the following for the current cycle by pressing the corresponding field time fan speed air temperature Pop up change values air setpoint By pressing the air setpoint key for example the air setpoint window pops up Enter the desired value First the digits then the negative sign Press OK to save the entered value The display jumps back one step to the cycle stages interface By confirmi...

Страница 32: ...vaporator fans run at full speed Open the door until the defrost process is finished after max 15 min and the pop up defrost finished appears Cycle interface defrost Center Large digits calculated end time Small digits date of end of cycle The blue bar below the date shows the time range of where the process is at The elapsed time is displayed below the bar By pressing the on off key the unit swit...

Страница 33: ...started Sterilization is highlighted in gray The air temperature is below 15 C The process cannot be started The cycle interface sterilization opens The evaporator fans run at low speed and the ozone is fed into the interior Please keep the unit s door closed until the cycle is finished after approx 15 min Press the Sterilization key Cycle interface Sterilization Center Large digits calculated end...

Страница 34: ...be removed Start screen Select cycle blast chilling blast freezing slow speed cooking Pop up preparing machine cooling OFF NO key Return to the start screen Pull down key Unit pre cools to 15 C Start key Unit immediately starts the blast chilling cycle Pop up prepare machine cooling Press Pull down Product selection page 1 The unit starts running The air temperature of the unit is indicated on the...

Страница 35: ...he two parameters Factory settings Blast chilling 15 C air temperature 100 fan speed Blast freezing 30 C air temperature 100 fan speed Slow speed cooking proving 60 C air temperature 40 fan speed Confirm with OK key Pop up product and duration smart level control Select the insertion level slot that you want to load and enter on the display that pops up the product and the duration for the product...

Страница 36: ...ayed Once the time of one level slot has elapsed a pop up opens with a ready message for this level slot Pop up level ready smart level control extend the time delete entry back to the overview smart level control Overview smart level control The finished levels slots are highlighted in blue with a check mark in the time column The On Off key ends the smart level control cycle ...

Страница 37: ...reparing machine cooling The unit starts running The air temperature is indicated on the display If the set target value has been reached the pop up unit pre cooled appears Pressing the run key takes you to the product selection menu with the corresponding preset recipes for blast chilling various products a manual function as well as the smart level control function Use the arrow key on the botto...

Страница 38: ...settings time air temperature core temperature fan speed Confirm your entries by pressing the OK key Press the clock symbol Pop up Manual programme setting the time After entering the appropriate setting in the pop up press OK and your settings are saved and the interface manual appears again on the display Press the OK key again to start the programme ...

Страница 39: ...reeze thaw combi slow speed cooking prove Pop up preparing machine cooling OFF NO key Press and the product selection menu opens up Window product selection menu With the arrow key on the bottom right you can scroll through the product selection menu and choose a programme Copy write programmes Press the selected programme key e g meat small pieces for 5 seconds ...

Страница 40: ...oard to enter a new name e g Schnitzel Confirm with OK key Window programme steps A window pops up with the individual steps of the programme To assign a new logo press the logo icon next to the name you have assigned to your programme Window selecting logos for the programme With the arrow keys on the bottom right you can scroll through the logo pages Choose your selection by pressing the icon Th...

Страница 41: ...can change each value by pressing the corresponding key Respective pop ups for setting the values open up Pop up air setpoint Check each programme step and change the values for your new programme As soon as all programme steps are set confirm your settings with the OK key The programme jumps back to the page with the programme steps Check once more if all steps are correct Confirm with OK Window ...

Страница 42: ...INTOS Start screen Select cycle chill freeze thaw combi slow speed cooking prove Pop up preparing machine cooling OFF NO key Press and the product selection menu opens up Window product selection With the arrow key on the bottom right you can scroll through the product selection menu and select a programme Press the key of the selected programme you want to edit e g meat small pieces for 5 seconds...

Страница 43: ...ps up where time air temperature evaporator fan speed and core temperature can be set and applied to each respective step Window settings You can now change each value by pressing the corresponding key A pop up for setting the respective values then opens Check each programme step and change the values for your new programme When all programme steps have been set save your settings by pressing the...

Страница 44: ...On the product selection menu press the key of the programme you want to move for 5 seconds e g Schnitzel Pop up move position Press the position key Another window pops up Use the left arrow key to return to the product selection menu Pop up enter position Enter the desired position e g 1 Confirm with OK The programme jumps back to the previous pop up position Window product selection Your progra...

Страница 45: ...e for 5 seconds e g Schnitzel Pop up delete position Press delete key Another window pops up Pop up delete recipe Delete recipe Schnitzel Press the OK key to delete the programme The product selection menu appears again on the display Window product selection Return to the start screen by pressing the left arrow key or choose and start a desired program ...

Страница 46: ...Is also protected by a password 2000 and is intended for maintenance and repair by a technician All parameters can be viewed and some important parameters can be changed Level IV Is protected by a password and only accessible to the factory and the factory service On this level all values and parameters can be viewed and changed The passwords of level II and III can be changed and saved The passwo...

Страница 47: ...try with OK and you will return to the previous password pop up Pop up login interface On the login interface press the left arrow key to be logged into the desired level Attention If you press the logout button on the login screen the control always returns to level I Change password You can change the password for levels II and III by pressing new password on the login screen and entering a new ...

Страница 48: ...pens up Window menu page 1 on Level IV Press menu key alarms The window alarm list pops up Window alarm list Alarm list The alarms with start and end time are being displayed Scroll through the list with the arrow keys at the bottom right Return to page 1 of the menu with the arrow at the bottom left ...

Страница 49: ...t from A G On this page there are parameters A G With the arrow keys at the bottom left you can scroll through the pages and by touching the letters you can check the parameters The parameters are only to be changed after consulting the factory customer service To change a parameter press the highlighted button One pop up at a time opens where you can change the settings of the parameter Confirm w...

Страница 50: ... on the bottom right to scroll through the pages To test the relays press one of the light gray buttons in the value column The relays will then switch on and you can check whether the corresponding component is working Attention After the function test the relays must be switched off again Using the arrow key on the bottom left you return to the menu page Attention Whenever you have changed the c...

Страница 51: ...e stick is needed for read out and that it is not to be deleted If the above file is deleted a data export is not possible In this case please contact the manufacturer As soon as the data export is complete on the display a pop up appears Done It s possible to remove USB stick All HACCP files are now stored as csv files on the USP stick The date of export is always specified in the file name for e...

Страница 52: ...heet programme e g Excel Depending on the programme it may be necessary to format the data To do so select the first column in Excel and choose the function Data Texts in columns In the submenu of this function all further default informations are then already included Then please select Finish ...

Страница 53: ...53 The HACCP data is then displayed in an Excel list with the following information serial number of the unit model type author product weight recipe date time air temperature core temperature ...

Страница 54: ...rs the highest possible safety standards 8 2 CLEANING Before cleaning detach the unit from the power grid Use a damp cloth and a non abrasive neutral cleaner to clean the steel surfaces on the inside and outside Wipe thoroughly with a damp cloth do not rinse clear with a water jet and dry carefully Do not scrape the surfaces with pointed objects Do not use decomposing substances solvents steel pad...

Страница 55: ...vided by the regulations in force Should you require customer service please contact the dealer from whom you have purchased the unit specify precisely the reason for your claim and provide the unit s data indicated on the rating plate on the back of the machine see point 4 Technical characteristics 10 DISPOSAL AND RECYCLING The following materials were used in the construction of the blast chille...

Страница 56: ...56 11 WIRING DIAGRAMS ...

Страница 57: ...57 ...

Страница 58: ...58 ...

Страница 59: ...59 ...

Страница 60: ...60 ...

Страница 61: ...61 ...

Страница 62: ...62 ...

Страница 63: ...63 ...

Страница 64: ... electrical appliances and machines for household and similar electrical appliances EN 60335 2 34 2014 10 Safety of electrical appliances and machines for household and similar electrical appliances Particular requirements for motor compressors EN 378 1 2018 04 Refrigerating systems and heat pumps Safety and environmental requirements EN 62233 2009 04 Measurement methods for electromagnetic fields...

Отзывы: