background image

10

The PC150H Crimper is calibrated at factory using the correct hose, fitting, and die 

set outlined in the Continental ContiTech Crimp Specifications Manual.

Note:


All settings are approximate, for minor adjustment adjust the dial as needed.

Due to variations in hose and fitting tolerances, some “offset” may required to 

achieve the correct crimp diameter for specific hose and fitting combinations across 

the range of hose and fittings being crimped. If crimp diameters are consistently too 

large or consistently too small, the crimper should be recalibrated. 


Step 1.

 Select the correct hose, fitting, and die set.

Note:

 Refer to the Continental ContiTech Crimp Specifications Manual.

Note: 

While the crimper can be calibrated using any recommended hose and fitting 

combination, using a hose and fitting combination close to the size most frequently 

crimped will minimize the offset required for other sizes and combinations of hose 

and fittings.

Step 2.

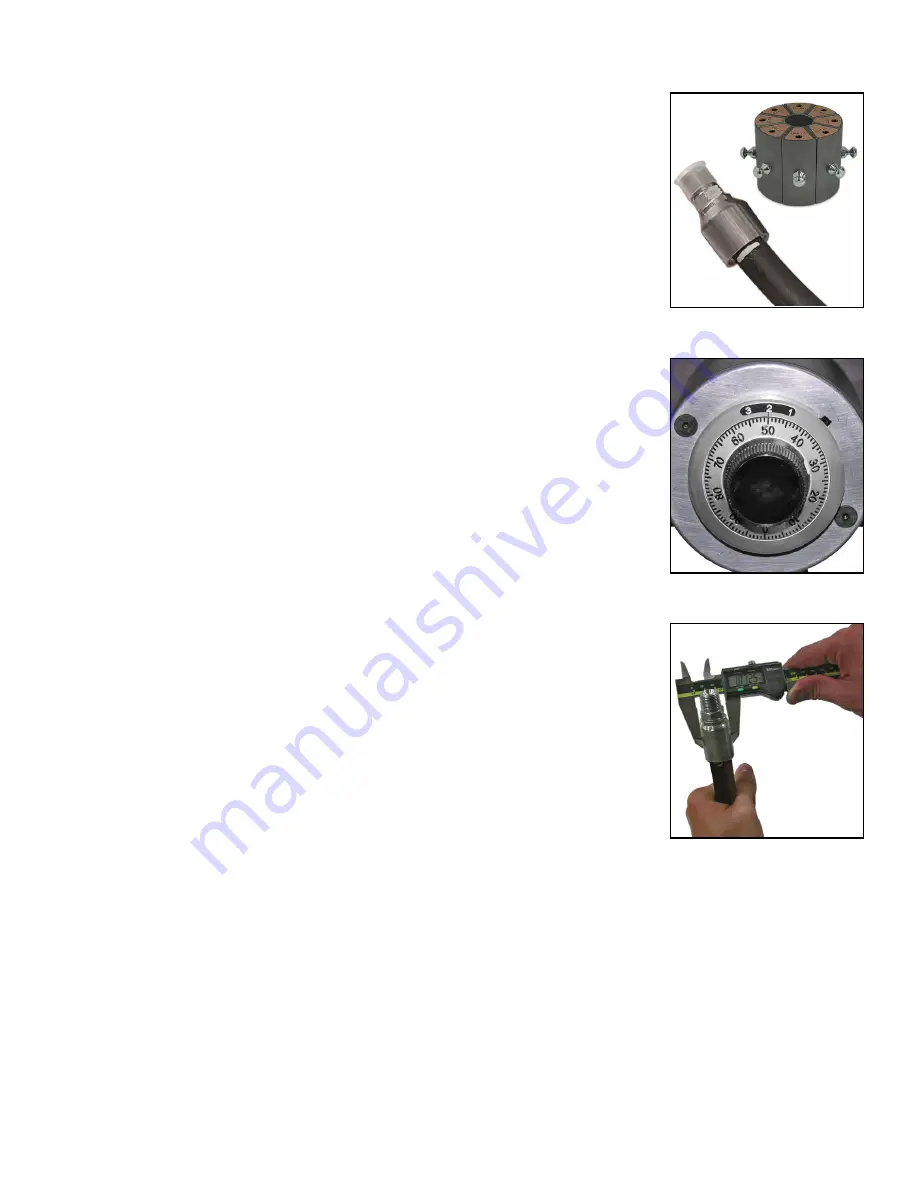
 Set the dial micrometer to the setting as shown in the most current Con

-

tinental ContiTech Crimp Specifications Manual for the combination of hose and 

fitting being crimped.

Step 3.

 Check the crimp diameter of the finished assembly with calipers or microm

-

eters, to be certain that it is within the specifications as outlined in the Continental 

ContiTech Crimp Specification Manual.

Note:

 If the above conditions are not met, the crimper requires recalibration.

• If necessary, the crimp size can be adjusted by making small adjustments on the 

unit’s micrometer. Each 100 on the micrometer represents 1 mm above the closed 

diameter of the die set.

• For example, with a 50mm die set installed and the Micrometer set at 250, the 

finished crimp diameter would be 52.5mm. (50mm + 2.5mm).

• Recheck calibration.

PC150H Calibration Check

Содержание PC150H Series

Страница 1: ...anual 2 PC1 C125 an and nd PC C125M O Ope perators Manual al Hydraulic Hose Crimpers PC125 and PC125M Operators Manual www contitech us Perma Crimp Hydraulic Hose Crimpers PC150H Series Operators Manual www continental industry com ...

Страница 2: ... specifi cations as necessary to meet the requirements of the buyer or the customer s application In such cases the buyer has sole responsibility to qualify the hose for the applications as necessary to ensure performance capability For guidance in the assembly of Continental ContiTech hose and couplings please refer to the Continental ContiTech Crimp Specifications Manual Information in this manu...

Страница 3: ... EQUIPMENT WARNING 2 PC150H COMPONENT IDENTIFICATION 4 PC150H CRIMPER SPECIFICATIONS 5 PC150H INITIAL CRIMPER SETUP 6 PC150H LUBRICATION PROCEDURE 7 PC150H CRIMPING PROCEDURE 8 PC150H CALIBRATION CHECK 10 TROUBLESHOOTING 11 PC150H PART REPLACEMENT GUIDE 12 ...

Страница 4: ...l Micrometer Pneumatic Switch Electrical Cord The 1 HP motor delivers the power needed to get the job done quickly Power Switch Close push button Voltage Tag Continental QR code Large opening allows right angles and special fittings to be inserted Retraction Stop When making repetitive crimps setting the Retraction Stop at a point where the hose and fitting can be conveniently withdrawn without al...

Страница 5: ... Change Tool PC150H Rack 9 Station Die Storage Rack PC150H Die Stud Hydraulic Dies Master Die Diameter 84mm Crimping Force 155 Ton Maximum Die Opening Die Size Plus 38mm Maximum Opening w o Dies 125mm Length 16 Width 23 Height 19 Weight 236 lb Electrical Power Requirement Std 110V Electrical Power Requirement Optional 220V 1 Ph Pump HP 110V 1 Hp Pump HP 220V Single Phase 2 Hp Oil Capacity 13 Qt Oi...

Страница 6: ... will not be accurate Check the electrical circuit to be certain that it matches the crimper requirements shown on the voltage tag Caution Do not run the PC150H crimper on an extension cord as low voltage can damage the motor and or electrical components Check to be certain that the shipping plug in the pump reservoir has been replaced with the vent plug shipped with the PC150H crimper Always chec...

Страница 7: ...d press the green button or the pneumatic switch to close the crimper to the 0 position Step 3 Turn the valve in the Hold position to keep the master dies closed Step 4 Lubricate the master die through the 8 lubrication fittings Caution Failure to lubricate this area may result in premature wear and damage A molybdenum disulfide high pressure grease can be used as well PC150H Lubrication Procedure...

Страница 8: ...ose and fitting being crimped The correct die set can be found in the Continental ContiTech Crimp Specification Manual Step 3 Use the quick change tool to place the die set into the crimper Then slowly hold and press the green button or the pneumatic switch to close the crimper head making sure that the retaining pins enter the location holes in the master die The die will click into place when it...

Страница 9: ...2 5 mm 50mm 2 5mm Step 7 With the valve in the release position insert the hose assembly from either direction into the crimper taking care not to disturb the die set Hold the assembly in place until the crimp is complete Activate the crimp cycle by pressing and holding the green close button or the pneumatic switch until the crimp is complete The pump will remain on after the crimp cycle is compl...

Страница 10: ...ose and fitting combination close to the size most frequently crimped will minimize the offset required for other sizes and combinations of hose and fittings Step 2 Set the dial micrometer to the setting as shown in the most current Con tinental ContiTech Crimp Specifications Manual for the combination of hose and fitting being crimped Step 3 Check the crimp diameter of the finished assembly with ...

Страница 11: ...equired Incorrect setting of the micrometer Check the Continental crimp specifications manual Incorrect die being used Each die has a range of approximately 3mm 120 in above the closed diameter of the die The closed diameter is the die size stamped on the die face Inadequate pump pressure Check oil level in the pump It should be 1 1 2 to 2 inches below the fill plug Replenish with ISO Viscosity Gr...

Страница 12: ...0H Close button PC150H Green close button 1 3 PC150H Protection pad PC150H Protection pad 8 4 PC150H DCT PC150H Die change tool 1 5 PC125 150 Switch PC125 150 Pneumatic pendant switch 1 6 PC125 150 Breaker s witch PC125 150 White breaker switch 1 PC150H part replacement guide PC150H Part Replacement Guide ...

Страница 13: ...luence on the industrial infrastructure We see digitalization and current trends as an opportunity to work with our customers to add sustainable value for both sides and for good Rev 02 27 2020 The content of this publication is not legally binding and is provided as information only The trademarks displayed in this publication are the property of Continental AG and or its affiliates Copyright 201...

Отзывы: