background image

5) 

Follow the 

food pack 

instructions or 

cook book 

for the 

frying 

time and 

meanwhile monitor 

the frying 

effect through 

the 

glass lid.

6) 

Wait 

a couple 

of minutes 

to let 

the oil 

vapor escape 

when food 

reaches desired 

brownness. Turn 

off the 

unit and 

then open 

the glass lid.

7) 

Insert the 

basket handle 

into the 

basket groove. 

Lift the 

basket 

with fried 

food out 

of the 

pot and 

place the 

fried food 

on the 

absorbent paper. Season to taste.

8) 

Unplug the 

cord from 

wall outlet 

and then 

from the 

unit when 

unit is not in use.

Caution:

• 

Do not plunge the basket quickly into hot oil. 

• 

Do not 

touch the 

pot and 

glass lid 

when unit 

is hot. 

Grasp the 

plastic lid knob to open the lid. 

• 

Do not carry or move the unit when the oil is hot.

Note:

• 

If too 

much food 

is fried 

at the 

same time, 

the food 

will not 

get 

crisp.

• 

The pieces of food should be of equal size and thickness. 

• 

Avoid cooking pieces of food that are extra thick. 

D. Oil use and filtering:

After each use, always strain oil to remove the accumulated residue.

• 

Place the filter paper on the basket.

• 

Attach the basket to the edge of the pot.

• 

Pour oil through the filter paper into the pot. 

• 

Discard the filter paper and unload the basket off the unit.

Note:


It is time to replace the cooking oil if any of the following occur:

• 

The oil is dark in color.

• 

The oil has an unpleasant odor.

• 

The oil smokes when it is heated.

• 

The oil foams excessively during frying.

• 

After 8-12 uses.


Stewing

1) 

Remove the lid and basket.  

2) 

Add some 

water or 

soup in 

the pot 

per the 

cook book 

insructions.

2)  Asegúrese  de  que  la  luz  indicadora  se  apague  antes  de 

proceder a freír los alimentos.

3)  Sostenga la canastilla con los alimentos dentro y lentamente 

colóquela  dentro  de  la  olla.  Luego  retire  el  mango  de  la 

canastilla.

4)  Cubra  la  olla  con  la  tapa  de  vidrio,  si  lo  desea,  para  evitar 

salpicaduras del aceite caliente.

5)  Siga las instrucciones de los alimentos que vienen empacados 

o  de  su  recetario  con  respecto  a  los  tiempos  de  fritura  y 

verifique el proceso a través de la tapa de vidrio.

6)  Espere un par de minutos para permitir que el vapor producido 

por el aceite escape cuando los alimentos alcancen el nivel de 

dorado deseado. Apague el electrodoméstico y luego proceda 

a retirar la tapa de vidrio.

7)  Inserte el mango dentro de la ranura de la canastilla. Levante 

la  canastilla  con  los  alimentos  fritos  sacándola  de  la  olla  y 

coloque los alimentos fritos sobre papel absorbente. Sazone 

al gusto.

8)  Desenchufe  del  tomacorriente  y  desconecte  el  cordón  del 

aparato si no se lo va a utilizar.

Precaución:


•  No  suelte  la  canastilla  de  manera  intempestiva  dentro  del 

aceite caliente. 

•  No  toque  la  olla  ni  la  tapa  de  vidrio  mientras  el  aparato  se 

encuentre caliente. Agarre la perilla de plástico de la tapa para 

retirarla.

•  No traslade ni mueva el electrodoméstico mientras el aceite se 

encuentre caliente.

Nota:


•  Si se fríe demasiados alimentos a la vez, éstos no quedarán 

crocantes.

•  Los trozos de alimentos deben ser de igual tamaño y grosor.

•  Evite  cocer  trozos  de  alimentos  que  sean  demasiado 

voluminosos.

D. Utilización del aceite y filtrado:


Después  de  cada  uso,  cuele  el  aceite  para  retirar  todo  residuo 

acumulado.

Содержание CE23279

Страница 1: ...Multi Cooker DeepFryer UserManual Model CE23279 ...

Страница 2: ... ground or strike it or it may be damaged Do not operate this appliance when the power cord or plug damaged or if the appliance malfunctions is dropped or has been damaged in any manner Return it to the Authorized Service Station for examination repair electric or mechanical adjustment The use of accessory attachment not recommended by the appliance manufacturer may result in fire electric shock o...

Страница 3: ...N USING THIS APPLIANCE PROVIDE ADEQUATE AIR SPACE ABOVE AND ON ALL SIDES FOR AIR CIRCULATION N SURFACES WHERE HEAT MAY CAUSE A PROBLEM AN INSULATED PAD IS RECOMMENDED HEATING THE APPLIANCE UNTIL THE SMOKE STOPS EMITTING O NOT PUT ANY OTHER THING ON TOP OF NON STICK COATING POT ONNECT THE UNIT ONLY TO PROPERLY WIRED WALL OUTLETS 7HEN NOT IN USE ALWAYS KEEP THE UNIT DRY ESPECIALLY THE NON STICK COAT...

Страница 4: ...dy during cooking 14 food contain moisture particularly frozen foods 15 Do not leave the basket handle attached during cooking Always remove the handle 16 17 Use the appliance on a stable work surface away from water 18 Do not unplug the socket by pulling on the supply cord 19 Be careful of rising steam from between the pot and lid when you remove the lid 20 Please wash the non stick coated pot an...

Страница 5: ...the oil filling level is between the MAX and MIN level lines which located on the inside of the pot 2 Turn the dial to the setting FRY 3 Close the lid of the multi cooker 4 Attach the cord to the unit by aligning the magnetic plug end of the cord assembly with the plug face up where marked with the words THIS SIDE UP 5 Plug another end of the cord assembly into a 120V wall outlet The indicator lig...

Страница 6: ...oweling before frying Moist foods cause excess foaming spattering and crackling Remove any ice crystals before putting the frozen foods into the hot oil Frying the frozen foods will take a little longer time C Frying food 1 Insert the basket handle by sliding the end of the handle into the fixing groove of the basket to hold the basket See the following photos for the details 2 Make sure that the ...

Страница 7: ... to open the lid Do not carry or move the unit when the oil is hot Note If too much food is fried at the same time the food will not get crisp The pieces of food should be of equal size and thickness Avoid cooking pieces of food that are extra thick D Oil use and filtering After each use always strain oil to remove the accumulated residue Place the filter paper on the basket Attach the basket to t...

Страница 8: ...ce the steamer in the pot and put the basket on the top of the steamer 2 Add sufficient water into the pot but don t overflow the steamer rack 3 Place the food into the basket And then cover the lid 4 Turn the dial to the setting STEAM 5 Follow the cook book instructions for the steaming time Add more steam time if the softer taste is needed or root food is steamed Note Frozen foods need more stea...

Страница 9: ...ÀV Ê V Ìi ÌÊ V Ã Ê Õ ÕÌÃ Ê Ã Õ Ê LiÊ V Ìi Ê Liv ÀiÊ vÀÞ Ê Þ V Ê V Ì Ê ÃÊ Ãi à i Ê y Ê ÕÀ Ê LÀi VÀÕ LÃÊ ÀÊ L ÌÌiÀ Ê 7 i Ê vÀÞ Ê V ÀivÕ ÞÊ Ì iÊ v ÃÊ Ì Ê Û Ê ÛiÀV Ê iÊ V Ê Ì iÊ ÞÊ Û ÀÞÊ VV À ÊÌ ÊÌ iÊµÕ Ì ÌÞÊ ÊÌ V iÃÃÊ vÊÌ iÊv ÊLi ÊvÀ i Ê i i LiÀÊ Ê vviÀi ViÊ vÊ iÊ ÀÊÌÜ Ê ÕÌiÃÊV ÊÀiÃÕ ÌÊ Ê ÛiÀÊ V i Êv 1 Problems Troubleshooting Solutions Solutions The oil overflows Frozen food is covered in ice Frozen...

Страница 10: ...ozen food is covered in ice Frozen food is covered in ice crystals Too much oil in the fryer once it has cooled Basket has been lowered into the oil too quickly Food not dried before immersing into oil Too much food in the basket Remove ice prior to frying Remove some of the oil Lower the basket slowly Dry food thoroughly There should be a maximum of 300g of frozen chips or 600g of chipped potatoe...

Страница 11: ...W lo cut To fryi cor wa bef dis cor the Re me ma Se on oil re out plu mo res ...

Страница 12: ... CABO EN UN ENTRO DE 3ERVICIO AUTORIZADO UANDO USE ESTE APARATO PROPORCIONE ESPACIOS ADECUADOS POR ENCIMA DEL APARATO Y HACIA TODOS LO LADOS PARA LA CIRCULACIØN PROBLEMA LE RECOMENDAMOS USAR UNA ALMOHADILLA AISLADA UANDO SE USA POR PRIMERA VEZ SE PRODUCIRÉ HUMO ONTINÞE CON EL CALENTAMIENTO DE LA UNIDAD HASTA QUE DEJE DE GENERARSE HUMO O COLOQUE NINGÞN OBJETO SOBRE LA OLLA DE ACABADO ANTIADHERENTE ...

Страница 13: ...1 1 1 1 1 1 2 2 2 2 ...

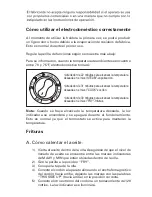
Страница 14: ...rante el funcionamiento Esto es normal ya que el termostato se activa para mantener la temperatura Frituras A Cómo calentar el aceite 1 Vierta el aceite dentro de la olla Asegúrese de que el nivel de llenado de aceite se encuentre entre las marcas indicadoras de MAXY y MIN que están ubicadas dentro de la olla 2 Gire la perilla a la posición FRY 3 Coloque la tapa de la olla 4 Conecte el cordón al a...

Страница 15: ...B C ÊÊ ...

Страница 16: ...io 7 Inserte el mango dentro de la ranura de la canastilla Levante la canastilla con los alimentos fritos sacándola de la olla y coloque los alimentos fritos sobre papel absorbente Sazone al gusto 8 Desenchufe del tomacorriente y desconecte el cordón del aparato si no se lo va a utilizar Precaución No suelte la canastilla de manera intempestiva dentro del aceite caliente No toque la olla ni la tap...

Страница 17: ...S ...

Страница 18: ...i Ì ViÃÊ ÊµÕi À ÊVÀÕ i Ìià ÃÊ ÃÊ i Ì Ã ÊiÝVi Ì Ê µÕi ÃÊV ÊÕ Ê Ì ÊV Ìi Ê iÊ Ê V Ê ÃÊ ÃÊÞÊ ÃÊ Ã Ê iLi ÊÀiVÕLÀ ÀÃiÊ ÌiÃÊ iÊ vÀi À Ã Ê ÊÀiVÕLÀ i Ì ÊÌ V ÊiÃÊ Ê À Êà â Ê Ê Ê Ê ÃÌ Ê Õ Ê ÃÊvÀ ÊÌ iÊi ÊÌ i Ê Ê ÃÊ i Ì ÃÊ À ÊiÛ Ì ÀÊ µÕiÊÃiÊV V i Ê iÊ Ã Ê ÃÊÌ i ÃÊ iÊV VV Ê Õi i ÊÛ À ÀÊ iÊ VÕiÀ ÊV Ê ÊV Ì ÊÞÊià ià ÀÊ iÊ ÃÊ i Ì ÃÊ ÊvÀi À Ê1 Ê viÀi V Ê iÊ Õ Ê Ê ÃÊ ÕÌ ÃÊ Õi iÊ ÀiÃÕ Ì ÀÊ i Ê i Ì ÃÊ V V ÃÊ iÊ Ã Soluc...

Страница 19: ... P ...
Отзывы: