


2
2
Instrucciones especiales:
NO permita que los niños o que las personas no capacitadas usen el electrodoméstico
sin supervisión.
NUNCA sumerja la plancha, el cordón ni el enchufe en ningún tipo de líquido.
NO deje que la plancha caliente entre en contacto con telas o superficies
muy inflamables.
NO deje la plancha enchufada si no es necesario. Desenchúfela si no la va a utilizar.
NUNCA toque el electrodoméstico con las manos mojadas o húmedas.
NO tire del cordón ni del electrodoméstico para desenchufarlo del tomacorriente.
NO deje el electrodoméstico expuesto a la intemperie (la lluvia, el sol, etc.)
NO deja la plancha funcionando sola mientras se encuentre conectada.
NO llene el tanque con agua sin antes haber desenchufado la plancha.
¡ATENCIÓN!
No utilice aditivos químicos, sustancias para perfumar ni para descalcificar. Si no se
cumple con estas indicaciones, se puede perder la cobertura de la garantía.
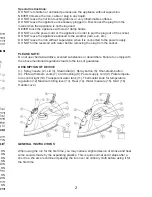
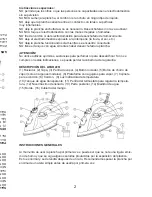
DESCRIPCIÓN DEL APARATO
(1) Rociador, (2) Tapa, (3) Perilla de vapor, (4) Botón rociador, (5) Botón de chorro de
vapor (solo en algunos modelos), (6) Plataforma con agujeros para vapor, (7) Cojinete
para el cordón, (8) Cordón, (9) Luz indicadora de temperatura
(10) Tanque de agua transparente, (11) Perilla del termostato para regular la tempera
-
tura, (12) Nivel máximo de llenado, (13) Parte posterior, (14) Medidor de agua
(15) Borde, (16) Cubierta del mango.
Special Instructions:
DO NOT let children or untrained persons use the appliance without supevision.
NEVER Immerse the iron, cable or plug in any liquid.
DO NOT leave the hot iron touching fabrics or very Inflammable surfaces.
DO NOT leave the appliance unnecessary plugged in. Disconnect the plug from the
mains when the appliance is not being used.
NEVER touch the appliance with wet or damp hands.
DO NOT use the power cord or the appliance in order to pull the plug out of the socket.
DO NOT leave the appliance exposed to the weather (rain, sun, etc.).
DO NOT leave the iron without supervision when it is connected to the power supply
.
DO NOT fill the reservoir with water before removing the plug from the socket.
PLEASE NOTE:
Do not use chemical additive, scented substances or decalcifiers. Failure to comply with
the above mentioned regulations leads to the loss of guarantee.
DESCRIPTION OF DEVICE
(1). Spray noozle (2). Lid (3). Steam dial (4). Spray button (5). Shot-steam button
(6). Plate with steam vents (7). Cord bushing (8). Power supply cord (9). Plate tempera
-
ture control light (10). Transparent water tank (1
1). Thermostat knob for temperature
regulation (12) Maximum filling level (13). Rear (14). Water measure (15). Skirt ( 16)
Handle cover
INSTRUCCIONES GENERALES
Al momento de usar la plancha por primera vez, puede ser que se note una ligera emis
-
ión de humo y que se oiga algunos sonidos producidos por la expansión del plástico.
Esto es normal y se detendrá después de un rato. Recomendamos pasar la plancha por
encima de una tela simple antes de usarla por primera vez.
GENERAL INSTRUCTIONS
When using the ron for the first time, you may notice a slight emission of smoke and hear
some sounds made by the expanding plastics. This is quite normal and it stops after a
short me. We also recommend passing the iron over an ordinary cIoth before using it for
the first time.


