
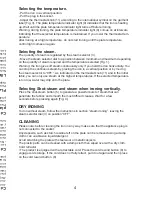


Selecting the temperature.
- Put the iron in a vertical position.
- Put the plug in the socket.
- Adjust the thermostat knob (1
1) according to the international symbol on the garment
label [Fig. 3]. The plate temperature indicator light (9) indicates that the iron is heating
up. Wait until the plate temperature indicator light turns of
f before ironing.
Warning: during ironing, the plate temperature indicator light (9) comes on at intervals,
indicating that the selected temperature is maintained. If you lower the thermostat tem
-
perature
after ironing at a high temperature, do not start ironing until the plate temperature
control light comes on again.
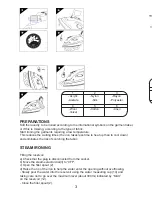
Selecting the steam.
The quantity of steam is regulated by the steam selector (3).
- Move the steam selector dial to a position between minimum and maximum depending
on the quantity of steam required and the temperature selected [Fig. 1].
Warning: the iron gives of
f steam continuously only if you hold the iron horizontally. Y
ou
can stop the continuous steam by placing the iron in a vertical position or by moving
the steam selector to “0FF ”. As indicated on the thermostat knob (1
1) and in the initial
table, you can only use steam at the highest temperatures. If the selected temperature
is too low, water may drip onto the plate.
Selecting Shot-steam and steam when ironing vertically.
Press the shot-steam button (5) to generate a powerful burst of steam that can
penetrate the fabrics and smooth the most difficult creases. Wait for a few
seconds before pressing again [Fig. 4].
DRY IRONING
To iron without steam, follow the instructions in section “steam ironing”, leaving the
steam selector dial (3) on position “0FF”.
CLEANING
Please note: before cleaning the iron in any way, make sure that the appliance plug is
not connected to the socket.
Any deposits, such as starch residue left on the plate can be removed using a damp
cloth or an unabrasive liquid detergent.
Avoid scratching the plate with steel wool or metallic objects.
The plastic parts can be cleaned with a damp cloth then wiped over with a dry cloth.
Cord retractor
• The product is equipped with a retractable cord. Press the cord rewind button (8) to
engage cord storage. If the cord does not fully retract, pull it out again and then press
on the cord rewind button. (8)
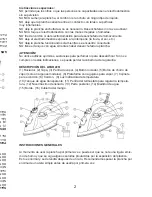
Cómo seleccionar la temperatura
-Coloque la plancha ezn posición vertical.
-Coloque el tapón en la abertura.
-Regule el termostato (11) de acuerdo al símbolo internacional en la etiqueta de la
prenda [Fig. 3]. La luz indicadora de temperatura (9) indica que la plancha se está
calentando. Espere hasta que luz indicadora se apague para comenzar a planchar.
Advertencia: Durante el planchado, la luz indicadora de temperatura (9) se enciende
en intervalos, indicando que la temperatura seleccionada se encuentra manteniéndose.
Si se baja la temperatura después de planchar a temperatura alta, no
planche hasta que la luz indicadora de temperatura se encienda de nuevo.
Cómo seleccionar el vapor
La cantidad de vapor se regula por medio del selector de vapor (3).
- Mueva el selector de vapor a la posición entre el mínimo y el máximo dependiendo
de la cantidad de vapor requerido y la temperatura seleccionada [Fig. 1].
Advertencia: La plancha produce vapor continuamente solo si se sostiene la plancha
de manera horizontal. Se puede detener el vapor colocando la plancha de manera
vertical o moviendo el selector de vapor a “0FF”. Como se indica en el termostato 811)
y en el cuadro inicial, solo se puede usar el vapor a temperaturas altas. Si la tempera -
tura es demasiado baja, el agua puede empezar a gotear de la plataforma.
Cómo seleccionar el planchado con chorro de vapor al
planchar verticalmente
Presione el botón para lanzar el chorro de vapor (5) para generar una potente
emisión de vapor que pueda penetrar en la tela y suavizar las arrugas más difíciles y
profundas. Espere unos segundos antes de presionar de nuevo [Fig. 4].
PLANCHADO AL SECO
Para planchar sin vapor, siga las instrucciones en al sección “Planchado con vapor”
dejando el selector de vapor (3) en la posición “0FF”.
LIMPIEZA
Nota: Antes de proceder a limpiar la plancha de cualquier forma, asegúrese de que
no se encuentre enchufada.
Cualquier tipo de depósitos, residuos de almidón o suciedad que se acumule en la
plataforma se puede remover utilizando un paño húmedo o un líquido detergente no
abrasivo.
Evite arañar la plataforma con una esponja de metal o con objetos metálicos.
Las partes plásticas se pueden limpiar con un paño húmedo y secar con otro paño.
4
4


