background image

10

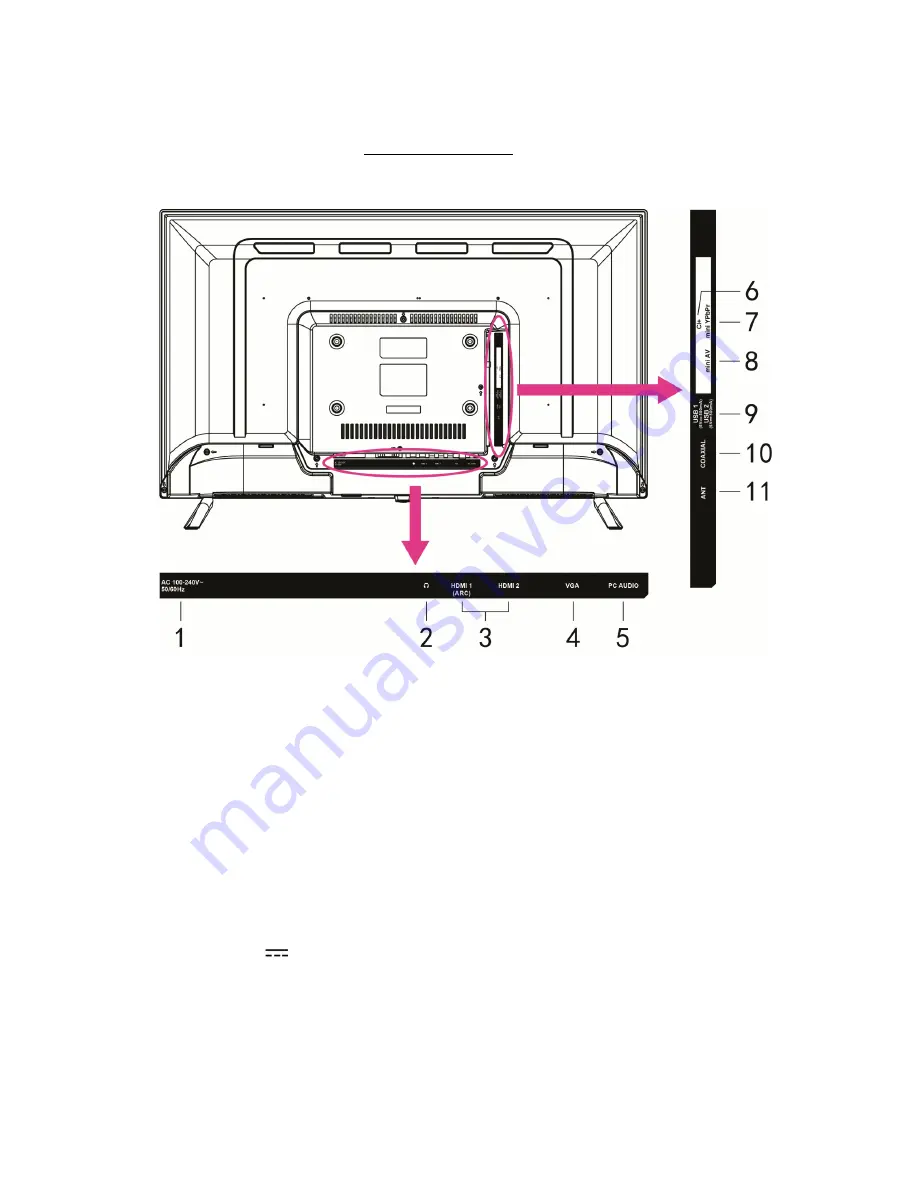
Rear view of the TV set

1.

POWER CORD:

to connect the TV to a power socket.

2.

EARPHONE or HEADPHONE OUTPUT:

to connect a 3.5 mm earphone jack plug.

3.

HDMI1 / HDMI2 :

allows the broadcasting of an uncompressed digital video and audio signal via a

single cable.

4.

VGA:

VGA input terminal.

5.

PC AUDIO

:

PC AUDIO input terminal.

6.

CI+:

CI input terminal.

7.

Mini YPbPr:

to connect the YPbPr cable of a VCR or DVD player.

8.

Mini AV:

to connect a DVD player or VCR to the source.

9.

USB1 / USB2 (5V

0.5A):

to connect a USB device, such as a storage device to access the TV's

media functions.

10.

COAXIAL

: COAXIAL output terminal.

11.

ANT:

to connect the coaxial cable of a terrestrial antenna.

Содержание CELED32HD22B7

Страница 1: ...1 CELED32HD22B7 TV LED HD 31 5 Guide d utilisation Instruction manual ...

Страница 2: ...w user can be informed of the operation of the device The warning sign showing a lightning bolt in a triangle indicates that this product contains dangerous electrical voltages CAUTION TO AVOID THE RISK OF ELECTROCUTION DO NOT REMOVE THE COVER OR THE BACK OF THE DEVICE NO PARTS ARE REPLACEABLE BY THE USER PLEASE CONTACT QUALIFIED PERSONNEL IN CASE OF FAILURE CAUTION RISK OF ELECTRIC SHOCK POWERED ...

Страница 3: ...e in which the protection against electric shock is not based solely on the main insulation but on a double insulation It does not have protective grounding The mains plug must always be easily accessible It serves as a mains disconnecting switch of the device To disconnect the device from the mains the plug must be disconnected Hold the mains cable by its plug Do not pull on the mains cable to di...

Страница 4: ...rs yourself this could be potentially dangerous Do not attempt to open or disassemble the device This would expose you to dangerous voltages The slots and openings of the device are intended for ventilation and to ensure its operation To prevent overheating these openings must not be obstructed or covered in any way such as by newspapers tablecloths or curtains Always leave a minimum distance of 1...

Страница 5: ...ice only on a stand furniture wall that can support its weight safely WARNING Never place a TV in an unstable place This can fall causing injuries or even the death of a person Many injuries especially in the case of children can be avoided by taking simple precautions such as The use of furniture or stands recommended by the TV manufacturer The exclusive use of furniture that can support the weig...

Страница 6: ...ion instructions CAUTION TO AVOID EYE HAZARDS It is best to have soft indirect lighting to watch TV Avoid completely dark environments and any reflection on the screen as these can cause eyestrain USE AND HANDLING OF BATTERIES CAUTION danger of explosion if the batteries are not inserted correctly or if they are replaced by a non similar or incompatible model Replace the batteries only with batter...

Страница 7: ...f children and animals Only adults are capable of handling the batteries For installation handling cleaning and disposal of the device refer to the following chapters of the user manual To avoid possible hearing damage do not listen at a high sound level for a long time SIMPLIFIED EU DCLARATION OF CONFORMITY Continental Edison declares that the radioelectric equipment type CELED32HD22B7 is in comp...

Страница 8: ...D 30 4 TIME 31 5 SETUP 32 6 LOCK 34 V MAINTENANCE AND CLEANING 38 VI TROUBLESHOOTING TIPS 39 VII WARRANTY 41 VIII DISPOSAL 42 This user guide any updates or new versions are available on our website 2011 65 EU Restriction of the use of certain hazardous substances in electronic equipment The CE marking indicates that the product meets the main requirements of the European Directives 2014 35 EU Low...

Страница 9: ...t view of the TV set 1 LED display screen 2 Remote control sensor Power indicator In standby mode the indicator light will display red color when switching on the unit the indicator light will display blue color POWER button To turn ON OFF the TV 3 Stand holder ...

Страница 10: ... signal via a single cable 4 VGA VGA input terminal 5 PC AUDIO PC AUDIO input terminal 6 CI CI input terminal 7 Mini YPbPr to connect the YPbPr cable of a VCR or DVD player 8 Mini AV to connect a DVD player or VCR to the source 9 USB1 USB2 5V 0 5A to connect a USB device such as a storage device to access the TV s media functions 10 COAXIAL COAXIAL output terminal 11 ANT to connect the coaxial cab...

Страница 11: ...ent DTV program and start recording in the background Play Pause in USB mode 10 SUBPAGE To display the teletext sub page To fast forward 11 Size For quick return Press repeatedly to change the size of the teletext 12 BUTTON To start SAVING a digital program in DTV mode 13 To stop playback in Multimedia mode 14 INDEX To read the following file To display the teletext index 15 FAV To play the previo...

Страница 12: ... 23 VOL VOL To raise or lower the volume 24 CH CH To display the next or previous channel 25 INFO To display the source and available information about a program 26 NUMERIC BUTTONS Press the button to directly enter the number of the channel you want to view 27 To change the digits 28 PREVIOUS BUTTON To return to the previous channel ...

Страница 13: ...ntrol power supply 3V 2 x LR03 AAA 1 5V batteriesnot included USB ports voltage and current 5V 0 5A Hotel Lock Yes Speaker Built in 2 x 8W Inputs Antenna HDMI Mini YPbPr Mini AV VGA PC AUDIO USB CI Outputs COAXIAL Headphones USB functions DVR digital video recorder USB multimedia playback formats Video AVI MPG MPEG 1 2 Music MP3 Photos JPEG JPG Text TXT These specifications are subject to change w...

Страница 14: ...PM1320162HCAT Energy efficiency class F Visible diagonal display 80 cm 31 inches Power consumption in running mode W 27 W Power consumption kWh per year based on the electricity consumption of a television set operating four hours a day for three hundred and sixty five days Actual consumption depends on the conditions of use of the television set 31 kWh 1000h Power consumption in standby mode W 0 ...

Страница 15: ...th the symbol are recyclable PE polyethylene PS polystyrene PP polypropylene This means that they can be recycled by disposing of them in appropriate collection containers Other packaging elements adhesive fasteners etc should be disposed of with household waste For more information www quefairedemesdechets fr B Wall mounting Contact a professional for assistance with the wall mounting of your TV ...

Страница 16: ... damage The bottom edge of the TV should protrude slightly from the edge of the flat surface to allow the stand legs to be fixed without damaging the LED display Step 2 Align the bottom of the TV with the stand legs until they are fully in place aligned mounting holes Step 3 Tighten the supplied screws with a screwdriver NOTE unplug the TV from the AC outlet when installing or removing the TV legs...

Страница 17: ...ad the instructions carefully before connecting any other device Connect to an external antenna ANT Connect an antenna to the antenna terminal to obtain the best possible image quality The use of antenna amplifiers is optional or depends on the type of external antenna used Mini AV connection Rear of the external terminal AV cable not provided ...

Страница 18: ...ble Mini YPbPr connection NOTE when connecting an external device match the color of the terminal to the color of the cable CI input terminal USB input terminal Rear of the external terminal AUDIO cable not provided YPbPr cable not provided The CI card is not provided The USB stick is not provided ...

Страница 19: ...ble Not included Use an HDMI cable to connect the TV to another device to receive a high definition multimedia signal Rear of the external terminal HDMI cable not provided Use VGA cable and Audio cable to connect the unit with TV or PC and use this product as a monitor ...

Страница 20: ...CEEDING MAKE SURE THAT ALL EQUIPMENT AND POWER CORDS ARE CONNECTED AND CONFIGURED PROPERLY Headphone and headset cable not included Use coaxial cable not included to connect the unit with amplifier or other audio decoding devices for coaxial audio signal output ...

Страница 21: ...lay Tuning Setup menu Select the preferred Tuning Option using the navigation buttons and press the OK button to start auto tuning Note Scan Type and following tuning options are adjustable only when Digital Type is DVB C B Main menu TV settings The TV has different parameter menus Once the selections have been made they will remain in memory until they are changed even if the TV is turned off Nav...

Страница 22: ...e the sound and press it again to restore it Selecting the source Press the SOURCE button to display the list of available sources Press to select the source and press the OK button to confirm Video Size Setting Press the ASPECT button on the remote control repeatedly to select the VIDEO SIZE directly Available options Auto 4 3 16 9 Zoom1 Zoom2 NOTE The available video size may be different for di...

Страница 23: ...isplay program guide of previous day Press BLUE button on remote control to display program guide of next day FAVORITE LIST When viewing an available channel press FAV button on remote control to enter Favorite List menu page Press UP or DOWN navigation button to select preferred channel Press OK button to confirm selection QUICK SELECT Press OK button on remote control to enter Channel List page ...

Страница 24: ... LEFT or RIGHT navigation button to select desired option Press OK button to confirm selection If the tool bar disappeared press EXIT button on remote control to display it again Press button to call out a reminding message Use LEFT RIGHT navigation button to exit or continue recording TIMESHIFT FOR DTV MODE ONLY Insert your USB memory device into USB slot first When watching digital programs pres...

Страница 25: ...lete files Use the navigation buttons to select a file and press the OK button to add it to the Playlist Press the button to start playback Press the INFO button to call out the tool bar below Use the navigation buttons to select a desired option and press OK to confirm it Press the EXIT button to dismiss the tool bar 2 MUSIC Press the LEFT RIGHT navigation button to select Music in the main menu ...

Страница 26: ...ED button to enter the submenu and you can delete a file accordingly Use the navigation buttons to select a file and press the OK button to add it to the Playlist Press the button to start playback Press the INFO button to call out the tool bar below Use the navigation buttons to select a desired option and press OK to confirm it Press the EXIT button to return Remote control operations when playi...

Страница 27: ...ntry Tune Type and LCN Note Scan type and following items are adjustable only when Antenna is DVB C Then press OK to start program tuning 1 3 ATV Manual Tuning Press the OK or RIGHT navigation button Current CH select current channel Color System select available color system Sound System select available sound system Fine Tune fine tune the frequency AFC turn on off Automatic Frequency Control Se...

Страница 28: ...red position and press the YELLOW button again to move it Press the BLUE button on the remote control to skip a highlighted channel Press the FAV button to set the current channel as a favorite channel and press the FAV button again to set it as a normal channel 1 6 Schedule List Press the UP or DOWN navigation button to select this item and press the OK or RIGHT button to enter it If any programs...

Страница 29: ...lable CAM Conditional Access Module card is connected to the CI slot users can view related information or manage the CAM card 2 PICTURE 2 1 Picture Mode Press the UP DOWN LEFT RIGHT navigation buttons to select an option Picture Mode available options Standard Mild Personal Dynamic Contrast Brightness Colour Tint Sharpness adjustable value 0 100 NOTE Contrast Brightness Colour and Sharpness are a...

Страница 30: ...t an option Sound Mode available options Standard Music Movie Sports Personal Treble Bass adjustable value 0 100 NOTE Treble and Bass are adjustable only when Sound Mode is Personal 3 2 Balance This item is used to adjust the audio output between left and right speaker from 50 to 50 3 3 Auto Volume This item is used to set Auto Volume ON or OFF 3 4 Surround Sound This item is used to select desire...

Страница 31: ...ion information 4 TIME 4 1 Clock It displays the current system time when an available channel was saved 4 2 Time Zone This item is used to select a desired time zone 4 3 Off Time Off Time available options Off Once Every Day Mon Fri Mon Sat Sat Sun Sun Hour Minute use navigation buttons to adjust the Hour Minute when the Off Time is not Off 4 4 On Time On Time available options Off Once Every Day...

Страница 32: ...remote control Available options Off 3 4 5 hours 4 7 OSD Timer This item is used to select a desired OSD menu duration Available options Off 5 10 15 20 25 30 35 seconds 5 SETUP 5 1 Language This item is used to select the default on screen display language 5 2 TT Language This item is used to select the default teletext language 5 3 Audio Language Press the RIGHT navigation button Then you can sel...

Страница 33: ...o size may be different for different input sources 5 7 PVR File System Press the RIGHT navigation button Press the UP DOWN navigation button to select a desired option and then press the LEFT RIGHT navigation button to adjust the selected option Press the OK button to enter the submenu or confirm the setting In this part you can select a desired disk check the PVR File System format your USB memo...

Страница 34: ...Press the SOURCE button on the remote control to select the HDMI input source HDMI CEC turn on off HDMI CEC HDMI ARC turn on off ARC function HDMI 1 Auto Power turn on off Auto Power function Device Menu display the setup menu of other device connected 6 LOCK Press RIGHT navigation button and input the factory default password 0000 using number buttons on remote control Press UP DOWN navigation bu...

Страница 35: ... navigation button to select the channel which you want to lock Press GREEN button repeatedly to lock unlock the highlighted channel 5 4 Parental Guidance This item is used to select desired program rating Available options Off 4 18 6 5 Key Lock This item is used to lock unlock TV buttons Available options On Off 6 6 Hotel Model Press RIGHT navigation button to enter it Press UP DOWN navigation bu...

Страница 36: ...perations of DTV mode PC VGA MODE Connect a personal computer to this unit Power on your computer and this unit Press the SOURCE button on the remote control to select PC VGA input source Press the MENU button to display the main menu and select PICTURE using the LEFT RIGHT navigation button Use the UP DOWN navigation button to highlight SCREEN and press OK or RIGHT navigation button to enter it P...

Страница 37: ...e of the vertical position 4 Size This item is used to adjust the signals transfer speed 5 Phase This item is used to adjust the picture applied to the TV NOTE For other menu operations in PC RGB VGA mode please refer to the menu operations of DTV mode ...

Страница 38: ...he surface is very dirty wipe it with a soft cloth slightly soaked in water Then wipe again with a dry soft cloth Never insert objects or liquids into the ventilation openings of your TV This could damage it or even cause a short circuit or risk of electric shock Never use alcohol benzene solvents or other chemicals Do not use compressed air to remove dust ...

Страница 39: ...und quality Adjust the volume using the VOL VOL keys Press the MUTE button to cancel the mute mute mode Disconnect the headphones If audio equipment is connected make sure it is properly connected Check that the TV and stereo equipment is properly configured Check the audio settings Noise or other type of interference Electronic equipment adjacent to the unit creates interference Check the connect...

Страница 40: ...s not formatted Make sure that the USB stick is compatible and that multimedia data formats can be played back The TV turns itself off Check if the Sleep Timer Auto Standby settings are not activated in the Time menu If the TV is used as a PC monitor check the PC s power and standby settings Color dots appear on the screen Although the LED display is manufactured with high precision technology bla...

Страница 41: ... and due to corrosion caused by rust 3 Any incident misapplication misuse alteration disassembly or unauthorized repair 4 Any improper maintenance operation use not in accordance with the instructions concerning the product or connection to an incorrect voltage 5 Any use of accessories not supplied or approved by CONTINENTAL EDISON The warranty will be cancelled if the nameplate and or product ser...

Страница 42: ... the impact on the environment and human health Thus at the end of the life of this device it must not be disposed of with unsorted household waste It must be disposed of in the return and collection systems made available to you by local authorities waste collection centres and distributors As an end consumer your role is essential in the reuse recycling and other forms of recovery cycle of this ...

Страница 43: ...CELED32HD22B7_IM_EN_09062022_V2 ...

Отзывы: