4
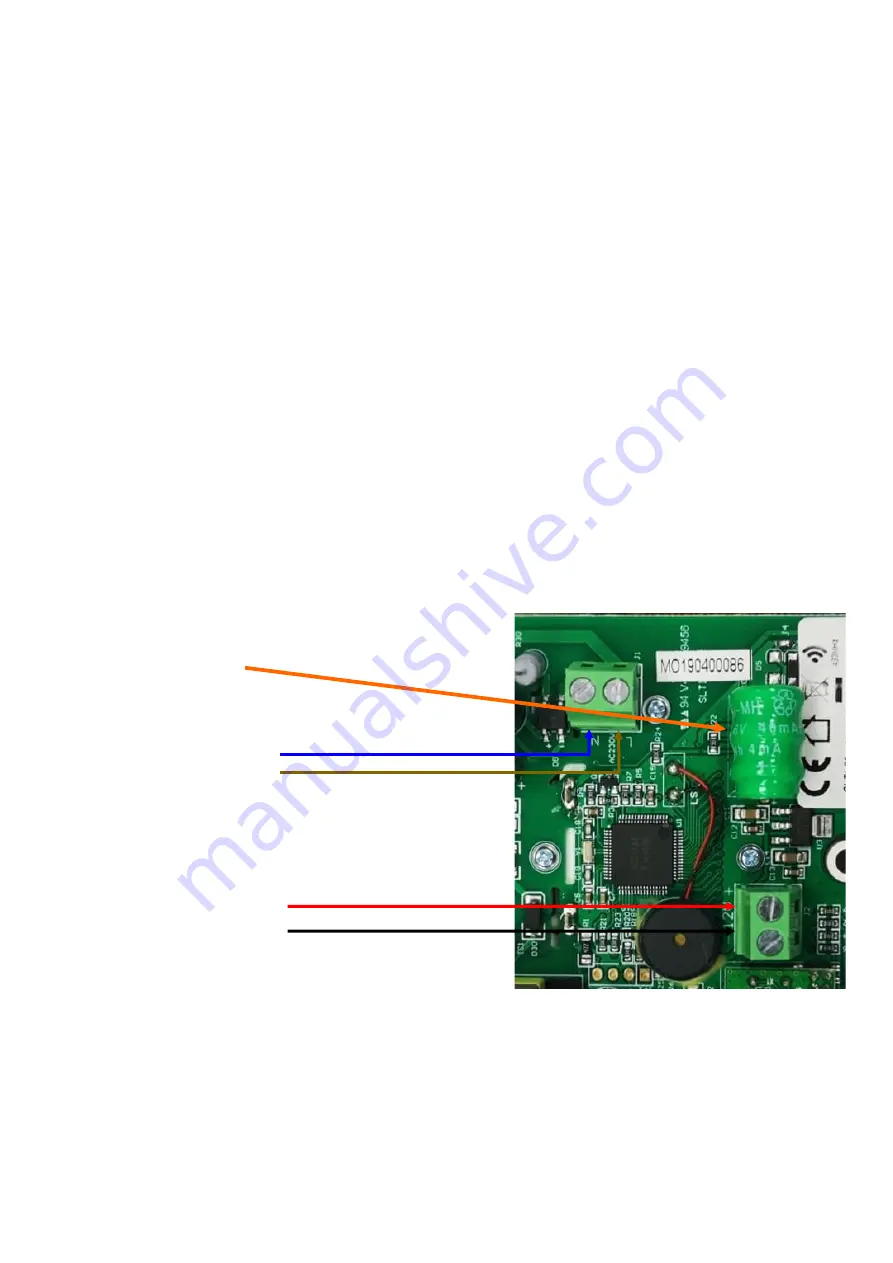
The controller is designed to fit onto most single gang back boxes. Please note the pattress screws must be oriented
vertically. When a metal box is used this must be earthed. The controller can be powered by either mains 240VAC
50Hz or 12VDC. The power consumption is less than 1W. Do not connect mains voltage to 12V terminals, this will
damage the controller. The maximum size wire that can be used is 1mm
2
, this can be twin and earth or standard
flex . Do not over-tighten the connector screws. Take care not to damage the components when connecting the
cables.
WARNING, this controller is not compatible with single gang metal back box with 4 fixing lugs.
For the mains power, connect L and N wires to the connectors marked as L and N.
Electrical installation should be carried out by a competent installer, preferably registered with NICEIC (National
Inspection Council for Electrical Installation Contracting) in accordance with the 17th edition of the IEE Wiring
Regulations, (BS.7671), and any relevant Local Authority Bye-Laws.
Powering the controller with 12Vdc allows the controller to be installed in a zone 2 area, however, the installation
must comply with the Separated Extra Low Voltage (SELV) requirements. When powered by 12VDC, please ensure
that the power supply is suitable for 12V 0.1A. For 12VDC power connect positive wire to terminal 12V and
negative to terminal marked –12V.
Please note: A 12Vdc power supply does not come with this controller, however, a standard 12Vdc constant voltage LED
driver could be used.
+
-
Mains Connection
230/240V AC 50Hz
N
12V DC
Installation
Connection to the Mains supply
Connection to 12V
Pairing with heaters
In order to pair your appliance with the controller you must:
Turn power to the appliance ON.
Within 20 seconds, press and hold the TIME and MODE buttons on the controller for 2 seconds. An identification
code should appear on the screen
Press TIME. The controller will beep 3 times and the heating will come on.
If the heating is set to off, then after 4 seconds the heating will turn off.
The appliance is now ready to be used.
Memory backup battery
(the controller will remember all settings including
time for 1 year after being disconnected from power)
L
The SLTI controller should be fixed to the wall. Avoid areas with a draught or direct sun. Do not position the controller
above or close to the heaters or other heat sources. Damp areas or areas where the SLTI can be mechanically
damaged should also be avoided. Avoid installing the controller in areas where there are metal objects between
the heater and the controller. This will reduce the RF range. The RF range in ideal conditions can be up to 20m,
however this can be reduced when the signal passes through the walls or other objects. The range can be also
affected where the controller is mounted close to power cables, motors or equipment producing strong
electromagnetic field. If the temperature control feature is used it is necessary to use one controller for each room
or zone.
Choosing a position in a room


